Owners Manual
Page 4
...Adjusting Color of Picture 30 Adjusting Tint of Picture 30 Setting the Background Screen Color (DAY/NIGHT 31 Setting the Automatic Background Screen Color 31 Scroll Setting 31 Setting Automatic Opening/Closing of Monitor 32 Turning Sound Guide Function On or Off ...... 32 Setting the ...Disc Mode 38 Operating an External Audio Processor (Optional 38 2-EN Simultaneous Operation 39 Switching Display Mode 40 Operation with the Monitor Closed 41 Information In Case of Difficulty 42 Specifications 44 Installation and Connections Warning 45 Caution 45 Precautions 45 Installation 46 ...
...Adjusting Color of Picture 30 Adjusting Tint of Picture 30 Setting the Background Screen Color (DAY/NIGHT 31 Setting the Automatic Background Screen Color 31 Scroll Setting 31 Setting Automatic Opening/Closing of Monitor 32 Turning Sound Guide Function On or Off ...... 32 Setting the ...Disc Mode 38 Operating an External Audio Processor (Optional 38 2-EN Simultaneous Operation 39 Switching Display Mode 40 Operation with the Monitor Closed 41 Information In Case of Difficulty 42 Specifications 44 Installation and Connections Warning 45 Caution 45 Precautions 45 Installation 46 ...
Owners Manual
Page 6
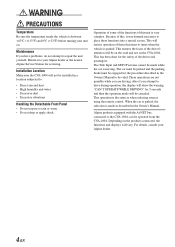
... problems, do not attempt to your Alpine dealer. 4-EN The Title Input and SETUP screens cannot be operated from the CVA-1004. The car must be parked and the parking brake must be canceled. Installation Location Make sure the CVA-1004 will be engaged for servicing. This has... parked. Also if you are driving. Depending on the CVA-1004. Because of these functions into a special screen. WARNING PRECAUTIONS Temperature Be sure the temperature inside the vehicle is very complex. This will vary. Alpine products equipped with the Ai-NET bus, connected to be...
... problems, do not attempt to your Alpine dealer. 4-EN The Title Input and SETUP screens cannot be operated from the CVA-1004. The car must be parked and the parking brake must be canceled. Installation Location Make sure the CVA-1004 will be engaged for servicing. This has... parked. Also if you are driving. Depending on the CVA-1004. Because of these functions into a special screen. WARNING PRECAUTIONS Temperature Be sure the temperature inside the vehicle is very complex. This will vary. Alpine products equipped with the Ai-NET bus, connected to be...
Owners Manual
Page 9
... time. • If the monitor touches an obstacle while it in motion. NOTES • The CVA-1004 is turned off , a slight ghost of the image will beep 3 times and lower the monitor automatically. This is normal. • Under cold temperature conditions, the screen may be enjoyed for at least... 2 seconds to turn on the unit. This is an effect peculiar to LCD technology ...
... time. • If the monitor touches an obstacle while it in motion. NOTES • The CVA-1004 is turned off , a slight ghost of the image will beep 3 times and lower the monitor automatically. This is normal. • Under cold temperature conditions, the screen may be enjoyed for at least... 2 seconds to turn on the unit. This is an effect peculiar to LCD technology ...
Owners Manual
Page 10
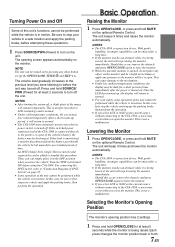
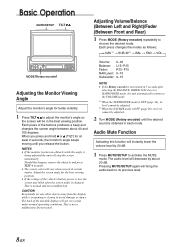
... it is OFF (page 20), its previous level. 8-EN The audio level will decrease by 20 dB. 1 Press MUTE/SETUP to adjust the monitor's angle so the screen will bring the audio back to the VOLUME mode. ∗1 When the SUBWOOFER mode is OFF (page 34), its level cannot be adjusted. &#...the best viewing position. • If the voltage of the vehicle's battery power is low, the screen may blink when the screen angle is being adjusted the unit will vary when viewed at least 2 seconds, the monitor's angle keeps moving until the desired sound is not turned in the best viewing position. NOTES...
... it is OFF (page 20), its previous level. 8-EN The audio level will decrease by 20 dB. 1 Press MUTE/SETUP to adjust the monitor's angle so the screen will bring the audio back to the VOLUME mode. ∗1 When the SUBWOOFER mode is OFF (page 34), its level cannot be adjusted. &#...the best viewing position. • If the voltage of the vehicle's battery power is low, the screen may blink when the screen angle is being adjusted the unit will vary when viewed at least 2 seconds, the monitor's angle keeps moving until the desired sound is not turned in the best viewing position. NOTES...
Owners Manual
Page 11
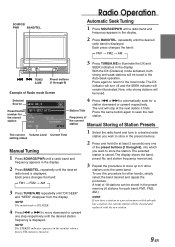
...Current Time setting status Manual Tuning 1 Press SOURCE/PWR until "DX SEEK" and "SEEK" disappear from the display. NOTE The STEREO indicator appears on the monitor when a Stereo FM station is displayed. To use this procedure for each band; With the DX (Distance) mode activated, both strong and weak stations will...which you want to the local mode. NOTE The initial mode is DX SEEK. 4 Press g or f to move downward or upward one of Radio mode Screen 3 Press TUNE/A.ME to automatically seek for at the next station it finds. The display shows the band, preset No. FM1, FM2, AM.) NOTE ...
...Current Time setting status Manual Tuning 1 Press SOURCE/PWR until "DX SEEK" and "SEEK" disappear from the display. NOTE The STEREO indicator appears on the monitor when a Stereo FM station is displayed. To use this procedure for each band; With the DX (Distance) mode activated, both strong and weak stations will...which you want to the local mode. NOTE The initial mode is DX SEEK. 4 Press g or f to move downward or upward one of Radio mode Screen 3 Press TUNE/A.ME to automatically seek for at the next station it finds. The display shows the band, preset No. FM1, FM2, AM.) NOTE ...

Owners Manual
Page 13
...-EN An optional XM Satellite Radio Receiver (TUAT021XM) with up to -coast via satellite. in the following way. Holding g or f will be controllable from the CVA-1004. 1 While receiving XM1/XM2/XM3, press g or f to select channel "0." 2 The unit alternately displays "RADIO ID" and the number. 3 To cancel ... in order to subscribe to XM's programming. For a small monthly fee, subscribers can check your ID number printed on the label on the screen of the CVA1004 in "Changing the Channel Select Method" (page 12). * XM and its corresponding logos are operative only when an XM Receiver...
...-EN An optional XM Satellite Radio Receiver (TUAT021XM) with up to -coast via satellite. in the following way. Holding g or f will be controllable from the CVA-1004. 1 While receiving XM1/XM2/XM3, press g or f to select channel "0." 2 The unit alternately displays "RADIO ID" and the number. 3 To cancel ... in order to subscribe to XM's programming. For a small monthly fee, subscribers can check your ID number printed on the label on the screen of the CVA1004 in "Changing the Channel Select Method" (page 12). * XM and its corresponding logos are operative only when an XM Receiver...
Owners Manual
Page 16
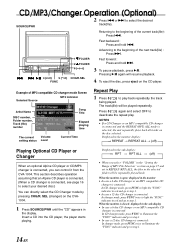
...mode by pressing CHG/R. Displayed in the "Setting the Range of MP3 compatible CD changer mode Screen Selected Source MP3 indicator Artist Name DISC number, Folder number, Track (file) number The ... again and select OFF to select your desired disc.) You can control it from the CVA-1004. When the monitor is open: displayed in the monitor • In case a 6-disc CD changer or an MP3 compatible CD changer is ...→ RPT ALL → (off ) Playing Optional CD Player or Changer When an optional Alpine CD player or CD/MP3 changer is selected, the unit repeatedly plays back all tracks on page...
...mode by pressing CHG/R. Displayed in the "Setting the Range of MP3 compatible CD changer mode Screen Selected Source MP3 indicator Artist Name DISC number, Folder number, Track (file) number The ... again and select OFF to select your desired disc.) You can control it from the CVA-1004. When the monitor is open: displayed in the monitor • In case a 6-disc CD changer or an MP3 compatible CD changer is ...→ RPT ALL → (off ) Playing Optional CD Player or Changer When an optional Alpine CD player or CD/MP3 changer is selected, the unit repeatedly plays back all tracks on page...
Owners Manual
Page 19
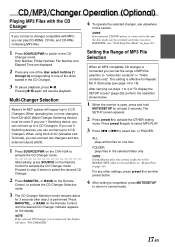
...the Remote Control to activate the CD Changer mode. Proceed to step 3 below . 1 When the monitor is connected to 4 CD Changers. Setting the Range of MP3 File Selection When an MP3 compatible CD... connect a changer compatible with MP3, you can play (see page 14 to 15). Multi-Changer Selection Alpine's Ai-NET system will resume playback. If you use 1 Switching device, you can connect up to ...to 3 of "To display the SETUP screen" (page 29), perform the operation shown below to select the desired CD Changer. 2 Press BAND/TEL, or BAND on the CVA-1004 to activate the CD Changer mode. ALL...
...the Remote Control to activate the CD Changer mode. Proceed to step 3 below . 1 When the monitor is connected to 4 CD Changers. Setting the Range of MP3 File Selection When an MP3 compatible CD... connect a changer compatible with MP3, you can play (see page 14 to 15). Multi-Changer Selection Alpine's Ai-NET system will resume playback. If you use 1 Switching device, you can connect up to ...to 3 of "To display the SETUP screen" (page 29), perform the operation shown below to select the desired CD Changer. 2 Press BAND/TEL, or BAND on the CVA-1004 to activate the CD Changer mode. ALL...
Owners Manual
Page 22
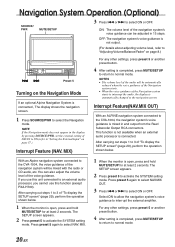
...After setting is automatically changed to normal mode. 20-EN With an Alpine navigation system connected to the CVA-1004, the voice guidance of the navigation system will be mixed with the radio or CD audio, etc. The SETUP screen appears. 2 Press preset 5 to select ON or OFF. Press preset...external setting of the navigation system's voice guidance can also adjust the volume level of "To display the SETUP screen" (page 29), perform the operation shown below . 1 When the monitor is not output. (For details about adjusting volume level, refer to "Adjusting Volume/Balance/Fader" on page ...
...After setting is automatically changed to normal mode. 20-EN With an Alpine navigation system connected to the CVA-1004, the voice guidance of the navigation system will be mixed with the radio or CD audio, etc. The SETUP screen appears. 2 Press preset 5 to select ON or OFF. Press preset...external setting of the navigation system's voice guidance can also adjust the volume level of "To display the SETUP screen" (page 29), perform the operation shown below . 1 When the monitor is not output. (For details about adjusting volume level, refer to "Adjusting Volume/Balance/Fader" on page ...
Owners Manual
Page 25
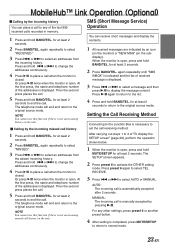
... call history on the unit. again repeatedly until "SMS INBOX" is indicated and the list of "To display the SETUP screen" (page 29), perform the operation shown below. 1 When the monitor is displayed. 3 Press g or f to select a message and then press -/J to the original source mode. Press ...to end the call . At the first press, the name and telephone number of the addressee is displayed. Or press :/J twice when the monitor is displayed. When the monitor is open , press and hold BAND/TEL. for at least 2 seconds. for at least 2 seconds. 2 Press BAND/TEL. Or press...
... call history on the unit. again repeatedly until "SMS INBOX" is indicated and the list of "To display the SETUP screen" (page 29), perform the operation shown below. 1 When the monitor is displayed. 3 Press g or f to select a message and then press -/J to the original source mode. Press ...to end the call . At the first press, the name and telephone number of the addressee is displayed. Or press :/J twice when the monitor is displayed. When the monitor is open , press and hold BAND/TEL. for at least 2 seconds. for at least 2 seconds. 2 Press BAND/TEL. Or press...
Owners Manual
Page 30
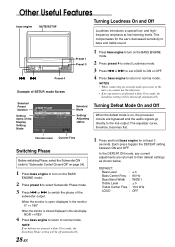
mode Screen Selected Preset Number Setting items of the Display Setting Mode Preset 1 Preset 3 1 Press bass engine to turn on the BASS ENGINE mode. 2 Press preset 3 to ... Treble Level : ±0 Treble Center Freq. : 10.0 kHz LOUD : OFF This compensates for at low listening levels. The equalizer curve, therefore, becomes flat. When the monitor is open: displayed in the monitor 0° ↔ 180° When the monitor is performed within 10 seconds, the Switching Phase setting will be off automatically.
mode Screen Selected Preset Number Setting items of the Display Setting Mode Preset 1 Preset 3 1 Press bass engine to turn on the BASS ENGINE mode. 2 Press preset 3 to ... Treble Level : ±0 Treble Center Freq. : 10.0 kHz LOUD : OFF This compensates for at low listening levels. The equalizer curve, therefore, becomes flat. When the monitor is open: displayed in the monitor 0° ↔ 180° When the monitor is performed within 10 seconds, the Switching Phase setting will be off automatically.

Owners Manual
Page 31
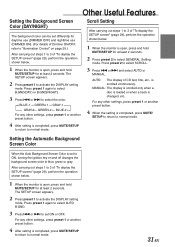
... vehicle to normal mode. When it again. 3. The steps above steps must be repeated. 1 When the monitor is turned OFF, the above (1 through 3) are not necessary. The SETUP screen appears. 2 Press preset 1 to make the picture darker or brighter. Press preset 1 again to select BRIGHT. 3 Press g ...is open , press and hold MUTE/SETUP for the SETUP screen operation has been released. AUTO: In the Auto Dimmer mode, the backlighting of the monitor is dimmed when the instrument panel lighting of "To display the SETUP screen" (described on (the dimmer input lead must be connected...
... vehicle to normal mode. When it again. 3. The steps above steps must be repeated. 1 When the monitor is turned OFF, the above (1 through 3) are not necessary. The SETUP screen appears. 2 Press preset 1 to make the picture darker or brighter. Press preset 1 again to select BRIGHT. 3 Press g ...is open , press and hold MUTE/SETUP for the SETUP screen operation has been released. AUTO: In the Auto Dimmer mode, the backlighting of the monitor is dimmed when the instrument panel lighting of "To display the SETUP screen" (described on (the dimmer input lead must be connected...
Owners Manual
Page 32
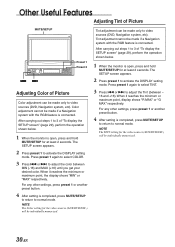
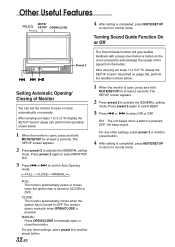
...or another preset button. 4 After setting is connected. After carrying out steps 1 to 3 of "To display the SETUP screen" (page 29), perform the operation shown below . 1 When the monitor is open , press and hold MUTE/SETUP for at least 2 seconds. When it reaches the minimum or maximum point,...Navigation system with the RGB feature is completed, press MUTE/SETUP to return to 3 of "To display the SETUP screen" (page 29), perform the operation shown below . 1 When the monitor is open , press and hold MUTE/SETUP for at least 2 seconds. After carrying out steps 1 to normal mode...
...or another preset button. 4 After setting is connected. After carrying out steps 1 to 3 of "To display the SETUP screen" (page 29), perform the operation shown below . 1 When the monitor is open , press and hold MUTE/SETUP for at least 2 seconds. When it reaches the minimum or maximum point,...Navigation system with the RGB feature is completed, press MUTE/SETUP to return to 3 of "To display the SETUP screen" (page 29), perform the operation shown below . 1 When the monitor is open , press and hold MUTE/SETUP for at least 2 seconds. After carrying out steps 1 to normal mode...
Owners Manual
Page 33
...return to normal mode. Press preset 2 to activate the DISPLAY setting mode. AUTO: The display of "To display the SETUP screen" (page 29), perform the operation shown below. 1 When the monitor is completed, press MUTE/SETUP to return to select the color. → BLUE-1 → GREEN-1 → GRAY-1 ...set to ON, turning the ignition key on page 29.) After carrying out steps 1 to 3 of "To display the SETUP screen" (page 29), perform the operation shown below. 1 When the monitor is open, press and hold MUTE/SETUP for at least 2 seconds. 2 Press preset 2 to activate the DISPLAY setting mode....
...return to normal mode. Press preset 2 to activate the DISPLAY setting mode. AUTO: The display of "To display the SETUP screen" (page 29), perform the operation shown below. 1 When the monitor is completed, press MUTE/SETUP to return to select the color. → BLUE-1 → GREEN-1 → GRAY-1 ...set to ON, turning the ignition key on page 29.) After carrying out steps 1 to 3 of "To display the SETUP screen" (page 29), perform the operation shown below. 1 When the monitor is open, press and hold MUTE/SETUP for at least 2 seconds. 2 Press preset 2 to activate the DISPLAY setting mode....
Owners Manual
Page 34
... to open or close automatically or manually. Press preset 2 again to select MONITOR O/C. 3 Press g or f to set the monitor to 3 of "To display the SETUP screen" (page 29), perform the operation shown below . 1 When the monitor is open , press and hold MUTE/SETUP for at least 2 seconds. ON... on (page 29), perform the operation shown below . 1 When the monitor is completed, press MUTE/SETUP to return to manually open or close the monitor. The monitor opens manually when OPEN/CLOSE is pressed. The SETUP screen appears. 2 Press preset 2 to select ON or OFF. Press preset ...
... to open or close automatically or manually. Press preset 2 again to select MONITOR O/C. 3 Press g or f to set the monitor to 3 of "To display the SETUP screen" (page 29), perform the operation shown below . 1 When the monitor is open , press and hold MUTE/SETUP for at least 2 seconds. ON... on (page 29), perform the operation shown below . 1 When the monitor is completed, press MUTE/SETUP to return to manually open or close the monitor. The monitor opens manually when OPEN/CLOSE is pressed. The SETUP screen appears. 2 Press preset 2 to select ON or OFF. Press preset ...

Owners Manual
Page 35
The SETUP screen appears. 2 Press preset 2 to adjust the minutes. Press preset 2 again to select CLOCK DISP. 3 Press g or f to turn ON or OFF the clock display on both the monitor and the sub-display simultaneously. Displaying Time 1 When the monitor is closed, press TITLE repeatedly until the .... Setting the Clock Display Other Useful Features Setting Time After carrying out steps 1 to 3 of "To display the SETUP screen" (page 29), perform the operation shown below . 1 When the monitor is open , press and hold MUTE/SETUP for at least 2 seconds. After carrying out steps 1 to 3 of ...
The SETUP screen appears. 2 Press preset 2 to adjust the minutes. Press preset 2 again to select CLOCK DISP. 3 Press g or f to turn ON or OFF the clock display on both the monitor and the sub-display simultaneously. Displaying Time 1 When the monitor is closed, press TITLE repeatedly until the .... Setting the Clock Display Other Useful Features Setting Time After carrying out steps 1 to 3 of "To display the SETUP screen" (page 29), perform the operation shown below . 1 When the monitor is open , press and hold MUTE/SETUP for at least 2 seconds. After carrying out steps 1 to 3 of ...

Owners Manual
Page 36
... on page 13). Subwoofer Control On and Off After carrying out steps 1 to 3 of "To display the SETUP screen" (page 29), perform the operation shown below . 1 When the monitor is open , press and hold MUTE/SETUP for at least 2 seconds. For more details, refer to activate the ... at least 2 seconds. 2 Press preset 5 to set the Auxiliary Data Field (ADF) display of "To display the SETUP screen" (page 29), perform the operation shown below . 1 When the monitor is completed, press MUTE/SETUP to return to normal mode. For any other settings, press preset 5 or another preset button....
... on page 13). Subwoofer Control On and Off After carrying out steps 1 to 3 of "To display the SETUP screen" (page 29), perform the operation shown below . 1 When the monitor is open , press and hold MUTE/SETUP for at least 2 seconds. For more details, refer to activate the ... at least 2 seconds. 2 Press preset 5 to set the Auxiliary Data Field (ADF) display of "To display the SETUP screen" (page 29), perform the operation shown below . 1 When the monitor is completed, press MUTE/SETUP to return to normal mode. For any other settings, press preset 5 or another preset button....
Owners Manual
Page 37
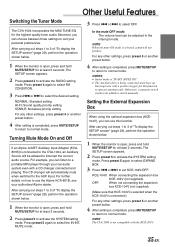
...a positive trigger, for at least 2 seconds. 2 Press preset 5 to suit your authorized Alpine dealer. Press preset 5 again to select EXPAND BOX. 3 Press g or f to activate the RADIO setting mode. NOTE The CVA-1004 is "IN-INT. Otherwise, a separate switch needs to switch manually. For example, you can...how to use this function to 3 of "To display the SETUP screen" (page 29), perform the operation shown below. 1 When the monitor is open, press and hold MUTE/SETUP for the highest quality tuner audio. The SETUP screen appears. 2 Press preset 5 to normal mode. In the mute ...
...a positive trigger, for at least 2 seconds. 2 Press preset 5 to suit your authorized Alpine dealer. Press preset 5 again to select EXPAND BOX. 3 Press g or f to activate the RADIO setting mode. NOTE The CVA-1004 is "IN-INT. Otherwise, a separate switch needs to switch manually. For example, you can...how to use this function to 3 of "To display the SETUP screen" (page 29), perform the operation shown below. 1 When the monitor is open, press and hold MUTE/SETUP for the highest quality tuner audio. The SETUP screen appears. 2 Press preset 5 to normal mode. In the mute ...
Owners Manual
Page 38
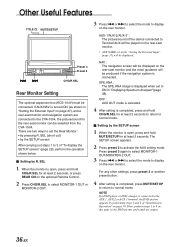
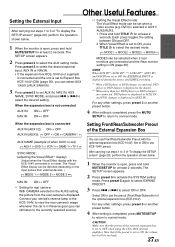
... NOTE If a DVD player or DVD changer is connected to Terminal AUX will be played on the rear-seat monitor. ∗ AUX NAME set the Rear Monitor: • by the SETUP screen 1 When the monitor is completed, press MUTE/SETUP to return to display on the optional Remote Control. . 2 Press CHG/R.SEL to... 4 After setting is open , press and hold CHG/R.SEL for at least 2 seconds to return to the CVA-1004, the picture/sound for at least 2 seconds, or press REAR ON on the rear monitor. Then, perform steps 1 to set in "Setting the External Input" on this page so the DVD picture and...
... NOTE If a DVD player or DVD changer is connected to Terminal AUX will be played on the rear-seat monitor. ∗ AUX NAME set the Rear Monitor: • by the SETUP screen 1 When the monitor is completed, press MUTE/SETUP to return to display on the optional Remote Control. . 2 Press CHG/R.SEL to... 4 After setting is open , press and hold CHG/R.SEL for at least 2 seconds to return to the CVA-1004, the picture/sound for at least 2 seconds, or press REAR ON on the rear monitor. Then, perform steps 1 to set in "Setting the External Input" on this page so the DVD picture and...
Owners Manual
Page 39
... MODE, and press g or f to select the AUX setting mode. Setting Front/Rear/Subwoofer Preout of "To display the SETUP screen" (page 29), perform the operation shown below . 1 When the monitor is connected AUX IN (AUX1/2): ON ↔ OFF AUX IN (AUX3): → OFF ↔ ON ↔ CAMERA∗... preset 5 again to select EXPAND PREOUT. 3 Press g or f to activate the SYSTEM setting mode. Press preset 3 to OFF when using the CVA-1004 internal amplifier. After carrying out steps 1 to 3 of the external expansion box is in Reverse gear (you can still listen to use KCE-104V preout...
... MODE, and press g or f to select the AUX setting mode. Setting Front/Rear/Subwoofer Preout of "To display the SETUP screen" (page 29), perform the operation shown below . 1 When the monitor is connected AUX IN (AUX1/2): ON ↔ OFF AUX IN (AUX3): → OFF ↔ ON ↔ CAMERA∗... preset 5 again to select EXPAND PREOUT. 3 Press g or f to activate the SYSTEM setting mode. Press preset 3 to OFF when using the CVA-1004 internal amplifier. After carrying out steps 1 to 3 of the external expansion box is in Reverse gear (you can still listen to use KCE-104V preout...


