Manual
Page 2
..., if not installed and used in accordance with Part 15 of exceeding the FCC radio frequency exposure limits, human proximity to radio or television reception, which the receiver is connected. 4. Connect the equipment into an outlet on , the user is subject to operate equipment. Federal Communication Commission (FCC) Radiation Exposure Statement This equipment complies with the instructions, may cause...
..., if not installed and used in accordance with Part 15 of exceeding the FCC radio frequency exposure limits, human proximity to radio or television reception, which the receiver is connected. 4. Connect the equipment into an outlet on , the user is subject to operate equipment. Federal Communication Commission (FCC) Radiation Exposure Statement This equipment complies with the instructions, may cause...
Manual
Page 3
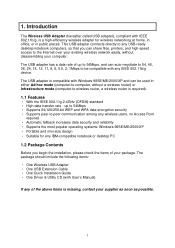
... with Windows 98SE/ME/2000/XP and can share files, printers, and high-speed access to the Internet over your existing wireless network easily, without a wireless router) or Infrastructure mode (computer-to any IBM-compatible notebook or desktop PC 1.2 Package Contents Before you begin the installation, please check the items of up to 54Mbps ‧ Supports 64/128/256-bit WEP and WPA data encryption security ‧ Supports...
... with Windows 98SE/ME/2000/XP and can share files, printers, and high-speed access to the Internet over your existing wireless network easily, without a wireless router) or Infrastructure mode (computer-to any IBM-compatible notebook or desktop PC 1.2 Package Contents Before you begin the installation, please check the items of up to 54Mbps ‧ Supports 64/128/256-bit WEP and WPA data encryption security ‧ Supports...
Manual
Page 7
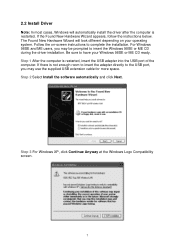
... complete the installation. Step 3 For Windows XP, click Continue Anyway at the Windows Logo Compatibility screen. 7 If the Found New Hardware Wizard appears, follow the instructions below. Follow the on your Windows 98SE or ME CD ready. The Found New Hardware Wizard will automatically install the driver after the computer is restarted, insert the USB adapter into the USB port of the computer. Step 2 Select Install the software automatically...
... complete the installation. Step 3 For Windows XP, click Continue Anyway at the Windows Logo Compatibility screen. 7 If the Found New Hardware Wizard appears, follow the instructions below. Follow the on your Windows 98SE or ME CD ready. The Found New Hardware Wizard will automatically install the driver after the computer is restarted, insert the USB adapter into the USB port of the computer. Step 2 Select Install the software automatically...
Manual
Page 9
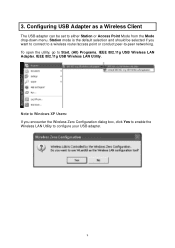
... default selection and should be set to -peer networking. Note to Windows XP Users: If you want to connect to a wireless router/access point or conduct peer-to either Station or Access Point Mode from the Mode drop-down menu. 3. Configuring USB Adapter as a Wireless Client The USB adapter can be selected if you encounter the Wireless Zero Configuration dialog box, click Yes to enable the Wireless LAN Utility to Start, (All) Programs, IEEE 802.11g USB Wireless LAN Adapter, IEEE 802.11g USB Wireless LAN Utility...
... default selection and should be set to -peer networking. Note to Windows XP Users: If you want to connect to a wireless router/access point or conduct peer-to either Station or Access Point Mode from the Mode drop-down menu. 3. Configuring USB Adapter as a Wireless Client The USB adapter can be selected if you encounter the Wireless Zero Configuration dialog box, click Yes to enable the Wireless LAN Utility to Start, (All) Programs, IEEE 802.11g USB Wireless LAN Adapter, IEEE 802.11g USB Wireless LAN Utility...
Manual
Page 11
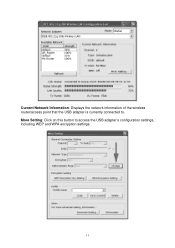
Current Network Information: Displays the network information of the wireless router/access point that the USB adapter is currently connected to access the USB adapter's configuration settings, including WEP and WPA encryption settings. 11 More Setting: Click on this button to .
Current Network Information: Displays the network information of the wireless router/access point that the USB adapter is currently connected to access the USB adapter's configuration settings, including WEP and WPA encryption settings. 11 More Setting: Click on this button to .

Manual
Page 12
... don't know the SSID). Encryption: Choose from Auto (recommended), Open System, or Shared Key. Tx Rate: Select the desired transmission rate, or leave the default setting of the wireless router/access point you 're trying to connect to . 3.1 Configuring General Settings Click Change to save the changes. 12 Channel: This setting is for computer-to a wireless router/access point) or Ad-Hoc (for Access Point Mode only. Network Type: Choose from Infrastructure (for connecting to -computer networking, bypassing the wireless router/access point).
... don't know the SSID). Encryption: Choose from Auto (recommended), Open System, or Shared Key. Tx Rate: Select the desired transmission rate, or leave the default setting of the wireless router/access point you 're trying to connect to . 3.1 Configuring General Settings Click Change to save the changes. 12 Channel: This setting is for computer-to a wireless router/access point) or Ad-Hoc (for Access Point Mode only. Network Type: Choose from Infrastructure (for connecting to -computer networking, bypassing the wireless router/access point).
Manual
Page 13
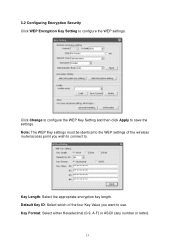
Click Change to configure the WEP Key Setting and then click Apply to configure the WEP settings. Note: The WEP Key settings must be identical to the WEP settings of the four Key Value you wish to connect to use. Default Key ID: Select which of the wireless router/access point you want to . Key Length: Select the appropriate encryption key length. 3.2 Configuring Encryption Security Click WEP Encryption Key Setting to save the settings. Key Format: Select either Hexadecimal (0-9, A-F) or ASCII (any number or letter). 13
Click Change to configure the WEP Key Setting and then click Apply to configure the WEP settings. Note: The WEP Key settings must be identical to the WEP settings of the four Key Value you wish to connect to use. Default Key ID: Select which of the wireless router/access point you want to . Key Length: Select the appropriate encryption key length. 3.2 Configuring Encryption Security Click WEP Encryption Key Setting to save the settings. Key Format: Select either Hexadecimal (0-9, A-F) or ASCII (any number or letter). 13
Manual
Page 14
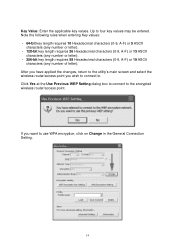
... applied the changes, return to the utility's main screen and select the wireless router/access point you want to . Click Yes at the Use Previous WEP Setting dialog box to connect to four key values may be entered. If you wish to connect to use WPA encryption, click on Change in the General Connection Setting. 14 Key Value: Enter the applicable key values. Up to the encrypted wireless router/access point. Note the following rules when entering Key values...
... applied the changes, return to the utility's main screen and select the wireless router/access point you want to . Click Yes at the Use Previous WEP Setting dialog box to connect to four key values may be entered. If you wish to connect to use WPA encryption, click on Change in the General Connection Setting. 14 Key Value: Enter the applicable key values. Up to the encrypted wireless router/access point. Note the following rules when entering Key values...
Manual
Page 15
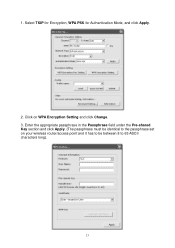
Select TKIP for Encryption, WPA PSK for Authentication Mode, and click Apply. 2. Enter the appropriate passphrase in the Passphrase field under the Pre-shared Key section and click Apply. (The passphrase must be identical to the passphrase set on WPA Encryption Setting and click Change. 3. Click on your wireless router/access point and it has to be between 8 to 63 ASCII characters long). 15 1.
Select TKIP for Encryption, WPA PSK for Authentication Mode, and click Apply. 2. Enter the appropriate passphrase in the Passphrase field under the Pre-shared Key section and click Apply. (The passphrase must be identical to the passphrase set on WPA Encryption Setting and click Change. 3. Click on your wireless router/access point and it has to be between 8 to 63 ASCII characters long). 15 1.

Manual
Page 17
User Interface: select the language for the adapter's user interface. Power Consumption Setting: • Continuous Access Mode: provides the best signal throughput but least power save. • Maximum Power-Saving Mode: provides the best power save but least throughput. • Fast Power-Saving Mode: provides average power save and throughput. Fragmentation Threshold: choose from the More Setting window to configure the adapter's advanced settings. 3.4 Advanced Settings Click on Advanced Setting from 256 to 2346 bytes. Country Roaming: select the country you...
User Interface: select the language for the adapter's user interface. Power Consumption Setting: • Continuous Access Mode: provides the best signal throughput but least power save. • Maximum Power-Saving Mode: provides the best power save but least throughput. • Fast Power-Saving Mode: provides average power save and throughput. Fragmentation Threshold: choose from the More Setting window to configure the adapter's advanced settings. 3.4 Advanced Settings Click on Advanced Setting from 256 to 2346 bytes. Country Roaming: select the country you...
Manual
Page 19
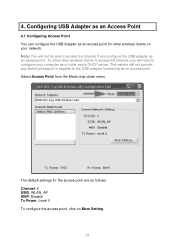
...-down menu. The default settings for other wireless clients to access the Internet, you will not be able to access the Internet if you configure the USB adapter as a router and a DHCP server. 4. To allow other wireless clients on More Setting. 19 Note: You will need to the USB adapter functioning as follows: Channel: 6 SSID: WLAN_AP WEP: Disable Tx Power: Level 0 To configure the access point, click on your computer as an access point. The vendor will not provide any technical support...
...-down menu. The default settings for other wireless clients to access the Internet, you will not be able to access the Internet if you configure the USB adapter as a router and a DHCP server. 4. To allow other wireless clients on More Setting. 19 Note: You will need to the USB adapter functioning as follows: Channel: 6 SSID: WLAN_AP WEP: Disable Tx Power: Level 0 To configure the access point, click on your computer as an access point. The vendor will not provide any technical support...

Manual
Page 20
... connected to. 20 SSID: enter the desired SSID for the access point. Hide SSID (check box): check to configure the settings. Basic Rate: select the applicable transfer rate. Click Apply to 54 Mbps. Tx Power: select the transmission signal power. This will allow any wireless client that is connected to the access point to be bridged to use. Tx Rate: select from Auto to submit the changes. Bridge Adapter: If you have another Ethernet card installed...
... connected to. 20 SSID: enter the desired SSID for the access point. Hide SSID (check box): check to configure the settings. Basic Rate: select the applicable transfer rate. Click Apply to 54 Mbps. Tx Power: select the transmission signal power. This will allow any wireless client that is connected to the access point to be bridged to use. Tx Rate: select from Auto to submit the changes. Bridge Adapter: If you have another Ethernet card installed...

Manual
Page 21
...-bit key length requires 26 Hexadecimal characters (0-9, A-F) or 13 ASCII characters (any number or letter). • 256-bit key length requires 58 Hexadecimal characters (0-9, A-F) or 19 ASCII characters (any number or letter). Default Key ID: Select which of letter). Authentication Mode: select from the WEP drop-down menu and click Setting. Up to use. Preamble: select Long or Short. 4.2 Configuring Encryption Security Select Enable from Open System...
...-bit key length requires 26 Hexadecimal characters (0-9, A-F) or 13 ASCII characters (any number or letter). • 256-bit key length requires 58 Hexadecimal characters (0-9, A-F) or 19 ASCII characters (any number or letter). Default Key ID: Select which of letter). Authentication Mode: select from the WEP drop-down menu and click Setting. Up to use. Preamble: select Long or Short. 4.2 Configuring Encryption Security Select Enable from Open System...

Manual
Page 22
Reject: only rejects connection from the MAC address listed. (Connection attempts from MAC address not in the list will be accepted, provided the client matches the encryption settings as well). Accept: only accepts connection from the MAC address listed. (Connection attempts from MAC address not in the list will be rejected). Click Apply to submit the changes. 22 4.3 Configuring MAC Address Filter Filter Type: Disable: disables MAC address filter.
Reject: only rejects connection from the MAC address listed. (Connection attempts from MAC address not in the list will be accepted, provided the client matches the encryption settings as well). Accept: only accepts connection from the MAC address listed. (Connection attempts from MAC address not in the list will be rejected). Click Apply to submit the changes. 22 4.3 Configuring MAC Address Filter Filter Type: Disable: disables MAC address filter.
Manual
Page 23
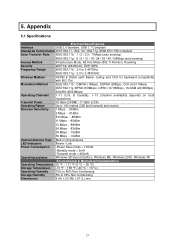
...auto sensing) Access Method Infrastructure Mode, Ad-Hoc Mode (802.11 Ad-Hoc), Roaming Security WEP 64/128/256-bit, TKIP, WPA Frequency Range IEEE 802.11b:2.4 to 2.497GHz IEEE 802.11g:2.4 to 2.4835GHz Wireless Medium OFDM & DSSS (with Barker coding... 54 Mbps:-72dBm Internal Antenna Type Built-in Chip Antenna LED Indicators Power / Link Power Consumption -Power Save mode = 103mA -Standby mode = 2mA -Transmit mode = 450mA Operating systems Windows 98 Second Edition, Windows ME, Windows 2000, Windows XP Environmental & Mechanical Characteristics Operating...
...auto sensing) Access Method Infrastructure Mode, Ad-Hoc Mode (802.11 Ad-Hoc), Roaming Security WEP 64/128/256-bit, TKIP, WPA Frequency Range IEEE 802.11b:2.4 to 2.497GHz IEEE 802.11g:2.4 to 2.4835GHz Wireless Medium OFDM & DSSS (with Barker coding... 54 Mbps:-72dBm Internal Antenna Type Built-in Chip Antenna LED Indicators Power / Link Power Consumption -Power Save mode = 103mA -Standby mode = 2mA -Transmit mode = 450mA Operating systems Windows 98 Second Edition, Windows ME, Windows 2000, Windows XP Environmental & Mechanical Characteristics Operating...
Manual
Page 24
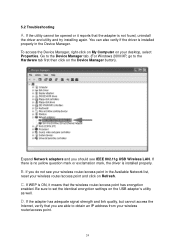
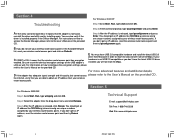
... driver and utility and try installing again. To access the Device Manager, right-click on My Computer on your wireless router/access point and click on the Device Manager button). B. Be sure to obtain an IP address from your wireless router/access point. 24 If the adapter has adequate signal strength and link quality, but cannot access the Internet, verify that the wireless router/access point has encryption enabled. Go to the Device Manager tab. (For Windows 2000/XP, go to the Hardware...
... driver and utility and try installing again. To access the Device Manager, right-click on My Computer on your wireless router/access point and click on the Device Manager button). B. Be sure to obtain an IP address from your wireless router/access point. 24 If the adapter has adequate signal strength and link quality, but cannot access the Internet, verify that the wireless router/access point has encryption enabled. Go to the Device Manager tab. (For Windows 2000/XP, go to the Hardware...
Manual
Page 25
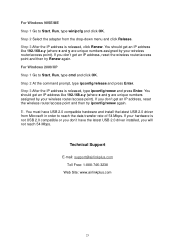
... unique numbers assigned by your wireless router/access point). For Windows 98SE/ME Step 1 Go to Start, Run, type cmd and click OK. For Windows 2000/XP Step 1 Go to Start, Run, type winipcfg and click OK. You should get an IP address like 192.168.x.y (where x and y are unique numbers assigned by your hardware is not USB 2.0 compatible or you don't have USB 2.0 compatible hardware and install the latest USB 2.0 driver...
... unique numbers assigned by your wireless router/access point). For Windows 98SE/ME Step 1 Go to Start, Run, type cmd and click OK. For Windows 2000/XP Step 1 Go to Start, Run, type winipcfg and click OK. You should get an IP address like 192.168.x.y (where x and y are unique numbers assigned by your hardware is not USB 2.0 compatible or you don't have USB 2.0 compatible hardware and install the latest USB 2.0 driver...

Quick installation guide
Page 2
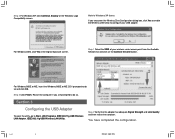
... the installation. For Windows 2000, click Yes at the Windows Logo Compatibility screen. If the Found New Hardware Wizard appears, follow the instructions below. If there is not enough room to insert the adapter directly to the USB port, you may use the supplied USB extension cable for the software or click Browse to manually select a different destination folder. Step 4 Click Next to accept the default destination...
... the installation. For Windows 2000, click Yes at the Windows Logo Compatibility screen. If the Found New Hardware Wizard appears, follow the instructions below. If there is not enough room to insert the adapter directly to the USB port, you may use the supplied USB extension cable for the software or click Browse to manually select a different destination folder. Step 4 Click Next to accept the default destination...
Quick installation guide
Page 3
... prompted to configure your wireless router/access point from the Available Network list and click on the Connect this site button. Section 3 Configuring the USB Adapter To open the utility, go to do so. Step 2 Verify that the adapter has adequate Signal Strength and Link Quality and then restart the computer. Restart the computer if you encounter the Wireless Zero Configuration dialog box, click Yes to enable the Wireless LAN Utility to do...
... prompted to configure your wireless router/access point from the Available Network list and click on the Connect this site button. Section 3 Configuring the USB Adapter To open the utility, go to do so. Step 2 Verify that the adapter has adequate Signal Strength and Link Quality and then restart the computer. Restart the computer if you encounter the Wireless Zero Configuration dialog box, click Yes to enable the Wireless LAN Utility to do...
Quick installation guide
Page 4
... USB 2.0 compatible hardware and install the latest USB 2.0 driver from the drop-down menu and click Release. For information on the provided CD. You should get an IP address, reset the wireless router/access point and then try ipconfig/renew again. For instructions on how to access the Device Manager, please refer to the User's Manual on the provided CD. For more advanced features and additional details, D If the adapter...
... USB 2.0 compatible hardware and install the latest USB 2.0 driver from the drop-down menu and click Release. For information on the provided CD. You should get an IP address, reset the wireless router/access point and then try ipconfig/renew again. For instructions on how to access the Device Manager, please refer to the User's Manual on the provided CD. For more advanced features and additional details, D If the adapter...

