
User Manual
Page 2
... Camera using the Input IP Method ...59 9.3 Using IPView Pro ...61 9.3.1 Status Mode Window...61 9.3.2 View Window and View Mode Buttons...63 9.3.3 Control Panel ...64 9.4 System Configuration ...66 9.4.1 Web Configuration...67 9.4.2 Motion Configuration-1 ...68 9.4.3 Motion Configuration-2 ...70 9.4.4 Tools ...71 9.5 Mail Configuration...72 9.6 Proxy Server...73 9.7 Recording Configuration ...74 9.7.1 Schedule-Recording Configuration ...75 9.8 Others...77 9.9 Log List...78 9.10 Account ...79 9.11 About...80 Frequently Asked Questions ...81 Specification ...83 Technical Support ...85 2 Using...
... Camera using the Input IP Method ...59 9.3 Using IPView Pro ...61 9.3.1 Status Mode Window...61 9.3.2 View Window and View Mode Buttons...63 9.3.3 Control Panel ...64 9.4 System Configuration ...66 9.4.1 Web Configuration...67 9.4.2 Motion Configuration-1 ...68 9.4.3 Motion Configuration-2 ...70 9.4.4 Tools ...71 9.5 Mail Configuration...72 9.6 Proxy Server...73 9.7 Recording Configuration ...74 9.7.1 Schedule-Recording Configuration ...75 9.8 Others...77 9.9 Log List...78 9.10 Account ...79 9.11 About...80 Frequently Asked Questions ...81 Specification ...83 Technical Support ...85 2 Using...
User Manual
Page 3
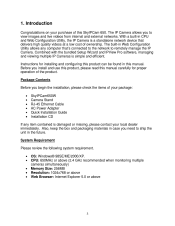
... and IPView Pro software, managing and viewing multiple IP Cameras is a standalone network device that 's connected to the network to view images and live videos from internal and external networks. CPU: 650MHz or above (2.4 GHz recommended when monitoring multiple cameras simultaneously) Memory Size: 256MB Resolution: 1024x768 or above Web Browser: Internet Explorer 5.0 or above 3 Package Contents Before you install and use this product, please read this manual carefully for installing and configuring this product...
... and IPView Pro software, managing and viewing multiple IP Cameras is a standalone network device that 's connected to the network to view images and live videos from internal and external networks. CPU: 650MHz or above (2.4 GHz recommended when monitoring multiple cameras simultaneously) Memory Size: 256MB Resolution: 1024x768 or above Web Browser: Internet Explorer 5.0 or above 3 Package Contents Before you install and use this product, please read this manual carefully for installing and configuring this product...
User Manual
Page 5
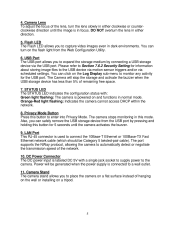
.... 9. Camera Lens To adjust the focus of hanging on the wall or installing on the Log Display sub-menu to the camera. USB Port The USB port allows you can click on a tripod. 5 STATUS LED The STATUS LED indicates the configuration status with a single jack socket to supply power to monitor any activity for 5 seconds until the image is powered on the flash light from the USB port by connecting a USB storage device...
.... 9. Camera Lens To adjust the focus of hanging on the wall or installing on the Log Display sub-menu to the camera. USB Port The USB port allows you can click on a tripod. 5 STATUS LED The STATUS LED indicates the configuration status with a single jack socket to supply power to monitor any activity for 5 seconds until the image is powered on the flash light from the USB port by connecting a USB storage device...
User Manual
Page 7
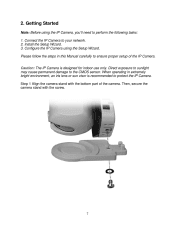
...: Before using the Setup Wizard. Install the Setup Wizard. 3. Step 1 Align the camera stand with the screw. 7 Connect the IP Camera to perform the following tasks: 1. When operating in this Manual carefully to ensure proper setup of the camera. Then, secure the camera stand with the bottom part of the IP Camera. Caution: The IP Camera is recommended to the CMOS sensor. Configure the IP Camera using the IP Camera...
...: Before using the Setup Wizard. Install the Setup Wizard. 3. Step 1 Align the camera stand with the screw. 7 Connect the IP Camera to perform the following tasks: 1. When operating in this Manual carefully to ensure proper setup of the camera. Then, secure the camera stand with the bottom part of the IP Camera. Caution: The IP Camera is recommended to the CMOS sensor. Configure the IP Camera using the IP Camera...

User Manual
Page 8
Step 4 Verify that all the connections are lit. If not, verify that the LED lights on the IP Camera by connecting one of the LAN ports of the Camera and connecting the other end to an electrical outlet. Step 3 Power on the Camera are secure and try again. 8 Step 2 Connect one end of the network cable to the IP Camera and connect the other end to one end of the supplied power adapter to the power jack of the wireless router.
Step 4 Verify that all the connections are lit. If not, verify that the LED lights on the IP Camera by connecting one of the LAN ports of the Camera and connecting the other end to an electrical outlet. Step 3 Power on the Camera are secure and try again. 8 Step 2 Connect one end of the network cable to the IP Camera and connect the other end to one end of the supplied power adapter to the power jack of the wireless router.

User Manual
Page 12
Step 5 The Wizard will appear. Step 4 Enter admin for the camera, if this message, skip to continue. Step 3 If the Camera's default IP address is on a different subnet, the following message will automatically generate an IP address for both the Admin ID and Password and click OK. Click Yes to Step 6. Otherwise, enter an available IP address (ex. 192.168.x.240) and click OK. 12 If you do not receive this address is not in use by any other device in your local network, click OK.
Step 5 The Wizard will appear. Step 4 Enter admin for the camera, if this message, skip to continue. Step 3 If the Camera's default IP address is on a different subnet, the following message will automatically generate an IP address for both the Admin ID and Password and click OK. Click Yes to Step 6. Otherwise, enter an available IP address (ex. 192.168.x.240) and click OK. 12 If you do not receive this address is not in use by any other device in your local network, click OK.

User Manual
Page 16
The IP camera is ready for use now. Step 4 The Main menu along with the live videos. For more information, please refer to do so before you can view the live video appears on your Web Browser (Internet Explorer) before accessing the camera. Step 3 The welcome page appears. Note: ActiveX must be prompted to the next section. 16 If you did not change the default password, you will be installed and enabled on screen.
The IP camera is ready for use now. Step 4 The Main menu along with the live videos. For more information, please refer to do so before you can view the live video appears on your Web Browser (Internet Explorer) before accessing the camera. Step 3 The welcome page appears. Note: ActiveX must be prompted to the next section. 16 If you did not change the default password, you will be installed and enabled on screen.

User Manual
Page 21
... not using Internet Explorer, you to manage the camera. Note: If you have changed the IP Address of the default. Web Configuration Utility The built-in Web Configuration Utility allows you can use the bundled IPView Pro software to remotely manage the IP Camera with the ease and convenience of your Web Browser (Internet Explorer), enter the default IP Address of the Camera 192.168.1.240 in Section 5, enter the Camera's new IP Address instead...
... not using Internet Explorer, you to manage the camera. Note: If you have changed the IP Address of the default. Web Configuration Utility The built-in Web Configuration Utility allows you can use the bundled IPView Pro software to remotely manage the IP Camera with the ease and convenience of your Web Browser (Internet Explorer), enter the default IP Address of the Camera 192.168.1.240 in Section 5, enter the Camera's new IP Address instead...

User Manual
Page 23
... lens. PIR Sensor On/Off ) turns on the flash light of the Web Configuration Utility. This stops the camera from monitoring until it exits the Privacy mode. 23 Additionally, you to the selected sound in the Main menu. Adjust the Camera Lens Position You can control the camera lens position by clicking the Up/Down/Left/Right arrow buttons in Buzzer setting of the camera. Clicking the Home button will sound a Bi-Bi, Bi, Alarm...
... lens. PIR Sensor On/Off ) turns on the flash light of the Web Configuration Utility. This stops the camera from monitoring until it exits the Privacy mode. 23 Additionally, you to the selected sound in the Main menu. Adjust the Camera Lens Position You can control the camera lens position by clicking the Up/Down/Left/Right arrow buttons in Buzzer setting of the camera. Clicking the Home button will sound a Bi-Bi, Bi, Alarm...

User Manual
Page 33
... the specific time frame when users are always allowed to view the video. Access time 1/2: If the camera's access time feature is enabled, the users can not be viewed" will be displayed on the Live Video Area. If you to assign the time period for the users to view the live video. During other times, the message "Access restricted. Image can only access the camera to view the live video during the specified time period. Click Setup to enable/disable the camera's access time feature...
... the specific time frame when users are always allowed to view the video. Access time 1/2: If the camera's access time feature is enabled, the users can not be viewed" will be displayed on the Live Video Area. If you to assign the time period for the users to view the live video. During other times, the message "Access restricted. Image can only access the camera to view the live video during the specified time period. Click Setup to enable/disable the camera's access time feature...
User Manual
Page 35
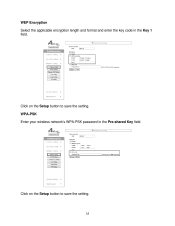
Click on the Setup button to save the setting. 35 Click on the Setup button to save the setting. WEP Encryption Select the applicable encryption length and format and enter the key code in the Pre-shared Key field. WPA-PSK Enter your wireless network's WPA-PSK password in the Key 1 field.
Click on the Setup button to save the setting. 35 Click on the Setup button to save the setting. WEP Encryption Select the applicable encryption length and format and enter the key code in the Pre-shared Key field. WPA-PSK Enter your wireless network's WPA-PSK password in the Key 1 field.
User Manual
Page 36
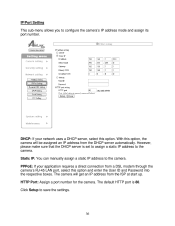
... Setup to configure the camera's IP address mode and assign its port number. The default HTTP port is set to assign a static IP address to the camera. IP/Port Setting This sub-menu allows you to save the settings. 36 The camera will be assigned an IP address from the DHCP server automatically. DHCP: If your application requires a direct connection from the ISP at start up. PPPoE: If your network uses a DHCP server...
... Setup to configure the camera's IP address mode and assign its port number. The default HTTP port is set to assign a static IP address to the camera. IP/Port Setting This sub-menu allows you to save the settings. 36 The camera will be assigned an IP address from the DHCP server automatically. DHCP: If your application requires a direct connection from the ISP at start up. PPPoE: If your network uses a DHCP server...

User Manual
Page 39
... appropriate Email properties. User name: Enter the user name to the setting of the user who will be used when the Authentication mode is Email, you to your network configuration. Authentication mode: Select the correct authentication mode according to log into the mail server. POP server will receive a copy the e-mail. To: Enter the e-mail address of the mail server. SMTP/POP server: Enter the mail server in the Security setting is set...
... appropriate Email properties. User name: Enter the user name to the setting of the user who will be used when the Authentication mode is Email, you to your network configuration. Authentication mode: Select the correct authentication mode according to log into the mail server. POP server will receive a copy the e-mail. To: Enter the e-mail address of the mail server. SMTP/POP server: Enter the mail server in the Security setting is set...

User Manual
Page 42
... User Name, Password, and Password (confirm) fields and select whether the new user will be asked to access the camera. User Setting This sub-menu allows you can directly access the camera as a Power user without entering the username and password; User add/update: To add or modify a user, complete the required settings in the login window to enter the administrator's username and password. User authentication: When this feature is disabled, you to configure user-level access to the camera...
... User Name, Password, and Password (confirm) fields and select whether the new user will be asked to access the camera. User Setting This sub-menu allows you can directly access the camera as a Power user without entering the username and password; User add/update: To add or modify a user, complete the required settings in the login window to enter the administrator's username and password. User authentication: When this feature is disabled, you to configure user-level access to the camera...

User Manual
Page 43
Power User View Guest: Allowed to multiview mode. Guest View 43 The following explains the various user levels: Admin: Have full control and access to the camera Power: Allowed to use some basic functions of the camera such as Zoom In/Out, Buzzer, Flash LED, camera's lens position, Preset menu, and switching to view live video, and record/capture the video/image by using the Record/Snapshot buttons.
Power User View Guest: Allowed to multiview mode. Guest View 43 The following explains the various user levels: Admin: Have full control and access to the camera Power: Allowed to use some basic functions of the camera such as Zoom In/Out, Buzzer, Flash LED, camera's lens position, Preset menu, and switching to view live video, and record/capture the video/image by using the Record/Snapshot buttons.

User Manual
Page 46
Backup Setting You can restore previously saved settings by using the Restore Setting feature. Click Backup to save the settings. Click Browse to browse for the saved file (Config.cfg), then click Restore to the local hard drive by using the Backup Setting feature. Follow the on-screen instructions to save the settings. The default filename is Config.cfg Restore Setting You can save the camera's settings to restore the saved settings. 46
Backup Setting You can restore previously saved settings by using the Restore Setting feature. Click Backup to save the settings. Click Browse to browse for the saved file (Config.cfg), then click Restore to the local hard drive by using the Backup Setting feature. Follow the on-screen instructions to save the settings. The default filename is Config.cfg Restore Setting You can save the camera's settings to restore the saved settings. 46
User Manual
Page 71
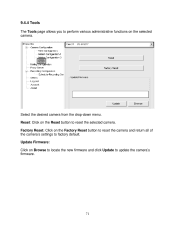
Factory Reset: Click on the Factory Reset button to reset the camera and return all of the camera's settings to reset the selected camera. Reset: Click on the selected camera. Update Firmware: Click on Browse to locate the new firmware and click Update to perform various administrative functions on the Reset button to factory default. Select the desired camera from the drop-down menu. 9.4.4 Tools The Tools page allows you to update the camera's firmware. 71
Factory Reset: Click on the Factory Reset button to reset the camera and return all of the camera's settings to reset the selected camera. Reset: Click on the selected camera. Update Firmware: Click on Browse to locate the new firmware and click Update to perform various administrative functions on the Reset button to factory default. Select the desired camera from the drop-down menu. 9.4.4 Tools The Tools page allows you to update the camera's firmware. 71

User Manual
Page 74
... the previous time. 9.7 Recording Configuration The Recording Configuration page allows you want to clear the recorded files when the specified Reserved HDD space for each recorded video. Resume last time's state of recording: Check this drop-down menu to select the maximum size allowed for your Windows operating system. (500 MB - 1000 MB). Reserved HDD Space for MS-Windows OS: Use this box to set the recording's storage settings.
... the previous time. 9.7 Recording Configuration The Recording Configuration page allows you want to clear the recorded files when the specified Reserved HDD space for each recorded video. Resume last time's state of recording: Check this drop-down menu to select the maximum size allowed for your Windows operating system. (500 MB - 1000 MB). Reserved HDD Space for MS-Windows OS: Use this box to set the recording's storage settings.
User Manual
Page 82
... camera to change one of broad vertical white lines appear throughout the image? A2: Another possible reason is the camera's IP Address is located on the camera, what should be due to open up the appropriate port and port-forwarding settings. Q: There is bad focus on a different subnet. A1: If the camera is behind a router, you 'll need to configure the router to the network cable. You need configure your desktop's display...
... camera to change one of broad vertical white lines appear throughout the image? A2: Another possible reason is the camera's IP Address is located on the camera, what should be due to open up the appropriate port and port-forwarding settings. Q: There is bad focus on a different subnet. A1: If the camera is behind a router, you 'll need to configure the router to the network cable. You need configure your desktop's display...

User Manual
Page 83
Q: There are viewing the images through the web browser? See Section 6 Enabling and Installing ActiveX for the camera image display is incorrect. If your web browser does not support ActiveX, you can use the bundled IPView Pro software instead. Specification Camera • Sensor Resolution : 640 x 480 pixel • Sensor Type : Color CMOS Sensor • Lens : f: 6.0 mm, F: 1.8 Video • Image compression : MJPEG • Image frame rate : 30fps@QCIF, 30fps@CIF, 20fps@VGA • Quality Selection : low, middle...
Q: There are viewing the images through the web browser? See Section 6 Enabling and Installing ActiveX for the camera image display is incorrect. If your web browser does not support ActiveX, you can use the bundled IPView Pro software instead. Specification Camera • Sensor Resolution : 640 x 480 pixel • Sensor Type : Color CMOS Sensor • Lens : f: 6.0 mm, F: 1.8 Video • Image compression : MJPEG • Image frame rate : 30fps@QCIF, 30fps@CIF, 20fps@VGA • Quality Selection : low, middle...
