

User Manual
Page 2
... ...33 8.2.4 Configuration - Network 34 8.2.5 Configuration - User...35 8.2.6 Configuration - E-mail ...38 8.3.1 Tools - Firmware Upgrade 41 8.3.6 Tools - Using the Setup Wizard ...9 6. Web Configuration Utility ...24 8.1.1 Management - Network 27 8.1.5 Management - IPView Pro...46 10.1 Installing IPView Pro...46 10.2 Starting IPView Pro ...48 10.2.1 Adding Camera using the Search Method 49 10.2.2 Adding Camera using the Input IP Method 53 10.3 Using IPView Pro ...55 10.3.1 Status Mode Window...56 10.3.2 View Window and View Mode Buttons 58 10.3.3 Control Panel ...59...
... ...33 8.2.4 Configuration - Network 34 8.2.5 Configuration - User...35 8.2.6 Configuration - E-mail ...38 8.3.1 Tools - Firmware Upgrade 41 8.3.6 Tools - Using the Setup Wizard ...9 6. Web Configuration Utility ...24 8.1.1 Management - Network 27 8.1.5 Management - IPView Pro...46 10.1 Installing IPView Pro...46 10.2 Starting IPView Pro ...48 10.2.1 Adding Camera using the Search Method 49 10.2.2 Adding Camera using the Input IP Method 53 10.3 Using IPView Pro ...55 10.3.1 Status Mode Window...56 10.3.2 View Window and View Mode Buttons 58 10.3.3 Control Panel ...59...

User Manual
Page 3
Xplug Control ...75 11.1 Installing Xplug Control 75 11.2 Enabling ActiveX...76 Appendix...79 Sending Images via Web Browser 79 Technical Support ...84 3 10.4.1 Camera Configuration...61 10.4.2 Web Configuration...62 10.4.3 Motion Configuration-1 63 10.4.4 Motion Configuration-2 64 10.4.5 Tools ...65 10.4.6 Mail Configuration...66 10.4.7 Proxy Server...67 10.4.8 Recording Configuration 68 10.4.9 Schedule-Recording Configuration 69 10.4.10 Others...71 10.4.11 Log List...72 10.4.12 Account ...73 10.4.13 About...74 11.
Xplug Control ...75 11.1 Installing Xplug Control 75 11.2 Enabling ActiveX...76 Appendix...79 Sending Images via Web Browser 79 Technical Support ...84 3 10.4.1 Camera Configuration...61 10.4.2 Web Configuration...62 10.4.3 Motion Configuration-1 63 10.4.4 Motion Configuration-2 64 10.4.5 Tools ...65 10.4.6 Mail Configuration...66 10.4.7 Proxy Server...67 10.4.8 Recording Configuration 68 10.4.9 Schedule-Recording Configuration 69 10.4.10 Others...71 10.4.11 Log List...72 10.4.12 Account ...73 10.4.13 About...74 11.

User Manual
Page 4
... of the product. The built-in this manual. Before you begin the installation, please check the items of your purchase of this manual carefully for installing and configuring this product can be found in Web Configuration Utility allows any item contained is a standalone network device that 's connected to the network to view images and live videos from internal and external networks. Instructions for proper operation of ownership.
... of the product. The built-in this manual. Before you begin the installation, please check the items of your purchase of this manual carefully for installing and configuring this product can be found in Web Configuration Utility allows any item contained is a standalone network device that 's connected to the network to view images and live videos from internal and external networks. Instructions for proper operation of ownership.
User Manual
Page 5
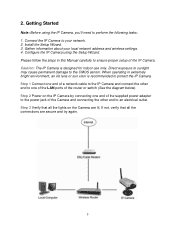
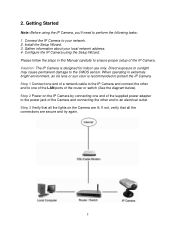
... of the supplied power adapter to an electrical outlet. Getting Started Note: Before using the Setup Wizard. Connect the IP Camera to perform the following tasks: 1. 2. Step 3 Verify that all the lights on the IP Camera by connecting one of the LAN ports of the router or switch (See the diagram below). Please follow the steps in extremely bright environment, an iris lens or sun...
... of the supplied power adapter to an electrical outlet. Getting Started Note: Before using the Setup Wizard. Connect the IP Camera to perform the following tasks: 1. 2. Step 3 Verify that all the lights on the IP Camera by connecting one of the LAN ports of the router or switch (See the diagram below). Please follow the steps in extremely bright environment, an iris lens or sun...

User Manual
Page 10
Note: If you do not receive this message, skip to continue. For example: If your local network address. Step 3 If the Camera's default IP Address is 192.168.2.100, change the first three numbers to match your computer's IP Address is on a different subnet, the following message will appear. Step 4 Enter admin for both the Admin ID and Password and click OK. Step 5 In the IP Address field, change the first three numbers to 192.168.2 as well but leave the last number 240 alone. 10 Click Yes to Step 9.
Note: If you do not receive this message, skip to continue. For example: If your local network address. Step 3 If the Camera's default IP Address is 192.168.2.100, change the first three numbers to match your computer's IP Address is on a different subnet, the following message will appear. Step 4 Enter admin for both the Admin ID and Password and click OK. Step 5 In the IP Address field, change the first three numbers to 192.168.2 as well but leave the last number 240 alone. 10 Click Yes to Step 9.

User Manual
Page 16
6. Step 2 The default page appears. To view images from within the same local area network as the Internet, please refer to view images from an external network such as the IP Camera. You can view live video by selecting either the ActiveX Mode (Internet Explorer) or the Java Mode (Internet Explorer and Netscape). 16 Viewing Images Note: The following steps describe how to Section 9 of this manual for further instructions. Step 1 At the Setup Wizard, select the desired camera from the list and click on the Web Config button.
6. Step 2 The default page appears. To view images from within the same local area network as the Internet, please refer to view images from an external network such as the IP Camera. You can view live video by selecting either the ActiveX Mode (Internet Explorer) or the Java Mode (Internet Explorer and Netscape). 16 Viewing Images Note: The following steps describe how to Section 9 of this manual for further instructions. Step 1 At the Setup Wizard, select the desired camera from the list and click on the Web Config button.

User Manual
Page 17
Step 3 Turn the Camera's lens clockwise or counter-clockwise to download and install the required Java software. Step 4 If you can view the live videos. Note: ActiveX and/or Java Applet must be installed and enabled on your Web Browser (Internet Explorer or Netscape) before you need to install Java Virtual Machine on your computer, do not follow the instructions on -screen XP instructions. The IP Camera is ready for use now. 17 Rather, go to http://www.java.com/en/download/manual.jsp and follow the on that web site to focus.
Step 3 Turn the Camera's lens clockwise or counter-clockwise to download and install the required Java software. Step 4 If you can view the live videos. Note: ActiveX and/or Java Applet must be installed and enabled on your Web Browser (Internet Explorer or Netscape) before you need to install Java Virtual Machine on your computer, do not follow the instructions on -screen XP instructions. The IP Camera is ready for use now. 17 Rather, go to http://www.java.com/en/download/manual.jsp and follow the on that web site to focus.
User Manual
Page 23
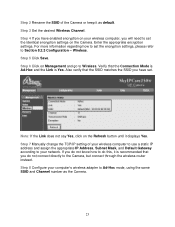
... 7 Manually change the TCP/IP setting of the Camera or keep it displays Yes. For more information regarding how to set the encryption settings, please refer to your computer's wireless adapter to set . Enter the appropriate encryption settings. If you do not know how to do not connect directly to Wireless. Step 3 Set the desired Wireless Channel. Step 6 Click on your wireless computer to use a static IP address...
... 7 Manually change the TCP/IP setting of the Camera or keep it displays Yes. For more information regarding how to set the encryption settings, please refer to your computer's wireless adapter to set . Enter the appropriate encryption settings. If you do not know how to do not connect directly to Wireless. Step 3 Set the desired Wireless Channel. Step 6 Click on your wireless computer to use a static IP address...
User Manual
Page 59
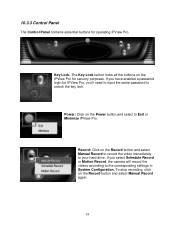
... record the video immediately to the corresponding settings in System Configuration. Record: Click on the Record button and select Manual Record again. 59 10.3.3 Control Panel The Control Panel contains essential buttons for security purposes. If you have enabled a password login for IPView Pro, you select Schedule Record or Motion Record, the camera will record the videos according to your hard drive. If you 'll need to input the same password to Exit or Minimize IPView Pro. Power...
... record the video immediately to the corresponding settings in System Configuration. Record: Click on the Record button and select Manual Record again. 59 10.3.3 Control Panel The Control Panel contains essential buttons for security purposes. If you have enabled a password login for IPView Pro, you select Schedule Record or Motion Record, the camera will record the videos according to your hard drive. If you 'll need to input the same password to Exit or Minimize IPView Pro. Power...

User Manual
Page 63
10.4.3 Motion Configuration-1 The Motion Configuration-1 page allows you have enabled Motion Record from the drop-down menu. Once motion is detected, recording will begin when motion is detected. 63 Recording will monitor the entire screen. Detect Region: When you select Full picture, the camera will begin if you to set the sensitivity level of the motion detection. Sensitivity Level: Adjust the slide bar to apply the changes. Click Save to set the Motion Detection settings. At the Record Button, select Motion Record. Select the desired camera from the Record Button.
10.4.3 Motion Configuration-1 The Motion Configuration-1 page allows you have enabled Motion Record from the drop-down menu. Once motion is detected, recording will begin when motion is detected. 63 Recording will monitor the entire screen. Detect Region: When you select Full picture, the camera will begin if you to set the sensitivity level of the motion detection. Sensitivity Level: Adjust the slide bar to apply the changes. Click Save to set the Motion Detection settings. At the Record Button, select Motion Record. Select the desired camera from the Record Button.
User Manual
Page 65
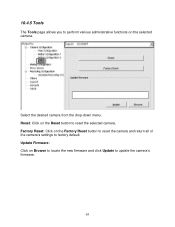
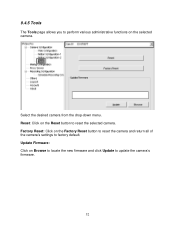
Update Firmware: Click on Browse to locate the new firmware and click Update to reset the selected camera. Reset: Click on the selected camera. 10.4.5 Tools The Tools page allows you to factory default. Select the desired camera from the drop-down menu. Factory Reset: Click on the Factory Reset button to reset the camera and return all of the camera's settings to perform various administrative functions on the Reset button to update the camera's firmware. 65
Update Firmware: Click on Browse to locate the new firmware and click Update to reset the selected camera. Reset: Click on the selected camera. 10.4.5 Tools The Tools page allows you to factory default. Select the desired camera from the drop-down menu. Factory Reset: Click on the Factory Reset button to reset the camera and return all of the camera's settings to perform various administrative functions on the Reset button to update the camera's firmware. 65

User Manual
Page 68
... to set the recording's storage settings. Reserved HDD Space for MS-Windows OS: Use this box to apply the changes. 68 The storage path indicates where the recorded videos will be saved. 10.4.8 Recording Configuration The Recording Configuration page allows you want to reserve for your Windows operating system. (500 MB - 1000 MB). Each Recording File Size: Use this box to select the maximum size allowed for each camera...
... to set the recording's storage settings. Reserved HDD Space for MS-Windows OS: Use this box to apply the changes. 68 The storage path indicates where the recorded videos will be saved. 10.4.8 Recording Configuration The Recording Configuration page allows you want to reserve for your Windows operating system. (500 MB - 1000 MB). Each Recording File Size: Use this box to select the maximum size allowed for each camera...

Quick Installation Guide
Page 2
... lights on the IP Camera by connecting one end of the Camera and connecting the other end to your local network address and wireless settings. 4. Getting Started Note: Before using the Setup Wizard. If not, verify that all the connections are lit. Section 1 This Quick Installation Guide only provides the basic instructions. Please follow the steps in the supplied CD. When operating in extremely bright environment, an iris lens...
... lights on the IP Camera by connecting one end of the Camera and connecting the other end to your local network address and wireless settings. 4. Getting Started Note: Before using the Setup Wizard. If not, verify that all the connections are lit. Section 1 This Quick Installation Guide only provides the basic instructions. Please follow the steps in the supplied CD. When operating in extremely bright environment, an iris lens...

Quick Installation Guide
Page 14
... enabled on your Web Browser (Internet Explorer or Netscape) before you need to install Java Virtual Machine on your computer, do not follow the instructions on that web site to www.java.com/en/download/manual.jsp and follow the on the provided CD. Rather, go to download and install the required Java software. Step 3 Turn the Camera's lens clockwise or counter-clockwise to the User's Manual on -screen XP instructions...
... enabled on your Web Browser (Internet Explorer or Netscape) before you need to install Java Virtual Machine on your computer, do not follow the instructions on that web site to www.java.com/en/download/manual.jsp and follow the on the provided CD. Rather, go to download and install the required Java software. Step 3 Turn the Camera's lens clockwise or counter-clockwise to the User's Manual on -screen XP instructions...
Instruction Manual
Page 2
... Images ...14 7. Upload 24 7.2.7 Configuration - User...22 7.2.5 Configuration - Installing the Setup Wizard...6 4. Network 18 7.1.4 Management - Factory Reset ...27 7.3.5 Tools - Video...18 7.1.3 Management - Date & Time 23 7.2.6 Configuration - About...29 8. Gathering Information ...8 5. IPView Pro...33 9.1 Installing IPView Pro...33 9.2 Starting IPView Pro ...35 9.2.1 Adding Camera using the Search Method 36 9.2.2 Adding Camera using the Input IP Method 40 9.3 Using IPView Pro ...42 9.3.1 Status Mode Window...43 9.3.2 View Window and View Mode Buttons...
... Images ...14 7. Upload 24 7.2.7 Configuration - User...22 7.2.5 Configuration - Installing the Setup Wizard...6 4. Network 18 7.1.4 Management - Factory Reset ...27 7.3.5 Tools - Video...18 7.1.3 Management - Date & Time 23 7.2.6 Configuration - About...29 8. Gathering Information ...8 5. IPView Pro...33 9.1 Installing IPView Pro...33 9.2 Starting IPView Pro ...35 9.2.1 Adding Camera using the Search Method 36 9.2.2 Adding Camera using the Input IP Method 40 9.3 Using IPView Pro ...42 9.3.1 Status Mode Window...43 9.3.2 View Window and View Mode Buttons...

Instruction Manual
Page 4
... network device that 's connected to the network to remotely manage the IP Camera. Instructions for proper operation of the product. Also, keep the box and packaging materials in case you install and use this product, please read this manual. Before you need to view images and live videos from internal and external networks. The built-in the future. 4 Package Contents Before you to ship the unit in Web Configuration...
... network device that 's connected to the network to remotely manage the IP Camera. Instructions for proper operation of the product. Also, keep the box and packaging materials in case you install and use this product, please read this manual. Before you need to view images and live videos from internal and external networks. The built-in the future. 4 Package Contents Before you to ship the unit in Web Configuration...
Instruction Manual
Page 5
... local network address. 4. Please follow the steps in extremely bright environment, an iris lens or sun visor is designed for indoor use only. When operating in this Manual carefully to protect the IP Camera. Install the Setup Wizard. 3. Step 3 Verify that all the lights on the IP Camera by connecting one of the LAN ports of the router or switch (See the diagram below). Connect the IP Camera...
... local network address. 4. Please follow the steps in extremely bright environment, an iris lens or sun visor is designed for indoor use only. When operating in this Manual carefully to protect the IP Camera. Install the Setup Wizard. 3. Step 3 Verify that all the lights on the IP Camera by connecting one of the LAN ports of the router or switch (See the diagram below). Connect the IP Camera...

Instruction Manual
Page 15
Note: ActiveX and/or Java Applet must be installed and enabled on -screen XP instructions. Step 4 If you need to install Java Virtual Machine on your computer, do not follow the instructions on that web site to focus. Rather, go to http://www.java.com/en/download/manual.jsp and follow the on your Web Browser (Internet Explorer or Netscape) before you can view the live videos. Step 3 Turn the Camera's lens clockwise or counter-clockwise to download and install the required Java software. The IP Camera is ready for use now. 15
Note: ActiveX and/or Java Applet must be installed and enabled on -screen XP instructions. Step 4 If you need to install Java Virtual Machine on your computer, do not follow the instructions on that web site to focus. Rather, go to http://www.java.com/en/download/manual.jsp and follow the on your Web Browser (Internet Explorer or Netscape) before you can view the live videos. Step 3 Turn the Camera's lens clockwise or counter-clockwise to download and install the required Java software. The IP Camera is ready for use now. 15
Instruction Manual
Page 52
Select the desired camera from the drop-down menu. Update Firmware: Click on Browse to locate the new firmware and click Update to reset the selected camera. Reset: Click on the selected camera. 9.4.5 Tools The Tools page allows you to factory default. Factory Reset: Click on the Factory Reset button to reset the camera and return all of the camera's settings to perform various administrative functions on the Reset button to update the camera's firmware. 52
Select the desired camera from the drop-down menu. Update Firmware: Click on Browse to locate the new firmware and click Update to reset the selected camera. Reset: Click on the selected camera. 9.4.5 Tools The Tools page allows you to factory default. Factory Reset: Click on the Factory Reset button to reset the camera and return all of the camera's settings to perform various administrative functions on the Reset button to update the camera's firmware. 52

Instruction Manual
Page 55
Reserved HDD Space for MS-Windows OS: Use this drop-down menu to select the size of the hard drive space you to add, modify, and delete individual storage paths. Storage List: Use the Add, Modify, Delete buttons to set the recording's storage settings. 9.4.8 Recording Configuration The Recording Configuration page allows you want to reserve for each camera is filled. (200 MB - 50000 MB). When a video reaches the maximum limit, a new...
Reserved HDD Space for MS-Windows OS: Use this drop-down menu to select the size of the hard drive space you to add, modify, and delete individual storage paths. Storage List: Use the Add, Modify, Delete buttons to set the recording's storage settings. 9.4.8 Recording Configuration The Recording Configuration page allows you want to reserve for each camera is filled. (200 MB - 50000 MB). When a video reaches the maximum limit, a new...
