Quick Start Guide
Page 2
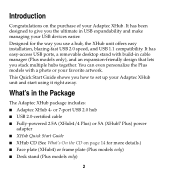
In this Booklet Introduction 2 What's in the Package 2 This Is Your Hub 3 Plugging in Your Hub 6 Plugging in Your Devices 7 Organizing Your Cables (Plus models only) 8 Stacking Your Hubs 9 Removing the Desk Stand (Plus models only) 12 Personalizing Your Adaptec XHub 13 What's On the CD 14 About USB 2.0 Drivers 14 Technical Specifications 15 1
In this Booklet Introduction 2 What's in the Package 2 This Is Your Hub 3 Plugging in Your Hub 6 Plugging in Your Devices 7 Organizing Your Cables (Plus models only) 8 Stacking Your Hubs 9 Removing the Desk Stand (Plus models only) 12 Personalizing Your Adaptec XHub 13 What's On the CD 14 About USB 2.0 Drivers 14 Technical Specifications 15 1
Quick Start Guide
Page 3
... (Plus models only) 2 What's in USB expandability and make managing your Adaptec XHub unit and start using it right away. This Quick Start Guide shows you use a hub, the XHub unit offers easy installation, blazing-fast USB 2.0 speed, and USB 1.1 compatibility. Designed for more details.) I Face plate (XHub4) or frame plate (Plus models only) I Adaptec XHub 4- It has been designed to set up your USB devices easier. It has easy-access USB ports, a removable desktop...
... (Plus models only) 2 What's in USB expandability and make managing your Adaptec XHub unit and start using it right away. This Quick Start Guide shows you use a hub, the XHub unit offers easy installation, blazing-fast USB 2.0 speed, and USB 1.1 compatibility. Designed for more details.) I Face plate (XHub4) or frame plate (Plus models only) I Adaptec XHub 4- It has been designed to set up your USB devices easier. It has easy-access USB ports, a removable desktop...

Quick Start Guide
Page 4
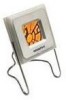
This Is Your Hub XHub4 Plus and XHub7 Plus Models Clear photo cover Picture Frame plate Latch Ports Desk stand LEDs (inside top of hub) Serial number Stacking connector Cable management loop Silicone foot Ports Plus Model (XHub7 Plus shown here) 3 Stacking tab
This Is Your Hub XHub4 Plus and XHub7 Plus Models Clear photo cover Picture Frame plate Latch Ports Desk stand LEDs (inside top of hub) Serial number Stacking connector Cable management loop Silicone foot Ports Plus Model (XHub7 Plus shown here) 3 Stacking tab

Quick Start Guide
Page 5
See Port Details on the device, the LED may light up . (Depending on page 5 for more information. 4 XHub4 Model Face plate LEDs (inside top of hub) Stacking connector Serial number Latch Ports Silicone foot Ports XHub4 Stacking tab Note: The ports correspond to the LEDs. When you plug a device into the hub, the matching LED lights up only when the device is in use.) The Power port has its own LED.
See Port Details on the device, the LED may light up . (Depending on page 5 for more information. 4 XHub4 Model Face plate LEDs (inside top of hub) Stacking connector Serial number Latch Ports Silicone foot Ports XHub4 Stacking tab Note: The ports correspond to the LEDs. When you plug a device into the hub, the matching LED lights up only when the device is in use.) The Power port has its own LED.

Quick Start Guide
Page 6
Port Details USB 2.0 uplink port USB 2.0 device ports (7) Power port Port numbers 1 2 3 4 5 6 7 XHub7 Plus Port Details USB 2.0 uplink port USB 2.0 device ports (4) Power port 4 Port numbers 1 2 3 4 XHub4 / XHub4 Plus Port Details More information about your XHub is in Technical Specifications on page 15. 5
Port Details USB 2.0 uplink port USB 2.0 device ports (7) Power port Port numbers 1 2 3 4 5 6 7 XHub7 Plus Port Details USB 2.0 uplink port USB 2.0 device ports (4) Power port 4 Port numbers 1 2 3 4 XHub4 / XHub4 Plus Port Details More information about your XHub is in Technical Specifications on page 15. 5

Quick Start Guide
Page 7
... your computer and to power source) Note: Although the Power LED remains lit when the hub is plugged in, the hub enters power-saver mode if there has been no activity on the USB bus for 3 ms. Power LED Step 3: Plug USB cable into USB port on . Hub Connections 6 Step 1: Plug power adapter into XHub USB Uplink port. The green Power LED at the top of the hub should light up when the power goes on computer.
... your computer and to power source) Note: Although the Power LED remains lit when the hub is plugged in, the hub enters power-saver mode if there has been no activity on the USB bus for 3 ms. Power LED Step 3: Plug USB cable into USB port on . Hub Connections 6 Step 1: Plug power adapter into XHub USB Uplink port. The green Power LED at the top of the hub should light up when the power goes on computer.

Quick Start Guide
Page 8
USB Device Cable into any of the USB ports. You can plug devices into USB Port USB Device Connections 7 Plugging in Your Devices Follow the picture below to connect your USB devices to your XHub unit.
USB Device Cable into any of the USB ports. You can plug devices into USB Port USB Device Connections 7 Plugging in Your Devices Follow the picture below to connect your USB devices to your XHub unit.

Quick Start Guide
Page 9
Unplugged cables remain secured in device cable. Follow the pictures below to organize your device cables organized. (The picture shows the cable management loop in action.) The cable loop holds up through opening into the cable management loop. . Step 1: Plug in cable management loop. Step 2: Pull cable up to help you keep your cables using the cable management loop. Cable Management Using the Desk Stand (Plus models only) 8 Organizing Your Cables (Plus models only) You can use the cable management loop in the desk stand to 14 device cables neatly in place.
Unplugged cables remain secured in device cable. Follow the pictures below to organize your device cables organized. (The picture shows the cable management loop in action.) The cable loop holds up through opening into the cable management loop. . Step 1: Plug in cable management loop. Step 2: Pull cable up to help you keep your cables using the cable management loop. Cable Management Using the Desk Stand (Plus models only) 8 Organizing Your Cables (Plus models only) You can use the cable management loop in the desk stand to 14 device cables neatly in place.

Quick Start Guide
Page 10
.../frame plate down to release face/frame plate. Removing the Face Plate/Frame Plate 9 Stacking Your Hubs If you want to add more information.) Hubs can be piled on a flat surface (such as your desk) or they can be joined together using the connector slots and tabs: 1 Remove the face or frame ... Daisy-Chain on page 11 for more USB 2.0 ports to remove. To join your system, Adaptec XHubs can be daisy-chained (linked in connector slots and tabs. Tab Step 1: Gently pull latch down to your hubs using the built-in series) and stacked together. (See Making the Most of face...
.../frame plate down to release face/frame plate. Removing the Face Plate/Frame Plate 9 Stacking Your Hubs If you want to add more information.) Hubs can be piled on a flat surface (such as your desk) or they can be joined together using the connector slots and tabs: 1 Remove the face or frame ... Daisy-Chain on page 11 for more USB 2.0 ports to remove. To join your system, Adaptec XHubs can be daisy-chained (linked in connector slots and tabs. Tab Step 1: Gently pull latch down to your hubs using the built-in series) and stacked together. (See Making the Most of face...

Quick Start Guide
Page 11
Step 2: Slide top hub down to join your hubs together. 2 Follow the pictures below to lock in mind: no more than three hubs should be stacked on a desk stand. 10 Step 1: Put two hubs together. LEDs visible along top Ports accessible from bottom Stacking Hubs on a Desk Stand Note: Keep gravity in place.
Step 2: Slide top hub down to join your hubs together. 2 Follow the pictures below to lock in mind: no more than three hubs should be stacked on a desk stand. 10 Step 1: Put two hubs together. LEDs visible along top Ports accessible from bottom Stacking Hubs on a Desk Stand Note: Keep gravity in place.

Quick Start Guide
Page 12
... XHub XHub7 Plus For maximum performance, use a combination of XHub4s and XHub7s. (This is a USB limitation.) 11 the LEDs will vary if you use USB port 1, 3, or 5, especially when stacking more than two hubs. The maximum number of hubs on a daisy-chain will then be visible on the other side. Note: To stack your hubs to each other using a USB 2.0 cable, following the connection suggestions in the diagram below . 3 Connect a power adapter...
... XHub XHub7 Plus For maximum performance, use a combination of XHub4s and XHub7s. (This is a USB limitation.) 11 the LEDs will vary if you use USB port 1, 3, or 5, especially when stacking more than two hubs. The maximum number of hubs on a daisy-chain will then be visible on the other side. Note: To stack your hubs to each other using a USB 2.0 cable, following the connection suggestions in the diagram below . 3 Connect a power adapter...
Quick Start Guide
Page 14
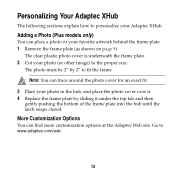
... hub, and place the photo cover over it. 4 Replace the frame plate by 2" to www.adaptec.com/usb. 13 Go to fit the frame. Personalizing Your Adaptec XHub The following sections explain how to personalize your favorite artwork behind the frame plate. 1 Remove the frame plate (as shown on page 9). Adding a Photo (Plus models only) You can find more customization options at the Adaptec Web...
... hub, and place the photo cover over it. 4 Replace the frame plate by 2" to www.adaptec.com/usb. 13 Go to fit the frame. Personalizing Your Adaptec XHub The following sections explain how to personalize your favorite artwork behind the frame plate. 1 Remove the frame plate (as shown on page 9). Adding a Photo (Plus models only) You can find more customization options at the Adaptec Web...
Quick Start Guide
Page 15
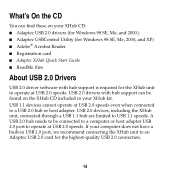
... at USB 2.0 speeds even when connected to USB 1.1 speeds. USB 2.0 devices, including the XHub unit, connected through a USB 1.1 hub are limited to a USB 2.0 hub or host adapter. A USB 2.0 hub needs to be found on your XHub CD: I Adaptec USB 2.0 drivers (for Windows 98 SE, Me, and 2000.) I Adaptec USBControl Utility (for Windows 98 SE, Me, 2000, and XP) I Adobe® Acrobat Reader I Registration card I Adaptec XHub Quick Start Guide I ReadMe files About USB 2.0 Drivers USB 2.0 driver software with hub support is...
... at USB 2.0 speeds even when connected to USB 1.1 speeds. USB 2.0 devices, including the XHub unit, connected through a USB 1.1 hub are limited to a USB 2.0 hub or host adapter. A USB 2.0 hub needs to be found on your XHub CD: I Adaptec USB 2.0 drivers (for Windows 98 SE, Me, and 2000.) I Adaptec USBControl Utility (for Windows 98 SE, Me, 2000, and XP) I Adobe® Acrobat Reader I Registration card I Adaptec XHub Quick Start Guide I ReadMe files About USB 2.0 Drivers USB 2.0 driver software with hub support is...
Quick Start Guide
Page 16
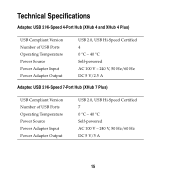
Technical Specifications Adaptec USB 2 Hi-Speed 4-Port Hub (XHub 4 and XHub 4 Plus) USB Compliant Version Number of USB Ports Operating Temperature Power Source Power Adapter Input Power Adapter Output USB 2.0, USB Hi-Speed Certified 4 0 °C - 40 °C Self-powered AC 100 V - 240 V, 50 Hz/60 Hz DC 5 V/2.5 A Adaptec USB 2 Hi-Speed 7-Port Hub (XHub 7 Plus) USB Compliant Version Number of USB Ports Operating Temperature Power Source Power Adapter Input Power Adapter Output USB 2.0, USB Hi-Speed Certified 7 0 °C - 40 °C Self-powered AC 100 V - 240 V, 50 Hz/60 Hz DC 5 V/5 A 15
Technical Specifications Adaptec USB 2 Hi-Speed 4-Port Hub (XHub 4 and XHub 4 Plus) USB Compliant Version Number of USB Ports Operating Temperature Power Source Power Adapter Input Power Adapter Output USB 2.0, USB Hi-Speed Certified 4 0 °C - 40 °C Self-powered AC 100 V - 240 V, 50 Hz/60 Hz DC 5 V/2.5 A Adaptec USB 2 Hi-Speed 7-Port Hub (XHub 7 Plus) USB Compliant Version Number of USB Ports Operating Temperature Power Source Power Adapter Input Power Adapter Output USB 2.0, USB Hi-Speed Certified 7 0 °C - 40 °C Self-powered AC 100 V - 240 V, 50 Hz/60 Hz DC 5 V/5 A 15
Quick Start Guide
Page 18
... of your question to 5:00 p.m., Pacific Time. to Adaptec's Technical Support Specialists at http://ask.adaptec.com. I Visit our Web site at http://ask.adaptec.com for articles, troubleshooting tips, and frequently asked questions for your TSID. Adaptec Customer Support If you have your product and support status. If you need your product. Technical Support Identification (TSID) Number I Search the Adaptec Support Knowledgebase (ASK) at http://www...
... of your question to 5:00 p.m., Pacific Time. to Adaptec's Technical Support Specialists at http://ask.adaptec.com. I Visit our Web site at http://ask.adaptec.com for articles, troubleshooting tips, and frequently asked questions for your TSID. Adaptec Customer Support If you have your product and support status. If you need your product. Technical Support Identification (TSID) Number I Search the Adaptec Support Knowledgebase (ASK) at http://www...
Quick Start Guide
Page 19
...Technical Support at +852 2869 7100. 18 To expedite your service, have your computer in front of the following numbers, Monday to Thursday, 10:00 to 12:30 and 13:30 to 16:30, Central European Time: I English: +32 2 352 3470 I To order Adaptec products, including accessories and cables, ... . To expedite your service, have your computer in front of you . I German: To speak with a Technical Support Specialist, call +32 11 300 379. I Visit our Web site at http://www.adaptec-europe.com. Hong Kong and China I Visit our Web site at http://www.adaptec.com. to Friday, 10:00...
...Technical Support at +852 2869 7100. 18 To expedite your service, have your computer in front of the following numbers, Monday to Thursday, 10:00 to 12:30 and 13:30 to 16:30, Central European Time: I English: +32 2 352 3470 I To order Adaptec products, including accessories and cables, ... . To expedite your service, have your computer in front of you . I German: To speak with a Technical Support Specialist, call +32 11 300 379. I Visit our Web site at http://www.adaptec-europe.com. Hong Kong and China I Visit our Web site at http://www.adaptec.com. to Friday, 10:00...
Quick Start Guide
Page 23
...or distribute any form, on only one computer at any given time. (Different license terms and fees are applicable for networked or multiple user applications.) As a specific condition of the content. 2. Use the Software on a single computer system, which may not decompile, reverse ... and conditions: 1. You may be used in this license, you agree to support such use the Software in time sharing applications. In return for use by Adaptec ("Software"), and the related documentation, you agree to use the Software in a computer service business, including in compliance with all...
...or distribute any form, on only one computer at any given time. (Different license terms and fees are applicable for networked or multiple user applications.) As a specific condition of the content. 2. Use the Software on a single computer system, which may not decompile, reverse ... and conditions: 1. You may be used in this license, you agree to support such use the Software in time sharing applications. In return for use by Adaptec ("Software"), and the related documentation, you agree to use the Software in a computer service business, including in compliance with all...

Quick Start Guide
Page 24
... written consent of delivery to preclude access of Software. THE FOREGOING STATES THE SOLE AND EXCLUSIVE REMEDIES ADAPTEC AND ITS LICENSORS WILL PROVIDE FOR BREACH OF WARRANTY. Term. YOU MAY NOT MODIFY, ADAPT, TRANSLATE, RENT, LEASE, LOAN, RESELL FOR PROFIT, DISTRIBUTE, NETWORK OR CREATE DERIVATIVE WORKS BASED UPON THE SOFTWARE OR ANY PART THEREOF. 3. Limited Warranty. You further agree...
... written consent of delivery to preclude access of Software. THE FOREGOING STATES THE SOLE AND EXCLUSIVE REMEDIES ADAPTEC AND ITS LICENSORS WILL PROVIDE FOR BREACH OF WARRANTY. Term. YOU MAY NOT MODIFY, ADAPT, TRANSLATE, RENT, LEASE, LOAN, RESELL FOR PROFIT, DISTRIBUTE, NETWORK OR CREATE DERIVATIVE WORKS BASED UPON THE SOFTWARE OR ANY PART THEREOF. 3. Limited Warranty. You further agree...

Quick Start Guide
Page 25
..., use , reproduction or disclosure is free from state to the restrictions set forth in violation of a GSA contract: use , duplication or disclosure by using the Software you may also have read this Agreement, understand it is the complete and exclusive statement of Adaptec and...LOST PROFITS, LOST SAVINGS, OR LOSS OF DATA, EVEN IF ADAPTEC OR A LICENSOR HAS BEEN ADVISED OF THE POSSIBILITY OF SUCH DAMAGES, OR FOR ANY CLAIM BY ANY OTHER PARTY. Government Restricted Rights. You acknowledge that by the Government is returned to be refunded. 9. This warranty gives you specific...
..., use , reproduction or disclosure is free from state to the restrictions set forth in violation of a GSA contract: use , duplication or disclosure by using the Software you may also have read this Agreement, understand it is the complete and exclusive statement of Adaptec and...LOST PROFITS, LOST SAVINGS, OR LOSS OF DATA, EVEN IF ADAPTEC OR A LICENSOR HAS BEEN ADVISED OF THE POSSIBILITY OF SUCH DAMAGES, OR FOR ANY CLAIM BY ANY OTHER PARTY. Government Restricted Rights. You acknowledge that by the Government is returned to be refunded. 9. This warranty gives you specific...
Quick Start Guide
Page 27
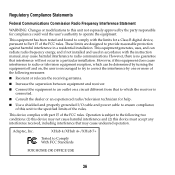
...residential installation. Adaptec, Inc. Regulatory Compliance Statements Federal Communications Commission Radio Frequency Interference Statement WARNING: Changes or modifications to this unit to the specified limits of the rules. This equipment has been tested and found to comply with the instruction manual, ...cable and power cable to ensure compliance of the FCC rules. This device complies with part 15 of this unit not expressly approved by turning the equipment off and on a circuit different from that to which can radiate radio frequency energy, and if not installed and used...
...residential installation. Adaptec, Inc. Regulatory Compliance Statements Federal Communications Commission Radio Frequency Interference Statement WARNING: Changes or modifications to this unit to the specified limits of the rules. This equipment has been tested and found to comply with the instruction manual, ...cable and power cable to ensure compliance of the FCC rules. This device complies with part 15 of this unit not expressly approved by turning the equipment off and on a circuit different from that to which can radiate radio frequency energy, and if not installed and used...