User Manual
Page 2
...supplementary documents and publications. All correspondence concerning your computer. Acer LCD Monitor User Guide Model number Serial number Date of purchase Place of purchase Acer and the Acer logo are registered trademarks of Acer Incorporated. Record the model number, serial number, purchase date...any means, electronically, mechanically, by photocopy, recording or otherwise, without obligation to the information in the space provided below. Acer LCD Monitor User Guide Original Issue: 4/2016 Changes may be reproduced, stored in a retrieval system, or transmitted, in any form...
...supplementary documents and publications. All correspondence concerning your computer. Acer LCD Monitor User Guide Model number Serial number Date of purchase Place of purchase Acer and the Acer logo are registered trademarks of Acer Incorporated. Record the model number, serial number, purchase date...any means, electronically, mechanically, by photocopy, recording or otherwise, without obligation to the information in the space provided below. Acer LCD Monitor User Guide Original Issue: 4/2016 Changes may be reproduced, stored in a retrieval system, or transmitted, in any form...
User Manual
Page 3
... following are normal with the LCD monitor and do not indicate a problem. • Due to the nature of the LCD screen, an afterimage ... the product. In this document for hours. Cleaning your safety and comfort Safety instructions Read these guidelines when cleaning the monitor: • Always unplug the monitor before cleaning. • Use a soft cloth to make sure the flicker disappears. • You may remain after ...• The LCD screen has 99.99% or more effective pixels. Turn off the power switch for your monitor Please carefully follow these instructions carefully.
... following are normal with the LCD monitor and do not indicate a problem. • Due to the nature of the LCD screen, an afterimage ... the product. In this document for hours. Cleaning your safety and comfort Safety instructions Read these guidelines when cleaning the monitor: • Always unplug the monitor before cleaning. • Use a soft cloth to make sure the flicker disappears. • You may remain after ...• The LCD screen has 99.99% or more effective pixels. Turn off the power switch for your monitor Please carefully follow these instructions carefully.
User Manual
Page 4
... power cord from overheating. This product should be used for this product through cabinet slots as possible. When you plug the power cord into this monitor, do not increase it under sporting, exercising, or any kind into is provided. • Never push objects of time listening to music at high volume...
... power cord from overheating. This product should be used for this product through cabinet slots as possible. When you plug the power cord into this monitor, do not increase it under sporting, exercising, or any kind into is provided. • Never push objects of time listening to music at high volume...

User Manual
Page 7
... section provides tips for comfortable use Computer users may occasionally misfire or appear as black or red dots. Users are also at risk of the monitor, using a footrest, or raising your comfort zone by pushing the power button. Nevertheless, some pixels may complain of eyestrain and headaches after long hours of...
... section provides tips for comfortable use Computer users may occasionally misfire or appear as black or red dots. Users are also at risk of the monitor, using a footrest, or raising your comfort zone by pushing the power button. Nevertheless, some pixels may complain of eyestrain and headaches after long hours of...

User Manual
Page 8
... incorrect glasses or contact lenses, glare, excessive room lighting, poorly focused screens, very small typefaces and low-contrast displays could stress your eyes from the monitor and focusing on how to reduce eyestrain. Eyes • Rest your eyes frequently. • Give your eyes regular breaks by using drapes, shades or blinds...
... incorrect glasses or contact lenses, glare, excessive room lighting, poorly focused screens, very small typefaces and low-contrast displays could stress your eyes from the monitor and focusing on how to reduce eyestrain. Eyes • Rest your eyes frequently. • Give your eyes regular breaks by using drapes, shades or blinds...

User Manual
Page 11
...-298-4000 254-298-4147 English Acer America Corporation 333 West San Carlos St., San Jose Suite 1500 CA 95110, U. S. Operation is subject to the following local Manufacturer /Importer ... Federal Communications Commission Declaration of Conformity This device complies with Part 15 of Responsible Party: Contact Person: Phone No.: Fax No.: LCD Monitor XR342CK/XR382CQK XR342CK/XR382CQK xxxxxx ("x" = 0~9, a ~ z, or A ~ Z) Acer America Corporation 333 West San Carlos St. A. S. The following two conditions: (1) this device may not cause harmful interference, and (2) this declaration: ...
...-298-4000 254-298-4147 English Acer America Corporation 333 West San Carlos St., San Jose Suite 1500 CA 95110, U. S. Operation is subject to the following local Manufacturer /Importer ... Federal Communications Commission Declaration of Conformity This device complies with Part 15 of Responsible Party: Contact Person: Phone No.: Fax No.: LCD Monitor XR342CK/XR382CQK XR342CK/XR382CQK xxxxxx ("x" = 0~9, a ~ z, or A ~ Z) Acer America Corporation 333 West San Carlos St. A. S. The following two conditions: (1) this device may not cause harmful interference, and (2) this declaration: ...
User Manual
Page 12
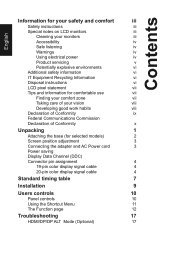
English Contents Information for your safety and comfort iii Safety instructions iii Special notes on LCD monitors iii Cleaning your monitors iii Accessibility iv Safe listening iv Warnings iv Using electrical power iv Product servicing v Potentially explosive environments vi Additional safety information vi IT Equipment Recycling ...
English Contents Information for your safety and comfort iii Safety instructions iii Special notes on LCD monitors iii Cleaning your monitors iii Accessibility iv Safe listening iv Warnings iv Using electrical power iv Product servicing v Potentially explosive environments vi Additional safety information vi IT Equipment Recycling ...

User Manual
Page 13
English Unpacking Please check that the following items are present when you unpack the box, and save the packing materials in case you need to ship or transport the monitor in the future. LCD monitor Quick start guide AC Adapter XR342CK/XR382CQK DP Cable (Optional) HDMI cable (Optional) AC Power cord USB 3.1 Type C-C cable (Optional) MHL cable (Optional) Wall mount BKT Headset hook
English Unpacking Please check that the following items are present when you unpack the box, and save the packing materials in case you need to ship or transport the monitor in the future. LCD monitor Quick start guide AC Adapter XR342CK/XR382CQK DP Cable (Optional) HDMI cable (Optional) AC Power cord USB 3.1 Type C-C cable (Optional) MHL cable (Optional) Wall mount BKT Headset hook
User Manual
Page 14
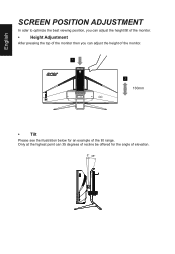
English SCREEN POSITION ADJUSTMENT In oder to optimize the best viewing position, you can adjust the height/tilt of the monitor. • Height Adjustment After pressing the top of the monitor then you can 35 degrees of recline be offered for an example of elevation. 5° 35° Only at the highest point can adjust the height of the monitor. 1 2 130mm • Tilt Please see the illustration below for the angle of the tilt range.
English SCREEN POSITION ADJUSTMENT In oder to optimize the best viewing position, you can adjust the height/tilt of the monitor. • Height Adjustment After pressing the top of the monitor then you can 35 degrees of recline be offered for an example of elevation. 5° 35° Only at the highest point can adjust the height of the monitor. 1 2 130mm • Tilt Please see the illustration below for the angle of the tilt range.

User Manual
Page 15
... plug rated 10 A/125 V. • For units using 220/240 V AC: Use a cord set should have the appropriate safety approvals for your area. • The monitor has a universal power supply that the power cord you use is the correct type required for the country in either 100/120 V AC or 220...
... plug rated 10 A/125 V. • For units using 220/240 V AC: Use a cord set should have the appropriate safety approvals for your area. • The monitor has a universal power supply that the power cord you use is the correct type required for the country in either 100/120 V AC or 220...
User Manual
Page 16
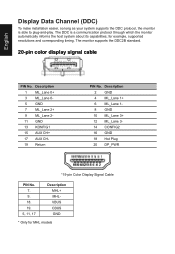
English Display Data Channel (DDC) To make installation easier, so long as your system supports the DDC protocol, the monitor is a communication protocol through which the monitor automatically informs the host system about its capabilities; Description 1 ML_Lane 0+ 3 ML_Lane 05 GND 7 ML_Lane 2+ 9 ML_Lane 211 GND 13 KONFIG1 15 ...9. 18. 19. 5, 11, 17 Description MHL+ MHLVBUS CBUS GND * Only for example, supported resolutions and corresponding timing. for MHL models The monitor supports the DDC2B standard. 20-pin color display signal cable PIN No. The DDC is able to plug-and-play.
English Display Data Channel (DDC) To make installation easier, so long as your system supports the DDC protocol, the monitor is a communication protocol through which the monitor automatically informs the host system about its capabilities; Description 1 ML_Lane 0+ 3 ML_Lane 05 GND 7 ML_Lane 2+ 9 ML_Lane 211 GND 13 KONFIG1 15 ...9. 18. 19. 5, 11, 17 Description MHL+ MHLVBUS CBUS GND * Only for example, supported resolutions and corresponding timing. for MHL models The monitor supports the DDC2B standard. 20-pin color display signal cable PIN No. The DDC is able to plug-and-play.
User Manual
Page 21
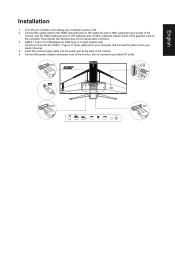
...optional) and /or DP (optional) and /or MHL (optional) output socket of the graphics card on the signal cable connector. 3. Insert the monitor power cable into the power port at the back of the USB 3.1 Type C-C cable (optional) to your computer and connect the other end ...the computer. USB 3.1 Type C-C Cable(Optional, USB Type C-C input models only) Connect one end of the monitor. 5. MHL USB DP English Installation 1. Connect the power adapter and power cord to the monitor, then to your computer's power cord. 2. Turn off your computer and unplug your electric devices. 4.
...optional) and /or DP (optional) and /or MHL (optional) output socket of the graphics card on the signal cable connector. 3. Insert the monitor power cable into the power port at the back of the USB 3.1 Type C-C cable (optional) to your computer and connect the other end ...the computer. USB 3.1 Type C-C Cable(Optional, USB Type C-C input models only) Connect one end of the monitor. 5. MHL USB DP English Installation 1. Connect the power adapter and power cord to the monitor, then to your computer's power cord. 2. Turn off your computer and unplug your electric devices. 4.
User Manual
Page 22
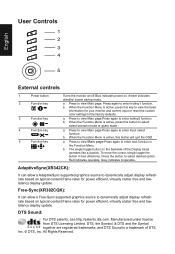
.... English User Controls 1 2 3 4 5 External controls 1 Power button 2 Function key / 3 Function key / 4 Function key /X 5 Function key / Turns the monitor on/off.Blue indicates power on the backside of DTS, Inc. © DTS, Inc. b. b. DTS, the Symbol, & DTS and the Symbol together are registered trademarks... typical content frame rates for power efficient, virtually stutter free and lowlatency display update. a. Free-Sync(XR382CQK): It can allow a Free-Sync supported graphics source to view Main page. Manufactured under license from DTS Licensing Limited.
.... English User Controls 1 2 3 4 5 External controls 1 Power button 2 Function key / 3 Function key / 4 Function key /X 5 Function key / Turns the monitor on/off.Blue indicates power on the backside of DTS, Inc. © DTS, Inc. b. b. DTS, the Symbol, & DTS and the Symbol together are registered trademarks... typical content frame rates for power efficient, virtually stutter free and lowlatency display update. a. Free-Sync(XR382CQK): It can allow a Free-Sync supported graphics source to view Main page. Manufactured under license from DTS Licensing Limited.
User Manual
Page 23
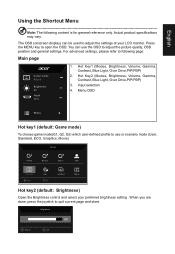
..., Graphics, Movie) Modes Action Racing Sports User Standard Move ECO OK Graphics Movie Hot key2 (default: Brightness) Open the Brightness control and select your LCD monitor. You can be used to open the OSD. Input selection 4. Menu OSD Menu Hot key1 (default: Game mode) To choose game mode(G1, G2, G3...
..., Graphics, Movie) Modes Action Racing Sports User Standard Move ECO OK Graphics Movie Hot key2 (default: Brightness) Open the Brightness control and select your LCD monitor. You can be used to open the OSD. Input selection 4. Menu OSD Menu Hot key1 (default: Game mode) To choose game mode(G1, G2, G3...
User Manual
Page 26
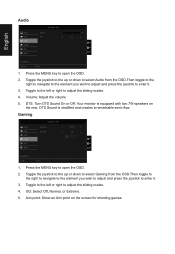
... press the joystick to adjust the sliding scales. 4. English Audio Picture Color Audio Gaming OSD System Game Mode - Move Enter 1. Volume: Adjust the volume 5. Your monitor is stratified and creates a remarkable sonic flow. Toggle to the left or right to enter it . 3. OD: Select Off, Normal, or Extreme. 5. User Volume DTS...
... press the joystick to adjust the sliding scales. 4. English Audio Picture Color Audio Gaming OSD System Game Mode - Move Enter 1. Volume: Adjust the volume 5. Your monitor is stratified and creates a remarkable sonic flow. Toggle to the left or right to enter it . 3. OD: Select Off, Normal, or Extreme. 5. User Volume DTS...
User Manual
Page 28
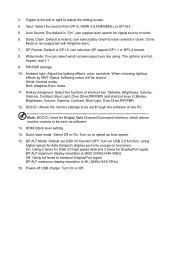
... is extend, can support auto search for Display Data Channel/Command Interface, which screen aspect you are Full, Aspect, and 1:1. 9. DDC/CI: Allows the monitor settings to be set USB 3.0 function OFF. DP ALT Mode: Default set through the software on to be shown: White: Normal mode. DP ALT maximum... signal. Power-off USB charge: Turn On or Off. Quick start mode: Select Off or On. Clone Mode is DP1.2, can select which allows monitor controls to speed up boot speed. 15. 3. Toggle to the left or right to transport DisplayPort signal. Red: Adaptive-Sync mode. 11.
... is extend, can support auto search for Display Data Channel/Command Interface, which screen aspect you are Full, Aspect, and 1:1. 9. DDC/CI: Allows the monitor settings to be set USB 3.0 function OFF. DP ALT Mode: Default set through the software on to be shown: White: Normal mode. DP ALT maximum... signal. Power-off USB charge: Turn On or Off. Quick start mode: Select Off or On. Clone Mode is DP1.2, can select which allows monitor controls to speed up boot speed. 15. 3. Toggle to the left or right to transport DisplayPort signal. Red: Adaptive-Sync mode. 11.
User Manual
Page 29
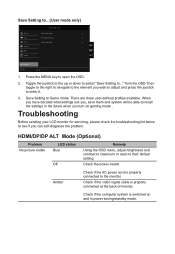
..., adjust brightness and contrast to maximum or reset to open the OSD. 2. Check if the computer system is properly connected at the back of monitor. Press the MENU key to their default setting. Toggle the joystick to the up or down to select "Save Setting to ...(User mode only)...saving/standby mode. Check if the video signal cable is switched on gaming mode . Troubleshooting Before sending your LCD monitor for servicing, please check the troubleshooting list below to the monitor. Amber Check if the AC power cord is properly connected to see if you can self-diagnose the problem.
..., adjust brightness and contrast to maximum or reset to open the OSD. 2. Check if the computer system is properly connected at the back of monitor. Press the MENU key to their default setting. Toggle the joystick to the up or down to select "Save Setting to ...(User mode only)...saving/standby mode. Check if the video signal cable is switched on gaming mode . Troubleshooting Before sending your LCD monitor for servicing, please check the troubleshooting list below to the monitor. Amber Check if the AC power cord is properly connected to see if you can self-diagnose the problem.


