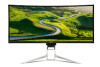
User Manual
Page 3
... recovered slowly by changing the image or turning off the power switch and then turn it on LCD monitors The following are normal with the LCD monitor and do not indicate a problem. • Due to make sure the flicker disappears. • You may flicker during initial use . • The LCD screen has 99.99% or more effective pixels. Turn off the power switch for your monitor Please carefully follow these instructions carefully. It...
... recovered slowly by changing the image or turning off the power switch and then turn it on LCD monitors The following are normal with the LCD monitor and do not indicate a problem. • Due to make sure the flicker disappears. • You may flicker during initial use . • The LCD screen has 99.99% or more effective pixels. Turn off the power switch for your monitor Please carefully follow these instructions carefully. It...
User Manual
Page 4
... the power cord. If you plug the power cord into this product through cabinet slots as possible. English Accessibility Be sure that could be seriously damaged. • Slots and openings are not sure of the type of power available, consult your ears have adjusted. • Limit the amount of time listening to music at high volume. • Avoid turning up the volume...
... the power cord. If you plug the power cord into this product through cabinet slots as possible. English Accessibility Be sure that could be seriously damaged. • Slots and openings are not sure of the type of power available, consult your ears have adjusted. • Limit the amount of time listening to music at high volume. • Avoid turning up the volume...
User Manual
Page 5
... with the supplied power supply cord set , make sure that the total ampere rating of the branch circuit rating. If power strips are used with this product, make sure that the new power cord meets the following the operating instructions The grounding pin is properly grounded before inserting the power cord plug. Note: The grounding pin also provides good protection from the wall outlet and refer servicing to service this...
... with the supplied power supply cord set , make sure that the total ampere rating of the branch circuit rating. If power strips are used with this product, make sure that the new power cord meets the following the operating instructions The grounding pin is properly grounded before inserting the power cord plug. Note: The grounding pin also provides good protection from the wall outlet and refer servicing to service this...

User Manual
Page 6
... provide the best working procedures to this electronic device into the trash when discarding. Potentially explosive environments Switch off your device in damage and will often require extensive work by the operating instructions, since improper adjustment of our products. Areas with a potentially explosive atmosphere and obey all signs and instructions. English Note: Adjust only those controls that are covered by a qualified...
... provide the best working procedures to this electronic device into the trash when discarding. Potentially explosive environments Switch off your device in damage and will often require extensive work by the operating instructions, since improper adjustment of our products. Areas with a potentially explosive atmosphere and obey all signs and instructions. English Note: Adjust only those controls that are covered by a qualified...

User Manual
Page 7
... long hours of working conditions, personal health and other factors greatly increase the risk of the monitor, using a footrest, or raising your comfort zone by pushing the power button. Incorrect computer usage may complain of a computer. The following section provides tips for power management: • Activate display's Sleep mode within 15 minutes of user inactivity. • Activate computer's Sleep mode within 30...
... long hours of working conditions, personal health and other factors greatly increase the risk of the monitor, using a footrest, or raising your comfort zone by pushing the power button. Incorrect computer usage may complain of a computer. The following section provides tips for power management: • Activate display's Sleep mode within 15 minutes of user inactivity. • Activate computer's Sleep mode within 30...

User Manual
Page 8
... room lighting, poorly focused screens, very small typefaces and low-contrast displays could stress your eyes regular breaks by using drapes, shades or blinds • using a task light • changing the display's viewing angle • using a glare-reduction filter • using a display visor, such as a piece of cardboard extended from drying out. The following work habits to an awkward viewing angle. • Avoid looking at bright light sources...
... room lighting, poorly focused screens, very small typefaces and low-contrast displays could stress your eyes regular breaks by using drapes, shades or blinds • using a task light • changing the display's viewing angle • using a glare-reduction filter • using a display visor, such as a piece of cardboard extended from drying out. The following work habits to an awkward viewing angle. • Avoid looking at bright light sources...
User Manual
Page 12
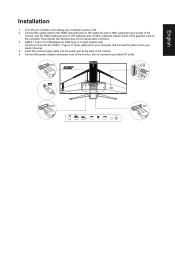
... Developing good work habits viii Declaration of Conformity ix Federal Communications Commission Declaration of Conformity x Unpacking 1 Attaching the base (for selected models) 2 Screen position adjustment 3 Connecting the adapter and AC Power cord 3 Power saving Display Data Channel (DDC) Connector pin assignment 4 19-pin color display signal cable 4 20-pin color display signal cable 4 Standard timing table 7 Installation 9 Users controls 10 Panel controls 10 Using the Shortcut Menu 11 The Function page 12 Troubleshooting 17 HDMI/DP/DP ALT Mode (Optional...
... Developing good work habits viii Declaration of Conformity ix Federal Communications Commission Declaration of Conformity x Unpacking 1 Attaching the base (for selected models) 2 Screen position adjustment 3 Connecting the adapter and AC Power cord 3 Power saving Display Data Channel (DDC) Connector pin assignment 4 19-pin color display signal cable 4 20-pin color display signal cable 4 Standard timing table 7 Installation 9 Users controls 10 Panel controls 10 Using the Shortcut Menu 11 The Function page 12 Troubleshooting 17 HDMI/DP/DP ALT Mode (Optional...
User Manual
Page 14
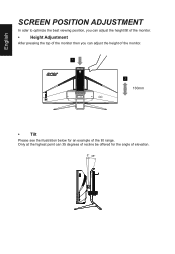
Only at the highest point can adjust the height of the monitor. 1 2 130mm • Tilt Please see the illustration below for the angle of the tilt range. English SCREEN POSITION ADJUSTMENT In oder to optimize the best viewing position, you can adjust the height/tilt of the monitor. • Height Adjustment After pressing the top of the monitor then you can 35 degrees of recline be offered for an example of elevation. 5° 35°
Only at the highest point can adjust the height of the monitor. 1 2 130mm • Tilt Please see the illustration below for the angle of the tilt range. English SCREEN POSITION ADJUSTMENT In oder to optimize the best viewing position, you can adjust the height/tilt of the monitor. • Height Adjustment After pressing the top of the monitor then you can 35 degrees of recline be offered for an example of elevation. 5° 35°

User Manual
Page 15
.... English Connecting the adapter and AC Power cord • Check first to make sure that allows operation in which the equipment will be installed. State ON Power Saving Mode LED Light Blue Amber The power saving states will be kept until a control signal has been detected or the keyboard or mouse is required. • Plug one end of H05VV-F cord and plug rated 10 A/250 V. The cord set consisting of the AC power cord to the Adapter...
.... English Connecting the adapter and AC Power cord • Check first to make sure that allows operation in which the equipment will be installed. State ON Power Saving Mode LED Light Blue Amber The power saving states will be kept until a control signal has been detected or the keyboard or mouse is required. • Plug one end of H05VV-F cord and plug rated 10 A/250 V. The cord set consisting of the AC power cord to the Adapter...
User Manual
Page 16
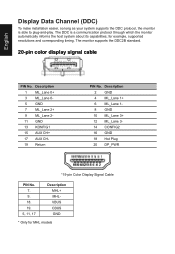
... CH+ 17 AUX CH19 Return PIN No. English Display Data Channel (DDC) To make installation easier, so long as your system supports the DDC protocol, the monitor is a communication protocol through which the monitor automatically informs the host system about its capabilities; The DDC is able to plug-and-play. The monitor supports the DDC2B standard. 20-pin color display signal cable PIN No.
... CH+ 17 AUX CH19 Return PIN No. English Display Data Channel (DDC) To make installation easier, so long as your system supports the DDC protocol, the monitor is a communication protocol through which the monitor automatically informs the host system about its capabilities; The DDC is able to plug-and-play. The monitor supports the DDC2B standard. 20-pin color display signal cable PIN No.
User Manual
Page 17
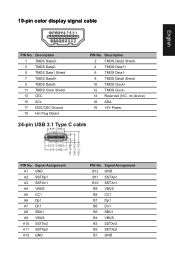
on device) 16 SDA 18 +5V Power 24-pin USB 3.1 Type C cable PIN No. Signal Assignment B12 GND B11 SSTXp1 B10 SSTXn1 B9 VBUS B8 CC1 B7 Dp1 B6 Dn1 B5 SBU1 B4 VBUS B3 SSTXn2 B2 SSTXp2 B1 GND ... Data25 TMDS Data1 Shield 7 TMDS Data0+ 9 TMDS Data011 TMDS Clock Shield 13 CEC 15 SCL 17 DDC/CEC Ground 19 Hot Plug Detect PIN No. English 19-pin color display signal cable PIN No. Signal Assignment A1 GND A2 SSTXp1 A3 SSTXn1 A4 VBUS A5 CC1 A6 Dp1 A7 Dn1 A8 SBU1 A9 VBUS A10 SSTXn2 A11...
on device) 16 SDA 18 +5V Power 24-pin USB 3.1 Type C cable PIN No. Signal Assignment B12 GND B11 SSTXp1 B10 SSTXn1 B9 VBUS B8 CC1 B7 Dp1 B6 Dn1 B5 SBU1 B4 VBUS B3 SSTXn2 B2 SSTXp2 B1 GND ... Data25 TMDS Data1 Shield 7 TMDS Data0+ 9 TMDS Data011 TMDS Clock Shield 13 CEC 15 SCL 17 DDC/CEC Ground 19 Hot Plug Detect PIN No. English 19-pin color display signal cable PIN No. Signal Assignment A1 GND A2 SSTXp1 A3 SSTXn1 A4 VBUS A5 CC1 A6 Dp1 A7 Dn1 A8 SBU1 A9 VBUS A10 SSTXn2 A11...
User Manual
Page 21
... card on the signal cable connector. 3. Connect the power adapter and power cord to the monitor, then to your computer's power cord. 2. MHL USB DP Then tighten the thumbscrews on the computer. USB 3.1 Type C-C Cable(Optional, USB Type C-C input models only) Connect one end of the monitor. 5. Insert the monitor power cable into the power port at the back of the USB 3.1 Type C-C cable (optional) to your computer and connect the other end to a properly grounded AC outlet. Turn...
... card on the signal cable connector. 3. Connect the power adapter and power cord to the monitor, then to your computer's power cord. 2. MHL USB DP Then tighten the thumbscrews on the computer. USB 3.1 Type C-C Cable(Optional, USB Type C-C input models only) Connect one end of the monitor. 5. Insert the monitor power cable into the power port at the back of the USB 3.1 Type C-C cable (optional) to your computer and connect the other end to a properly grounded AC outlet. Turn...
User Manual
Page 22
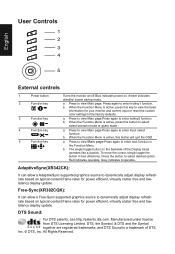
.../ power saving mode. Press to view Main page.Press again to view Main page. English User Controls 1 2 3 4 5 External controls 1 Power button 2 Function key / 3 Function key / 4 Function key /X 5 Function key / Turns the monitor on/off.Blue indicates power on typical content frame rates for your monitor and current input or reset the custom color settings to select select scenario mode or game mode . b. Press to enter hotkey2 function. a. Free-Sync(XR382CQK): It can allow a Free-Sync supported graphics source to dynamically adjust display refresh rate based...
.../ power saving mode. Press to view Main page.Press again to view Main page. English User Controls 1 2 3 4 5 External controls 1 Power button 2 Function key / 3 Function key / 4 Function key /X 5 Function key / Turns the monitor on/off.Blue indicates power on typical content frame rates for your monitor and current input or reset the custom color settings to select select scenario mode or game mode . b. Press to enter hotkey2 function. a. Free-Sync(XR382CQK): It can allow a Free-Sync supported graphics source to dynamically adjust display refresh rate based...
User Manual
Page 23
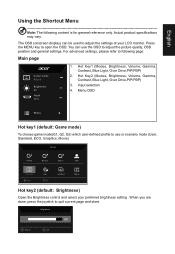
... Hot key2 (default: Brightness) Open the Brightness control and select your LCD monitor. Hot Key1 (Modes, Brightness, Volume, Gamma, Contrast, Blue Light, Over Drive,PIP/PBP) 2. Brightness 80 Adjust OK Press the MENU key to quit current page and store. When you are done, press the joystick to open the OSD. Actual product specifications may vary. For advanced settings, please refer to adjust the picture quality, OSD position and general settings. English Using the Shortcut Menu Note: The...
... Hot key2 (default: Brightness) Open the Brightness control and select your LCD monitor. Hot Key1 (Modes, Brightness, Volume, Gamma, Contrast, Blue Light, Over Drive,PIP/PBP) 2. Brightness 80 Adjust OK Press the MENU key to quit current page and store. When you are done, press the joystick to open the OSD. Actual product specifications may vary. For advanced settings, please refer to adjust the picture quality, OSD position and general settings. English Using the Shortcut Menu Note: The...
User Manual
Page 24
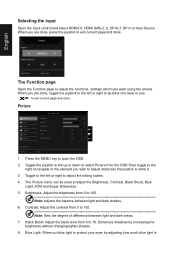
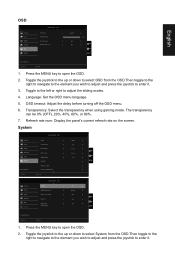
... input Open the Input control and select HDMI2.0, HDMI (MHL2.1), DP ALT, DP In or Auto Source. When you are done, press the joystick to 100 Note: Sets the degree of difference between light and dark shades. 6. Black Boost: Adjust the black level from the OSD.Then toggle to the right to navigate to adjust the Brightness, Contrast, Black Boost, Blue Light, ACM and Super Sharpness. 5. Picture Picture Color Audio Gaming OSD System Game Mode...
... input Open the Input control and select HDMI2.0, HDMI (MHL2.1), DP ALT, DP In or Auto Source. When you are done, press the joystick to 100 Note: Sets the degree of difference between light and dark shades. 6. Black Boost: Adjust the black level from the OSD.Then toggle to the right to navigate to adjust the Brightness, Contrast, Black Boost, Blue Light, ACM and Super Sharpness. 5. Picture Picture Color Audio Gaming OSD System Game Mode...
User Manual
Page 25
... Picture Color Audio Gaming OSD System Game Mode - You can simulate high-resolution images by boosting the pixel density of the original source to better color match with peripheral devices, such as printers and digital cameras. 7. 6-axis Hue: Adjust the red, green, blue, yellow, magenta and cyan hue. 8. 6-axis Saturate: Adjust the red, green, blue, yellow, magenta and cyan saturation. Move Enter 1. The default is warm. Color Picture Color Audio Gaming OSD System Save setting to open the OSD. 2. User...
... Picture Color Audio Gaming OSD System Game Mode - You can simulate high-resolution images by boosting the pixel density of the original source to better color match with peripheral devices, such as printers and digital cameras. 7. 6-axis Hue: Adjust the red, green, blue, yellow, magenta and cyan hue. 8. 6-axis Saturate: Adjust the red, green, blue, yellow, magenta and cyan saturation. Move Enter 1. The default is warm. Color Picture Color Audio Gaming OSD System Save setting to open the OSD. 2. User...
User Manual
Page 26
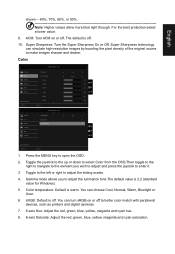
... it . 3. Your monitor is stratified and creates a remarkable sonic flow. User Picture Color Audio Gaming OSD System Over Drive Aim point Normal Off X Save setting to ... Press the MENU key to adjust the sliding scales. 4. Toggle to the left or right to open the OSD. 2. Move Enter 1. Volume: Adjust the volume 5. English Audio Picture Color Audio Gaming OSD System Game Mode - Gaming Game Mode - DTS Sound is equipped with two 7W speakers on the screen for shooting...
... it . 3. Your monitor is stratified and creates a remarkable sonic flow. User Picture Color Audio Gaming OSD System Over Drive Aim point Normal Off X Save setting to ... Press the MENU key to adjust the sliding scales. 4. Toggle to the left or right to open the OSD. 2. Move Enter 1. Volume: Adjust the volume 5. English Audio Picture Color Audio Gaming OSD System Game Mode - Gaming Game Mode - DTS Sound is equipped with two 7W speakers on the screen for shooting...
User Manual
Page 27
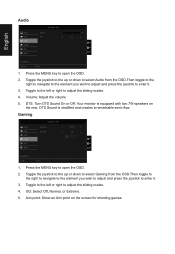
... the left or right to open the OSD. 2. System Game Mode - Move Input Auto Source Daisy Chian DP Format Wide Mode PIP/PBP Ambient Light Hot Key Assignment Enter MHL Off Clone DP 1.2 Full X Game Mode - Press the MENU key to ... User Picture Color Audio Gaming OSD System Save setting to open the OSD. 2. User Picture Color Audio Gaming OSD System DDC/CI HDMI Black Level Quick start mode USB 3.0 Power-off USB Charge On Nomal Off Off Off X Save setting to ... The transparency can...
... the left or right to open the OSD. 2. System Game Mode - Move Input Auto Source Daisy Chian DP Format Wide Mode PIP/PBP Ambient Light Hot Key Assignment Enter MHL Off Clone DP 1.2 Full X Game Mode - Press the MENU key to ... User Picture Color Audio Gaming OSD System Save setting to open the OSD. 2. User Picture Color Audio Gaming OSD System DDC/CI HDMI Black Level Quick start mode USB 3.0 Power-off USB Charge On Nomal Off Off Off X Save setting to ... The transparency can...
User Manual
Page 28
... display resolution is extend, can select which allows monitor controls to speed up boot speed. 15. Red: Adaptive-Sync mode. 11. DP ALT Mode: Default set through the software on USB 3.0 function, Using higher speed for DisplayPort signal. Power-off USB charge: Turn On or Off. When choosing lighting effects by MNT Status, following colors will be set USB 3.0 function OFF. HDMI Black level setting. 14. PIP/PBP settings 10. Daisy Chain: Default is QHD (3440x1440-30Hz). Input...
... display resolution is extend, can select which allows monitor controls to speed up boot speed. 15. Red: Adaptive-Sync mode. 11. DP ALT Mode: Default set through the software on USB 3.0 function, Using higher speed for DisplayPort signal. Power-off USB charge: Turn On or Off. When choosing lighting effects by MNT Status, following colors will be set USB 3.0 function OFF. HDMI Black level setting. 14. PIP/PBP settings 10. Daisy Chain: Default is QHD (3440x1440-30Hz). Input...
User Manual
Page 29
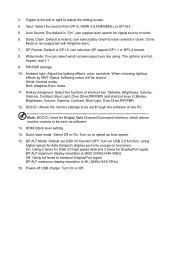
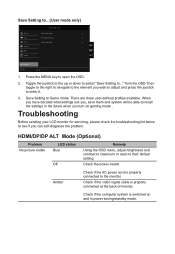
... the settings in the future when you turn on and in power saving/standby mode. Press the MENU key to ... User Picture Game Mode Action Color Game Mode Racting Audio Game Mode Sport Gaming OSD System X Save setting to open the OSD. 2. Move Enter 1. HDMI/DP/DP ALT Mode (Optional) Problem No picture visible LED status Blue Off Remedy Using the OSD menu, adjust brightness and contrast to maximum or reset to the monitor. Amber Check if the AC power cord is properly connected to their default setting.
... the settings in the future when you turn on and in power saving/standby mode. Press the MENU key to ... User Picture Game Mode Action Color Game Mode Racting Audio Game Mode Sport Gaming OSD System X Save setting to open the OSD. 2. Move Enter 1. HDMI/DP/DP ALT Mode (Optional) Problem No picture visible LED status Blue Off Remedy Using the OSD menu, adjust brightness and contrast to maximum or reset to the monitor. Amber Check if the AC power cord is properly connected to their default setting.

