

User Manual
Page 3
... fluorescent light, the screen may remain after switching the image, when the same image is recovered slowly by changing the image or turning off the power switch and then turn it on the desktop pattern you use . Keep this case, the screen is displayed for a few hours. It may include blemishes of 0.01% or less such as a missing pixel or a pixel lit all warnings and instructions marked on LCD monitors...
... fluorescent light, the screen may remain after switching the image, when the same image is recovered slowly by changing the image or turning off the power switch and then turn it on the desktop pattern you use . Keep this case, the screen is displayed for a few hours. It may include blemishes of 0.01% or less such as a missing pixel or a pixel lit all warnings and instructions marked on LCD monitors...
User Manual
Page 4
... without distortion. • After setting the volume level, do not be used with this product on an unstable cart, stand or table. Safe listening To protect your dealer or local power company. • Do not allow anything to rest on the power cord. iv Accessibility Be sure that the power outlet you plug the power cord into is easily accessible and...
... without distortion. • After setting the volume level, do not be used with this product on an unstable cart, stand or table. Safe listening To protect your dealer or local power company. • Do not allow anything to rest on the power cord. iv Accessibility Be sure that the power outlet you plug the power cord into is easily accessible and...
User Manual
Page 5
... need for details. v ampere rating of the equipment plugged into a non-grounded power outlet. If power strips are used, the load should not exceed 80% of the branch circuit rating. The plug only fits in performance, indicating a need to replace the power cord set . Warning! The overall system load must not exceed 80% of the power strip's input rating. • This product's power cord is equipped with the supplied power supply cord set , make...
... need for details. v ampere rating of the equipment plugged into a non-grounded power outlet. If power strips are used, the load should not exceed 80% of the branch circuit rating. The plug only fits in performance, indicating a need to replace the power cord set . Warning! The overall system load must not exceed 80% of the power strip's input rating. • This product's power cord is equipped with the supplied power supply cord set , make...

User Manual
Page 6
... and instructions. or where blasting operations are in fuel depots, storage and distribution areas; IT Equipment Recycling Information Acer is strongly committed to normal condition. vi Note: Adjust only those controls that are covered by a qualified technician to restore the product to environmental protection and views recycling, in the form of salvaging and disposal of used equipment...
... and instructions. or where blasting operations are in fuel depots, storage and distribution areas; IT Equipment Recycling Information Acer is strongly committed to normal condition. vi Note: Adjust only those controls that are covered by a qualified technician to restore the product to environmental protection and views recycling, in the form of salvaging and disposal of used equipment...

User Manual
Page 7
... as black or red dots. Tips and information for power management: • Activate display's Sleep mode within 15 minutes of user inactivity. • Activate computer's Sleep mode within 30 minutes of user inactivity....monitor, using a footrest, or raising your comfort zone by pushing the power button. Finding your comfort zone Find your sitting height to remove the strain on the recorded image and does not constitute a malfunction. The following tips: • refrain from Sleep mode by adjusting the viewing angle of physical injury. vii LCD pixel statement The LCD...
... as black or red dots. Tips and information for power management: • Activate display's Sleep mode within 15 minutes of user inactivity. • Activate computer's Sleep mode within 30 minutes of user inactivity....monitor, using a footrest, or raising your comfort zone by pushing the power button. Finding your comfort zone Find your sitting height to remove the strain on the recorded image and does not constitute a malfunction. The following tips: • refrain from Sleep mode by adjusting the viewing angle of physical injury. vii LCD pixel statement The LCD...

User Manual
Page 8
... or blinds • using a task light • changing the display's viewing angle • using a glare-reduction filter • using a display visor, such as open windows, for enhanced text readability and graphics clarity. • Eliminate glare and reflections by: • placing your display in such a way that the side faces the window or any light source • minimizing room light by looking at bright light sources, such as a piece...
... or blinds • using a task light • changing the display's viewing angle • using a glare-reduction filter • using a display visor, such as open windows, for enhanced text readability and graphics clarity. • Eliminate glare and reflections by: • placing your display in such a way that the side faces the window or any light source • minimizing room light by looking at bright light sources, such as a piece...

User Manual
Page 9
TABLE OF CONTENTS UNPACKING 1 ATTACHING / REMOVING THE BASE 2 SCREEN POSITION ADJUSTMENT 2 CONNECTING THE POWER CORD 3 SAFETY PRECAUTION 3 CLEANING YOUR MONITOR 3 POWER SAVING 4 DDC...4 CONNECTOR PIN ASSIGNMENT 5 STANDARD TIMING TABLE 8 INSTALLATION 10 MHL (Mobile High-Definition Link) (Only for MHL-input Models) .. 11 USER CONTROLS 12 TROUBLESHOOTING 19
TABLE OF CONTENTS UNPACKING 1 ATTACHING / REMOVING THE BASE 2 SCREEN POSITION ADJUSTMENT 2 CONNECTING THE POWER CORD 3 SAFETY PRECAUTION 3 CLEANING YOUR MONITOR 3 POWER SAVING 4 DDC...4 CONNECTOR PIN ASSIGNMENT 5 STANDARD TIMING TABLE 8 INSTALLATION 10 MHL (Mobile High-Definition Link) (Only for MHL-input Models) .. 11 USER CONTROLS 12 TROUBLESHOOTING 19

User Manual
Page 11
... monitor can adjust the tilt of the monitor as indicated by using both of your hands to optimize the best viewing position, you can be adjusted to 15 degrees up or 5 degrees down on a stable surface -- monitor stand arm. use a cloth to the Ensure that the base is locked onto the base. SCREEN POSITION ADJUSTMENT In order to hold the edges of the monitor by arrow below . Carefully place the monitor...
... monitor can adjust the tilt of the monitor as indicated by using both of your hands to optimize the best viewing position, you can be adjusted to 15 degrees up or 5 degrees down on a stable surface -- monitor stand arm. use a cloth to the Ensure that the base is locked onto the base. SCREEN POSITION ADJUSTMENT In order to hold the edges of the monitor by arrow below . Carefully place the monitor...
User Manual
Page 12
... be installed. The cord set should have the appropriate safety approvals for your area. This monitor has a universal power supply that the power cord you use of any other heavy object, on the face of the monitor. No user-adjustment is fragile. In order to prevent damage to the monitor, do not lift the monitor by its base. CONNECTING THE POWER CORD Check first to make sure...
... be installed. The cord set should have the appropriate safety approvals for your area. This monitor has a universal power supply that the power cord you use of any other heavy object, on the face of the monitor. No user-adjustment is fragile. In order to prevent damage to the monitor, do not lift the monitor by its base. CONNECTING THE POWER CORD Check first to make sure...
User Manual
Page 13
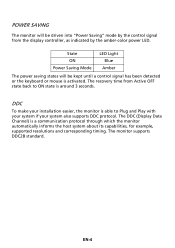
DDC To make your installation easier, the monitor is a communication protocol through which the monitor automatically informs the host system about its capabilities, for example, supported resolutions and corresponding timing. The monitor supports DDC2B standard. State ON Power Saving Mode LED Light Blue Amber The power saving states will be kept until a control signal has been detected or the keyboard or mouse is activated. EN-4 The DDC (Display Data Channel...
DDC To make your installation easier, the monitor is a communication protocol through which the monitor automatically informs the host system about its capabilities, for example, supported resolutions and corresponding timing. The monitor supports DDC2B standard. State ON Power Saving Mode LED Light Blue Amber The power saving states will be kept until a control signal has been detected or the keyboard or mouse is activated. EN-4 The DDC (Display Data Channel...

User Manual
Page 14
DDC Clock 18. TMDS Data 0/5 Shield 8. NC 10. TMDS Data 1/3 Shield 23. Logic Ground 4. NC 17. NC 24. Hot Plug Detect 5. DDC Data 19. TMDS Data2- 13. NC 9. TMDS Clock Shield 11. DDC TMDS Clock- * only for certain models EN-5 TMDS Data1- 21. TMDS Data 2/4 Shield 15. TMDS Data1+ 22. TMDS Data0- 6. CONNECTOR PIN ASSIGNMENT 24-Pin Color Display Signal Cable* PIN Meaning PIN Meaning 1. NC 2. TMDS Data2+ 14. +5V Power 3. NC 16. TMDS Data0+ 7. NC 20. TMDS Clock+ 12.
DDC Clock 18. TMDS Data 0/5 Shield 8. NC 10. TMDS Data 1/3 Shield 23. Logic Ground 4. NC 17. NC 24. Hot Plug Detect 5. DDC Data 19. TMDS Data2- 13. NC 9. TMDS Clock Shield 11. DDC TMDS Clock- * only for certain models EN-5 TMDS Data1- 21. TMDS Data 2/4 Shield 15. TMDS Data1+ 22. TMDS Data0- 6. CONNECTOR PIN ASSIGNMENT 24-Pin Color Display Signal Cable* PIN Meaning PIN Meaning 1. NC 2. TMDS Data2+ 14. +5V Power 3. NC 16. TMDS Data0+ 7. NC 20. TMDS Clock+ 12.

User Manual
Page 15
...-6 TMDS Clock- 13. Reserved (N.C. SDA 17. Hot Plug Detect PIN 7. 9. 18. 19. 5, 11, 17 * only for certain models 19-Pin Color Display Signal Cable* PIN Meaning 10. on device) 15. SCL 16. TMDS Data2 Shield 3. TMDS Data1+ 5. CEC 14. TMDS Data0+ 8. TMDS Data2- 4. DDC/CEC Ground 18. +5V Power 19. TMDS Clock+ 11. 19-Pin Color Display Signal Cable* PIN Meaning 1.
...-6 TMDS Clock- 13. Reserved (N.C. SDA 17. Hot Plug Detect PIN 7. 9. 18. 19. 5, 11, 17 * only for certain models 19-Pin Color Display Signal Cable* PIN Meaning 10. on device) 15. SCL 16. TMDS Data2 Shield 3. TMDS Data1+ 5. CEC 14. TMDS Data0+ 8. TMDS Data2- 4. DDC/CEC Ground 18. +5V Power 19. TMDS Clock+ 11. 19-Pin Color Display Signal Cable* PIN Meaning 1.

User Manual
Page 18
Note: The DisplayPort of XG270HU is purposely supporting the AMD FreeSync technology and targeting AMD graphic solutions. Only for MHL models Mode 1 2 3 4 5 6 7 8 9 10 11 12 Resolution 640 x 480 @60Hz 720 x 480p @60Hz 720 x 576p @50Hz 800 x 600 @60Hz 1024 x 768 @60Hz ...) x 576i @50Hz EN-9 For other GPUs, please contact the graphic card manufactures whether they can support or not. FreeSync supported AMD GPUs: AMD Radeon™ R7 260 series and R9 290 series graphic cards. Note: To experience optimized picture quality by HDMI or DisplayPort, set the refresh rate to 120Hz or 144Hz.
Note: The DisplayPort of XG270HU is purposely supporting the AMD FreeSync technology and targeting AMD graphic solutions. Only for MHL models Mode 1 2 3 4 5 6 7 8 9 10 11 12 Resolution 640 x 480 @60Hz 720 x 480p @60Hz 720 x 576p @50Hz 800 x 600 @60Hz 1024 x 768 @60Hz ...) x 576i @50Hz EN-9 For other GPUs, please contact the graphic card manufactures whether they can support or not. FreeSync supported AMD GPUs: AMD Radeon™ R7 260 series and R9 290 series graphic cards. Note: To experience optimized picture quality by HDMI or DisplayPort, set the refresh rate to 120Hz or 144Hz.
User Manual
Page 19
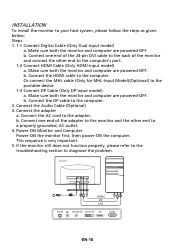
... adapter. Make sure both the monitor and computer are powered-OFF. Connect the AC cord to the portable device. 1-3 Connect DP Cable (Only DP-input model) a. Make sure both the monitor and computer are powered-OFF. Make sure both the monitor and computer are powered-OFF. b. Power-ON Monitor and Computer Power-ON the monitor first, then power-ON the computer. Connect the Audio Cable (Optional) 3. This sequence is very important. 5. DC-IN AUDIO-IN DVI...
... adapter. Make sure both the monitor and computer are powered-OFF. Connect the AC cord to the portable device. 1-3 Connect DP Cable (Only DP-input model) a. Make sure both the monitor and computer are powered-OFF. Make sure both the monitor and computer are powered-OFF. b. Power-ON Monitor and Computer Power-ON the monitor first, then power-ON the computer. Connect the Audio Cable (Optional) 3. This sequence is very important. 5. DC-IN AUDIO-IN DVI...
User Manual
Page 20
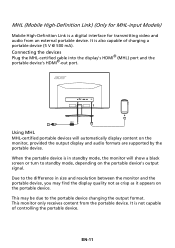
... signal. EN-11 DC-IN AUDIO-IN DVI-D IN DP HDMI MHL DC MHL Using MHL MHL-certified portable devices will show a black screen or turn to the portable device changing the output format. This monitor only receives content from an external portable device. MHL (Mobile High-Definition Link) (Only for MHL-input Models) Mobile High-Definition Link is a digital interface for transmitting video...
... signal. EN-11 DC-IN AUDIO-IN DVI-D IN DP HDMI MHL DC MHL Using MHL MHL-certified portable devices will show a black screen or turn to the portable device changing the output format. This monitor only receives content from an external portable device. MHL (Mobile High-Definition Link) (Only for MHL-input Models) Mobile High-Definition Link is a digital interface for transmitting video...

User Manual
Page 21
... active, press it to either Normal or Extreme mode. If the OSD is turned ON. OSD functions Press to enter a selection. Press the key to your preferred level. Press the Empowering key to open the Brightness control and set it to open the Acer eColor Management OSD and access the scenario modes. Lights up to indicate the power is active, press it to view the OSD.
... active, press it to either Normal or Extreme mode. If the OSD is turned ON. OSD functions Press to enter a selection. Press the key to your preferred level. Press the Empowering key to open the Brightness control and set it to open the Acer eColor Management OSD and access the scenario modes. Lights up to indicate the power is active, press it to view the OSD.
User Manual
Page 22
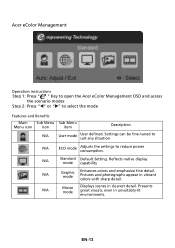
... native display mode capability N/A Graphic mode Enhances colors and emphasize fine detail. N/A Movie mode Displays scenes in clearest detail. EN-13 Acer eColor Management Operation instructions Step 1: Press " " Key to open the Acer eColor Management OSD and access the scenario modes Step 2: Press "" or "" to reduce power consumption. N/A Standard Default Setting. Settings can be fine-tuned to suit any situation N/A ECO mode Adjusts the settings to select the mode...
... native display mode capability N/A Graphic mode Enhances colors and emphasize fine detail. N/A Movie mode Displays scenes in clearest detail. EN-13 Acer eColor Management Operation instructions Step 1: Press " " Key to open the Acer eColor Management OSD and access the scenario modes Step 2: Press "" or "" to reduce power consumption. N/A Standard Default Setting. Settings can be fine-tuned to suit any situation N/A ECO mode Adjusts the settings to select the mode...

User Manual
Page 23
... picture quality, OSD position and general settings. When you are done, use Exit to following content is for adjusting the settings of your LCD Monitor. Press the MENU key to go back one level. For advanced settings, please refer to go back one level. When you are done, use Exit to open the OSD. Actual product specifications may vary. Adjusting the OSD settings Note: The following page: Adjusting Brightness Open the Brightness control...
... picture quality, OSD position and general settings. When you are done, use Exit to following content is for adjusting the settings of your LCD Monitor. Press the MENU key to go back one level. For advanced settings, please refer to go back one level. When you are done, use Exit to open the OSD. Actual product specifications may vary. Adjusting the OSD settings Note: The following page: Adjusting Brightness Open the Brightness control...

User Manual
Page 24
... mode is 2.2. (Standard value for red, green, blue, yellow, magenta and cyan. 8. The default value is for user to adjust Tone of the original source. EN-15 Adjusting picture quality 1. Press the MENU key to adjust. 3. Use the / keys to adjust the Brightness, Contrast, Colour Temp, Blue Light, 6-axis Saturate, 6-axis Hue and other image-related qualities. 5. Blue Light: filter out blue light by boosting the pixel density of luminance. The Picture menu can make images...
... mode is 2.2. (Standard value for red, green, blue, yellow, magenta and cyan. 8. The default value is for user to adjust Tone of the original source. EN-15 Adjusting picture quality 1. Press the MENU key to adjust. 3. Use the / keys to adjust the Brightness, Contrast, Colour Temp, Blue Light, 6-axis Saturate, 6-axis Hue and other image-related qualities. 5. Blue Light: filter out blue light by boosting the pixel density of luminance. The Picture menu can make images...

User Manual
Page 28
... the problem. (DVI/HDMI/DP Mode) Problems No Picture Abnormal Sound (Only Audio-Input model) (Optional) Current Status Remedy LED ON Using OSD, adjust brightness and contrast to maximum or reset to the monitor. Check if video signal cable is properly connected at the back LED displays amber color of monitor. Check if the power of the is too low host PC is properly connected to their default settings. Check the power switch. LED OFF Check if AC power cord is in minimum position and...
... the problem. (DVI/HDMI/DP Mode) Problems No Picture Abnormal Sound (Only Audio-Input model) (Optional) Current Status Remedy LED ON Using OSD, adjust brightness and contrast to maximum or reset to the monitor. Check if video signal cable is properly connected at the back LED displays amber color of monitor. Check if the power of the is too low host PC is properly connected to their default settings. Check the power switch. LED OFF Check if AC power cord is in minimum position and...

