User Manual
Page 2
Acer LCD Monitor User Guide Original Issue: 2/2017 Changes may be reproduced, stored in a retrieval system, or transmitted, in this manual or supplementary documents and publications. The serial number and model number are recorded on the label affixed to the contents hereof and specifically disclaims the implied warranties of such revisions or changes. Acer Incorporated. All Rights Reserved. Such changes will be made periodically to the...
Acer LCD Monitor User Guide Original Issue: 2/2017 Changes may be reproduced, stored in a retrieval system, or transmitted, in this manual or supplementary documents and publications. The serial number and model number are recorded on the label affixed to the contents hereof and specifically disclaims the implied warranties of such revisions or changes. Acer Incorporated. All Rights Reserved. Such changes will be made periodically to the...

User Manual
Page 3
... instructions Read these guidelines when cleaning the monitor: • Always unplug the monitor before cleaning. • Use a soft cloth to make sure the flicker disappears. • You may find slightly uneven brightness on the screen depending on LCD monitors The following are normal with the LCD monitor and do not indicate a problem. • Due to the nature of 0.01% or less such as a missing pixel or pixel...
... instructions Read these guidelines when cleaning the monitor: • Always unplug the monitor before cleaning. • Use a soft cloth to make sure the flicker disappears. • You may find slightly uneven brightness on the screen depending on LCD monitors The following are normal with the LCD monitor and do not indicate a problem. • Due to the nature of 0.01% or less such as a missing pixel or pixel...

User Manual
Page 4
... on an unstable cart, stand or table. Safe listening To protect your ears have adjusted. • Limit the amount of the product and to rest on the power cord. If you are provided for ventilation to ensure reliable operation of time listening to music at high volume. • Avoid turning up the volume to block out noisy...
... on an unstable cart, stand or table. Safe listening To protect your ears have adjusted. • Limit the amount of the product and to rest on the power cord. If you are provided for ventilation to ensure reliable operation of time listening to music at high volume. • Avoid turning up the volume to block out noisy...
User Manual
Page 5
... noise produced by plugging in a grounded power outlet. If you to replace the power cord set . Note: The grounding pin also provides good protection from the wall outlet and refer servicing to qualified service personnel when: • the power cord or plug is equipped with the supplied power supply cord set , make sure that the total ampere rating of all servicing to service this product yourself, as opening or removing covers may interfere with...
... noise produced by plugging in a grounded power outlet. If you to replace the power cord set . Note: The grounding pin also provides good protection from the wall outlet and refer servicing to qualified service personnel when: • the power cord or plug is equipped with the supplied power supply cord set , make sure that the total ampere rating of all servicing to service this product yourself, as opening or removing covers may interfere with...

User Manual
Page 6
English Note: Adjust only those controls that are covered by a qualified technician to restore the product to turn off your device in any area with a potentially explosive atmosphere are in progress. Potentially explosive atmospheres include areas where you ...all signs and instructions. We at Acer are very conscious of the environmental effects of our business and strive to identify and provide the best working procedures to this electronic device into the trash when discarding. Keep them out of the reach of our other controls may contain small parts. For more information...
English Note: Adjust only those controls that are covered by a qualified technician to restore the product to turn off your device in any area with a potentially explosive atmosphere are in progress. Potentially explosive atmospheres include areas where you ...all signs and instructions. We at Acer are very conscious of the environmental effects of our business and strive to identify and provide the best working procedures to this electronic device into the trash when discarding. Keep them out of the reach of our other controls may contain small parts. For more information...

User Manual
Page 7
... occasionally misfire or appear as black or red dots. English LCD pixel statement The LCD unit is in Active Off mode, move the mouse or press any other recurring or persistent discomfort and/or pain related to computer use . Tips and information for power management: • Activate display's Sleep mode within 5 minutes of user inactivity. • Wake the monitor when it is produced with...
... occasionally misfire or appear as black or red dots. English LCD pixel statement The LCD unit is in Active Off mode, move the mouse or press any other recurring or persistent discomfort and/or pain related to computer use . Tips and information for power management: • Activate display's Sleep mode within 5 minutes of user inactivity. • Wake the monitor when it is produced with...

User Manual
Page 8
..., shades or blinds • using a task light • changing the display's viewing angle • using a glare-reduction filter • using a display visor, such as a piece of cardboard extended from the display's top front edge • Avoid adjusting your display to make your display in such a way that the side faces the window or any light source • minimizing room light by looking at bright light sources, such as possible. •...
..., shades or blinds • using a task light • changing the display's viewing angle • using a glare-reduction filter • using a display visor, such as a piece of cardboard extended from the display's top front edge • Avoid adjusting your display to make your display in such a way that the side faces the window or any light source • minimizing room light by looking at bright light sources, such as possible. •...
User Manual
Page 11
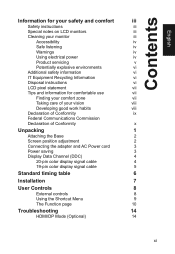
... zone vii Taking care of your vision viii Developing good work habits viii Declaration of Conformity ix Federal Communications Commission Declaration of Conformity x Unpacking 1 Attaching the Base 2 Screen position adjustment 2 Connecting the adapter and AC Power cord 3 Power saving 3 Display Data Channel (DDC) 4 20-pin color display signal cable 4 19-pin color display signal cable 5 Standard timing table 6 Installation 7 User Controls 8 External controls 8 Using the Shortcut Menu 9 The Function page 10 Troubleshooting 14 HDMI/DP Mode (Optional) 14 xi
... zone vii Taking care of your vision viii Developing good work habits viii Declaration of Conformity ix Federal Communications Commission Declaration of Conformity x Unpacking 1 Attaching the Base 2 Screen position adjustment 2 Connecting the adapter and AC Power cord 3 Power saving 3 Display Data Channel (DDC) 4 20-pin color display signal cable 4 19-pin color display signal cable 5 Standard timing table 6 Installation 7 User Controls 8 External controls 8 Using the Shortcut Menu 9 The Function page 10 Troubleshooting 14 HDMI/DP Mode (Optional) 14 xi
User Manual
Page 12
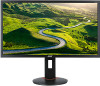
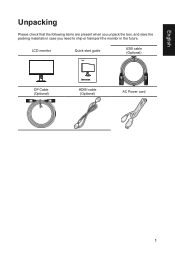
LCD monitor Quick start guide XF270H USB cable (Optional) DP Cable (Optional) XF Series USER GUIDE HDMI cable (Optional) AC Power cord 1 English Unpacking Please check that the following items are present when you unpack the box, and save the packing materials in case you need to ship or transport the monitor in the future.
LCD monitor Quick start guide XF270H USB cable (Optional) DP Cable (Optional) XF Series USER GUIDE HDMI cable (Optional) AC Power cord 1 English Unpacking Please check that the following items are present when you unpack the box, and save the packing materials in case you need to ship or transport the monitor in the future.

User Manual
Page 13
Only at the highest point can adjust the height of the monitor. 1 2 150mm • Tilt Please see the illustration below for the angle of the tilt range. English SCREEN POSITION ADJUSTMENT In oder to optimize the best viewing position, you can adjust the height/tilt of the monitor. • Height Adjustment After pressing the top of the monitor then you can 35 degrees of recline be offered for an example of elevation. 5o 35o 2
Only at the highest point can adjust the height of the monitor. 1 2 150mm • Tilt Please see the illustration below for the angle of the tilt range. English SCREEN POSITION ADJUSTMENT In oder to optimize the best viewing position, you can adjust the height/tilt of the monitor. • Height Adjustment After pressing the top of the monitor then you can 35 degrees of recline be offered for an example of elevation. 5o 35o 2
User Manual
Page 15
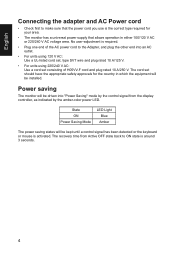
.... • The monitor has a universal power supply that the power cord you use is the correct type required for the country in either 100/120 V AC or 220/240 V AC voltage area. Power saving The monitor will be installed. English Connecting the adapter and AC Power cord • Check first to ON state is activated. No user-adjustment is required. • Plug one end of H05VV-F cord and plug rated 10 A/250 V.
.... • The monitor has a universal power supply that the power cord you use is the correct type required for the country in either 100/120 V AC or 220/240 V AC voltage area. Power saving The monitor will be installed. English Connecting the adapter and AC Power cord • Check first to ON state is activated. No user-adjustment is required. • Plug one end of H05VV-F cord and plug rated 10 A/250 V.
User Manual
Page 16
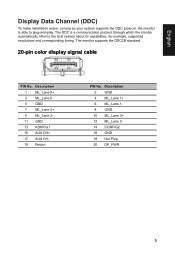
The monitor supports the DDC2B standard. 20-pin color display signal cable PIN No. The DDC is able to plug-and-play. for example, supported resolutions and corresponding timing. Description 2 GND 4 ML_Lane 1+ 6 ML_Lane 18 GND 10 ML_Lane 3+ 12 ML_Lane 314 CONFIG2 16 GND 18 Hot Plug 20 DP_PWR 5 Description 1 ML_Lane 0+ 3 ML_Lane 05 GND 7 ML_Lane 2+ 9 ML_Lane 211 GND 13 KONFIG1 15 AUX...
The monitor supports the DDC2B standard. 20-pin color display signal cable PIN No. The DDC is able to plug-and-play. for example, supported resolutions and corresponding timing. Description 2 GND 4 ML_Lane 1+ 6 ML_Lane 18 GND 10 ML_Lane 3+ 12 ML_Lane 314 CONFIG2 16 GND 18 Hot Plug 20 DP_PWR 5 Description 1 ML_Lane 0+ 3 ML_Lane 05 GND 7 ML_Lane 2+ 9 ML_Lane 211 GND 13 KONFIG1 15 AUX...
User Manual
Page 19
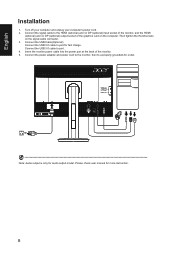
... signal cable connector. 3. Please check user manual for fast charge. Connect the signal cable to port for more instruction. 8 Connect the USB Cable(Optional) Connect the USB 3.0 cable to the HDMI (optional) and /or DP (optional) input socket of the monitor, and the HDMI (optional) and /or DP (optional) output socket of the monitor. 5. USB3.0 port -supporting fast charge USB3.0 port USB USB Note: Audio output is only for audio output model. Turn off your computer and unplug your computer's power cord. 2. Connect the power adapter...
... signal cable connector. 3. Please check user manual for fast charge. Connect the signal cable to port for more instruction. 8 Connect the USB Cable(Optional) Connect the USB 3.0 cable to the HDMI (optional) and /or DP (optional) input socket of the monitor, and the HDMI (optional) and /or DP (optional) output socket of the monitor. 5. USB3.0 port -supporting fast charge USB3.0 port USB USB Note: Audio output is only for audio output model. Turn off your computer and unplug your computer's power cord. 2. Connect the power adapter...
User Manual
Page 20
... adjust display refresh rate based on typical content frame rates for your monitor and current input or reset the custom color settings to the factory defaults. FreeSync : It can allow a FreeSync supported graphics source to select select scenario mode or game mode . b. The single toggle button on . Amber indicates standby/ power saving mode. a. When the Function Menu is active, this key to view the basic information for power efficient, virtually stutter free and low-latency display update...
... adjust display refresh rate based on typical content frame rates for your monitor and current input or reset the custom color settings to the factory defaults. FreeSync : It can allow a FreeSync supported graphics source to select select scenario mode or game mode . b. The single toggle button on . Amber indicates standby/ power saving mode. a. When the Function Menu is active, this key to view the basic information for power efficient, virtually stutter free and low-latency display update...
User Manual
Page 21
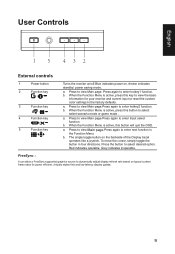
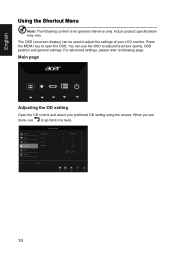
... English Using the Shortcut Menu Note: The following page: Main page Adjusting the OD setting Open the OD control and select your LCD monitor. Press the MENU key to adjust the picture quality, OSD position and general settings. For advanced settings, please refer to go back one level. The OSD (onscreen display) can use to following content is for general reference only. Picture Color Audio Gaming OSD System Mode - When you are done, use the OSD...
... English Using the Shortcut Menu Note: The following page: Main page Adjusting the OD setting Open the OD control and select your LCD monitor. Press the MENU key to adjust the picture quality, OSD position and general settings. For advanced settings, please refer to go back one level. The OSD (onscreen display) can use to following content is for general reference only. Picture Color Audio Gaming OSD System Mode - When you are done, use the OSD...
User Manual
Page 22
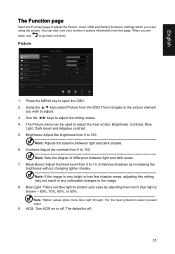
The Picture menu can also view your eyes by increasing the brightness without changing lighter shades Note: If the image is off . Standard Brightness Contrast Black Boost Blue Light ACM 65 50 5 Off Off Move Enter 1. ACM: Turn ACM on or off . 11 English The Function page Open the Function page to adjust the Picture, Color, OSD and Setting functions, settings which you are done, use to go back one level. Enhances...
The Picture menu can also view your eyes by increasing the brightness without changing lighter shades Note: If the image is off . Standard Brightness Contrast Black Boost Blue Light ACM 65 50 5 Off Off Move Enter 1. ACM: Turn ACM on or off . 11 English The Function page Open the Function page to adjust the Picture, Color, OSD and Setting functions, settings which you are done, use to go back one level. Enhances...
User Manual
Page 23
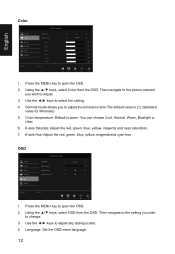
...: Default is 2.2 (standard value Save setting to open the OSD. 2. Use the ◄/► keys to select the setting. 4. Move Enter 5. Sports Language OSD Timeout Transparency Refresh rate num Enter English 10 Off Off 1. OSD Picture Color Audio Gaming OSD System Move Game Mode - Press the MENU key to change. 3. English Color Picture Color Audio Gaming OSD System Move Mode - Then navigate to the picture element you wish to open the OSD. 2. Using the ▲/▼ keys, select Color from the OSD. Language: Set the OSD menu language...
...: Default is 2.2 (standard value Save setting to open the OSD. 2. Use the ◄/► keys to select the setting. 4. Move Enter 5. Sports Language OSD Timeout Transparency Refresh rate num Enter English 10 Off Off 1. OSD Picture Color Audio Gaming OSD System Move Game Mode - Press the MENU key to change. 3. English Color Picture Color Audio Gaming OSD System Move Mode - Then navigate to the picture element you wish to open the OSD. 2. Using the ▲/▼ keys, select Color from the OSD. Language: Set the OSD menu language...
User Manual
Page 24
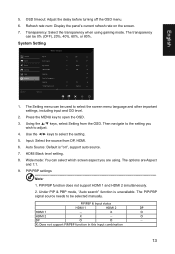
... refresh rate on ", support auto source. 7. Use the ◄/► keys to be used to open the OSD. 3. PIP/PBP settings Note: 1. PIP/PBP & Input status HDMI 1 HDMI 2 DP HDMI 1 -- X: Does not support PIP/PBP function in this input combination 13 Standard Input Auto Source DP Format Wide Mode PIP/PBP Hot Key Assigment DDC/CI HDMI Black Level Enter DP On DP12 Full On Normal 1. The PIP/PBP signal source needs to select the setting. 5. System Setting Picture Color Audio...
... refresh rate on ", support auto source. 7. Use the ◄/► keys to be used to open the OSD. 3. PIP/PBP settings Note: 1. PIP/PBP & Input status HDMI 1 HDMI 2 DP HDMI 1 -- X: Does not support PIP/PBP function in this input combination 13 Standard Input Auto Source DP Format Wide Mode PIP/PBP Hot Key Assigment DDC/CI HDMI Black Level Enter DP On DP12 Full On Normal 1. The PIP/PBP signal source needs to select the setting. 5. System Setting Picture Color Audio...

User Manual
Page 25
English 10. Quick start mode setting. 14 DDC/CI: Allows the monitor settings to be set through the software on the PC Note: DDC/CI, short for Display Data Channel/Command Interface, which allows monitor controls to be sent via software. 11.
English 10. Quick start mode setting. 14 DDC/CI: Allows the monitor settings to be set through the software on the PC Note: DDC/CI, short for Display Data Channel/Command Interface, which allows monitor controls to be sent via software. 11.
User Manual
Page 26
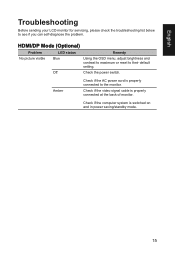
HDMI/DP Mode (Optional) Problem LED status Remedy No picture visible Blue Using the OSD menu, adjust brightness and contrast to maximum or reset to the monitor. Check if the video signal cable is switched on and in power saving/standby mode. 15 Off Check the power switch. Amber Check if the AC power cord is properly connected to their default setting. Check if the computer system is properly connected at the back of monitor. English Troubleshooting Before sending your LCD monitor for servicing, please check the troubleshooting list below to see...
HDMI/DP Mode (Optional) Problem LED status Remedy No picture visible Blue Using the OSD menu, adjust brightness and contrast to maximum or reset to the monitor. Check if the video signal cable is switched on and in power saving/standby mode. 15 Off Check the power switch. Amber Check if the AC power cord is properly connected to their default setting. Check if the computer system is properly connected at the back of monitor. English Troubleshooting Before sending your LCD monitor for servicing, please check the troubleshooting list below to see...

