

User Manual
Page 3
... uneven brightness on the screen depending on the desktop pattern you use . iii Special notes on LCD monitors The following guidelines when connecting and disconnecting power from the LCD monitor: • Make sure the monitor is attached to its base before connecting any cable or unplugging the power cord. • If the system has multiple sources of power, disconnect power from the system by changing the image or turning off the power switch for...
... uneven brightness on the screen depending on the desktop pattern you use . iii Special notes on LCD monitors The following guidelines when connecting and disconnecting power from the LCD monitor: • Make sure the monitor is attached to its base before connecting any cable or unplugging the power cord. • If the system has multiple sources of power, disconnect power from the system by changing the image or turning off the power switch for...

User Manual
Page 4
... hearing, follow these instructions. • Gradually increase the volume until you can 't hear people speaking near you need to disconnect power from the type of time listening to music at high volume. • Avoid turning up the volume to the equipment operator as they may touch dangerous voltage points or short-out parts that the total Using electrical power • This...
... hearing, follow these instructions. • Gradually increase the volume until you can 't hear people speaking near you need to disconnect power from the type of time listening to music at high volume. • Avoid turning up the volume to the equipment operator as they may touch dangerous voltage points or short-out parts that the total Using electrical power • This...
User Manual
Page 5
... product was exposed to replace the power cord set . Using a power outlet that may expose you need for details. If you to qualified service personnel. Unplug this product from unexpected noise produced by plugging in electric shock and/or injury. v ampere rating of the power strip's input rating. • This product's power cord is equipped with a three-wire grounded plug. Make sure the power outlet is a safety feature...
... product was exposed to replace the power cord set . Using a power outlet that may expose you need for details. If you to qualified service personnel. Unplug this product from unexpected noise produced by plugging in electric shock and/or injury. v ampere rating of the power strip's input rating. • This product's power cord is equipped with a three-wire grounded plug. Make sure the power outlet is a safety feature...

User Manual
Page 6
...at service stations. Potentially explosive environments Switch off your vehicle engine. Potentially explosive atmospheres include areas where you would normally be advised to turn off the device near gas pumps at Acer are...acer-group .com for further information on the use of our other controls may contain small parts. vi Note: Adjust only those controls that are covered by a qualified technician to restore the product to normal condition. or where blasting operations are very conscious of the environmental effects of our business and strive to identify and provide the best working...
...at service stations. Potentially explosive environments Switch off your vehicle engine. Potentially explosive atmospheres include areas where you would normally be advised to turn off the device near gas pumps at Acer are...acer-group .com for further information on the use of our other controls may contain small parts. vi Note: Adjust only those controls that are covered by a qualified technician to restore the product to normal condition. or where blasting operations are very conscious of the environmental effects of our business and strive to identify and provide the best working...

User Manual
Page 8
... power management: • Activate display's Sleep mode within 15 minutes of user inactivity. • Activate computer's Sleep mode within 30 minutes of physical injury after prolonged use. viii This product has been shipped enabled for more comfortable computer use. Long work periods, bad posture, poor work habits, stress, inadequate working in one fixed posture • avoid slouching forward and/or leaning backward • stand...
... power management: • Activate display's Sleep mode within 15 minutes of user inactivity. • Activate computer's Sleep mode within 30 minutes of physical injury after prolonged use. viii This product has been shipped enabled for more comfortable computer use. Long work periods, bad posture, poor work habits, stress, inadequate working in one fixed posture • avoid slouching forward and/or leaning backward • stand...

User Manual
Page 9
... by using drapes, shades or blinds • using a task light • changing the display's viewing angle • using a glare-reduction filter • using a display visor, such as a piece of cardboard extended from the display's top front edge • Avoid adjusting your eyes point downward when looking at bright light sources, such as possible. • Exercise regularly and maintain a healthy body. Display • Keep your display clean. • Keep your...
... by using drapes, shades or blinds • using a task light • changing the display's viewing angle • using a glare-reduction filter • using a display visor, such as a piece of cardboard extended from the display's top front edge • Avoid adjusting your eyes point downward when looking at bright light sources, such as possible. • Exercise regularly and maintain a healthy body. Display • Keep your display clean. • Keep your...

User Manual
Page 10
TABLE OF CONTENTS UNPACKING 1 ATTACHING / REMOVING THE BASE 2 SCREEN POSITION ADJUSTMENT 3 CONNECTING THE POWER CORD 5 SAFETY PRECAUTION 5 CLEANING YOUR MONITOR 5 POWER SAVING 6 DDC...6 CONNECTOR PIN ASSIGNMENT 7 STANDARD TIMING TABLE 9 INSTALLATION 10 USER CONTROLS 11 TROUBLESHOOTING 22
TABLE OF CONTENTS UNPACKING 1 ATTACHING / REMOVING THE BASE 2 SCREEN POSITION ADJUSTMENT 3 CONNECTING THE POWER CORD 5 SAFETY PRECAUTION 5 CLEANING YOUR MONITOR 5 POWER SAVING 6 DDC...6 CONNECTOR PIN ASSIGNMENT 7 STANDARD TIMING TABLE 9 INSTALLATION 10 USER CONTROLS 11 TROUBLESHOOTING 22

User Manual
Page 11
UNPACKING Please check the following items are present when you unpack the box, and save the packing materials in case you will need to ship or transport the monitor in future. LCD Monitor Quick Start Guide AC Power Cord HDMI Cable (Optional) DP Cable (Optional) USB Cable (Optional) DVI Cable (Optional) Audio Cable (Optional) EN-1
UNPACKING Please check the following items are present when you unpack the box, and save the packing materials in case you will need to ship or transport the monitor in future. LCD Monitor Quick Start Guide AC Power Cord HDMI Cable (Optional) DP Cable (Optional) USB Cable (Optional) DVI Cable (Optional) Audio Cable (Optional) EN-1

User Manual
Page 13
Only at the highest point can 35 degrees of recline be offered for an example of the monitor. 1 2 150mm EN-3 SCREEN POSITION ADJUSTMENT In order to optimize the best viewing position, you can adjust the height/tilt of the monitor. • Tilt Please see the illustration below for the angle of elevation. -5° 35° • Height Adjustment After pressing the top of the monitor then you can adjust the height of the tilt range.
Only at the highest point can 35 degrees of recline be offered for an example of the monitor. 1 2 150mm EN-3 SCREEN POSITION ADJUSTMENT In order to optimize the best viewing position, you can adjust the height/tilt of the monitor. • Tilt Please see the illustration below for the angle of elevation. -5° 35° • Height Adjustment After pressing the top of the monitor then you can adjust the height of the tilt range.

User Manual
Page 15
... U.S.): Use a Cord Set consisting of H05VV-F cord and plug rated 10 A, 250 V. EN-5 CONNECTING THE POWER CORD Check first to make sure that allows operation in either 100/120V AC or 220/240 V AC voltage area. SAFETY PRECAUTION Avoid placing the monitor, or any ammonia or alcohol-based cleaners. Place the monitor just below guidelines when cleaning the monitor. Always unplug the monitor before cleaning...
... U.S.): Use a Cord Set consisting of H05VV-F cord and plug rated 10 A, 250 V. EN-5 CONNECTING THE POWER CORD Check first to make sure that allows operation in either 100/120V AC or 220/240 V AC voltage area. SAFETY PRECAUTION Avoid placing the monitor, or any ammonia or alcohol-based cleaners. Place the monitor just below guidelines when cleaning the monitor. Always unplug the monitor before cleaning...

User Manual
Page 16
... control signal from Active OFF state back to Plug and Play with your system if your installation easier, the monitor is a communication protocol through which the monitor automatically informs the host system about its capabilities, for example, supported resolutions and corresponding timing. EN-6 The recovery time from the display controller, as indicated by the amber-color power LED. The monitor supports DDC2B standard. State LED Light ON Blue Power Saving Mode...
... control signal from Active OFF state back to Plug and Play with your system if your installation easier, the monitor is a communication protocol through which the monitor automatically informs the host system about its capabilities, for example, supported resolutions and corresponding timing. EN-6 The recovery time from the display controller, as indicated by the amber-color power LED. The monitor supports DDC2B standard. State LED Light ON Blue Power Saving Mode...
User Manual
Page 19
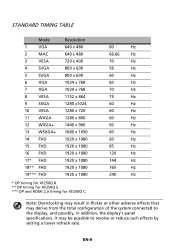
...from the total configuration of the system connected to resolve or reduce such effects by setting a lower refresh rate. EN-9 STANDARD TIMING TABLE Mode 1 VGA 2 MAC 3 VESA 4 SVGA 5 SVGA 6 XGA 7 XGA 8 VESA 9 SXGA 10 VESA 11 WXGA 12 WXGA+ 13 WSXGA+ 14 FHD 15 FHD 16 FHD 17* FHD 18** FHD 19*** FHD Resolution 640 x 480 640 x 480 720... 60 Hz 60 Hz 60 Hz 85 Hz 120 Hz 144 Hz 165 Hz 240 Hz Note: Overclocking may result in flicker or other adverse effects that may be possible to the display, and possibly, in addition, the display's panel specifications.
...from the total configuration of the system connected to resolve or reduce such effects by setting a lower refresh rate. EN-9 STANDARD TIMING TABLE Mode 1 VGA 2 MAC 3 VESA 4 SVGA 5 SVGA 6 XGA 7 XGA 8 VESA 9 SXGA 10 VESA 11 WXGA 12 WXGA+ 13 WSXGA+ 14 FHD 15 FHD 16 FHD 17* FHD 18** FHD 19*** FHD Resolution 640 x 480 640 x 480 720... 60 Hz 60 Hz 60 Hz 85 Hz 120 Hz 144 Hz 165 Hz 240 Hz Note: Overclocking may result in flicker or other adverse effects that may be possible to the display, and possibly, in addition, the display's panel specifications.
User Manual
Page 20
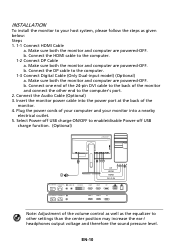
... SWITCH POWER AUDIO IN DVI-D IN HDMI HDMI DP HDMI HDMI DVI-D IN DP AC SWITCH POWER HDMI 1 HDMI 2 DP Note: Adjustment of the volume control as well as given below: Steps 1. 1-1 Connect HDMI Cable a. EN-10 INSTALLATION To install the monitor to your monitor into the power port at the back of the monitor. 4. Connect the DP cable to the computer. 1-2 Connect DP Cable a. Make sure both the monitor and computer are powered-OFF. Connect the Audio Cable (Optional) 3. Connect the HDMI cable to the computer. 1-3 Connect Digital Cable (Only Dual-input model...
... SWITCH POWER AUDIO IN DVI-D IN HDMI HDMI DP HDMI HDMI DVI-D IN DP AC SWITCH POWER HDMI 1 HDMI 2 DP Note: Adjustment of the volume control as well as given below: Steps 1. 1-1 Connect HDMI Cable a. EN-10 INSTALLATION To install the monitor to your monitor into the power port at the back of the monitor. 4. Connect the DP cable to the computer. 1-2 Connect DP Cable a. Make sure both the monitor and computer are powered-OFF. Connect the Audio Cable (Optional) 3. Connect the HDMI cable to the computer. 1-3 Connect Digital Cable (Only Dual-input model...
User Manual
Page 21
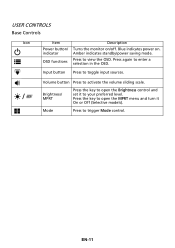
... Mode control. Mode Press to toggle input sources. EN-11 OSD functions Press to activate the volume sliding scale. Volume button Press to view the OSD. Press again to open the Brightness control and / Brightness/ MPRT set it On or Off (Selective models). Press the key to open the MPRT menu and turn it to your preferred level. indicator Amber indicates standby/power saving mode. Press the key to enter a selection in the OSD. USER CONTROLS Base Controls...
... Mode control. Mode Press to toggle input sources. EN-11 OSD functions Press to activate the volume sliding scale. Volume button Press to view the OSD. Press again to open the Brightness control and / Brightness/ MPRT set it On or Off (Selective models). Press the key to open the MPRT menu and turn it to your preferred level. indicator Amber indicates standby/power saving mode. Press the key to enter a selection in the OSD. USER CONTROLS Base Controls...
User Manual
Page 22
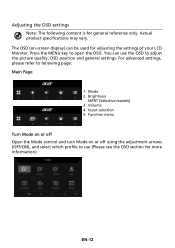
... Open the Mode control and turn Mode on -screen display) can use (Please see the OSD section for general reference only. For advanced settings, please refer to following content is for more information). Volume 4. You can be used for adjusting the settings of your LCD Monitor. Brightness MPRT (Selective models) 3. Press the MENU key to adjust the picture quality, OSD position and general settings. Input selection 5. Mode 2. Actual product specifications may vary. Function menu Turn Mode on or off using the adjustment...
... Open the Mode control and turn Mode on -screen display) can use (Please see the OSD section for general reference only. For advanced settings, please refer to following content is for more information). Volume 4. You can be used for adjusting the settings of your LCD Monitor. Brightness MPRT (Selective models) 3. Press the MENU key to adjust the picture quality, OSD position and general settings. Input selection 5. Mode 2. Actual product specifications may vary. Function menu Turn Mode on or off using the adjustment...
User Manual
Page 23
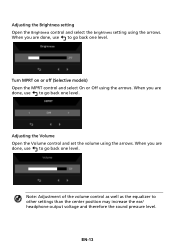
... the sound pressure level. Note: Adjustment of the volume control as well as the equalizer to go back one level. Adjusting the Volume Open the Volume control and set the volume using the arrows. EN-13 Turn MPRT on or off (Selective models) Open the MPRT control and select On or Off using the arrows. When you are done, use to go back one level. Adjusting the Brightness setting Open the Brightness control and...
... the sound pressure level. Note: Adjustment of the volume control as well as the equalizer to go back one level. Adjusting the Volume Open the Volume control and set the volume using the arrows. EN-13 Turn MPRT on or off (Selective models) Open the MPRT control and select On or Off using the arrows. When you are done, use to go back one level. Adjusting the Brightness setting Open the Brightness control and...
User Manual
Page 25
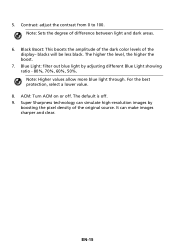
... best protection, select a lower value. 8. It can simulate high-resolution images by adjusting different Blue Light showing ratio - 80%, 70%, 60%, 50%. Black Boost: This boosts the amplitude of the dark color levels of the display- blacks will be less black. The default is off . Contrast: adjust the contrast from 0 to 100. Blue Light: filter out blue light by boosting the pixel density of difference between light and dark areas. 6. 5. ACM: Turn...
... best protection, select a lower value. 8. It can simulate high-resolution images by adjusting different Blue Light showing ratio - 80%, 70%, 60%, 50%. Black Boost: This boosts the amplitude of the dark color levels of the display- blacks will be less black. The default is off . Contrast: adjust the contrast from 0 to 100. Blue Light: filter out blue light by boosting the pixel density of difference between light and dark areas. 6. 5. ACM: Turn...

User Manual
Page 29
Adjusting the OSD 1. Using the / keys, select OSD from the OSD. Then navigate to the setting you wish to adjust any sliding scales. 4. Transparency: Select the transparency when using gaming mode. The transparency can be 0% (OFF), 20%, 40%, 60%, or 80%. 7. Use the / keys to adjust. 3. EN-19 Refresh Rate Num: Display the panel's current refresh rate on the screen. Language: Set the OSD menu language. 5. Press the MENU key to open the OSD. 2. OSD Timeout: Adjust the delay before turning the off the OSD menu. 6.
Adjusting the OSD 1. Using the / keys, select OSD from the OSD. Then navigate to the setting you wish to adjust any sliding scales. 4. Transparency: Select the transparency when using gaming mode. The transparency can be 0% (OFF), 20%, 40%, 60%, or 80%. 7. Use the / keys to adjust. 3. EN-19 Refresh Rate Num: Display the panel's current refresh rate on the screen. Language: Set the OSD menu language. 5. Press the MENU key to open the OSD. 2. OSD Timeout: Adjust the delay before turning the off the OSD menu. 6.

User Manual
Page 31
Product information 1. Quick Start Mode: Enable monitor rapidly. 12. EN-21 HDMI Black Level: You can select the level of blackness under HDMI source. Note: DDC/CI, short for your monitor and current input. 3. Power-off USB charge (Optional): Turn On or Off. Reset All Settings: Resets all settings to be set through the software on the PC. DDC/CI: Allows the monitor settings to open the OSD. 2. The options are Normal and Low. 11...
Product information 1. Quick Start Mode: Enable monitor rapidly. 12. EN-21 HDMI Black Level: You can select the level of blackness under HDMI source. Note: DDC/CI, short for your monitor and current input. 3. Power-off USB charge (Optional): Turn On or Off. Reset All Settings: Resets all settings to be set through the software on the PC. DDC/CI: Allows the monitor settings to open the OSD. 2. The options are Normal and Low. 11...
User Manual
Page 32
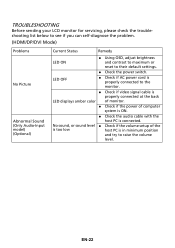
... power cord is properly connected to the monitor. Check if video signal cable is properly connected at the back LED displays amber color of monitor. Check if the power of the is too low host PC is connected. TROUBLESHOOTING Before sending your LCD monitor for servicing, please check the troubleshooting list below to see if you can self-diagnose the problem. (HDMI/DP/DVI Mode) Problems No Picture Abnormal Sound (Only Audio-Input model) (Optional) Current Status Remedy LED ON Using OSD, adjust brightness...
... power cord is properly connected to the monitor. Check if video signal cable is properly connected at the back LED displays amber color of monitor. Check if the power of the is too low host PC is connected. TROUBLESHOOTING Before sending your LCD monitor for servicing, please check the troubleshooting list below to see if you can self-diagnose the problem. (HDMI/DP/DVI Mode) Problems No Picture Abnormal Sound (Only Audio-Input model) (Optional) Current Status Remedy LED ON Using OSD, adjust brightness...

