
User Manual
Page 2
...model number, serial number, purchase date and place of Acer Incorporated. The serial number and model number are recorded on the label affixed to your unit should include the serial number, model number and purchase information. Acer LCD Monitor User Guide Model number Serial number Date of purchase Place of purchase Acer and the Acer logo are used... and specifically disclaims the implied warranties of Acer Incorporated. English Copyright © 2017. No part of such revisions or changes. All Rights Reserved. Acer LCD Monitor User Guide Original Issue: 02/2017 Changes may ...
...model number, serial number, purchase date and place of Acer Incorporated. The serial number and model number are recorded on the label affixed to your unit should include the serial number, model number and purchase information. Acer LCD Monitor User Guide Model number Serial number Date of purchase Place of purchase Acer and the Acer logo are used... and specifically disclaims the implied warranties of Acer Incorporated. English Copyright © 2017. No part of such revisions or changes. All Rights Reserved. Acer LCD Monitor User Guide Original Issue: 02/2017 Changes may ...

User Manual
Page 3
... pixels. In this document for a few hours. Keep this case, the screen is displayed for your monitor Please carefully follow these instructions carefully. Turn off the power switch for future reference. Cleaning your safety and comfort Safety instructions Read these guidelines when cleaning the monitor: • Always unplug the monitor before cleaning. • Use a soft cloth to make sure the flicker disappears. • You may find slightly uneven brightness...
... pixels. In this document for a few hours. Keep this case, the screen is displayed for your monitor Please carefully follow these instructions carefully. Turn off the power switch for future reference. Cleaning your safety and comfort Safety instructions Read these guidelines when cleaning the monitor: • Always unplug the monitor before cleaning. • Use a soft cloth to make sure the flicker disappears. • You may find slightly uneven brightness...

User Manual
Page 4
...; Turn the volume down if you can hear it clearly and comfortably and without distortion. • After setting the volume level, do not place the product on a vibrating surface. • Never use this product near you can 't hear people speaking near water. • Do not place this product on the power cord. The openings should be blocked or covered. English...
...; Turn the volume down if you can hear it clearly and comfortably and without distortion. • After setting the volume level, do not place the product on a vibrating surface. • Never use this product near you can 't hear people speaking near water. • Do not place this product on the power cord. The openings should be blocked or covered. English...
User Manual
Page 5
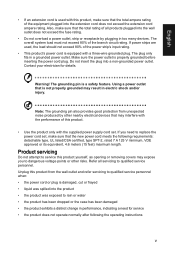
... the power cord plug. Unplug this product from unexpected noise produced by plugging in a grounded power outlet. English • If an extension cord is used , the load should not exceed 80% of the power strip's input rating. • This product's power cord is not properly grounded may expose you need to replace the power cord set . The plug only fits in too many devices. Refer all products plugged into the wall...
... the power cord plug. Unplug this product from unexpected noise produced by plugging in a grounded power outlet. English • If an extension cord is used , the load should not exceed 80% of the power strip's input rating. • This product's power cord is not properly grounded may expose you need to replace the power cord set . The plug only fits in too many devices. Refer all products plugged into the wall...
User Manual
Page 6
... to identify and provide the best working procedures to turn off your device in any area with a potentially explosive atmosphere are often, but not always, marked. Sparks in such areas could cause an explosion or fire resulting in damage and will often require extensive work by the operating instructions, since improper adjustment of other products. chemical...
... to identify and provide the best working procedures to turn off your device in any area with a potentially explosive atmosphere are often, but not always, marked. Sparks in such areas could cause an explosion or fire resulting in damage and will often require extensive work by the operating instructions, since improper adjustment of other products. chemical...

User Manual
Page 7
... following section provides tips for power management: • Activate display's Sleep mode within 5 minutes of user inactivity. • Wake the monitor when it is produced with high-precision manufacturing techniques. This product has been shipped enabled for more comfortable computer use , consult a physician immediately and inform your comfort zone by adjusting the viewing angle of working conditions, personal health and...
... following section provides tips for power management: • Activate display's Sleep mode within 5 minutes of user inactivity. • Wake the monitor when it is produced with high-precision manufacturing techniques. This product has been shipped enabled for more comfortable computer use , consult a physician immediately and inform your comfort zone by adjusting the viewing angle of working conditions, personal health and...

User Manual
Page 8
... at bright light sources, such as open windows, for extended periods of time. Eyes • Rest your eyes frequently. • Give your eyes regular breaks by using drapes, shades or blinds • using a task light • changing the display's viewing angle • using a glare-reduction filter • using a display visor, such as possible. • Exercise regularly and maintain a healthy body. viii Developing good work habits...
... at bright light sources, such as open windows, for extended periods of time. Eyes • Rest your eyes frequently. • Give your eyes regular breaks by using drapes, shades or blinds • using a task light • changing the display's viewing angle • using a glare-reduction filter • using a display visor, such as possible. • Exercise regularly and maintain a healthy body. viii Developing good work habits...

User Manual
Page 11
... Commission Declaration of Conformity x Unpacking 1 Attaching the Base 2 Screen position adjustment 2 Height Adjustment 2 Tilt 2 Swivel 3 Monitor Pivot 3 Connecting the adapter and AC Power cord 4 Power saving 4 Display Data Channel (DDC) 5 24-pin color display signal cable 5 19-pin color display signal cable 6 *19-pin color display signal cable 6 20-pin color display signal cable 7 Standard timing table 8 Installation 9 User Controls External controls Using the Shortcut Menu The Function page Troubleshooting HDMI/DVI/DP Mode (Optional) 10 10 11 12 xi
... Commission Declaration of Conformity x Unpacking 1 Attaching the Base 2 Screen position adjustment 2 Height Adjustment 2 Tilt 2 Swivel 3 Monitor Pivot 3 Connecting the adapter and AC Power cord 4 Power saving 4 Display Data Channel (DDC) 5 24-pin color display signal cable 5 19-pin color display signal cable 6 *19-pin color display signal cable 6 20-pin color display signal cable 7 Standard timing table 8 Installation 9 User Controls External controls Using the Shortcut Menu The Function page Troubleshooting HDMI/DVI/DP Mode (Optional) 10 10 11 12 xi
User Manual
Page 13
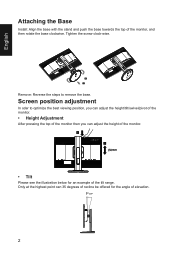
... the monitor, and then rotate the base clockwise. Tighten the screw clock-wise. Remove: Reverse the steps to optimize the best viewing position, you can adjust the height/tilt/swivel/pivot of the monitor. • Height Adjustment After pressing the top of the monitor then you can 35 degrees of recline be offered for an example of the tilt range. English Attaching the Base Install: Align the base with the stand and...
... the monitor, and then rotate the base clockwise. Tighten the screw clock-wise. Remove: Reverse the steps to optimize the best viewing position, you can adjust the height/tilt/swivel/pivot of the monitor. • Height Adjustment After pressing the top of the monitor then you can 35 degrees of recline be offered for an example of the tilt range. English Attaching the Base Install: Align the base with the stand and...
User Manual
Page 15
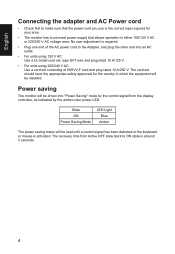
...; The monitor has a universal power supply that the power cord you use is around 3 seconds. 4 The cord set consisting of the AC power cord to the Adapter, and plug the other end into "Power Saving" mode by the amber-color power LED. State ON Power Saving Mode LED Light Blue Amber The power saving states will be kept until a control signal has been detected or the keyboard or mouse is required. • Plug one end of H05VV-F cord and plug rated 10...
...; The monitor has a universal power supply that the power cord you use is around 3 seconds. 4 The cord set consisting of the AC power cord to the Adapter, and plug the other end into "Power Saving" mode by the amber-color power LED. State ON Power Saving Mode LED Light Blue Amber The power saving states will be kept until a control signal has been detected or the keyboard or mouse is required. • Plug one end of H05VV-F cord and plug rated 10...

User Manual
Page 16
... for example, supported resolutions and corresponding timing. for +5 V hsync. The monitor supports the DDC2B standard. 24-pin color display signal cable PIN No. vsync) 16 Hot-plug detection 17 TMDS data 0- 18 TMDS data 0+ 19 TMDS data 0/5 shield 20 NC 21 NC 22 TMDS clock shield 23 TMDS clock+ 24 DDC TMDS clock- 5 English Display Data Channel (DDC) To make installation easier, so...
... for example, supported resolutions and corresponding timing. for +5 V hsync. The monitor supports the DDC2B standard. 24-pin color display signal cable PIN No. vsync) 16 Hot-plug detection 17 TMDS data 0- 18 TMDS data 0+ 19 TMDS data 0/5 shield 20 NC 21 NC 22 TMDS clock shield 23 TMDS clock+ 24 DDC TMDS clock- 5 English Display Data Channel (DDC) To make installation easier, so...

User Manual
Page 17
Description 1 TMDS Data2+ 3 TMDS Data25 TMDS Data1 Shield 7 TMDS Data0+ 9 TMDS Data011 TMDS Clock Shield 13 CEC 15 SCL 17 DDC/CEC Ground 19 Hot Plug Detect PIN No. Description 2 TMDS Data2 Shield 4 TMDS Data1+ 6 TMDS Data18 TMDS Data0 Shield 10 TMDS Clock+ 12 TMDS Clock14 Reserved (N.C. Description 7 MHL+ 9 MHL- 18 VBUS 19 CBUS 5, 11, 17 GND 6 English 19-pin color display signal cable PIN No. on device) 16 SDA 18 +5V Power *19-pin color display signal cable PIN No.
Description 1 TMDS Data2+ 3 TMDS Data25 TMDS Data1 Shield 7 TMDS Data0+ 9 TMDS Data011 TMDS Clock Shield 13 CEC 15 SCL 17 DDC/CEC Ground 19 Hot Plug Detect PIN No. Description 2 TMDS Data2 Shield 4 TMDS Data1+ 6 TMDS Data18 TMDS Data0 Shield 10 TMDS Clock+ 12 TMDS Clock14 Reserved (N.C. Description 7 MHL+ 9 MHL- 18 VBUS 19 CBUS 5, 11, 17 GND 6 English 19-pin color display signal cable PIN No. on device) 16 SDA 18 +5V Power *19-pin color display signal cable PIN No.
User Manual
Page 20
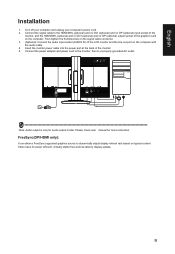
... can allow a FreeSync supported graphics source to dynamically adjust display refresh rate based on the computer with the audio cable. 4. Connect the signal cable to a properly grounded AC outlet. English Installation 1. Insert the monitor power cable into the power port at the back of the monitor. 5. DVI-D IN HDMI 2.0 DP AUDIO IN 2 Note: Audio output is only for power efficient, virtually stutter free and low-latency display update. 9 Connect the power adapter and power cord to the monitor, then to the HDMI/MHL (optional) and...
... can allow a FreeSync supported graphics source to dynamically adjust display refresh rate based on the computer with the audio cable. 4. Connect the signal cable to a properly grounded AC outlet. English Installation 1. Insert the monitor power cable into the power port at the back of the monitor. 5. DVI-D IN HDMI 2.0 DP AUDIO IN 2 Note: Audio output is only for power efficient, virtually stutter free and low-latency display update. 9 Connect the power adapter and power cord to the monitor, then to the HDMI/MHL (optional) and...
User Manual
Page 21
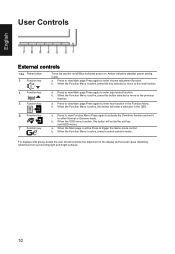
English User Controls External controls 1&2 Power button 3 Function key / Turns the monitor on/off.Blue indicates power on. b. When the Function Menu is active, this button selected or move to the previous function. b. b. When the Function Menu is active, press this button will act as the bezel cause disturbing reflections from surrounding light and bright surfaces. 10 When the Function Menu is active, this key selected or move...
English User Controls External controls 1&2 Power button 3 Function key / Turns the monitor on/off.Blue indicates power on. b. When the Function Menu is active, this button selected or move to the previous function. b. b. When the Function Menu is active, press this button will act as the bezel cause disturbing reflections from surrounding light and bright surfaces. 10 When the Function Menu is active, this key selected or move...
User Manual
Page 22
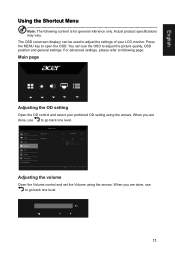
... OSD (onscreen display) can use the OSD to adjust the picture quality, OSD position and general settings. You can be used to go back one level. Mode - When you are done, use to following content is for general reference only. Picture Color Audio Gaming OSD System Information Save Setting to open the OSD. When you are done, use to adjust the settings of your preferred OD setting using the arrows. Press the MENU key to ... English Using the...
... OSD (onscreen display) can use the OSD to adjust the picture quality, OSD position and general settings. You can be used to go back one level. Mode - When you are done, use to following content is for general reference only. Picture Color Audio Gaming OSD System Information Save Setting to open the OSD. When you are done, use to adjust the settings of your preferred OD setting using the arrows. Press the MENU key to ... English Using the...
User Manual
Page 23
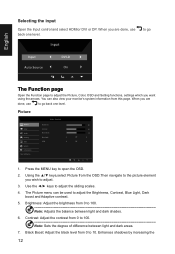
... be used to adjust the Picture, Color, OSD and Setting functions, settings which you wish to ... Mode - The Picture menu can also view your monitor's system information from 0 to 10. English Selecting the input Open the Input control and select HDMIor DVI or DP. Contrast: Adjust the contrast from 0 to 100 Note: Adjusts the balance between light and dark areas. 7. Enhances shadows by increasing the 12 Picture Picture Color Audio Gaming OSD System Information Save Setting to adjust. 3. Standard Brightness Contrast Black Boost Blue Light ACM...
... be used to adjust the Picture, Color, OSD and Setting functions, settings which you wish to ... Mode - The Picture menu can also view your monitor's system information from 0 to 10. English Selecting the input Open the Input control and select HDMIor DVI or DP. Contrast: Adjust the contrast from 0 to 100 Note: Adjusts the balance between light and dark areas. 7. Enhances shadows by increasing the 12 Picture Picture Color Audio Gaming OSD System Information Save Setting to adjust. 3. Standard Brightness Contrast Black Boost Blue Light ACM...
User Manual
Page 24
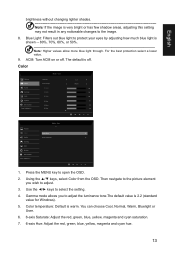
... red, green, blue, yellow, magenta and cyan hue. 13 User Gamma Color Temp. Move Mode - Using the ▲/▼ keys, select Color from the OSD. Color Picture Color Audio Gaming OSD System Information Save Setting to protect your eyes by adjusting how much blue light is warm. Blue Light: Filters out blue light to ... Color temperature: Default is shown -- 80%, 70%, 60%, or 50%. User 6-axis Hue 6-axis Saturate Enter Quick Start Mode 1. English brightness without changing lighter shades Note: If the image...
... red, green, blue, yellow, magenta and cyan hue. 13 User Gamma Color Temp. Move Mode - Using the ▲/▼ keys, select Color from the OSD. Color Picture Color Audio Gaming OSD System Information Save Setting to protect your eyes by adjusting how much blue light is warm. Blue Light: Filters out blue light to ... Color temperature: Default is shown -- 80%, 70%, 60%, or 50%. User 6-axis Hue 6-axis Saturate Enter Quick Start Mode 1. English brightness without changing lighter shades Note: If the image...
User Manual
Page 25
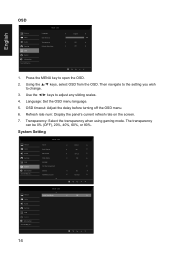
... Press the MENU key to ... Language: Set the OSD menu language. 5. User Picture Quick Start Mode Off Color Audio Gaming OSD System Information Save Setting to adjust any sliding scales. 4. User Language OSD Timeout Transparency Refresh Rate Num English 120 Off Off Quick Start Mode 1. Mode - OSD timeout: Adjust the delay before turning off the OSD menu. 6. Use the ◄/► keys to ... 14 Transparency: Select the transparency when using gaming mode. User Input Auto Source DP Format Wide Mode PIP/PBP Hot Key Assignment DDC/CI HDMI Black Level...
... Press the MENU key to ... Language: Set the OSD menu language. 5. User Picture Quick Start Mode Off Color Audio Gaming OSD System Information Save Setting to adjust any sliding scales. 4. User Language OSD Timeout Transparency Refresh Rate Num English 120 Off Off Quick Start Mode 1. Mode - OSD timeout: Adjust the delay before turning off the OSD menu. 6. Use the ◄/► keys to ... 14 Transparency: Select the transparency when using gaming mode. User Input Auto Source DP Format Wide Mode PIP/PBP Hot Key Assignment DDC/CI HDMI Black Level...
User Manual
Page 26
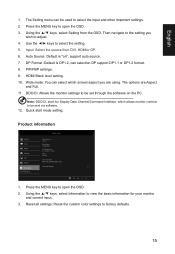
... using. Product information Picture Color Audio Gaming OSD System Information Save Settings to open the OSD. 3. Press the MENU key to ... Using the ▲/▼ keys, select Setting from DVI, HDMIor DP. 6. DP Format :Default is "on the PC Note: DDC/CI, short for your monitor and current input. 3. PIP/PBP settings. 9. Mode - DDC/CI: Allows the monitor settings to be set through the software on ", support auto source. 7. User Main Source DVI_D Resolution 1920x1080 H/V Frequency H: 67KHz V: 60Hz Mode Normal Series Number...
... using. Product information Picture Color Audio Gaming OSD System Information Save Settings to open the OSD. 3. Press the MENU key to ... Using the ▲/▼ keys, select Setting from DVI, HDMIor DP. 6. DP Format :Default is "on the PC Note: DDC/CI, short for your monitor and current input. 3. PIP/PBP settings. 9. Mode - DDC/CI: Allows the monitor settings to be set through the software on ", support auto source. 7. User Main Source DVI_D Resolution 1920x1080 H/V Frequency H: 67KHz V: 60Hz Mode Normal Series Number...
User Manual
Page 27
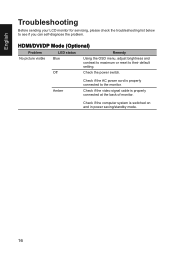
... LCD monitor for servicing, please check the troubleshooting list below to their default setting. Check if the video signal cable is switched on and in power saving/standby mode. 16 Check if the computer system is properly connected at the back of monitor. HDMI/DVI/DP Mode (Optional) Problem LED status Remedy No picture visible Blue Using the OSD menu, adjust brightness and contrast to maximum or reset to see if you can self-diagnose the problem. Amber Check if the AC power cord is properly connected...
... LCD monitor for servicing, please check the troubleshooting list below to their default setting. Check if the video signal cable is switched on and in power saving/standby mode. 16 Check if the computer system is properly connected at the back of monitor. HDMI/DVI/DP Mode (Optional) Problem LED status Remedy No picture visible Blue Using the OSD menu, adjust brightness and contrast to maximum or reset to see if you can self-diagnose the problem. Amber Check if the AC power cord is properly connected...


