

XD1150 Service Guide
Page 2
... manual is applied to Acer PD100 0.55 inch 120 DDR DMD SVGA Micro Portable Projector / PD100D 0.55 inch 120 DDR DMD SVGA Micro Portable Projector / PD120 0.55 inch 120 DDR DMD SVGA Micro Portable Projector / PD120D 0.55 inch 120 DDR DMD SVGA Micro Portable Projector / XD1170D 0.55 inch... 120 DDR DMD SVGA Micro Portable Projector / XD1270D 0.55 inch 120 DDR DMD XGA Micro Portable Projector / XD1150 0.55 inch 120 DDR DMD SVGA Micro Portable Projector / XD1250 0.55 inch 120 DDR DMD XGA Micro Portable Projector. NOTICE : The inform ...
... manual is applied to Acer PD100 0.55 inch 120 DDR DMD SVGA Micro Portable Projector / PD100D 0.55 inch 120 DDR DMD SVGA Micro Portable Projector / PD120 0.55 inch 120 DDR DMD SVGA Micro Portable Projector / PD120D 0.55 inch 120 DDR DMD SVGA Micro Portable Projector / XD1170D 0.55 inch... 120 DDR DMD SVGA Micro Portable Projector / XD1270D 0.55 inch 120 DDR DMD XGA Micro Portable Projector / XD1150 0.55 inch 120 DDR DMD SVGA Micro Portable Projector / XD1250 0.55 inch 120 DDR DMD XGA Micro Portable Projector. NOTICE : The inform ...

XD1150 Service Guide
Page 12
Connecting the Projector Item 1 2 3 4 5 6 7 8 9 Description Power Cord VGA Cable Composite Video Cable USB Cable VGA to Component / HDTV Adapter S-Video Cable Audio Cable Jack / Jack (for PD100/PD100D/PD120/PD120D/XD1170D/XD1270D only) DVI Cable (Optional Accessory) (for PD100D/PD120D/XD1170D/XD1270D only) 5V DC Output Jack for attached Dongle Device (for PD100/PD120 only) Confidential 6
Connecting the Projector Item 1 2 3 4 5 6 7 8 9 Description Power Cord VGA Cable Composite Video Cable USB Cable VGA to Component / HDTV Adapter S-Video Cable Audio Cable Jack / Jack (for PD100/PD100D/PD120/PD120D/XD1170D/XD1270D only) DVI Cable (Optional Accessory) (for PD100D/PD120D/XD1170D/XD1270D only) 5V DC Output Jack for attached Dongle Device (for PD100/PD120 only) Confidential 6

XD1150 Service Guide
Page 13
... Screw : 5mm Tweezers Screw Bit General Information Before You Begin Before proceeding with the disassembly procedure, make sure that you disassemble the projector, be sure to their category. Confidential 1 Moreover, when you do the following procedures: 1. Anti-static wrist strap.... Chapter 2 Mechanical Disassembly & Reassembly This section provides disassembly & Reassembly procedures for PD100 Micro Portable SVGA DMD Projector. Turn off the power of these procedures, be sure to put the screws in a safe place and separate them according to...
... Screw : 5mm Tweezers Screw Bit General Information Before You Begin Before proceeding with the disassembly procedure, make sure that you disassemble the projector, be sure to their category. Confidential 1 Moreover, when you do the following procedures: 1. Anti-static wrist strap.... Chapter 2 Mechanical Disassembly & Reassembly This section provides disassembly & Reassembly procedures for PD100 Micro Portable SVGA DMD Projector. Turn off the power of these procedures, be sure to put the screws in a safe place and separate them according to...

XD1150 Service Guide
Page 47
Execute the Factory Reset to enter Service Mode: 1. Confidential 8 Guide to Entering Service Mode and Factory Reset No Item 1 Service Mode Steps Please do the following pictures show) 1 2 3 4 2 Factory Reset Power "Left"button "Left"button Menu After final QC step, we have to erase all saved change again and restore the factory defaults. Turn on the projector. 2. Press "Power", "Left" button, "Left" button and "Menu" by order to enter the Service Mode. (As the following steps to restore the deault setting.
Execute the Factory Reset to enter Service Mode: 1. Confidential 8 Guide to Entering Service Mode and Factory Reset No Item 1 Service Mode Steps Please do the following pictures show) 1 2 3 4 2 Factory Reset Power "Left"button "Left"button Menu After final QC step, we have to erase all saved change again and restore the factory defaults. Turn on the projector. 2. Press "Power", "Left" button, "Left" button and "Menu" by order to enter the Service Mode. (As the following steps to restore the deault setting.

XD1150 Service Guide
Page 48
USB) - DLP Composer - Chapter 5 Firmware Upgrade Equipment Needed Software : (DDP 2000- Firmware (PD100 / PD100D / PD120 / PD120D / XD1170D / XD1270D / XD1150 / XD1250) Hardware : Item Photo Item Photo Projector (PD100 / PD100D) Projector (PD120 / PD120D) Power Cord Projector (XD1170D /XD1270D) USB Cable PC or Laptop Projector (XD1150/ XD1250) Confidential 1
USB) - DLP Composer - Chapter 5 Firmware Upgrade Equipment Needed Software : (DDP 2000- Firmware (PD100 / PD100D / PD120 / PD120D / XD1170D / XD1270D / XD1150 / XD1250) Hardware : Item Photo Item Photo Projector (PD100 / PD100D) Projector (PD120 / PD120D) Power Cord Projector (XD1170D /XD1270D) USB Cable PC or Laptop Projector (XD1150/ XD1250) Confidential 1
XD1150 Service Guide
Page 51
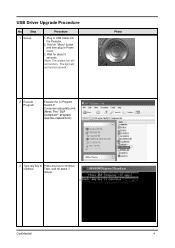
Wait for about 5 seconds. (Note: The system fan will not function as well.) 2 Execute Program Execute the C:\Program files\DLP Composer\usbupdata.cmd. (Note: The "DLP Composer" program must be closed first.) Photo 3 Type any key to Press any key to continue. Hold on "Menu" button and then plug in USB Cable into the Projector. 2. continue Then, wait for about 1 minute. The light will not function. Plug in Power Cord. 3. Confidential 4 USB Driver Upgrade Procedure No Step 1 Set-up Procedure 1.
Wait for about 5 seconds. (Note: The system fan will not function as well.) 2 Execute Program Execute the C:\Program files\DLP Composer\usbupdata.cmd. (Note: The "DLP Composer" program must be closed first.) Photo 3 Type any key to Press any key to continue. Hold on "Menu" button and then plug in USB Cable into the Projector. 2. continue Then, wait for about 1 minute. The light will not function. Plug in Power Cord. 3. Confidential 4 USB Driver Upgrade Procedure No Step 1 Set-up Procedure 1.

XD1150 Service Guide
Page 53
... function. Select "Edit\Preferences\ Communications" and choose "USB". 2. Wait for about 5 seconds. (Note: The system fan will not function as well.) Link PC COM1 and projector Execute the "DLP ComposeTM" file. . 4 Click "Edit" and "Preferences". 1 Photo 2 5 1. Click "OK". Confidential 1 USB Vendor: 0x451 Product: 0x2000 2 OK 6 Plug in Power Cord. 3. The library...
... function. Select "Edit\Preferences\ Communications" and choose "USB". 2. Wait for about 5 seconds. (Note: The system fan will not function as well.) Link PC COM1 and projector Execute the "DLP ComposeTM" file. . 4 Click "Edit" and "Preferences". 1 Photo 2 5 1. Click "OK". Confidential 1 USB Vendor: 0x451 Product: 0x2000 2 OK 6 Plug in Power Cord. 3. The library...

XD1150 Service Guide
Page 54
..." to search the firmware file. (PD100 / PD120) 3. Confidential 1 2 7 Click "Yes" to erase the flash memory. (Note: If the error message "cannot open USB driver No projectors found" appears, please unplug the USB Cable and replug, then re-do 4. No Step Procedure 7 1. Click "Reset Bus" to erase the flash memory. Click "Reset...
..." to search the firmware file. (PD100 / PD120) 3. Confidential 1 2 7 Click "Yes" to erase the flash memory. (Note: If the error message "cannot open USB driver No projectors found" appears, please unplug the USB Cable and replug, then re-do 4. No Step Procedure 7 1. Click "Reset Bus" to erase the flash memory. Click "Reset...

XD1150 Service Guide
Page 57
Fixture P1 to Projector Analog Port 4. Fixture P2 to PC COM1 Port 3. Power On Fixture Power on Fixture RS-232 Cable To Analog Port EDID Key-In Procedure No ... to Fixture JP1 2. In the Port Selection Bar, 1 please choose the Port that you use "COM 1", choose COM 1 in the Port selection. 2. Power Adapter to Projector Digital Port Photo Adapter To Digital Port JP1 P3 P1 P2 2. Choose the EDID that responses to execute Program. Setup Procedure No Step Procedure 1 Connect...
Fixture P1 to Projector Analog Port 4. Fixture P2 to PC COM1 Port 3. Power On Fixture Power on Fixture RS-232 Cable To Analog Port EDID Key-In Procedure No ... to Fixture JP1 2. In the Port Selection Bar, 1 please choose the Port that you use "COM 1", choose COM 1 in the Port selection. 2. Power Adapter to Projector Digital Port Photo Adapter To Digital Port JP1 P3 P1 P2 2. Choose the EDID that responses to execute Program. Setup Procedure No Step Procedure 1 Connect...

XD1150 Service Guide
Page 94
XD1170D PROJECTION DISPLAY PROJECTOR ASSY SYSTEM FAN 80x25 MODULE Confidential 35
XD1170D PROJECTION DISPLAY PROJECTOR ASSY SYSTEM FAN 80x25 MODULE Confidential 35

XD1150 Service Guide
Page 117
XD1270D PROJECTION DISPLAY PROJECTOR Confidential 58
XD1270D PROJECTION DISPLAY PROJECTOR Confidential 58

XD1150 User's Guide EN
Page 1
Manual for Acer Projector XD1150/XD1150D/ XD1250/XD1250D series
Manual for Acer Projector XD1150/XD1150D/ XD1250/XD1250D series

XD1150 User's Guide EN
Page 3
......6 Control Panel ...7 Connection Ports ...8 Remote Control...9 Installation 10 Connecting the Projector 10 Powering On/Off the Projector 11 Powering On the Projector 11 Powering Off the projector 12 Warning Indicator ...12 Adjusting the Projected Image 13 Adjusting the Projector Image Height 13 Adjusting the Projector Zoom / Focus 14 Adjusting Projected Image Size 14 User Controls 15...
......6 Control Panel ...7 Connection Ports ...8 Remote Control...9 Installation 10 Connecting the Projector 10 Powering On/Off the Projector 11 Powering On the Projector 11 Powering Off the projector 12 Warning Indicator ...12 Adjusting the Projected Image 13 Adjusting the Projector Image Height 13 Adjusting the Projector Zoom / Focus 14 Adjusting Projected Image Size 14 User Controls 15...

XD1150 User's Guide EN
Page 4
...64257;re or electric shock, do not open or disassemble the product as recommended in operation. WarningWarningWarning- Do not look into the projector's lens when the lamp is in this product to rain or moisture. If this may cause electric shock. Warning- Warning- WarningWarningWarningWarningWarning... (refer to cool down, and follow the procedures listed under "Replacing the Lamp". Do not use lens cap when projector is on the projector first and then the signal sources. Usage Notice Precautions Follow all changing instructions. To replace the lamp, follow all...
...64257;re or electric shock, do not open or disassemble the product as recommended in operation. WarningWarningWarning- Do not look into the projector's lens when the lamp is in this product to rain or moisture. If this may cause electric shock. Warning- Warning- WarningWarningWarningWarningWarning... (refer to cool down, and follow the procedures listed under "Replacing the Lamp". Do not use lens cap when projector is on the projector first and then the signal sources. Usage Notice Precautions Follow all changing instructions. To replace the lamp, follow all...

XD1150 User's Guide EN
Page 6
ible (480i/p, 576i/p, 720p, 1080i) User friendly and powerful Acer Empowering key in- cluding: Acer eView Management, Acer eTimer Management and Acer eOpening Management. High-tech DVI connection for digital signal with HDCP function and supports 480p, 576p, 720p and ... NTSC3.58/NTSC4.43/PAL/SECAM and HDTV compat- Introduction Product Features This product is an XGA(XD1250/XD1250D)/ SVGA(XD1150/XD1150D) single chip 0.55" DLP® projector. Outstanding features include: True XGA, 1024 x 768 addressable pixels (for XD1250/ XD1250D) True SVGA, 800 x 600...
ible (480i/p, 576i/p, 720p, 1080i) User friendly and powerful Acer Empowering key in- cluding: Acer eView Management, Acer eTimer Management and Acer eOpening Management. High-tech DVI connection for digital signal with HDCP function and supports 480p, 576p, 720p and ... NTSC3.58/NTSC4.43/PAL/SECAM and HDTV compat- Introduction Product Features This product is an XGA(XD1250/XD1250D)/ SVGA(XD1150/XD1150D) single chip 0.55" DLP® projector. Outstanding features include: True XGA, 1024 x 768 addressable pixels (for XD1250/ XD1250D) True SVGA, 800 x 600...
XD1150 User's Guide EN
Page 7
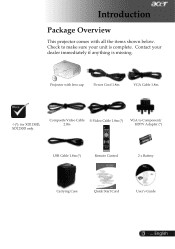
Composite Video Cable S-Video Cable 1.8m (*) 2.0m VGA to make sure your dealer immediately if anything is complete. Contact your unit is missing. Projector with all the items shown below. Check to Component/ HDTV Adapter (*) USB Cable 1.8m (*) Remote Control 2 x Battery Carrying Case Quick Start Card User's Guide 5 ... English Introduction Package Overview This projector comes with lens cap Power Cord 1.8m VGA Cable 1.8m (*): for XD1150D, XD1250D only.
Composite Video Cable S-Video Cable 1.8m (*) 2.0m VGA to make sure your dealer immediately if anything is complete. Contact your unit is missing. Projector with all the items shown below. Check to Component/ HDTV Adapter (*) USB Cable 1.8m (*) Remote Control 2 x Battery Carrying Case Quick Start Card User's Guide 5 ... English Introduction Package Overview This projector comes with lens cap Power Cord 1.8m VGA Cable 1.8m (*): for XD1150D, XD1250D only.
XD1150 User's Guide EN
Page 12
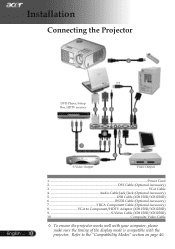
... well with your computer, please make sure the timing of the display mode is compatible with the projector. Installation Connecting the Projector 1 RGB USB 5 DVD Player, Settop Box, HDTV receiver 2 34 6 English ... 10 7 S-Video Output 8 10 9 Video Output 1...Power Cord 2 DVI Cable (Optional Accessory) 3...VGA Cable 4 Audio ...
... well with your computer, please make sure the timing of the display mode is compatible with the projector. Installation Connecting the Projector 1 RGB USB 5 DVD Player, Settop Box, HDTV receiver 2 34 6 English ... 10 7 S-Video Output 8 10 9 Video Output 1...Power Cord 2 DVI Cable (Optional Accessory) 3...VGA Cable 4 Audio ...

XD1150 User's Guide EN
Page 13
English The Power LED will turn blue. 4. The projector will detect your source (computer, notebook, video player ,etc.). Turn on the lamp by pressing "Power" button on this source type and there is no ...;Turn on your source automatically. If the screen displays "Lock" & "Source" icons, it means the pro- Remove the lens cap. 2. Turn on the projector first and then the signal sources. 1 Lens Cap 11 ... Installation Powering On/Off the...
English The Power LED will turn blue. 4. The projector will detect your source (computer, notebook, video player ,etc.). Turn on the lamp by pressing "Power" button on this source type and there is no ...;Turn on your source automatically. If the screen displays "Lock" & "Source" icons, it means the pro- Remove the lens cap. 2. Turn on the projector first and then the signal sources. 1 Lens Cap 11 ... Installation Powering On/Off the...

XD1150 User's Guide EN
Page 14
...cycle and the Power LED will automatically turn off procedure. Under normal conditions, the projector can be quick red flash. displayed on the projector immediately following a power off soon." The projector will see a message "Fan fail. Disconnect the power cord from the electrical outlet...center. Lamp will be switched on , you will disappear after it indicates the projector has been overheated. Lamp will automatically turn off the projector lamp, you must wait until the projector has completed the cooling cycle and has entered standby mode. Press the "Power"...
...cycle and the Power LED will automatically turn off procedure. Under normal conditions, the projector can be quick red flash. displayed on the projector immediately following a power off soon." The projector will see a message "Fan fail. Disconnect the power cord from the electrical outlet...center. Lamp will be switched on , you will disappear after it indicates the projector has been overheated. Lamp will automatically turn off the projector lamp, you must wait until the projector has completed the cooling cycle and has entered standby mode. Press the "Power"...

XD1150 User's Guide EN
Page 15
Press the elevator button . 2. Press the elevator button. 2. lease the button to lock the elevator foot into position. 2 Elevator Foot 1 Elevator Button 13 ... To lower the image: 1. Installation Adjusting the Projected Image Adjusting the Projector Image Height The projector is equipped with an elevator foot for adjusting the image height. Lower the image, then release the button to the desired height angle , then re- Raise the image to lock the el- English To raise the image: 1. evator foot into position.
Press the elevator button . 2. Press the elevator button. 2. lease the button to lock the elevator foot into position. 2 Elevator Foot 1 Elevator Button 13 ... To lower the image: 1. Installation Adjusting the Projected Image Adjusting the Projector Image Height The projector is equipped with an elevator foot for adjusting the image height. Lower the image, then release the button to the desired height angle , then re- Raise the image to lock the el- English To raise the image: 1. evator foot into position.


