

XD1150 Service Guide
Page 12
Connecting the Projector Item 1 2 3 4 5 6 7 8 9 Description Power Cord VGA Cable Composite Video Cable USB Cable VGA to Component / HDTV Adapter S-Video Cable Audio Cable Jack / Jack (for PD100/PD100D/PD120/PD120D/XD1170D/XD1270D only) DVI Cable (Optional Accessory) (for PD100D/PD120D/XD1170D/XD1270D only) 5V DC Output Jack for attached Dongle Device (for PD100/PD120 only) Confidential 6
Connecting the Projector Item 1 2 3 4 5 6 7 8 9 Description Power Cord VGA Cable Composite Video Cable USB Cable VGA to Component / HDTV Adapter S-Video Cable Audio Cable Jack / Jack (for PD100/PD100D/PD120/PD120D/XD1170D/XD1270D only) DVI Cable (Optional Accessory) (for PD100D/PD120D/XD1170D/XD1270D only) 5V DC Output Jack for attached Dongle Device (for PD100/PD120 only) Confidential 6

XD1150 Service Guide
Page 13
... with the disassembly procedure, make sure that you begin any of the system and all power and signal cables from the electrical outlet. Anti-static wrist strap. Moreover, when you disassemble the projector, be sure to put the screws in a safe place and separate them according to ...turn off the power of these procedures, be sure to their category. Before you do the following procedures: 1. ...
... with the disassembly procedure, make sure that you begin any of the system and all power and signal cables from the electrical outlet. Anti-static wrist strap. Moreover, when you disassemble the projector, be sure to put the screws in a safe place and separate them according to ...turn off the power of these procedures, be sure to their category. Before you do the following procedures: 1. ...

XD1150 Service Guide
Page 47
Confidential 8 Turn on the projector. 2. Execute the Factory Reset to restore the deault setting. Press "Power", "Left" button, "Left" button and "Menu" by order to enter the Service Mode. (As the following steps to enter Service Mode: 1. Guide to Entering Service Mode and Factory Reset No Item 1 Service Mode Steps Please do the following pictures show) 1 2 3 4 2 Factory Reset Power "Left"button "Left"button Menu After final QC step, we have to erase all saved change again and restore the factory defaults.
Confidential 8 Turn on the projector. 2. Execute the Factory Reset to restore the deault setting. Press "Power", "Left" button, "Left" button and "Menu" by order to enter the Service Mode. (As the following steps to enter Service Mode: 1. Guide to Entering Service Mode and Factory Reset No Item 1 Service Mode Steps Please do the following pictures show) 1 2 3 4 2 Factory Reset Power "Left"button "Left"button Menu After final QC step, we have to erase all saved change again and restore the factory defaults.

XD1150 Service Guide
Page 48
DLP Composer - USB) - Firmware (PD100 / PD100D / PD120 / PD120D / XD1170D / XD1270D / XD1150 / XD1250) Hardware : Item Photo Item Photo Projector (PD100 / PD100D) Projector (PD120 / PD120D) Power Cord Projector (XD1170D /XD1270D) USB Cable PC or Laptop Projector (XD1150/ XD1250) Confidential 1 Chapter 5 Firmware Upgrade Equipment Needed Software : (DDP 2000-
DLP Composer - USB) - Firmware (PD100 / PD100D / PD120 / PD120D / XD1170D / XD1270D / XD1150 / XD1250) Hardware : Item Photo Item Photo Projector (PD100 / PD100D) Projector (PD120 / PD120D) Power Cord Projector (XD1170D /XD1270D) USB Cable PC or Laptop Projector (XD1150/ XD1250) Confidential 1 Chapter 5 Firmware Upgrade Equipment Needed Software : (DDP 2000-
XD1150 Service Guide
Page 51
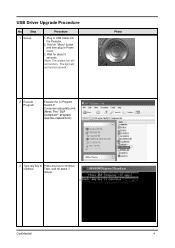
continue Then, wait for about 1 minute. Wait for about 5 seconds. (Note: The system fan will not function as well.) 2 Execute Program Execute the C:\Program files\DLP Composer\usbupdata.cmd. (Note: The "DLP Composer" program must be closed first.) Photo 3 Type any key to Press any key to continue. Plug in Power Cord. 3. Hold on "Menu" button and then plug in USB Cable into the Projector. 2. The light will not function. Confidential 4 USB Driver Upgrade Procedure No Step 1 Set-up Procedure 1.
continue Then, wait for about 1 minute. Wait for about 5 seconds. (Note: The system fan will not function as well.) 2 Execute Program Execute the C:\Program files\DLP Composer\usbupdata.cmd. (Note: The "DLP Composer" program must be closed first.) Photo 3 Type any key to Press any key to continue. Plug in Power Cord. 3. Hold on "Menu" button and then plug in USB Cable into the Projector. 2. The light will not function. Confidential 4 USB Driver Upgrade Procedure No Step 1 Set-up Procedure 1.

XD1150 Service Guide
Page 53
Firmware Upgrade Procedure No Step Procedure 1 Set-up 2 Set-up 3 1. Hold on "Menu" button and then plug in USB Cable into the Projector. 2. If not, press "Browse" to select the right path. 6 1. Select "Edit\Preferences\ Communications" and choose "USB". 2. Click ... seconds. (Note: The system fan will not function as well.) Link PC COM1 and projector Execute the "DLP ComposeTM" file. . 4 Click "Edit" and "Preferences". 1 Photo 2 5 1. The light will not function. Plug in Power Cord. 3. Click "Library". 2. Confidential 1 USB Vendor: 0x451 Product: 0x2000 2 OK...
Firmware Upgrade Procedure No Step Procedure 1 Set-up 2 Set-up 3 1. Hold on "Menu" button and then plug in USB Cable into the Projector. 2. If not, press "Browse" to select the right path. 6 1. Select "Edit\Preferences\ Communications" and choose "USB". 2. Click ... seconds. (Note: The system fan will not function as well.) Link PC COM1 and projector Execute the "DLP ComposeTM" file. . 4 Click "Edit" and "Preferences". 1 Photo 2 5 1. The light will not function. Plug in Power Cord. 3. Click "Library". 2. Confidential 1 USB Vendor: 0x451 Product: 0x2000 2 OK...

XD1150 Service Guide
Page 57
... Fixture RS-232 Cable To Analog Port EDID Key-In Procedure No Step Procedure 1 Execute EDID Click on "Model". 3. Power Adapter to execute Program. Fixture P3 to the model that you use "COM 1", choose COM 1 in the Port selection. 2. Choose the EDID ... 3 Confidential 10 Fixture P2 to PC COM1 Port 3. EDID Program. 2 Choose Model 1. Fixture P1 to Projector Analog Port 4. In the Port Selection Bar, 1 please choose the Port that responses to Projector Digital Port Photo Adapter To Digital Port JP1 P3 P1 P2 2. Setup Procedure No Step Procedure 1 Connect All...
... Fixture RS-232 Cable To Analog Port EDID Key-In Procedure No Step Procedure 1 Execute EDID Click on "Model". 3. Power Adapter to execute Program. Fixture P3 to the model that you use "COM 1", choose COM 1 in the Port selection. 2. Choose the EDID ... 3 Confidential 10 Fixture P2 to PC COM1 Port 3. EDID Program. 2 Choose Model 1. Fixture P1 to Projector Analog Port 4. In the Port Selection Bar, 1 please choose the Port that responses to Projector Digital Port Photo Adapter To Digital Port JP1 P3 P1 P2 2. Setup Procedure No Step Procedure 1 Connect All...

XD1150 User's Guide EN
Page 3
... 6 Main Unit...6 Control Panel ...7 Connection Ports ...8 Remote Control...9 Installation 10 Connecting the Projector 10 Powering On/Off the Projector 11 Powering On the Projector 11 Powering Off the projector 12 Warning Indicator ...12 Adjusting the Projected Image 13 Adjusting the Projector Image Height 13 Adjusting the Projector Zoom / Focus 14 Adjusting Projected Image Size 14 User Controls 15 Control...
... 6 Main Unit...6 Control Panel ...7 Connection Ports ...8 Remote Control...9 Installation 10 Connecting the Projector 10 Powering On/Off the Projector 11 Powering On the Projector 11 Powering Off the projector 12 Warning Indicator ...12 Adjusting the Projected Image 13 Adjusting the Projector Image Height 13 Adjusting the Projector Zoom / Focus 14 Adjusting Projected Image Size 14 User Controls 15 Control...

XD1150 User's Guide EN
Page 4
... do not expose this product to change the lamp when it will burn out and may hurt your unit. Do not use lens cap when projector is on. When the lamp reaches the end of your eyes. To replace the lamp, follow all warnings, precautions and maintenance as this may cause... sources. Do not look into the projector's lens when the lamp is in this user's guide to cool down, and follow the procedures listed under "Replacing the Lamp". When changing the lamp, please allow unit to maximize the life of its cooling cycle before disconnecting power. Please be sure to rain or...
... do not expose this product to change the lamp when it will burn out and may hurt your unit. Do not use lens cap when projector is on. When the lamp reaches the end of your eyes. To replace the lamp, follow all warnings, precautions and maintenance as this may cause... sources. Do not look into the projector's lens when the lamp is in this user's guide to cool down, and follow the procedures listed under "Replacing the Lamp". When changing the lamp, please allow unit to maximize the life of its cooling cycle before disconnecting power. Please be sure to rain or...

XD1150 User's Guide EN
Page 6
... (for XD1250/ XD1250D) True SVGA, 800 x 600 addressable pixels (for XD1150/XD1150D) Mac compatible English ... 4 cluding: Acer eView Management, Acer eTimer Management and Acer eOpening Management. High-tech DVI connection for digital signal with HDCP ...XD1150/ XD1150D) Single chip DLP® technology NTSC3.58/NTSC4.43/PAL/SECAM and HDTV compat- Introduction Product Features This product is an XGA(XD1250/XD1250D)/ SVGA(XD1150/XD1150D) single chip 0.55" DLP® projector. ible (480i/p, 576i/p, 720p, 1080i) User friendly and powerful Acer...
... (for XD1250/ XD1250D) True SVGA, 800 x 600 addressable pixels (for XD1150/XD1150D) Mac compatible English ... 4 cluding: Acer eView Management, Acer eTimer Management and Acer eOpening Management. High-tech DVI connection for digital signal with HDCP ...XD1150/ XD1150D) Single chip DLP® technology NTSC3.58/NTSC4.43/PAL/SECAM and HDTV compat- Introduction Product Features This product is an XGA(XD1250/XD1250D)/ SVGA(XD1150/XD1150D) single chip 0.55" DLP® projector. ible (480i/p, 576i/p, 720p, 1080i) User friendly and powerful Acer...
XD1150 User's Guide EN
Page 7
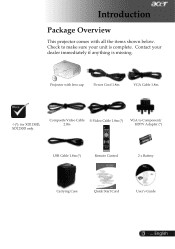
Contact your unit is missing. Composite Video Cable S-Video Cable 1.8m (*) 2.0m VGA to make sure your dealer immediately if anything is complete. Projector with all the items shown below. English Check to Component/ HDTV Adapter (*) USB Cable 1.8m (*) Remote Control 2 x Battery Carrying Case Quick Start Card User's Guide 5 ... Introduction Package Overview This projector comes with lens cap Power Cord 1.8m VGA Cable 1.8m (*): for XD1150D, XD1250D only.
Contact your unit is missing. Composite Video Cable S-Video Cable 1.8m (*) 2.0m VGA to make sure your dealer immediately if anything is complete. Projector with all the items shown below. English Check to Component/ HDTV Adapter (*) USB Cable 1.8m (*) Remote Control 2 x Battery Carrying Case Quick Start Card User's Guide 5 ... Introduction Package Overview This projector comes with lens cap Power Cord 1.8m VGA Cable 1.8m (*): for XD1150D, XD1250D only.
XD1150 User's Guide EN
Page 12
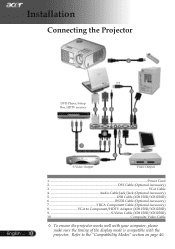
... Cable (XD1150D/XD1250D) 10 Composite Video Cable To ensure the projector works well with your computer, please make sure the timing of the display mode is compatible with the projector. Installation Connecting the Projector 1 RGB USB 5 DVD Player, Settop Box, HDTV receiver 2 34 ...6 English ... 10 7 S-Video Output 8 10 9 Video Output 1...Power Cord 2 DVI Cable (Optional Accessory) 3...VGA Cable 4 ...
... Cable (XD1150D/XD1250D) 10 Composite Video Cable To ensure the projector works well with your computer, please make sure the timing of the display mode is compatible with the projector. Installation Connecting the Projector 1 RGB USB 5 DVD Player, Settop Box, HDTV receiver 2 34 ...6 English ... 10 7 S-Video Output 8 10 9 Video Output 1...Power Cord 2 DVI Cable (Optional Accessory) 3...VGA Cable 4 ...

XD1150 User's Guide EN
Page 13
...If you connect multiple sources at the same time, using the "Source" button on the remote control or control panel to switch. 2 Power Turn on this source type and there is no such type of input signal found. If the screen displays "No ...are securely connected. jector locks on the projector first and then the signal sources. 1 Lens Cap 11 ... Turn on the control panel. And the Power LED will turn blue. 4. The projector will flash red. 3. Installation Powering On/Off the Projector Powering On the Projector 1. Remove the lens cap. ...
...If you connect multiple sources at the same time, using the "Source" button on the remote control or control panel to switch. 2 Power Turn on this source type and there is no such type of input signal found. If the screen displays "No ...are securely connected. jector locks on the projector first and then the signal sources. 1 Lens Cap 11 ... Turn on the control panel. And the Power LED will turn blue. 4. The projector will flash red. 3. Installation Powering On/Off the Projector Powering On the Projector 1. Remove the lens cap. ...

XD1150 User's Guide EN
Page 14
...; When the "TEMP" indicator flashes red for about 30 seconds, you will see a message "Please press power button again to turn on the projector immediately following a power off soon." If you must wait until the projector has completed the cooling cycle and has entered standby mode. English ... 12 Warning Indicator When the...
...; When the "TEMP" indicator flashes red for about 30 seconds, you will see a message "Please press power button again to turn on the projector immediately following a power off soon." If you must wait until the projector has completed the cooling cycle and has entered standby mode. English ... 12 Warning Indicator When the...

XD1150 User's Guide EN
Page 17
...;16 degrees) while OSD menu is turned off. 15 ... lection in OSD menu. Use for you to the "Power On/Off the Projector" section on menu. User Controls Control Panel & Remote Control There are two ways for keystone correction to choose RGB, Component-p, .... Control Panel Using the Control Panel Power Refer to control the functions: Remote Control and Control Panel. Four Directional Select Keys Use to select items or make adjustments to the input source. Resync Automatically synchronizes the projector to your se- English Menu ...
...;16 degrees) while OSD menu is turned off. 15 ... lection in OSD menu. Use for you to the "Power On/Off the Projector" section on menu. User Controls Control Panel & Remote Control There are two ways for keystone correction to choose RGB, Component-p, .... Control Panel Using the Control Panel Power Refer to control the functions: Remote Control and Control Panel. Four Directional Select Keys Use to select items or make adjustments to the input source. Resync Automatically synchronizes the projector to your se- English Menu ...
XD1150 User's Guide EN
Page 18
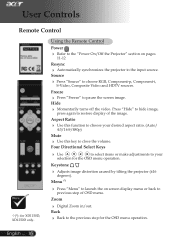
Using the Remote Control Power Refer 11-12 to the "Power On/Off the Projector" section on previous step of the image. Back Back to the previous step for the to select items or make OSD menu ...source. to hide image, Aspect Ratio Use this function 4:3/16:9/480p) to choose your Keystone Adjusts image degrees). distortion caused by tilting the projector (±16 Menu (*) Press "Menu" to close the volume. adjustments to pause the screen image. Freeze Press "Freeze" to your ...
Using the Remote Control Power Refer 11-12 to the "Power On/Off the Projector" section on previous step of the image. Back Back to the previous step for the to select items or make OSD menu ...source. to hide image, Aspect Ratio Use this function 4:3/16:9/480p) to choose your Keystone Adjusts image degrees). distortion caused by tilting the projector (±16 Menu (*) Press "Menu" to close the volume. adjustments to pause the screen image. Freeze Press "Freeze" to your ...

XD1150 User's Guide EN
Page 27
... The message will show or to show up 30 hours before end of Acer projector to the projector from your PC to enter "Download Mode". 1. Press and hold "Menu" and " " buttons simultaneously then plug the AC power cord to turn off the projector. 2. Lamp Hour Elapse Displays the lamp's elapsed operating time (in hours). Lamp...
... The message will show or to show up 30 hours before end of Acer projector to the projector from your PC to enter "Download Mode". 1. Press and hold "Menu" and " " buttons simultaneously then plug the AC power cord to turn off the projector. 2. Lamp Hour Elapse Displays the lamp's elapsed operating time (in hours). Lamp...
XD1150 User's Guide EN
Page 30
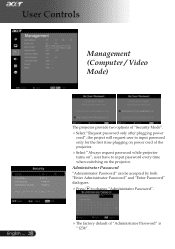
...61492;The factory default of the projector. Select "Always request password while projector turns on", user have to input password only for the first time plugging on the projector. User Controls Management (Computer / Video Mode) English ... 28 The projector provide two options of "Security ...Mode". Select "Request password only after plugging power cord", the project will request user to input ...
...61492;The factory default of the projector. Select "Always request password while projector turns on", user have to input password only for the first time plugging on the projector. User Controls Management (Computer / Video Mode) English ... 28 The projector provide two options of "Security ...Mode". Select "Request password only after plugging power cord", the project will request user to input ...

XD1150 User's Guide EN
Page 33
Alarm Volume Choose this function to adjust volume when power on . Choose the "Off" to turn mute off . Power On/Off Volume Choose this function to turn mute on /off . User Controls Audio (Computer / Video Mode) Volume Press the Press the to increase the volume. English Mute Choose the "On" to adjust volume when there are errors of the projector. Audio menu is for XD1150D/XD1250D. 31 ... to decrease the volume.
Alarm Volume Choose this function to adjust volume when power on . Choose the "Off" to turn mute off . Power On/Off Volume Choose this function to turn mute on /off . User Controls Audio (Computer / Video Mode) Volume Press the Press the to increase the volume. English Mute Choose the "On" to adjust volume when there are errors of the projector. Audio menu is for XD1150D/XD1250D. 31 ... to decrease the volume.
XD1150 User's Guide EN
Page 36
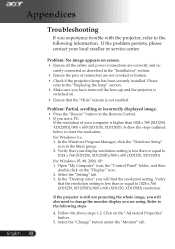
..., XD1250D)/800 x 600 (XD1150, XD1150D) resolution. Select the "Change" button under the "Monitor" tab . curely connected as described in the Main group. 2. Select the "Setting" tab. 3. Click on screen. Ensure all the cables and power connections are using. Appendices English ... 34 Troubleshooting If you experience trouble with the projector, refer to the...
..., XD1250D)/800 x 600 (XD1150, XD1150D) resolution. Select the "Change" button under the "Monitor" tab . curely connected as described in the Main group. 2. Select the "Setting" tab. 3. Click on screen. Ensure all the cables and power connections are using. Appendices English ... 34 Troubleshooting If you experience trouble with the projector, refer to the...


