
User Guide
Page 2
... pixel or a pixel lit all of the fluorescent light, the screen may flicker during initial use . In this case, the screen is displayed for hours. X263W NOTES y Due to the nature of the time. Turn off the Power Switch for hours. y Due to make sure the flicker disappears. y The LCD screen...
... pixel or a pixel lit all of the fluorescent light, the screen may flicker during initial use . In this case, the screen is displayed for hours. X263W NOTES y Due to the nature of the time. Turn off the Power Switch for hours. y Due to make sure the flicker disappears. y The LCD screen...

User Guide
Page 3
... and openings are provided for accessibility Be sure that could be seriously damaged. Safe listening Follow these instructions carefully. INFORMATION FOR YOUR SAFETY AND COMFORT X263W Safety instructions Read these instructions, suggested by placing the product on a vibrating surface. CAUTION for ventilation to ensure reliable operation of internal components and to...
... and openings are provided for accessibility Be sure that could be seriously damaged. Safe listening Follow these instructions carefully. INFORMATION FOR YOUR SAFETY AND COMFORT X263W Safety instructions Read these instructions, suggested by placing the product on a vibrating surface. CAUTION for ventilation to ensure reliable operation of internal components and to...

User Guide
Page 4
... Note: Adjust only those controls that are also at the center of your documents, place the display at risk of physical injury after prolonged use . X263W Product servicing Do not attempt to service this product from staying too long in the hands, wrists, arms, shoulders, neck or back: y numbness, or a burning...
... Note: Adjust only those controls that are also at the center of your documents, place the display at risk of physical injury after prolonged use . X263W Product servicing Do not attempt to service this product from staying too long in the hands, wrists, arms, shoulders, neck or back: y numbness, or a burning...

User Guide
Page 5
..., shades or blinds Š using a task light Š changing the display's viewing angle Š using a glare-reduction filter Š using the product on a distant point. X263W Taking care of your vision Long viewing hours, wearing incorrect glasses or contact lenses, glare, excessive room lighting, poorly focused screens, very small typefaces and... at a higher level than the top edge of time. y Keep your head at bright light sources, such as possible. The following websites: Worldwide: http://global.acer.com/about/sustainability.htm EN- 4
..., shades or blinds Š using a task light Š changing the display's viewing angle Š using a glare-reduction filter Š using the product on a distant point. X263W Taking care of your vision Long viewing hours, wearing incorrect glasses or contact lenses, glare, excessive room lighting, poorly focused screens, very small typefaces and... at a higher level than the top edge of time. y Keep your head at bright light sources, such as possible. The following websites: Worldwide: http://global.acer.com/about/sustainability.htm EN- 4
User Guide
Page 6
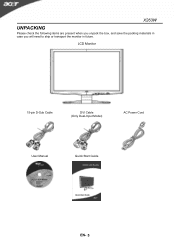
LCD Monitor 15-pin D-Sub Cable DVI Cable (Only Dual-Input Model) AC Power Cord User Manual Quick Start Guide EN- 5 X263W UNPACKING Please check the following items are present when you unpack the box, and save the packing materials in case you will need to ship or transport the monitor in future.
LCD Monitor 15-pin D-Sub Cable DVI Cable (Only Dual-Input Model) AC Power Cord User Manual Quick Start Guide EN- 5 X263W UNPACKING Please check the following items are present when you unpack the box, and save the packing materials in case you will need to ship or transport the monitor in future.

User Guide
Page 7
SCREEN POSITION ADJUSTMENT In order to optimize the best viewing position, you can be adjusted to hold the edges of the monitor as indicated by using both of your hands to 15 degrees up or 5 degrees down as shown in the figure below . The monitor can adjust the tilt of the base. EN- 6 X263W ATTACHING / REMOVING THE BASE Install: Align the release button on the bottom of the monitor with the corresponding slots on the bottom of the monitor by arrow below .
SCREEN POSITION ADJUSTMENT In order to optimize the best viewing position, you can be adjusted to hold the edges of the monitor as indicated by using both of your hands to 15 degrees up or 5 degrees down as shown in the figure below . The monitor can adjust the tilt of the base. EN- 6 X263W ATTACHING / REMOVING THE BASE Install: Align the release button on the bottom of the monitor with the corresponding slots on the bottom of the monitor by arrow below .

User Guide
Page 8
X263W WALL MOUNTING (OPTIONAL) To obtain a wall-mounting kit, contact your local dealer, Refer to the instructions that come with UL Listed Wall Mount Bracket EN- 7 Screw holes (100 mm X 100 mm) * For use only with the base mounting kit.
X263W WALL MOUNTING (OPTIONAL) To obtain a wall-mounting kit, contact your local dealer, Refer to the instructions that come with UL Listed Wall Mount Bracket EN- 7 Screw holes (100 mm X 100 mm) * For use only with the base mounting kit.
User Guide
Page 9
.../240 V AC (outside of U.S.): y Use a Cord Set consisting of the monitor. y Do not expose the monitor to wipe the screen and cabinet front and sides. X263W CONNECTING THE POWER CORD y Check first to make sure that allows operation in which the equipment will be installed. y This monitor has a universal power supply...
.../240 V AC (outside of U.S.): y Use a Cord Set consisting of the monitor. y Do not expose the monitor to wipe the screen and cabinet front and sides. X263W CONNECTING THE POWER CORD y Check first to make sure that allows operation in which the equipment will be installed. y This monitor has a universal power supply...

User Guide
Page 10
... about its capabilities, for example, supported resolutions and corresponding timing. The monitor supports DDC2B standard. DDC To make your system also supports DDC protocol. EN- 9 X263W POWER SAVING The monitor will be driven into Power Saving" mode by the control signal from Active OFF state back to Plug and Play with...
... about its capabilities, for example, supported resolutions and corresponding timing. The monitor supports DDC2B standard. DDC To make your system also supports DDC protocol. EN- 9 X263W POWER SAVING The monitor will be driven into Power Saving" mode by the control signal from Active OFF state back to Plug and Play with...

User Guide
Page 11
DESCRIPTION +5V Logic Ground Monitor Ground DDC-Serial Data H-Sync V-Sync DDC-Serial Clock EN- 10 CONNECTOR PIN ASSIGNMENT X263W PIN NO. 1. 2. 3. 4. 5. 6. 7. 8. 15-Pin Color Display Signal Cable DESCRIPTION Red Green Blue Monitor Ground DDC-return R-Ground G-Ground B-Ground PIN NO. 9. 10. 11. 12. 13. 14. 15.
DESCRIPTION +5V Logic Ground Monitor Ground DDC-Serial Data H-Sync V-Sync DDC-Serial Clock EN- 10 CONNECTOR PIN ASSIGNMENT X263W PIN NO. 1. 2. 3. 4. 5. 6. 7. 8. 15-Pin Color Display Signal Cable DESCRIPTION Red Green Blue Monitor Ground DDC-return R-Ground G-Ground B-Ground PIN NO. 9. 10. 11. 12. 13. 14. 15.

User Guide
Page 12
TMDS Data4+ 6. GND(return for +5V hsync.vsync) 16. Analogue Vertical Sync 20. 9. TMDS Data1+ 22. 11. DDC Clock PIN Meaning 13. TMDS Data3- 24. Hot Plug Detect 17. TMDS Data 0/5 8. TMDS Data0+ 7. TMDS Data1- 21. 10. TMDS Data4- 5. TMDS Data0- 18. EN- 11 TMDS Data 1/3 Shield 23. 12. TMDS Data5TMDS Data5+ TMDS Clock Shield TMDS Clock+ DDC TMDS Clock- TMDS Data2- 2. DDC Data 19. TMDS Data3+ 14. +5V Power 15. TMDS Data 2/4 Shield 4. TMDS Data2+ 3. X263W 24-Pin Color Display Signal Cable PIN Meaning 1.
TMDS Data4+ 6. GND(return for +5V hsync.vsync) 16. Analogue Vertical Sync 20. 9. TMDS Data1+ 22. 11. DDC Clock PIN Meaning 13. TMDS Data3- 24. Hot Plug Detect 17. TMDS Data 0/5 8. TMDS Data0+ 7. TMDS Data1- 21. 10. TMDS Data4- 5. TMDS Data0- 18. EN- 11 TMDS Data 1/3 Shield 23. 12. TMDS Data5TMDS Data5+ TMDS Clock Shield TMDS Clock+ DDC TMDS Clock- TMDS Data2- 2. DDC Data 19. TMDS Data3+ 14. +5V Power 15. TMDS Data 2/4 Shield 4. TMDS Data2+ 3. X263W 24-Pin Color Display Signal Cable PIN Meaning 1.

User Guide
Page 13
X263W Pin No. 1 2 3 4 5 6 7 8 9 10 HDMI 19pin Connector Pin Function T.M.D.S Data 2+ T.M.D.S Data 2 Ground T.M.D.S Data 2T.M.D.S Data 1+ T.M.D.S Data 1 Ground T.M.D.S Data 1T.M.D.S Data 0+ T.M.D.S Data 0 Ground T.M.D.S Data 0T.M.D.S Clock+ Pin No. 11 12 13 14 15 16 17 18 19 Pin Function T.M.D.S Clock Ground T.M.D.S ClockNC NC Clock line (SCL) Data line (SDA) Ground +5V Hot Plug Detect EN- 12
X263W Pin No. 1 2 3 4 5 6 7 8 9 10 HDMI 19pin Connector Pin Function T.M.D.S Data 2+ T.M.D.S Data 2 Ground T.M.D.S Data 2T.M.D.S Data 1+ T.M.D.S Data 1 Ground T.M.D.S Data 1T.M.D.S Data 0+ T.M.D.S Data 0 Ground T.M.D.S Data 0T.M.D.S Clock+ Pin No. 11 12 13 14 15 16 17 18 19 Pin Function T.M.D.S Clock Ground T.M.D.S ClockNC NC Clock line (SCL) Data line (SDA) Ground +5V Hot Plug Detect EN- 12
User Guide
Page 14
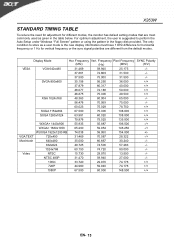
... 27.000 -/- 1080i 33.720 29.970 74.176 +/+ 720P 44.960 59.940 74.176 +/+ 1080P 67.500 60.000 148.500 +/+ EN- 13 X263W STANDARD TIMING TABLE To reduce the need for adjustment for vertical frequency or the sync signal polarities are different from the default modes. For optimum...
... 27.000 -/- 1080i 33.720 29.970 74.176 +/+ 720P 44.960 59.940 74.176 +/+ 1080P 67.500 60.000 148.500 +/+ EN- 13 X263W STANDARD TIMING TABLE To reduce the need for adjustment for vertical frequency or the sync signal polarities are different from the default modes. For optimum...
User Guide
Page 15
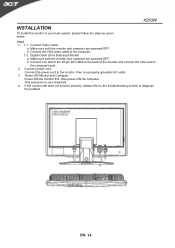
... Connect the power cord to the monitor, then to your host system, please follow the steps as given below: Steps 1. 1-1 Connect Video Cable a. EN- 14 X263W INSTALLATION To install the monitor to a properly grounded AC outlet. 3. Connect the VGA video cable to the computer. 1-2 Digital Cable (Only Dual-Input Model) a. This...
... Connect the power cord to the monitor, then to your host system, please follow the steps as given below: Steps 1. 1-1 Connect Video Cable a. EN- 14 X263W INSTALLATION To install the monitor to a properly grounded AC outlet. 3. Connect the VGA video cable to the computer. 1-2 Digital Cable (Only Dual-Input Model) a. This...

User Guide
Page 16
... button will act as EXIT-KEY (EXIT OSD menu). 2)When OSD menu is ON. EN- 15 Press < or > to select the desired function. USER CONTROLS X263W Front Panel Controls 1.Power Switch: To turn ON or OFF the power. 2.Power LED: Lights up to indicate the power is turned ON. 3.Empowering / Exit...
... button will act as EXIT-KEY (EXIT OSD menu). 2)When OSD menu is ON. EN- 15 Press < or > to select the desired function. USER CONTROLS X263W Front Panel Controls 1.Power Switch: To turn ON or OFF the power. 2.Power LED: Lights up to indicate the power is turned ON. 3.Empowering / Exit...
User Guide
Page 17
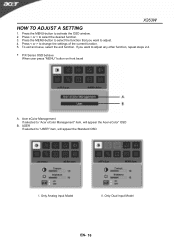
X263W HOW TO ADJUST A SETTING 1. Press the MENU-button to select the function that you want to select the desired function. 3. Only Analog Input Model II. Press < or > to adjust. 4. If you want to "Acer eColor Management" item, will appear the Standard OSD I. Acer eColor Management If selected to adjust any other... function, repeat steps 2-4. Press < or > to "USER" item, will appear the Acer eColor" OSD B. To exit and save, select the exit function. y P/X Series OSD behave When user press "MENU" button on front bezel A. USER ...
X263W HOW TO ADJUST A SETTING 1. Press the MENU-button to select the function that you want to select the desired function. 3. Only Analog Input Model II. Press < or > to adjust. 4. If you want to "Acer eColor Management" item, will appear the Standard OSD I. Acer eColor Management If selected to adjust any other... function, repeat steps 2-4. Press < or > to "USER" item, will appear the Acer eColor" OSD B. To exit and save, select the exit function. y P/X Series OSD behave When user press "MENU" button on front bezel A. USER ...

User Guide
Page 18
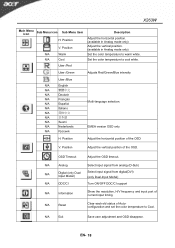
... fine detail N/A Movie mode Displays scenes in analog mode only) EN- 17 Settings can be fine-tuned to read onscreen text N/A Standard mode Default Setting. Acer eColor Management Main Menu icon Sub Menu icon Sub Menu item Description N/A User mode User defined. USER Main Menu icon Sub Menu icon Sub Menu... of the screen image Brightness Adjust the background brightness of brightness and contrast prevent eyestrain. Pictures and photographs appear in vibrant colors with sharp detail B. X263W ADJUSTING THE PICTURE The descriptions for function control LEDS A.
... fine detail N/A Movie mode Displays scenes in analog mode only) EN- 17 Settings can be fine-tuned to read onscreen text N/A Standard mode Default Setting. Acer eColor Management Main Menu icon Sub Menu icon Sub Menu item Description N/A User mode User defined. USER Main Menu icon Sub Menu icon Sub Menu... of the screen image Brightness Adjust the background brightness of brightness and contrast prevent eyestrain. Pictures and photographs appear in vibrant colors with sharp detail B. X263W ADJUSTING THE PICTURE The descriptions for function control LEDS A.
User Guide
Page 19
... Show the resolution, H/V frequency and input port of Autoconfiguration and set the color temperature to Cool. N/A Reset Clear each old status of current input timing. X263W Main Menu icon Sub Menu icon Sub Menu item H. User /Green Adjusts Red/Green/Blue intensity User /Blue N/A English N/A 繁體中文 N/A Deutsch N/A Fran...
... Show the resolution, H/V frequency and input port of Autoconfiguration and set the color temperature to Cool. N/A Reset Clear each old status of current input timing. X263W Main Menu icon Sub Menu icon Sub Menu item H. User /Green Adjusts Red/Green/Blue intensity User /Blue N/A English N/A 繁體中文 N/A Deutsch N/A Fran...
User Guide
Page 20
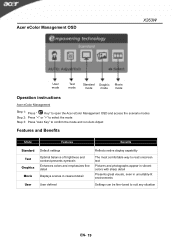
Acer eColor Management OSD X263W User mode Text mode Standard Graphic Movie mode mode mode Operation instructions Acer eColor Management Step 1: Press " Key" to open the Acer eColor Management OSD and access the scenario modes Step 2: Press "" to select the mode Step 3: Press "Auto Key" to confirm the mode and run Auto ...
Acer eColor Management OSD X263W User mode Text mode Standard Graphic Movie mode mode mode Operation instructions Acer eColor Management Step 1: Press " Key" to open the Acer eColor Management OSD and access the scenario modes Step 2: Press "" to select the mode Step 3: Press "Auto Key" to confirm the mode and run Auto ...
User Guide
Page 21
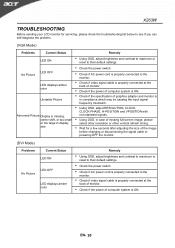
y Check if the power of computer system is properly connected to the monitor. X263W TROUBLESHOOTING Before sending your LCD monitor for a few seconds after adjusting the size of the image before changing or disconnecting the signal cable or powering ...
y Check if the power of computer system is properly connected to the monitor. X263W TROUBLESHOOTING Before sending your LCD monitor for a few seconds after adjusting the size of the image before changing or disconnecting the signal cable or powering ...