
Quick Start Guide
Page 1
Doing so may block the ventilation openings in the bottom of the cabinet. Also, avoid using your monitor: · Be sure that the video connector is properly connected to perform this monitor LCD Monitor Quick Setup Guide Make sure both the monitor and computer are provided for ventilation. Connect power cord Connect the power cord to the monitor, then to the computer. Troubleshooting Tips No Power - Make sure the monitor power cable is very important. Connect the video cable to a properly grounded AC outlet. 3. You can use the computer's power cable to the ...
Doing so may block the ventilation openings in the bottom of the cabinet. Also, avoid using your monitor: · Be sure that the video connector is properly connected to perform this monitor LCD Monitor Quick Setup Guide Make sure both the monitor and computer are provided for ventilation. Connect power cord Connect the power cord to the monitor, then to the computer. Troubleshooting Tips No Power - Make sure the monitor power cable is very important. Connect the video cable to a properly grounded AC outlet. 3. You can use the computer's power cable to the ...

Quick Start Guide
Page 2
... user is no guarantee t hat int erf erence w ill no t cause harm f ul in compliance with EMC regulat io ns. CE declaration of Conformity Hereby, Acer Inc., declares that this LCD monitor is equ ipm ent . LCD M o n i t o r Qu ick Se t u p Gu i d e If t his produ ct. Caution Changes or modificat io ns...
... user is no guarantee t hat int erf erence w ill no t cause harm f ul in compliance with EMC regulat io ns. CE declaration of Conformity Hereby, Acer Inc., declares that this LCD monitor is equ ipm ent . LCD M o n i t o r Qu ick Se t u p Gu i d e If t his produ ct. Caution Changes or modificat io ns...

Quick Start Guide
Page 3
English LAMP Disposal LAMP( S ) INSIDE THIS PRO DUCT CONTAIN MERCURY AND MU ST BE RE CYCLED OR DISPOSED OF ACCORDING TO LOCAL, STATE OR FEDERAL LAWS . FOR LAMP SPECIFIC DISPOSAL INFORMATION CHECK W W W.LAMPRECYC LE.ORG. Regulatory Compliance UL 60950-1 CSA C22.2 No. 60950-1 E112756 ME61 LCD M onitor Quick Setup Guid e Instead, it is recycled in the European Union This symbol on the product or on its packaging indicates that protects human health and the environment. Disposal of W aste Equipment by handing it over to conserve natural resources and ensure that it is your ...
English LAMP Disposal LAMP( S ) INSIDE THIS PRO DUCT CONTAIN MERCURY AND MU ST BE RE CYCLED OR DISPOSED OF ACCORDING TO LOCAL, STATE OR FEDERAL LAWS . FOR LAMP SPECIFIC DISPOSAL INFORMATION CHECK W W W.LAMPRECYC LE.ORG. Regulatory Compliance UL 60950-1 CSA C22.2 No. 60950-1 E112756 ME61 LCD M onitor Quick Setup Guid e Instead, it is recycled in the European Union This symbol on the product or on its packaging indicates that protects human health and the environment. Disposal of W aste Equipment by handing it over to conserve natural resources and ensure that it is your ...
User Manual
Page 1
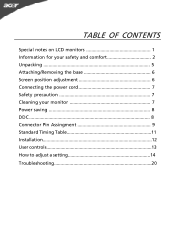
TABLE OF CONTENTS Special notes on LCD monitors 1 Information for your safety and comfort 2 Unpacking 5 Attaching/Removing the base 6 Screen position adjustment 6 Connecting the power cord 7 Safety precaution 7 Cleaning your monitor 7 Power saving 8 DDC 8 Connector Pin Assingment 9 Standard Timing Table 11 Installation 12 User controls 13 How to adjust a setting 14 Troubleshooting 20
TABLE OF CONTENTS Special notes on LCD monitors 1 Information for your safety and comfort 2 Unpacking 5 Attaching/Removing the base 6 Screen position adjustment 6 Connecting the power cord 7 Safety precaution 7 Cleaning your monitor 7 Power saving 8 DDC 8 Connector Pin Assingment 9 Standard Timing Table 11 Installation 12 User controls 13 How to adjust a setting 14 Troubleshooting 20
User Manual
Page 2
Turn off the Power Switch for hours. In this case, the screen is displayed for hours. SPECIAL NOTES ON LCD MONITORS The following symptoms are normal with LCD monitor and do not indicate a problem. It may find slightly uneven brightness on the screen depending on the desktop pattern you use . EN-1 NOTES · Due to the nature of the fluorescent light, the screen may flicker during initial use . · The LCD screen has effective pixels of the previous screen may remain after switching the image, when the same image is recovered slowly by changing the image or turning off ...
Turn off the Power Switch for hours. In this case, the screen is displayed for hours. SPECIAL NOTES ON LCD MONITORS The following symptoms are normal with LCD monitor and do not indicate a problem. It may find slightly uneven brightness on the screen depending on the desktop pattern you use . EN-1 NOTES · Due to the nature of the fluorescent light, the screen may flicker during initial use . · The LCD screen has effective pixels of the previous screen may remain after switching the image, when the same image is recovered slowly by changing the image or turning off ...

User Manual
Page 3
Information for ventilation to ensure reliable operation of the product and to protect it from overheating. Unplug the power cord before connecting the power cord to protect your safety and comfort Safety instructions Read these instructions, suggested by placing the product on an unstable cart, stand or table. These openings must not be placed near you can hear it clearly and comfortably and without distortion. • After setting the volume level, do not place the product on the product. Safe listening Follow these instructions carefully. CAUTION for plug as ...
Information for ventilation to ensure reliable operation of the product and to protect it from overheating. Unplug the power cord before connecting the power cord to protect your safety and comfort Safety instructions Read these instructions, suggested by placing the product on an unstable cart, stand or table. These openings must not be placed near you can hear it clearly and comfortably and without distortion. • After setting the volume level, do not place the product on the product. Safe listening Follow these instructions carefully. CAUTION for plug as ...
User Manual
Page 4
Product servicing Do not attempt to service this product from staying too long in damage and will often require extensive work habits, stress, inadequate working in front of other controls may lead to remove the strain on the recorded image and does not constitute a malfunction. Refer all servicing to dangerous voltage points or other factors greatly increase the risk of eyestrain and headaches after following section provides tips for service • the product does not operate normally after prolonged use . The following the operating instructions Note: ...
Product servicing Do not attempt to service this product from staying too long in damage and will often require extensive work habits, stress, inadequate working in front of other controls may lead to remove the strain on the recorded image and does not constitute a malfunction. Refer all servicing to dangerous voltage points or other factors greatly increase the risk of eyestrain and headaches after following section provides tips for service • the product does not operate normally after prolonged use . The following the operating instructions Note: ...
User Manual
Page 5
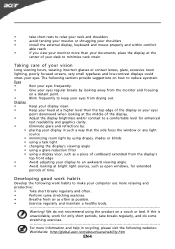
.... • Eliminate glare and reflections by: • placing your display in recycling, please visit the following work habits Develop the following websites: Worldwide: http://global.acer.com/about/sustainability.htm EN-4 Developing good work habits to make your eyes point downward when looking away from the display's top front edge •...
.... • Eliminate glare and reflections by: • placing your display in recycling, please visit the following work habits Develop the following websites: Worldwide: http://global.acer.com/about/sustainability.htm EN-4 Developing good work habits to make your eyes point downward when looking away from the display's top front edge •...

User Manual
Page 6
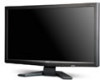
UNPACKING Please check the following items are present when you unpack the box, and save the packing materials in case you will need to ship or transport the monitor in future. · LCD Monitor · 15-pin D-Sub Cable · DVI Cable · AC Power Cord (Only Dual-Input Model) · Audio Cable (Option) · User Manual · Quick Start Guide X243H LCD Monitor P/N:MU.LFH00.001 X243H 2008 Quick Start Guide EN-5
UNPACKING Please check the following items are present when you unpack the box, and save the packing materials in case you will need to ship or transport the monitor in future. · LCD Monitor · 15-pin D-Sub Cable · DVI Cable · AC Power Cord (Only Dual-Input Model) · Audio Cable (Option) · User Manual · Quick Start Guide X243H LCD Monitor P/N:MU.LFH00.001 X243H 2008 Quick Start Guide EN-5
User Manual
Page 7
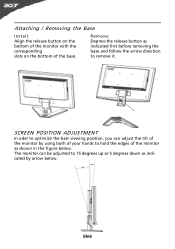
SCREEN POSITION ADJUSTMENT In oder to optimize the best viewing position, you can be adjusted to 15 degrees up or 5 degrees down as shown in the figure below . Attaching / Removing the Base Install: Align the release button on the bottom of the monitor with the corresponding slots on the bottom of your hands to remove it. EN-6 The monitor can adjust the tilt of the monitor by arrow below . Remove: Depress the release button as indicated first before removing the base and follow the arrow direction to hold the edges of the monitor as indicated by using both of the base.
SCREEN POSITION ADJUSTMENT In oder to optimize the best viewing position, you can be adjusted to 15 degrees up or 5 degrees down as shown in the figure below . Attaching / Removing the Base Install: Align the release button on the bottom of the monitor with the corresponding slots on the bottom of your hands to remove it. EN-6 The monitor can adjust the tilt of the monitor by arrow below . Remove: Depress the release button as indicated first before removing the base and follow the arrow direction to hold the edges of the monitor as indicated by using both of the base.

User Manual
Page 8
light or other heavy object, on the face of the monitor. CONNECTING THE POWER CORD · Check first to a proper AC outlet. · For unit using at 120 V AC: Use a UL Listed Cord Set, Type SVT wire and plug rated 10 A/125 V. · For unit using at 220/240 V AC (outside of U.S.): Use a Cord Set consisting of H05VV-F cord and plug rated 10 A, 250 V. No user-adjustment is required. · Plug one end of the power cord to the AC Inlet, plug another end to make sure that the power cord you use is the correct type required for the country in a place where there is fragile. ...
light or other heavy object, on the face of the monitor. CONNECTING THE POWER CORD · Check first to a proper AC outlet. · For unit using at 120 V AC: Use a UL Listed Cord Set, Type SVT wire and plug rated 10 A/125 V. · For unit using at 220/240 V AC (outside of U.S.): Use a Cord Set consisting of H05VV-F cord and plug rated 10 A, 250 V. No user-adjustment is required. · Plug one end of the power cord to the AC Inlet, plug another end to make sure that the power cord you use is the correct type required for the country in a place where there is fragile. ...

User Manual
Page 9
The recovery time from the display controller, as indicated by the control signal from Active OFF state back to Plug and Play with your system if your installation easier, the monitor is activated. The monitor supports DDC2B standard. DDC To make your system also supports DDC protocol. EN-8 Power saving The monitor will be driven into Power Saving" mode by the amber-color power LED. State ON Power Saving Mode LED Light Blue Amber The power saving states will be kept until a control signal has been detected or the keyboard or mouse is able to ON state is around 3 ...
The recovery time from the display controller, as indicated by the control signal from Active OFF state back to Plug and Play with your system if your installation easier, the monitor is activated. The monitor supports DDC2B standard. DDC To make your system also supports DDC protocol. EN-8 Power saving The monitor will be driven into Power Saving" mode by the amber-color power LED. State ON Power Saving Mode LED Light Blue Amber The power saving states will be kept until a control signal has been detected or the keyboard or mouse is able to ON state is around 3 ...
User Manual
Page 10
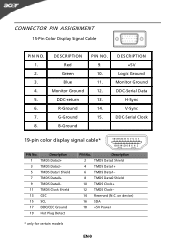
on device) 16 SDA 18 +5V Power * only for certain models EN-9 Description 1 TMDS Data2+ 3 TMDS Data2- 5 TMDS Data1 Shield 7 TMDS Data0+ 9 TMDS Data0- 11 TMDS Clock Shield 13 CEC 15 SCL 17 DDC/CEC Ground 19 Hot Plug Detect PIN No. DESCRIPTION +5V Logic Ground Monitor Ground DDC-Serial Data H-Sync V-Sync DDC-Serial Clock 19-pin color display signal cable* 1917151311 9 7 5 3 1 1816141210 8 6 4 2 PIN No. DESCRIPTION Red Green Blue Monitor Ground DDC-return R-Ground G-Ground B-Ground PIN NO. 9. 10. 11. 12. 13. 14. 15. Description 2 TMDS Data2 Shield 4 TMDS Data1+ 6 ...
on device) 16 SDA 18 +5V Power * only for certain models EN-9 Description 1 TMDS Data2+ 3 TMDS Data2- 5 TMDS Data1 Shield 7 TMDS Data0+ 9 TMDS Data0- 11 TMDS Clock Shield 13 CEC 15 SCL 17 DDC/CEC Ground 19 Hot Plug Detect PIN No. DESCRIPTION +5V Logic Ground Monitor Ground DDC-Serial Data H-Sync V-Sync DDC-Serial Clock 19-pin color display signal cable* 1917151311 9 7 5 3 1 1816141210 8 6 4 2 PIN No. DESCRIPTION Red Green Blue Monitor Ground DDC-return R-Ground G-Ground B-Ground PIN NO. 9. 10. 11. 12. 13. 14. 15. Description 2 TMDS Data2 Shield 4 TMDS Data1+ 6 ...
User Manual
Page 12
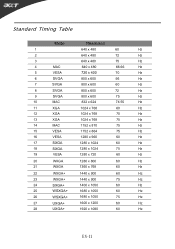
Standard Timing Table Mode Resolution 1 640 x 480 60 Hz 2 640 x 480 72 Hz 3 4 MAC 5 VESA 6 SVGA 7 SVGA 640 x 480 640 x 480 720 x 400 800 x 600 800 x 600 75 Hz 66.66 Hz 70 Hz 56 Hz 60 Hz 8 SVGA 9 SVGA 10 MAC 800 x 600 800 x 600 832 x 624 72 Hz 75 Hz 74.55 Hz 11 XGA 12 XGA 1024 x 768 1024 x 768 60 Hz 70 Hz 13 XGA 1024 x 768 75 Hz 14 MAC 1152 x 870 75 Hz 15 VESA 1152 x 864 75 Hz 16 VESA 1280 x 960 60 Hz 17 SXGA 1280 x 1024 60 Hz 18 SXGA 1280 x 1024 75 Hz 19 VESA 1280 x 720 60 Hz 20 WXGA 21 WXGA 1280 x 800 ...
Standard Timing Table Mode Resolution 1 640 x 480 60 Hz 2 640 x 480 72 Hz 3 4 MAC 5 VESA 6 SVGA 7 SVGA 640 x 480 640 x 480 720 x 400 800 x 600 800 x 600 75 Hz 66.66 Hz 70 Hz 56 Hz 60 Hz 8 SVGA 9 SVGA 10 MAC 800 x 600 800 x 600 832 x 624 72 Hz 75 Hz 74.55 Hz 11 XGA 12 XGA 1024 x 768 1024 x 768 60 Hz 70 Hz 13 XGA 1024 x 768 75 Hz 14 MAC 1152 x 870 75 Hz 15 VESA 1152 x 864 75 Hz 16 VESA 1280 x 960 60 Hz 17 SXGA 1280 x 1024 60 Hz 18 SXGA 1280 x 1024 75 Hz 19 VESA 1280 x 720 60 Hz 20 WXGA 21 WXGA 1280 x 800 ...
User Manual
Page 13
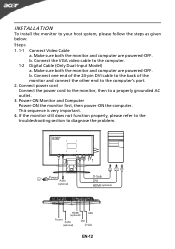
Connect one end of the 24-pin DVI cable to the back of the monitor and connect the other end to the computer. 1-2 Digital Cable (Only Dual-Input Model) a. Power-ON Monitor and Computer Power-ON the monitor first, then power-ON the computer. Connect the VGA video cable to the computer's port. 2. Make sure both the monitor and computer are powered-OFF. This sequence is very important. 4. b. If the monitor still does not function properly, please refer to the troubleshooting section to your host system, please follow the steps as given below: Steps 1. 1-1 Connect Video Cable a. ...
Connect one end of the 24-pin DVI cable to the back of the monitor and connect the other end to the computer. 1-2 Digital Cable (Only Dual-Input Model) a. Power-ON Monitor and Computer Power-ON the monitor first, then power-ON the computer. Connect the VGA video cable to the computer's port. 2. Make sure both the monitor and computer are powered-OFF. This sequence is very important. 4. b. If the monitor still does not function properly, please refer to the troubleshooting section to your host system, please follow the steps as given below: Steps 1. 1-1 Connect Video Cable a. ...

User Manual
Page 14
USER CONTROLS 3 4 6 5 5 12 Front Panel Controls 1.Power Switch: To turn ON or OFF the power. 2.Power LED: Lights up to indicate the power is turned ON. 3.Empowering / Exit: 1) When OSD menu is in active status, this button will act as EXIT-KEY(EXIT OSD menu). 2) When OSD menu is in off status, press this button to select scenario mode. 4.Auto Adjust button / Exit: 1)When OSD menu is in active status, this button will act as EXIT-KEY (EXIT OSD menu). 2)When OSD menu is in off status, press this button for 2 seconds to activate the AutoAdjustment function.The Auto Adjustment function is ...
USER CONTROLS 3 4 6 5 5 12 Front Panel Controls 1.Power Switch: To turn ON or OFF the power. 2.Power LED: Lights up to indicate the power is turned ON. 3.Empowering / Exit: 1) When OSD menu is in active status, this button will act as EXIT-KEY(EXIT OSD menu). 2) When OSD menu is in off status, press this button to select scenario mode. 4.Auto Adjust button / Exit: 1)When OSD menu is in active status, this button will act as EXIT-KEY (EXIT OSD menu). 2)When OSD menu is in off status, press this button for 2 seconds to activate the AutoAdjustment function.The Auto Adjustment function is ...
User Manual
Page 15
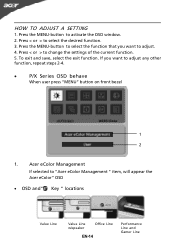
... If selected to select the desired function. 3. Press < or > to "Acer eColor Management " item, will appear the Acer eColor" OSD · OSD and" Key " locations Value Line Value Line w/speaker Office Line EN-14 Performance Line and Gamer Line If you want to ...
... If selected to select the desired function. 3. Press < or > to "Acer eColor Management " item, will appear the Acer eColor" OSD · OSD and" Key " locations Value Line Value Line w/speaker Office Line EN-14 Performance Line and Gamer Line If you want to ...

User Manual
Page 16
· Acer eColor Management OSD · Operation instructions Acer eColor Management Step 1: Press " Key " to open the Acer eColor Management OSD and access the scenario modes Step 2: Press "" to select the mode Step 3: Press " Key " to confirm the mode and run Auto Adjust Automatic Adjustment Step 1: Press " Auto Key "to initial scenario mode Step 2: Press " Auto Key " again to perform an Auto Adjust EN-15
· Acer eColor Management OSD · Operation instructions Acer eColor Management Step 1: Press " Key " to open the Acer eColor Management OSD and access the scenario modes Step 2: Press "" to select the mode Step 3: Press " Key " to confirm the mode and run Auto Adjust Automatic Adjustment Step 1: Press " Auto Key "to initial scenario mode Step 2: Press " Auto Key " again to perform an Auto Adjust EN-15

User Manual
Page 17
USER If selected to "USER" item, will appear the Standard OSD I. Only Analog Input Model EN-16 · Features and Benefits 2.
USER If selected to "USER" item, will appear the Standard OSD I. Only Analog Input Model EN-16 · Features and Benefits 2.

User Manual
Page 18
Only Dual Input Model · ADJUSTING THE PICTURE The descriptions for function control LEDS Main Menu icon Sub Menu icon Sub Menu item Description Contrast Adjusts the contrast between the foreground andbackground of the screenimage. Brightness Adjusts the background brightness of the screen image. ACM ACM (Adaptive Contrast Management): ACM ON/OFF Switch, default is "OFF" Focus Adjusts picture Focus.(available in Analog mode only) Clock Adjusts picture Clock.(available in Analog mode only) EN-17 II.
Only Dual Input Model · ADJUSTING THE PICTURE The descriptions for function control LEDS Main Menu icon Sub Menu icon Sub Menu item Description Contrast Adjusts the contrast between the foreground andbackground of the screenimage. Brightness Adjusts the background brightness of the screen image. ACM ACM (Adaptive Contrast Management): ACM ON/OFF Switch, default is "OFF" Focus Adjusts picture Focus.(available in Analog mode only) Clock Adjusts picture Clock.(available in Analog mode only) EN-17 II.