

User Manual
Page 5
... controls may result in following the operating instructions. Warning! Consult your eyes. • Turn on . English English v Product servicing Do not attempt to service this product from walls and have free flowing air around it. • Locations where temperatures may become excessively high, such as opening or removing covers may expose you to qualified service personnel. Keep them out of the reach of other risks. Refer all windows...
... controls may result in following the operating instructions. Warning! Consult your eyes. • Turn on . English English v Product servicing Do not attempt to service this product from walls and have free flowing air around it. • Locations where temperatures may become excessively high, such as opening or removing covers may expose you to qualified service personnel. Keep them out of the reach of other risks. Refer all windows...

User Manual
Page 6
... power abruptly or unplug the projector during operation. Change the lamp when the warning message is displayed. • Reset the Lamp Hour Reset function from the onscreen display Management menu after replacing the lamp module. • Do not attempt to disassemble the projector, as opening or removing covers may be hot. • If the projector has an air filter, clean it is securely installed. Allow the projector to cool for replacement. • Do not operate lamps beyond the rated lamp life...
... power abruptly or unplug the projector during operation. Change the lamp when the warning message is displayed. • Reset the Lamp Hour Reset function from the onscreen display Management menu after replacing the lamp module. • Do not attempt to disassemble the projector, as opening or removing covers may be hot. • If the projector has an air filter, clean it is securely installed. Allow the projector to cool for replacement. • Do not operate lamps beyond the rated lamp life...
User Manual
Page 8
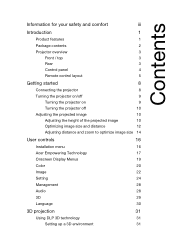
... top 3 Rear 3 Control panel 4 Remote control layout 5 Getting started 8 Connecting the projector 8 Turning the projector on/off 9 Turning the projector on 9 Turning the projector off 10 Adjusting the projected image 10 Adjusting the height of the projected image 10 Optimizing image size and distance 12 Adjusting distance and zoom to optimize image size 14 User controls 16 Installation menu 16 Acer Empowering Technology 17 Onscreen Display Menus 19 Color 20 Image 22 Setting 24 Management 28 Audio 28 3D 29 Language 30 3D projection 31 Using DLP 3D...
... top 3 Rear 3 Control panel 4 Remote control layout 5 Getting started 8 Connecting the projector 8 Turning the projector on/off 9 Turning the projector on 9 Turning the projector off 10 Adjusting the projected image 10 Adjusting the height of the projected image 10 Optimizing image size and distance 12 Adjusting distance and zoom to optimize image size 14 User controls 16 Installation menu 16 Acer Empowering Technology 17 Onscreen Display Menus 19 Color 20 Image 22 Setting 24 Management 28 Audio 28 3D 29 Language 30 3D projection 31 Using DLP 3D...

User Manual
Page 10
... Black) mode extends lamp life. • Acer EcoProjeciton Technology delivers Intelligent power management approach and physical efficiency improvement. • Empowering Key reveals Acer Empowering Technology utilities (Acer eView, eTimer, ePower Management, e3D Management) for easy adjustment of settings. • P1223/D413D/EV-X34H: Equipped with HDMI connection supporting HDCP. • Advanced digital keystone correction optimizes presentations. • Multi-language onscreen display. • 0.8 to 1.85X digital zoom and...
... Black) mode extends lamp life. • Acer EcoProjeciton Technology delivers Intelligent power management approach and physical efficiency improvement. • Empowering Key reveals Acer Empowering Technology utilities (Acer eView, eTimer, ePower Management, e3D Management) for easy adjustment of settings. • P1223/D413D/EV-X34H: Equipped with HDMI connection supporting HDCP. • Advanced digital keystone correction optimizes presentations. • Multi-language onscreen display. • 0.8 to 1.85X digital zoom and...

User Manual
Page 15
.... 11 HDMI/DVI Press HDMI/DVI to change source to the VGA1-IN/ VGA2-IN connector. MUTE Turns the sound on/off the video. 6 English English # Icon Function Description 7 KeyPad 0 to 9 Press 0 to 9 to enter a password when required. 8 VIDEO Press VIDEO to change source to composite video. 9 VGA Press VGA to change source to HDMI/ DVI. 12 HIDE Momentarily turns off . 17 KEYSTONE Adjusts the image to compensate for the OSD menu operation or...
.... 11 HDMI/DVI Press HDMI/DVI to change source to the VGA1-IN/ VGA2-IN connector. MUTE Turns the sound on/off the video. 6 English English # Icon Function Description 7 KeyPad 0 to 9 Press 0 to 9 to enter a password when required. 8 VIDEO Press VIDEO to change source to composite video. 9 VGA Press VGA to change source to HDMI/ DVI. 12 HIDE Momentarily turns off . 17 KEYSTONE Adjusts the image to compensate for the OSD menu operation or...

User Manual
Page 18
... item. Turning the projector on/off Turning the projector on the remote control to multiple sources at the same time, use the SOURCE button on 1 Ensure that input signal type is not detected. • If the screen displays No Signal, please make sure the timing of the display mode is locked onto a specific source type and that the power cord and signal cable are securely connected. • If you connect to switch between inputs. Power button The power indicator LED will flash and then turn blue. 3 Turn on the control panel.
... item. Turning the projector on/off Turning the projector on the remote control to multiple sources at the same time, use the SOURCE button on 1 Ensure that input signal type is not detected. • If the screen displays No Signal, please make sure the timing of the display mode is locked onto a specific source type and that the power cord and signal cable are securely connected. • If you connect to switch between inputs. Power button The power indicator LED will flash and then turn blue. 3 Turn on the control panel.

User Manual
Page 19
... process finishes, the power indicator LED becomes steady blue. 4 It is equipped with automatically turn off , the projector will automatically shut down, and the LED temp indicator will vary depending on page 28 for adjusting the image height. This onscreen message indicates that the projector has overheated. The lamp will automatically shut down and the LED power, temp and lamp indicators blink, contact your local dealer or service center. • Fan Fail. Warning messages! • Projector Overheated. Contact your local...
... process finishes, the power indicator LED becomes steady blue. 4 It is equipped with automatically turn off , the projector will automatically shut down, and the LED temp indicator will vary depending on page 28 for adjusting the image height. This onscreen message indicates that the projector has overheated. The lamp will automatically shut down and the LED power, temp and lamp indicators blink, contact your local dealer or service center. • Fan Fail. Warning messages! • Projector Overheated. Contact your local...

User Manual
Page 25
... new settings will be saved automatically upon exiting the menu. 5 Push the MENU button anytime to exit the menu and return to enter a feature settings submenu. English English 16 User controls Installation menu The installation menu provides an onscreen display (OSD) for adjusting the calibration and alignment settings, such as screen size and distance, focus and more. 4 The Installation menu includes the following options: • Projection method • Menu location • Keystone settings • Language settings • Reset to factory defaults Use...
... new settings will be saved automatically upon exiting the menu. 5 Push the MENU button anytime to exit the menu and return to enter a feature settings submenu. English English 16 User controls Installation menu The installation menu provides an onscreen display (OSD) for adjusting the calibration and alignment settings, such as screen size and distance, focus and more. 4 The Installation menu includes the following options: • Projection method • Menu location • Keystone settings • Language settings • Reset to factory defaults Use...

User Manual
Page 30
... projector lamp which will look brighter. • Color R: Adjusts the red color. • Color G: Adjusts the green color. • Color B: Adjusts the blue color. • Color C: Adjusts the cyan color. • Color Y: Adjusts the yellow color. • Color M: Adjusts the magenta color. Choose Off to adjust advanced color settings. • Color Temperature: Adjust the color temperature. With greater gamma value, dark scenery will automatically detect the brightness level of dark scenery. Use this function to turn off Dynamic Black. At higher color temperatures, the screen looks...
... projector lamp which will look brighter. • Color R: Adjusts the red color. • Color G: Adjusts the green color. • Color B: Adjusts the blue color. • Color C: Adjusts the cyan color. • Color Y: Adjusts the yellow color. • Color M: Adjusts the magenta color. Choose Off to adjust advanced color settings. • Color Temperature: Adjust the color temperature. With greater gamma value, dark scenery will automatically detect the brightness level of dark scenery. Use this function to turn off Dynamic Black. At higher color temperatures, the screen looks...

User Manual
Page 31
... screen and displayed using a 4:3 ratio. • 16:9: The image will be scaled to fit the width of the screen and the height adjusted to display the image using a 16:9 ratio. Adjust image distortion caused by tilting the projector (±40 degrees). 22 Image English English P1223/D413D/EV-X34H X1223/D413/EV-X34 Projection • Front: The factory default setting. Use this function, the projector reverses and inverts the image at same time...
... screen and displayed using a 4:3 ratio. • 16:9: The image will be scaled to fit the width of the screen and the height adjusted to display the image using a 16:9 ratio. Adjust image distortion caused by tilting the projector (±40 degrees). 22 Image English English P1223/D413D/EV-X34H X1223/D413/EV-X34 Projection • Front: The factory default setting. Use this function, the projector reverses and inverts the image at same time...

User Manual
Page 33
If you change the setting, the changes will take effect when you exit the OSD menu. • Acer: The default Acer projector startup screen. • User: Use a customized picture from the screen capture function. Use this function to select your desired startup screen. 24 Setting English English Menu Location Startup Screen Choose the menu location on the display screen.
If you change the setting, the changes will take effect when you exit the OSD menu. • Acer: The default Acer projector startup screen. • User: Use a customized picture from the screen capture function. Use this function to select your desired startup screen. 24 Setting English English Menu Location Startup Screen Choose the menu location on the display screen.
User Manual
Page 34
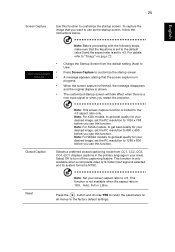
... screen capture is a new input signal or when you use this function. Closed Caption Note: This screen capture function is 16:9, Auto, Full or L.Box. Note: For SVGA models, to 800 x 600 before you restart the projector. This function is only available when a composite video or S-Video input signal is selected and its system format is set the PC resolution to 1024 x 768 before you use...
... screen capture is a new input signal or when you use this function. Closed Caption Note: This screen capture function is 16:9, Auto, Full or L.Box. Note: For SVGA models, to 800 x 600 before you restart the projector. This function is only available when a composite video or S-Video input signal is selected and its system format is set the PC resolution to 1024 x 768 before you use...

User Manual
Page 35
... switch on the projector without password. User Password • Press to set your must enter the Administrator Password first before changing the security settings. • Select On to enable the security function. Press to change the User Password. • Use the number keys to set up , the projector will prompt the user to enter the password every time the power cord is plugged in. • If you select Always request password while projector turns...
... switch on the projector without password. User Password • Press to set your must enter the Administrator Password first before changing the security settings. • Select On to enable the security function. Press to change the User Password. • Use the number keys to set up , the projector will prompt the user to enter the password every time the power cord is plugged in. • If you select Always request password while projector turns...

User Manual
Page 37
... 0 hours. Lamp Hour Reset Press the button and choose Yes to reset the lamp hour counter to decrease the volume. 28 Management English English ECO Mode Choose On to turn on High Altitude mode. Turn Off Mode • Instant Off: Enables you to dim the projector lamp which will automatically shutdown when there is no signal input after the allocated time (in hours). Auto Shutdown The projector will lower power consumption, extend the lamp life and...
... 0 hours. Lamp Hour Reset Press the button and choose Yes to reset the lamp hour counter to decrease the volume. 28 Management English English ECO Mode Choose On to turn on High Altitude mode. Turn Off Mode • Instant Off: Enables you to dim the projector lamp which will automatically shutdown when there is no signal input after the allocated time (in hours). Auto Shutdown The projector will lower power consumption, extend the lamp life and...

User Manual
Page 40
... menu button on the projector remote control to view 3D content, you have bought has integrated DLP 3D technology. Using DLP 3D technology Before you can enjoy the benefits of the DLP 3D technology, you will need to do not wish to open the OSD. Setting up a 3D environment Once you have installed the drivers, you will need to your graphics card's documentation. 2 Download and install...
... menu button on the projector remote control to view 3D content, you have bought has integrated DLP 3D technology. Using DLP 3D technology Before you can enjoy the benefits of the DLP 3D technology, you will need to do not wish to open the OSD. Setting up a 3D environment Once you have installed the drivers, you will need to your graphics card's documentation. 2 Download and install...

User Manual
Page 45
... the projector is properly connected as onscreen described in use. incorrectly • For an incorrectly displayed image: displayed image [For PC (Windows 95/98/2000/XP)] • Open My Computer > Control Panel, and then double-click the Display icon. • Select the Settings tab. • Verify that your display resolution setting is lower than or equal to UXGA (1600 x 1200). • Click the Change button under the Models box...
... the projector is properly connected as onscreen described in use. incorrectly • For an incorrectly displayed image: displayed image [For PC (Windows 95/98/2000/XP)] • Open My Computer > Control Panel, and then double-click the Display icon. • Select the Settings tab. • Verify that your display resolution setting is lower than or equal to UXGA (1600 x 1200). • Click the Change button under the Models box...

User Manual
Page 46
... to flickering bar "Image" on page 22 for more information. • Check and reconfigure the display mode of the projector. Refer to "Optimizing image size and distance" on the projector lens. • Make sure the projection screen is within the required distance from the screen. • Press MENU on the OSD and adjust the projection direction. or too large • Move the projector closer to or further from the projector. Problems...
... to flickering bar "Image" on page 22 for more information. • Check and reconfigure the display mode of the projector. Refer to "Optimizing image size and distance" on the projector lens. • Make sure the projection screen is within the required distance from the screen. • Press MENU on the OSD and adjust the projection direction. or too large • Move the projector closer to or further from the projector. Problems...

User Manual
Page 48
... then solid on for 45 seconds After 15 seconds then solid on mode with cooling Lamp events Lamp ignition fail End of lamp lifetime Thermal events Temperature error Fan error Color wheel or DMD error Flashing for 45 seconds -- 39 English English LED and alarm definitions LED indicators Indicator Power LED Blue Power events Standby V Normal turn on mode Flashing for 30 seconds after power on then steady blue Download mode V Normal turn off mode V Turn on for 15 seconds then steady blue V V V V V Temp LED Blue ---
... then solid on for 45 seconds After 15 seconds then solid on mode with cooling Lamp events Lamp ignition fail End of lamp lifetime Thermal events Temperature error Fan error Color wheel or DMD error Flashing for 45 seconds -- 39 English English LED and alarm definitions LED indicators Indicator Power LED Blue Power events Standby V Normal turn on mode Flashing for 30 seconds after power on then steady blue Download mode V Normal turn off mode V Turn on for 15 seconds then steady blue V V V V V Temp LED Blue ---

User Manual
Page 49
... the dirt is difficult to obtain a new filter. 2 Dust Filter (Illustration #2) English English 40 Replacing and cleaning the dust filter 1 Turn the projector off then unplug the power cord. 2 Pull the dust filter out (Illustration #1). 3 Clean or replace the dust filter. 4 To put the dust filter back, reverse the previous steps. (Illustration #1) Cleaning the dust filter Clean the dust filter after every 1000 hours of use a small vacuum cleaner designed for...
... the dirt is difficult to obtain a new filter. 2 Dust Filter (Illustration #2) English English 40 Replacing and cleaning the dust filter 1 Turn the projector off then unplug the power cord. 2 Pull the dust filter out (Illustration #1). 3 Clean or replace the dust filter. 4 To put the dust filter back, reverse the previous steps. (Illustration #1) Cleaning the dust filter Clean the dust filter after every 1000 hours of use a small vacuum cleaner designed for...
User Manual
Page 54
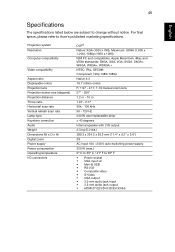
...8226; Mini-B USB • RS-232 • Composite video • S-Video • VGA output • 3.5 mm audio jack input • 3.5 mm audio jack output • HDMI (P1223/D413D/EV-X34H) Projection system Resolution Computer compatibility Video compatibility Aspect ratio Displayable colors Projection lens Projection screen size (diagonal) Projection distance Throw ratio Horizontal scan rate Vertical refresh scan rate Lamp type Keystone correction Audio Weight Dimensions (W x D x H) Digital zoom Power supply Power consumption Operating temperature I/O connectors DLP® Native: XGA (1024...
...8226; Mini-B USB • RS-232 • Composite video • S-Video • VGA output • 3.5 mm audio jack input • 3.5 mm audio jack output • HDMI (P1223/D413D/EV-X34H) Projection system Resolution Computer compatibility Video compatibility Aspect ratio Displayable colors Projection lens Projection screen size (diagonal) Projection distance Throw ratio Horizontal scan rate Vertical refresh scan rate Lamp type Keystone correction Audio Weight Dimensions (W x D x H) Digital zoom Power supply Power consumption Operating temperature I/O connectors DLP® Native: XGA (1024...


