

User Manual
Page 2
... your unit should include the serial number, model number and purchase information. The serial number and model number are trademarks or registered trademarks of this manual or supplementary documents and publications. All Rights Reserved. Record the model number, serial number, purchase date and place of merchantability or fitness for a particular purpose. Model number Serial number Date of purchase Place of such revisions or changes. Acer Projector User's Guide Original Issue: 03/2016...
... your unit should include the serial number, model number and purchase information. The serial number and model number are trademarks or registered trademarks of this manual or supplementary documents and publications. All Rights Reserved. Record the model number, serial number, purchase date and place of merchantability or fitness for a particular purpose. Model number Serial number Date of purchase Place of such revisions or changes. Acer Projector User's Guide Original Issue: 03/2016...
User Manual
Page 3
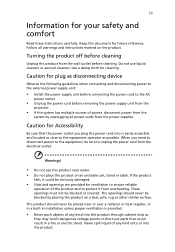
... external power supply unit: • Install the power supply unit before cleaning. Never spill liquid of any kind onto or into is provided. • Never push objects of the product and to unplug the power cord from overheating. Warnings! • Do not use liquid cleaners or aerosol cleaners. Caution for future reference. The openings should never be blocked by unplugging all warnings and instructions...
... external power supply unit: • Install the power supply unit before cleaning. Never spill liquid of any kind onto or into is provided. • Never push objects of the product and to unplug the power cord from overheating. Warnings! • Do not use liquid cleaners or aerosol cleaners. Caution for future reference. The openings should never be blocked by unplugging all warnings and instructions...
User Manual
Page 5
... not use non-compliant parts when adding or changing components. The bright may contain small parts. v Product servicing Do not attempt to service this product from walls and free flow of air around the projector is necessary. • Locations where temperatures may become excessively high, such as opening or removing covers may result in damage and will often require extensive work by the operating instructions, since improper adjustment of...
... not use non-compliant parts when adding or changing components. The bright may contain small parts. v Product servicing Do not attempt to service this product from walls and free flow of air around the projector is necessary. • Locations where temperatures may become excessively high, such as opening or removing covers may result in damage and will often require extensive work by the operating instructions, since improper adjustment of...
User Manual
Page 6
.... Please be sure to change the lamp when is the lamp which has its cooling cycle before turning main power off the lamp, press HIDE on end vertically. The only user serviceable part is showing warning message. • When changing the lamp, please allow unit to cool down, and follow all changing instructions. • Reset the "Lamp Hour Reset" function from the Onscreen display "Management" menu after replacing the lamp module. • Do...
.... Please be sure to change the lamp when is the lamp which has its cooling cycle before turning main power off the lamp, press HIDE on end vertically. The only user serviceable part is showing warning message. • When changing the lamp, please allow unit to cool down, and follow all changing instructions. • Reset the "Lamp Hour Reset" function from the Onscreen display "Management" menu after replacing the lamp module. • Do...
User Manual
Page 8
... popping sound. To replace the lamp, follow all warnings, precautions and maintenance as this user's guide to maximize the life of its cooling cycle before cleaning. • Use a soft cloth moistened with mild detergent to clean the display housing. • Disconnect the power plug from the Onscreen display "Management" menu after replacing the lamp module. • When switching the projector off the product before disconnecting power. • Turn on the projector...
... popping sound. To replace the lamp, follow all warnings, precautions and maintenance as this user's guide to maximize the life of its cooling cycle before cleaning. • Use a soft cloth moistened with mild detergent to clean the display housing. • Disconnect the power plug from the Onscreen display "Management" menu after replacing the lamp module. • When switching the projector off the product before disconnecting power. • Turn on the projector...
User Manual
Page 9
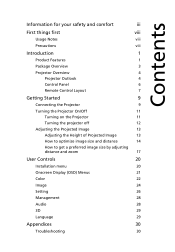
... 1 Package Overview 3 Projector Overview 4 Projector Outlook 4 Control Panel 6 Remote Control Layout 7 Getting Started 9 Connecting the Projector 9 Turning the Projector On/Off 11 Turning on the Projector 11 Turning the projector off 12 Adjusting the Projected Image 13 Adjusting the Height of Projected Image 13 How to optimize image size and distance 14 How to get a preferred image size by adjusting distance and zoom 17 User Controls 20 Installation menu 20 Onscreen Display (OSD) Menus 21 Color 22 Image 24 Setting 26 Management 28 Audio 28 3D 29...
... 1 Package Overview 3 Projector Overview 4 Projector Outlook 4 Control Panel 6 Remote Control Layout 7 Getting Started 9 Connecting the Projector 9 Turning the Projector On/Off 11 Turning on the Projector 11 Turning the projector off 12 Adjusting the Projected Image 13 Adjusting the Height of Projected Image 13 How to optimize image size and distance 14 How to get a preferred image size by adjusting distance and zoom 17 User Controls 20 Installation menu 20 Onscreen Display (OSD) Menus 21 Color 22 Image 24 Setting 26 Management 28 Audio 28 3D 29...

User Manual
Page 11
.../E145F/HE-801K series: 1920x1080 1080p resolution Full/4:3/16:9/L.Box aspect ratio supported • Enables projecting 3D content via DLP Link Technology: Blue-Ray 3D supported and nVidia 3DTV Play Ready • Acer ColorBoost technology delivers nature's true colors for vivid, life-like images • High brightness and contrast ratio • Versatile display modes (Bright, Presentation, Standard, Video, Game, Education, Movie, Dark Cinema, Sports...
.../E145F/HE-801K series: 1920x1080 1080p resolution Full/4:3/16:9/L.Box aspect ratio supported • Enables projecting 3D content via DLP Link Technology: Blue-Ray 3D supported and nVidia 3DTV Play Ready • Acer ColorBoost technology delivers nature's true colors for vivid, life-like images • High brightness and contrast ratio • Versatile display modes (Bright, Presentation, Standard, Video, Game, Education, Movie, Dark Cinema, Sports...

User Manual
Page 13
Check to make sure your dealer immediately if any thing is complete. Contact your unit is missing. English Projector Power cord VGA cable Remote control 2 x Batteries (option) Security card (option) User's guide (option) Quick start guide Carrying case (option) Dust filters (option) HDMI cable (option) 3 Package Overview This projector comes with all the items shown below.
Check to make sure your dealer immediately if any thing is complete. Contact your unit is missing. English Projector Power cord VGA cable Remote control 2 x Batteries (option) Security card (option) User's guide (option) Quick start guide Carrying case (option) Dust filters (option) HDMI cable (option) 3 Package Overview This projector comes with all the items shown below.
User Manual
Page 16
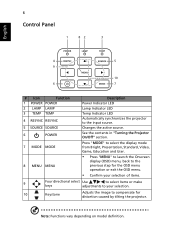
... OSD menu. • Confirm your selection of items. 9 Four directional select Use to select items or make keys adjustments to your selection. 10 Keystone Adjusts the image to the input source. 6 Control Panel 1 82 3 English 4 5 9 10 6 7 # Icon Function 1 POWER POWER 2 LAMP LAMP 3 TEMP TEMP 4 RESYNC RESYNC 5 SOURCE SOURCE 6 POWER Description Power Indicator LED Lamp Indicator LED Temp Indicator LED Automatically synchronizes the projector to compensate for distortion caused by tilting the projector. Note: Functions vary depending on model definition. Changes...
... OSD menu. • Confirm your selection of items. 9 Four directional select Use to select items or make keys adjustments to your selection. 10 Keystone Adjusts the image to the input source. 6 Control Panel 1 82 3 English 4 5 9 10 6 7 # Icon Function 1 POWER POWER 2 LAMP LAMP 3 TEMP TEMP 4 RESYNC RESYNC 5 SOURCE SOURCE 6 POWER Description Power Indicator LED Lamp Indicator LED Temp Indicator LED Automatically synchronizes the projector to compensate for distortion caused by tilting the projector. Note: Functions vary depending on model definition. Changes...

User Manual
Page 17
... screen image. • Press "MENU" to launch the Onscreen display (OSD) menu, back to the previous step for the OSD menu operation or exit the OSD menu. • Confirm your selection of items. Adjusts the image to display the image. 7 MEDIA MEDIA_SETUP No function. Press "HIDE" to hide the image, press again to compensate for distortion caused by tilting the projector. English 7 Remote Control Layout 1 3 2 SOURCE 4 5 MEDIA 6 SETUP MODE...
... screen image. • Press "MENU" to launch the Onscreen display (OSD) menu, back to the previous step for the OSD menu operation or exit the OSD menu. • Confirm your selection of items. Adjusts the image to display the image. 7 MEDIA MEDIA_SETUP No function. Press "HIDE" to hide the image, press again to compensate for distortion caused by tilting the projector. English 7 Remote Control Layout 1 3 2 SOURCE 4 5 MEDIA 6 SETUP MODE...

User Manual
Page 22
... the LED lamp indicator turns solid red, contact your local dealer or service center. • "Fan failed. Warning indicators: • "Projector Overheated. The lamp with automatically turn the projector immediately back on model definition. Note 1: Whenever the projector automatically shuts down period to unplug the power cord. Lamp will blink. This onscreen message indicates that the fan has failed. Press the power button again. 2 The LED power indicator will turn RED and blink rapidly after the projector is turned off , press and hold the power button...
... the LED lamp indicator turns solid red, contact your local dealer or service center. • "Fan failed. Warning indicators: • "Projector Overheated. The lamp with automatically turn the projector immediately back on model definition. Note 1: Whenever the projector automatically shuts down period to unplug the power cord. Lamp will blink. This onscreen message indicates that the fan has failed. Press the power button again. 2 The LED power indicator will turn RED and blink rapidly after the projector is turned off , press and hold the power button...
User Manual
Page 24
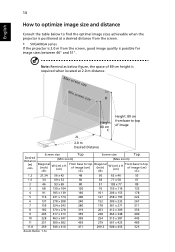
... of image A 2.0 m Desired Distance Screen size Top Screen size Top Desired Distance (Min zoom) (Max zoom) (m) Diagonal (inch) W (cm) x H (cm) From base to top of image (cm) Diagonal (inch) W (cm) x H (cm) From base to find the optimal image sizes achievable when the projector is positioned at a desired distance from the screen. • SVGA/XGA series If the projector is 2.0 m from the screen, good image quality is required when located at 2.0 m distance...
... of image A 2.0 m Desired Distance Screen size Top Screen size Top Desired Distance (Min zoom) (Max zoom) (m) Diagonal (inch) W (cm) x H (cm) From base to top of image (cm) Diagonal (inch) W (cm) x H (cm) From base to find the optimal image sizes achievable when the projector is positioned at a desired distance from the screen. • SVGA/XGA series If the projector is 2.0 m from the screen, good image quality is required when located at 2.0 m distance...

User Manual
Page 30
... more. 1 Turn on the projector by pressing "Power" button on the control pad. 2 Press the "MENU" button on the remote control to launch the OSD for projector installation and maintenance. 3 The background pattern acts as a guide to adjusting the calibration and alignment settings, such as screen size and distance, focus and more. 4 The Installation menu includes the following options: •Projection Mode •Projection Location •Auto Keystone settings •Manual Keystone settings •Keystone settings •Language settings •Reset to factory default function Use the...
... more. 1 Turn on the projector by pressing "Power" button on the control pad. 2 Press the "MENU" button on the remote control to launch the OSD for projector installation and maintenance. 3 The background pattern acts as a guide to adjusting the calibration and alignment settings, such as screen size and distance, focus and more. 4 The Installation menu includes the following options: •Projection Mode •Projection Location •Auto Keystone settings •Manual Keystone settings •Keystone settings •Language settings •Reset to factory default function Use the...

User Manual
Page 33
... vary depending on -screen color spectrum that are not supported under computer or HDMI mode. White Peaking Increases the brightness of dark scenery. B Gain Adjusts the blue gain for each analog source. English 23 Color Temperature Dynamic Black Gamma Advanced Mode Use this function to be shown in incredible detail. Note 1: "Saturation" and "Tint" functions are near 100%. (video sources only) Film Mode Sets the image optimized to -life images.
... vary depending on -screen color spectrum that are not supported under computer or HDMI mode. White Peaking Increases the brightness of dark scenery. B Gain Adjusts the blue gain for each analog source. English 23 Color Temperature Dynamic Black Gamma Advanced Mode Use this function to be shown in incredible detail. Note 1: "Saturation" and "Tint" functions are near 100%. (video sources only) Film Mode Sets the image optimized to -life images.

User Manual
Page 34
... the screen and displayed using a 4:3 ratio. • 16:9: The image will be scaled to fit the width of the screen and the height adjusted to choose your desired aspect ratio. • Auto: Keep the image with ceiling mounted projection. • Projection Mode • Front-Ceiling: When you select this function, the projector reverses and inverts the image at same time. Automatically adjusts vertical image. Front: The factory default setting. • Projection Location Rear: Reverses the image so...
... the screen and displayed using a 4:3 ratio. • 16:9: The image will be scaled to fit the width of the screen and the height adjusted to choose your desired aspect ratio. • Auto: Keep the image with ceiling mounted projection. • Projection Mode • Front-Ceiling: When you select this function, the projector reverses and inverts the image at same time. Automatically adjusts vertical image. Front: The factory default setting. • Projection Location Rear: Reverses the image so...
User Manual
Page 36
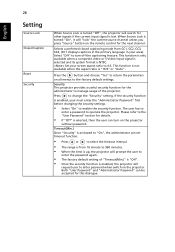
... function is enabled, the projector will request user to enter password when switch on all menus to the factory default settings. If the security function is lost. English 26 Setting Source Lock Closed Caption Reset Security When Source Lock is turned "Off", the projector will search for other signals if the current input signal is enabled, your must enter the "Administrator Password" first before changing the security settings. • Select "On...
... function is enabled, the projector will request user to enter password when switch on all menus to the factory default settings. If the security function is lost. English 26 Setting Source Lock Closed Caption Reset Security When Source Lock is turned "Off", the projector will search for other signals if the current input signal is enabled, your must enter the "Administrator Password" first before changing the security settings. • Select "On...

User Manual
Page 38
... turn off main menu/one direct-key menu manually by user. Operate the fans at full speed continuously to change the lamp 30 hours before its expected end-of the projector. • Instant Off: Shuts down the projector without fan cooling. • Instant Resume: Resumes the system when the Power button is 15 seconds). Activate this function to display a reminder to allow for proper high altitude cooling of -life. Audio...
... turn off main menu/one direct-key menu manually by user. Operate the fans at full speed continuously to change the lamp 30 hours before its expected end-of the projector. • Instant Off: Shuts down the projector without fan cooling. • Instant Resume: Resumes the system when the Power button is 15 seconds). Activate this function to display a reminder to allow for proper high altitude cooling of -life. Audio...

User Manual
Page 40
... using and follow the steps below: • Verify that the resolution setting is lower than or equal to the following troubleshooting guide. Next, select "Standard monitor types" under the SP box, and choose the resolution mode you are bent or broken. • Check if the projector lamp has been securely installed. If the problem still appears, change the monitor display you need under the "Models...
... using and follow the steps below: • Verify that the resolution setting is lower than or equal to the following troubleshooting guide. Next, select "Standard monitor types" under the SP box, and choose the resolution mode you are bent or broken. • Check if the projector lamp has been securely installed. If the problem still appears, change the monitor display you need under the "Models...

User Manual
Page 41
... to flickering bar the "Image" section for more information. • Check and reconfigure the display mode of your presentation • If you are using an Apple® Mac® OS based notebook: In System Preferences, open Display and select Video Mirroring "On". 5 Image is unstable • Adjust the "Tracking" to correct it compatible with the projector. 7 Image is out of focus • Make sure the lens...
... to flickering bar the "Image" section for more information. • Check and reconfigure the display mode of your presentation • If you are using an Apple® Mac® OS based notebook: In System Preferences, open Display and select Video Mirroring "On". 5 Image is unstable • Adjust the "Tracking" to correct it compatible with the projector. 7 Image is out of focus • Make sure the lens...
User Manual
Page 43
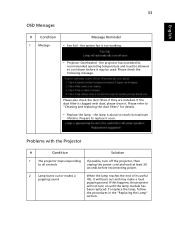
... they are installed. Problems with dust, please clean it soon. To replace the lamp, follow the procedures in the "Replacing the Lamp" section. Please check the following message. the lamp is about to reach its recommended operating temperature and must be used. Please refer to replace it . If this happens, the projector will burn out and may be allowed to all controls unplug the power cord and wait...
... they are installed. Problems with dust, please clean it soon. To replace the lamp, follow the procedures in the "Replacing the Lamp" section. Please check the following message. the lamp is about to reach its recommended operating temperature and must be used. Please refer to replace it . If this happens, the projector will burn out and may be allowed to all controls unplug the power cord and wait...


