

User Manual
Page 5
... following the operating instructions Note: Adjust only those controls that is poorly ventilated or confined. At least 50cm clearance from the wall outlet and refer servicing to qualified service personnel when: • the power cord or plug is damaged, cut or frayed • liquid was spilled into the projector's lens when the lamp is on the projector first and then signal sources • Do...
... following the operating instructions Note: Adjust only those controls that is poorly ventilated or confined. At least 50cm clearance from the wall outlet and refer servicing to qualified service personnel when: • the power cord or plug is damaged, cut or frayed • liquid was spilled into the projector's lens when the lamp is on the projector first and then signal sources • Do...

User Manual
Page 6
... temporarily turn off the main power abruptly or unplug the projector during operation. There are dangerous high voltages inside may hurt your eyes. • Always open the lens shutter or remove the lens cap when the projector is on the remote control. • The lamp becomes extremely hot during operation. Only use acer ceiling mount kit for mounting the projector and ensure it is the lamp which becomes hot. • Clean the air filter...
... temporarily turn off the main power abruptly or unplug the projector during operation. There are dangerous high voltages inside may hurt your eyes. • Always open the lens shutter or remove the lens cap when the projector is on the remote control. • The lamp becomes extremely hot during operation. Only use acer ceiling mount kit for mounting the projector and ensure it is the lamp which becomes hot. • Clean the air filter...

User Manual
Page 8
... clean the display housing. • Disconnect the power plug from the Onscreen display "Management" menu after replacing the lamp module. • When switching the projector off, please ensure the projector completes its life, it shows warning messages. • Reset the "Lamp Hour Reset" function from AC outlet if the product is on until the lamp module has been replaced. Precautions Follow all changing instructions. • This product will detect the life of time. Warning...
... clean the display housing. • Disconnect the power plug from the Onscreen display "Management" menu after replacing the lamp module. • When switching the projector off, please ensure the projector completes its life, it shows warning messages. • Reset the "Lamp Hour Reset" function from AC outlet if the product is on until the lamp module has been replaced. Precautions Follow all changing instructions. • This product will detect the life of time. Warning...

User Manual
Page 9
... 3 Projector Outlook 3 Control Panel 5 Remote Control Layout 6 MHL (Mobile High-Definition Link) Control 8 Getting Started 9 Connecting the Projector 9 Turning the Projector On/Off 11 Turning on the Projector 11 Turning the projector off 12 Adjusting the Projected Image 13 Adjusting the Height of Projected Image 13 How to optimize image size and distance 14 How to get a preferred image size by adjusting distance and zoom 18 User Controls 22 Installation menu 22 Onscreen Display (OSD) Menus 24 Color 25 Image 27 Setting 29 Management 32 Audio 33...
... 3 Projector Outlook 3 Control Panel 5 Remote Control Layout 6 MHL (Mobile High-Definition Link) Control 8 Getting Started 9 Connecting the Projector 9 Turning the Projector On/Off 11 Turning on the Projector 11 Turning the projector off 12 Adjusting the Projected Image 13 Adjusting the Height of Projected Image 13 How to optimize image size and distance 14 How to get a preferred image size by adjusting distance and zoom 18 User Controls 22 Installation menu 22 Onscreen Display (OSD) Menus 24 Color 25 Image 27 Setting 29 Management 32 Audio 33...
User Manual
Page 10
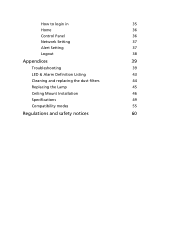
How to login in 35 Home 36 Control Panel 36 Network Setting 37 Alert Setting 37 Logout 38 Appendices 39 Troubleshooting 39 LED & Alarm Definition Listing 43 Cleaning and replacing the dust filters 44 Replacing the Lamp 45 Ceiling Mount Installation 46 Specifications 49 Compatibility modes 55 Regulations and safety notices 60
How to login in 35 Home 36 Control Panel 36 Network Setting 37 Alert Setting 37 Logout 38 Appendices 39 Troubleshooting 39 LED & Alarm Definition Listing 43 Cleaning and replacing the dust filters 44 Replacing the Lamp 45 Ceiling Mount Installation 46 Specifications 49 Compatibility modes 55 Regulations and safety notices 60
User Manual
Page 11
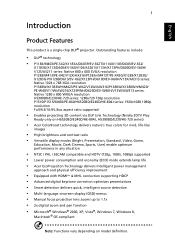
... (ECO) mode extends lamp life • Acer EcoProjeciton Technology delivers Intelligent power management approach and physical efficiency improvement • Equipped with HDMI™ & MHL connection supporting HDCP • Advanced digital keystone correction optimizes presentations • Smart detection delivers quick, intelligent source detection • Multi-language onscreen display (OSD) menus • Manual focus projection lens zooms up to 1.1x • 2x digital zoom and pan function • Microsoft® Windows®...
... (ECO) mode extends lamp life • Acer EcoProjeciton Technology delivers Intelligent power management approach and physical efficiency improvement • Equipped with HDMI™ & MHL connection supporting HDCP • Advanced digital keystone correction optimizes presentations • Smart detection delivers quick, intelligent source detection • Multi-language onscreen display (OSD) menus • Manual focus projection lens zooms up to 1.1x • 2x digital zoom and pan function • Microsoft® Windows®...

User Manual
Page 15
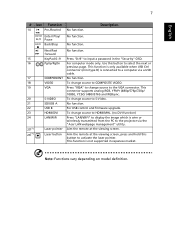
... caused by tilting the projector (± 40 degrees). Changes the active source. 5 Control Panel 1 82 3 English 4 5 9 10 6 7 # Icon Function 1 POWER 2 LAMP 3 TEMP 4 RESYNC 5 SOURCE 6 POWER Description Power Indicator LED Lamp Indicator LED Temp Indicator LED Automatically synchronizes the projector to compensate for the OSD menu operation or exit the OSD menu. • Confirm your selection of items. 9 Four directional select Use to select items or make keys adjustments to your selection. 10 Keystone Adjusts the image to the input source.
... caused by tilting the projector (± 40 degrees). Changes the active source. 5 Control Panel 1 82 3 English 4 5 9 10 6 7 # Icon Function 1 POWER 2 LAMP 3 TEMP 4 RESYNC 5 SOURCE 6 POWER Description Power Indicator LED Lamp Indicator LED Temp Indicator LED Automatically synchronizes the projector to compensate for the OSD menu operation or exit the OSD menu. • Confirm your selection of items. 9 Four directional select Use to select items or make keys adjustments to your selection. 10 Keystone Adjusts the image to the input source.

User Manual
Page 16
... Momentarily turns off the video. Refer to the "Turning the Projector On/Off" section. 3 3D Press "3D" to select 3D models. 4 SOURCE Changes the active source. 5 MODE Press "MODE" to the projector. Press "HIDE" to hide the image, press again to display the image. 7 MEDIA_SETUP No function. 8 RATIO To choose the desired aspect ratio. 9 ZOOM Zooms the projector display in or out. 10 FREEZE To pause the screen image. 11 MENU...
... Momentarily turns off the video. Refer to the "Turning the Projector On/Off" section. 3 3D Press "3D" to select 3D models. 4 SOURCE Changes the active source. 5 MODE Press "MODE" to the projector. Press "HIDE" to hide the image, press again to display the image. 7 MEDIA_SETUP No function. 8 RATIO To choose the desired aspect ratio. 9 ZOOM Zooms the projector display in or out. 10 FREEZE To pause the screen image. 11 MENU...
User Manual
Page 17
... this button to a computer via the "Acer LAN webpage management" utility. Press "VGA" to change source to HDMI/MHL. (no DVI function) Press "LAN/WiFi" to display the image which is connected to select the next or previous page. This connector supports analog RGB, YPbPr (480p/576p/720p/ 1080i), YCbCr (480i/576i) and RGBsync. Aim the remote at the viewing screen. No function. For USB control and firmware upgrade...
... this button to a computer via the "Acer LAN webpage management" utility. Press "VGA" to change source to HDMI/MHL. (no DVI function) Press "LAN/WiFi" to display the image which is connected to select the next or previous page. This connector supports analog RGB, YPbPr (480p/576p/720p/ 1080i), YCbCr (480i/576i) and RGBsync. Aim the remote at the viewing screen. No function. For USB control and firmware upgrade...

User Manual
Page 18
...) Control 1 MEDIA SOURCE 2 SETUP MODE HIDE ZOOM 3 4 FREEZE 5 6 8 7 # Icon Component Description 1 MODE • Press "MODE" button for one second to activate the MHL Control Mode. • To exit, press the "MODE" button again. 2 SOURCE Press the "SOURCE" button to toggle between Navigation or Numeric mode. 3 MENU Press to launch the root memu. (only for Navigation mode) 4 Direction Keys Use up, down, left, right buttons to select items or make adjustments to...
...) Control 1 MEDIA SOURCE 2 SETUP MODE HIDE ZOOM 3 4 FREEZE 5 6 8 7 # Icon Component Description 1 MODE • Press "MODE" button for one second to activate the MHL Control Mode. • To exit, press the "MODE" button again. 2 SOURCE Press the "SOURCE" button to toggle between Navigation or Numeric mode. 3 MENU Press to launch the root memu. (only for Navigation mode) 4 Direction Keys Use up, down, left, right buttons to select items or make adjustments to...
User Manual
Page 22
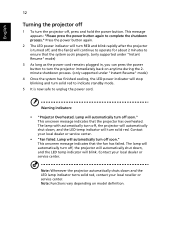
... projector will automatically shut down, and the LED temp indicator will automatically turn off soon." Lamp will turn the projector immediately back on model definition. Warning indicators: • "Projector Overheated. Lamp will blink. Note: Functions vary depending on anytime during the 2minute shutdown process. (only supported under "Instant Resume" mode) 3 As long as the power cord remains plugged in, you can press the power button to turn solid red. This message appears: "Please press the power button...
... projector will automatically shut down, and the LED temp indicator will automatically turn off soon." Lamp will turn the projector immediately back on model definition. Warning indicators: • "Projector Overheated. Lamp will blink. Note: Functions vary depending on anytime during the 2minute shutdown process. (only supported under "Instant Resume" mode) 3 As long as the power cord remains plugged in, you can press the power button to turn solid red. This message appears: "Please press the power button...
User Manual
Page 32
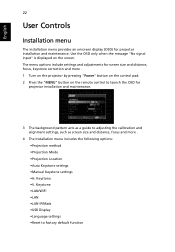
... for projector installation and maintenance. English 22 User Controls Installation menu The installation menu provides an onscreen display (OSD) for projector installation and maintenance. 3 The background pattern acts as a guide to adjusting the calibration and alignment settings, such as screen size and distance, focus and more . 1 Turn on the projector by pressing "Power" button on the control pad. 2 Press the "MENU" button on the screen. Keystone •V. Use the OSD only when the message "No signal input" is displayed on the remote control to factory default...
... for projector installation and maintenance. English 22 User Controls Installation menu The installation menu provides an onscreen display (OSD) for projector installation and maintenance. 3 The background pattern acts as a guide to adjusting the calibration and alignment settings, such as screen size and distance, focus and more . 1 Turn on the projector by pressing "Power" button on the control pad. 2 Press the "MENU" button on the screen. Keystone •V. Use the OSD only when the message "No signal input" is displayed on the remote control to factory default...
User Manual
Page 36
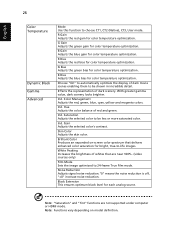
... saturated color. Color Management Adjusts the red, green, blue, cyan, yellow and magenta colors. Hue Adjusts the color balance of dark movie scenes enabling them to automatically optimize the display of red and green. Ind. Gain Adjusts the selected color's contrast. White Peaking Increases the brightness of dark scenery. Note: Functions vary depending on -screen color spectrum that are not supported under computer or HDMI mode. B Gain Adjusts the blue gain for color temperature optimization...
... saturated color. Color Management Adjusts the red, green, blue, cyan, yellow and magenta colors. Hue Adjusts the color balance of dark movie scenes enabling them to automatically optimize the display of red and green. Ind. Gain Adjusts the selected color's contrast. White Peaking Increases the brightness of dark scenery. Note: Functions vary depending on -screen color spectrum that are not supported under computer or HDMI mode. B Gain Adjusts the blue gain for color temperature optimization...

User Manual
Page 37
...: Automatically adjusts projection location of image. • Desktop Aspect Ratio Auto Keystone Manual Keystone • Ceiling: Turns the image upside down for ceiling-mounted projection. Front: The factory default setting. • Projection Location Rear: Reverses the image so you can project from behind a translucent screen. • Rear-Ceiling: When you select this function, the projector reverses and inverts the image at same time. Use this function to choose your desired aspect ratio. • Auto: Keep the image with ceiling mounted projection. • Projection Mode...
...: Automatically adjusts projection location of image. • Desktop Aspect Ratio Auto Keystone Manual Keystone • Ceiling: Turns the image upside down for ceiling-mounted projection. Front: The factory default setting. • Projection Location Rear: Reverses the image so you can project from behind a translucent screen. • Rear-Ceiling: When you select this function, the projector reverses and inverts the image at same time. Use this function to choose your desired aspect ratio. • Auto: Keep the image with ceiling mounted projection. • Projection Mode...

User Manual
Page 39
... English Setting Startup Screen Screen Capture Source Lock Closed Caption VGA OUT (Standby) Reset Security Use this function to customize the startup screen. This function is only available when a composite video or S-Video input signal is selected and its system format is "Off". Press to operate the projector. The user has to enter a password to change the setting, the changes will "lock" the current source channel unless you want to use the current image as...
... English Setting Startup Screen Screen Capture Source Lock Closed Caption VGA OUT (Standby) Reset Security Use this function to customize the startup screen. This function is only available when a composite video or S-Video input signal is selected and its system format is "Off". Press to operate the projector. The user has to enter a password to change the setting, the changes will "lock" the current source channel unless you want to use the current image as...

User Manual
Page 40
... the password every time when the projector is turned on the Security Card (please check accessory in both the "Enter Administrator Password" and "Enter Password" dialog boxes. • Press to change the "Administrator Password". • The factory default of "Timeout(Min.)" is "Off". • Once the security function is enabled, the projector will request user to enter password when switch on the remote control and press "MENU" to...
... the password every time when the projector is turned on the Security Card (please check accessory in both the "Enter Administrator Password" and "Enter Password" dialog boxes. • Press to change the "Administrator Password". • The factory default of "Timeout(Min.)" is "Off". • Once the security function is enabled, the projector will request user to enter password when switch on the remote control and press "MENU" to...

User Manual
Page 42
... Power button is pressed again within 2 minutes. • Standard: Properly shuts down the projector after the allocated time. (default is no signal input after fan cooling. Activate this function to display a reminder to return normal mode. Note: Functions vary depending on High Altitude mode. The projector will lower power consumption, extend the lamp life and reduce noise. Operate the fans at full speed continuously to turn the lamp hour counter to dim the projector lamp...
... Power button is pressed again within 2 minutes. • Standard: Properly shuts down the projector after the allocated time. (default is no signal input after fan cooling. Activate this function to display a reminder to return normal mode. Note: Functions vary depending on High Altitude mode. The projector will lower power consumption, extend the lamp life and reduce noise. Operate the fans at full speed continuously to turn the lamp hour counter to dim the projector lamp...

User Manual
Page 49
... all devices". 39 Appendices English Troubleshooting If you experience a problem with your Acer projector, refer to the "Replacing the Lamp" section. • Make sure you have removed the lens cap and the projector is switched on. 2 Partial, scrolling • Press "RESYNC" on the remote control. If the problem still appears, change the monitor display you are bent or broken. • Check if the projector lamp has been securely installed.
... all devices". 39 Appendices English Troubleshooting If you experience a problem with your Acer projector, refer to the "Replacing the Lamp" section. • Make sure you have removed the lens cap and the projector is switched on. 2 Partial, scrolling • Press "RESYNC" on the remote control. If the problem still appears, change the monitor display you are bent or broken. • Check if the projector lamp has been securely installed.

User Manual
Page 50
...; Change the display color depth settings on the projector lens. • Make sure the projection screen is within the required distance of your graphics card to correct it compatible with the projector. 7 Image is out of the notebook computer is not displaying your presentation • If you are using an Apple® Mac® OS based notebook: In System Preferences, open Display and select Video Mirroring "On". 5 Image...
...; Change the display color depth settings on the projector lens. • Make sure the projection screen is within the required distance of your graphics card to correct it compatible with the projector. 7 Image is out of the notebook computer is not displaying your presentation • If you are using an Apple® Mac® OS based notebook: In System Preferences, open Display and select Video Mirroring "On". 5 Image...

User Manual
Page 52
... recommended operating temperature and must be used. Please check the following message. If the dust filter is clogged with the Projector # Condition Solution 1 The projector stops responding If possible, turn on until the lamp module has been replaced. Prepare to replace it may make a loud popping sound. If this happens, the projector will burn out and may be allowed to all controls unplug the power cord and...
... recommended operating temperature and must be used. Please check the following message. If the dust filter is clogged with the Projector # Condition Solution 1 The projector stops responding If possible, turn on until the lamp module has been replaced. Prepare to replace it may make a loud popping sound. If this happens, the projector will burn out and may be allowed to all controls unplug the power cord and...


