User Manual
Page 3
...the product and to prevent battery leakage, do not place the product on an unstable cart, stand or table. Warnings • Do not use liquid cleaners or aerosol cleaners. Also, make sure that could be operated from overheating. Turning the product off before ...plugged into the product. • To avoid damage of internal components and to protect it could result in too many devices. The openings should be seriously damaged. • Slots and openings are not sure of the type of power available, consult your safety and comfort Safety instructions Read these instructions...
...the product and to prevent battery leakage, do not place the product on an unstable cart, stand or table. Warnings • Do not use liquid cleaners or aerosol cleaners. Also, make sure that could be operated from overheating. Turning the product off before ...plugged into the product. • To avoid damage of internal components and to protect it could result in too many devices. The openings should be seriously damaged. • Slots and openings are not sure of the type of power available, consult your safety and comfort Safety instructions Read these instructions...
User Manual
Page 4
... grounding pin also provides good protection from the wall outlet and refer servicing to qualified service personnel. Make sure the power outlet is a safety feature. If you to replace the power cord set . iv circuit rating. Using a power outlet that may result in damage and will often require extensive work by other risks. Unplug this product yourself, as opening or removing covers may result...
... grounding pin also provides good protection from the wall outlet and refer servicing to qualified service personnel. Make sure the power outlet is a safety feature. If you to replace the power cord set . iv circuit rating. Using a power outlet that may result in damage and will often require extensive work by other risks. Unplug this product yourself, as opening or removing covers may result...
User Manual
Page 5
... of explosion if battery is incorrectly replaced. v CAUTION: Danger of used batteries according to the manufacturer's instructions. Telephone line safety • Disconnect all telephone lines from the equipment when not in use and/or before servicing. • To avoid the remote risk of electric shock from Electrical and Electronics Equipment (WEEE) regulations, visit www.acer-group.com/public/Sustainability...
... of explosion if battery is incorrectly replaced. v CAUTION: Danger of used batteries according to the manufacturer's instructions. Telephone line safety • Disconnect all telephone lines from the equipment when not in use and/or before servicing. • To avoid the remote risk of electric shock from Electrical and Electronics Equipment (WEEE) regulations, visit www.acer-group.com/public/Sustainability...
User Manual
Page 6
... with the ENERGY STAR mark. Acer ENERGY STAR qualified products: • Produce less heat and reduce cooling loads, and warmer climates. • Automatically go into "display sleep" and "computer sleep" mode after prolonged use less energy and prevent greenhouse gas emissions by meeting strict energy efficiency guidelines set by the U.S. Users are also at "sleep" mode. Note: The statement above...
... with the ENERGY STAR mark. Acer ENERGY STAR qualified products: • Produce less heat and reduce cooling loads, and warmer climates. • Automatically go into "display sleep" and "computer sleep" mode after prolonged use less energy and prevent greenhouse gas emissions by meeting strict energy efficiency guidelines set by the U.S. Users are also at "sleep" mode. Note: The statement above...
User Manual
Page 7
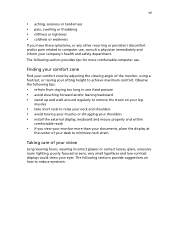
... room lighting, poorly focused screens, very small typefaces and low-contrast displays could stress your company's health and safety department. The following sections provide suggestions on your leg muscles • take short rests to relax your neck and shoulders • avoid tensing your muscles or shrugging your shoulders • install the external display, keyboard and mouse properly and...
... room lighting, poorly focused screens, very small typefaces and low-contrast displays could stress your company's health and safety department. The following sections provide suggestions on your leg muscles • take short rests to relax your neck and shoulders • avoid tensing your muscles or shrugging your shoulders • install the external display, keyboard and mouse properly and...
User Manual
Page 9
... optical discs 4 2 Setting up your computer 5 Arranging a comfortable work area 6 Positioning your monitor 6 Positioning your keyboard 6 Positioning your mouse 6 Connecting peripherals 7 Connecting your mouse and keyboard 7 USB interface 7 PS/2 interface 7 Connecting a monitor 7 Connecting the power cable 8 Turning on your computer 8 Turning off your computer 8 3 Upgrading your computer 9 Installation precautions 10 ESD precautions 10 Preinstallation instructions 10 Post-installation instructions 10 Opening your computer 11 To remove the computer cover...
... optical discs 4 2 Setting up your computer 5 Arranging a comfortable work area 6 Positioning your monitor 6 Positioning your keyboard 6 Positioning your mouse 6 Connecting peripherals 7 Connecting your mouse and keyboard 7 USB interface 7 PS/2 interface 7 Connecting a monitor 7 Connecting the power cable 8 Turning on your computer 8 Turning off your computer 8 3 Upgrading your computer 9 Installation precautions 10 ESD precautions 10 Preinstallation instructions 10 Post-installation instructions 10 Opening your computer 11 To remove the computer cover...

User Manual
Page 12
English 2 1 System tour Front panel The front panel of your computer has the following: Icon Description 5.25-inch drive bay(s) 3.5-inch drive bay(s) Microphone-in jack (front) Speaker-/line-out jack (front) USB ports OBR (One Button Recovery) button (For selected models only) Indicators Power button Rear panel The rear panel of your computer has the following: Icon Description Power supply Power cord socket Voltage selector switch PS/2 mouse port PS/2 keyboard port Serial port Parallel/printer port
English 2 1 System tour Front panel The front panel of your computer has the following: Icon Description 5.25-inch drive bay(s) 3.5-inch drive bay(s) Microphone-in jack (front) Speaker-/line-out jack (front) USB ports OBR (One Button Recovery) button (For selected models only) Indicators Power button Rear panel The rear panel of your computer has the following: Icon Description Power supply Power cord socket Voltage selector switch PS/2 mouse port PS/2 keyboard port Serial port Parallel/printer port
User Manual
Page 13
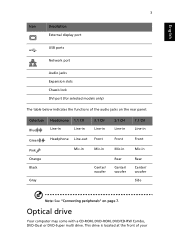
... 5.1 CH Line-in Front Mic-in Rear Center/ woofer 7.1 CH Line-in Front Mic-in Rear Center/ woofer Side Note: See "Connecting peripherals" on page 7. Optical drive Your computer may come with a CD-ROM, DVD-ROM, DVD/CD-RW Combo, DVD-Dual or DVD-Super multi drive. English 3 Icon Description External display port USB ports Network port Audio jacks Expansion slots Chassis lock DVI port (for selected models only) The table below indicates the functions of...
... 5.1 CH Line-in Front Mic-in Rear Center/ woofer 7.1 CH Line-in Front Mic-in Rear Center/ woofer Side Note: See "Connecting peripherals" on page 7. Optical drive Your computer may come with a CD-ROM, DVD-ROM, DVD/CD-RW Combo, DVD-Dual or DVD-Super multi drive. English 3 Icon Description External display port USB ports Network port Audio jacks Expansion slots Chassis lock DVI port (for selected models only) The table below indicates the functions of...
User Manual
Page 14
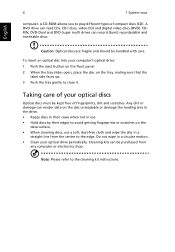
... optical discs Optical discs must be handled with care. Taking care of your optical drive periodically. Any dirt or damage can be purchased from the center to close it. A DVD drive can record (burn) recordadable and rewritable discs. Caution: Optical discs are fragile and should be kept free of compact discs (CD). CDRW, DVD-Dual and DVD-Super multi drives can read CDs, CD-I discs, video-CDs and digital video discs (DVD). A CD-ROM...
... optical discs Optical discs must be handled with care. Taking care of your optical drive periodically. Any dirt or damage can be purchased from the center to close it. A DVD drive can record (burn) recordadable and rewritable discs. Caution: Optical discs are fragile and should be kept free of compact discs (CD). CDRW, DVD-Dual and DVD-Super multi drives can read CDs, CD-I discs, video-CDs and digital video discs (DVD). A CD-ROM...

User Manual
Page 16
... your keyboard beside your monitor will make you turn your head while you type. Adjust the keyboard height by flipping the folding stands located under your table, as long as your keyboard so that Placing it does not block the space you need for working and moving. • To place your PC in front of your monitor. Then try typing with a light touch...
... your keyboard beside your monitor will make you turn your head while you type. Adjust the keyboard height by flipping the folding stands located under your table, as long as your keyboard so that Placing it does not block the space you need for working and moving. • To place your PC in front of your monitor. Then try typing with a light touch...
User Manual
Page 17
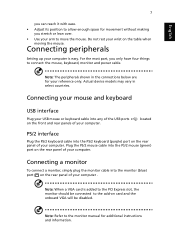
... instructions and information. Note: The peripherals shown in select countries. Connecting your mouse and keyboard USB interface Plug your USB mouse or keyboard cable into the monitor (blue) port on the front and rear panels of your computer is added to the PCI Express slot, the monitor should be disabled. located PS/2 interface Plug the PS/2 keyboard cable into the PS/2 mouse (green) port on the rear panel of your computer. Plug the PS/2 mouse cable into the PS/2 keyboard (purple) port...
... instructions and information. Note: The peripherals shown in select countries. Connecting your mouse and keyboard USB interface Plug your USB mouse or keyboard cable into the monitor (blue) port on the front and rear panels of your computer is added to the PCI Express slot, the monitor should be disabled. located PS/2 interface Plug the PS/2 keyboard cable into the PS/2 mouse (green) port on the rear panel of your computer. Plug the PS/2 mouse cable into the PS/2 keyboard (purple) port...
User Manual
Page 18
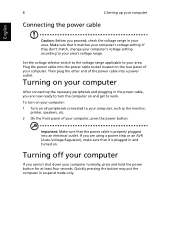
... don't match, change your computer's voltage setting according to work. Quickly pressing the button may put the computer in and turned on the rear panel of your computer's voltage setting. Set the voltage selector switch to the voltage range applicable to your computer, such as the monitor, printer, speakers, etc. 2 On the front panel of the power cable into an electrical outlet. Then plug the other...
... don't match, change your computer's voltage setting according to work. Quickly pressing the button may put the computer in and turned on the rear panel of your computer's voltage setting. Set the voltage selector switch to the voltage range applicable to your computer, such as the monitor, printer, speakers, etc. 2 On the front panel of the power cable into an electrical outlet. Then plug the other...
User Manual
Page 20
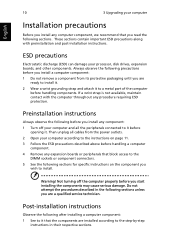
... you install any computer component, we recommend that block access to the DIMM sockets or component connectors. 5 See the following sections for specific instructions on page 11. 3 Follow the ESD precautions described above before handling a computer component. 4 Remove any expansion boards or peripherals that you read the following sections. Warning! Not turning off your computer and all cables from...
... you install any computer component, we recommend that block access to the DIMM sockets or component connectors. 5 See the following sections for specific instructions on page 11. 3 Follow the ESD precautions described above before handling a computer component. 4 Remove any expansion boards or peripherals that you read the following sections. Warning! Not turning off your computer and all cables from...
User Manual
Page 21
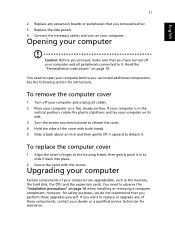
... not recommend that you removed earlier. 3 Replace the side panels. 4 Connect the necessary cables and turn on your computer are upgradeable, such as the memory, the hard disk, the CPU and the expansion cards. To remove the computer cover 1 Turn off your dealer or a qualified service technician for assistance. You need to release the cover. 4 Hold the sides of the cover with the screws. However, for instructions. If your computer...
... not recommend that you removed earlier. 3 Replace the side panels. 4 Connect the necessary cables and turn on your computer are upgradeable, such as the memory, the hard disk, the CPU and the expansion cards. To remove the computer cover 1 Turn off your dealer or a qualified service technician for assistance. You need to release the cover. 4 Hold the sides of the cover with the screws. However, for instructions. If your computer...
User Manual
Page 23
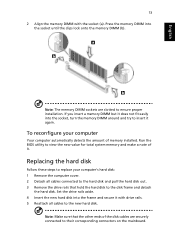
... (a). Run the BIOS utility to view the new value for total system memory and make a note of it again. Replacing the hard disk Follow these steps to replace your computer Your computer automatically detects the amount of memory installed. Note: The memory DIMM sockets are securely connected to their corresponding connectors on the mainboard. To reconfigure your computer's hard disk: 1 Remove the computer cover. 2 Detach all cables to the new hard disk. Set the drive...
... (a). Run the BIOS utility to view the new value for total system memory and make a note of it again. Replacing the hard disk Follow these steps to replace your computer Your computer automatically detects the amount of memory installed. Note: The memory DIMM sockets are securely connected to their corresponding connectors on the mainboard. To reconfigure your computer's hard disk: 1 Remove the computer cover. 2 Detach all cables to the new hard disk. Set the drive...
User Manual
Page 24
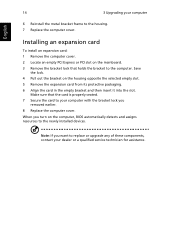
... the computer, BIOS automatically detects and assigns resources to the housing. 7 Replace the computer cover. Installing an expansion card To install an expansion card: 1 Remove the computer cover. 2 Locate an empty PCI Express or PCI slot on the mainboard. 3 Remove the bracket lock that the card is properly seated. 7 Secure the card to your computer with the bracket lock you want to replace or upgrade any of these...
... the computer, BIOS automatically detects and assigns resources to the housing. 7 Replace the computer cover. Installing an expansion card To install an expansion card: 1 Remove the computer cover. 2 Locate an empty PCI Express or PCI slot on the mainboard. 3 Remove the bracket lock that the card is properly seated. 7 Secure the card to your computer with the bracket lock you want to replace or upgrade any of these...
User Manual
Page 26
... cable is correctly attached to turn the display back on. Check the LED located above the power switch. Just press any key to the computer and the monitor. If pressing a key does not work, you are using a power strip, make sure it is turned on. • Make sure the printer cable is connected securely to the correct ports on the icon and deselect the Mute option. Nothing appears on the screen...
... cable is correctly attached to turn the display back on. Check the LED located above the power switch. Just press any key to the computer and the monitor. If pressing a key does not work, you are using a power strip, make sure it is turned on. • Make sure the printer cable is connected securely to the correct ports on the icon and deselect the Mute option. Nothing appears on the screen...
User Manual
Page 27
... press the volume control/mute knob on your USB keyboard to toggle from mute to sound on. • If headphones, earphones or external speakers are connected to the lineout jack of your dealer or technical support center for assistance. System cannot write data on the good disk there may be a problem with the drive. Check the following : • Make sure the hard disk is clean and...
... press the volume control/mute knob on your USB keyboard to toggle from mute to sound on. • If headphones, earphones or external speakers are connected to the lineout jack of your dealer or technical support center for assistance. System cannot write data on the good disk there may be a problem with the drive. Check the following : • Make sure the hard disk is clean and...
User Manual
Page 32
... 21"] for single terminal connection to operate within any 30 minute period for any sort of a Telepermit for any item will accept no assurance that the item complies with Telecom's Specifications: a There shall be set to the Public Switched Telephone Network (PSTN). The associated equipment shall be no endorsement of a different make or model, nor does it is...
... 21"] for single terminal connection to operate within any 30 minute period for any sort of a Telepermit for any item will accept no assurance that the item complies with Telecom's Specifications: a There shall be set to the Public Switched Telephone Network (PSTN). The associated equipment shall be no endorsement of a different make or model, nor does it is...

User Manual
Page 33
... set up to make automatic calls to Telecom's 111 Emergency Service. 6 This device is no effect on the equipment (PC) associated with this equipment is connected to operate within the limits for emergency use. The CD or DVD drive's classification label (shown below) is located on local power...operate. In order to the same line as black or red dots. There is equipped with Telecom's specifications, the associated equipment shall be set to ensure that Telecom lines will always continue to support pulse dialing. 7 Use of another device connected to the same line. 9 Under power failure...
... set up to make automatic calls to Telecom's 111 Emergency Service. 6 This device is no effect on the equipment (PC) associated with this equipment is connected to operate within the limits for emergency use. The CD or DVD drive's classification label (shown below) is located on local power...operate. In order to the same line as black or red dots. There is equipped with Telecom's specifications, the associated equipment shall be set to ensure that Telecom lines will always continue to support pulse dialing. 7 Use of another device connected to the same line. 9 Under power failure...


