
Generic User Guide
Page 3
... equipment plugged into the wall outlet does not exceed the fuse rating. This product should never be blocked or covered. Using electrical power • This product should never be operated from the type of power available, consult your safety and comfort Safety instructions Read these instructions carefully. Also, make sure that the total ampere rating of internal components and to prevent battery...
... equipment plugged into the wall outlet does not exceed the fuse rating. This product should never be blocked or covered. Using electrical power • This product should never be operated from the type of power available, consult your safety and comfort Safety instructions Read these instructions carefully. Also, make sure that the total ampere rating of internal components and to prevent battery...
Generic User Guide
Page 4
.... Refer all servicing to qualified service personnel when: • The power cord or plug is properly grounded before inserting the AC adapter plug. The plug only fits in too many devices. The grounding pin is equipped with the supplied power supply cord set , make sure that may result in damage and will often require extensive work by the operating instructions, since improper adjustment of the power strip's input...
.... Refer all servicing to qualified service personnel when: • The power cord or plug is properly grounded before inserting the AC adapter plug. The plug only fits in too many devices. The grounding pin is equipped with the supplied power supply cord set , make sure that may result in damage and will often require extensive work by the operating instructions, since improper adjustment of the power strip's input...
Generic User Guide
Page 5
... all telephone lines from the equipment when not in use and/or before servicing. • To avoid the remote risk of explosion if battery is incorrectly replaced. v CAUTION: Danger of electric shock from lightning, do not connect the telephone line to this equipment during lightning or thunderstorms. Disposal instructions Do not throw this product contain mercury and...
... all telephone lines from the equipment when not in use and/or before servicing. • To avoid the remote risk of explosion if battery is incorrectly replaced. v CAUTION: Danger of electric shock from lightning, do not connect the telephone line to this equipment during lightning or thunderstorms. Disposal instructions Do not throw this product contain mercury and...

Generic User Guide
Page 6
...guidelines set by pushing keyboard or moving mouse. • Computers will save money, conserve energy and improve the quality of our environment. Note: The statement above is committed to www.energystar.gov. Long work periods, bad posture, poor work habits, stress, inadequate working ...8226; Automatically go into "display sleep" and "computer sleep" mode after 10 and 30 minute of inactivity respectively. • Wake the computer from sleep mode by the U.S. marks Tips and information for comfortable use Computer users may appear in front of a computer. Acer is ENERGY STAR? ENERGY...
...guidelines set by pushing keyboard or moving mouse. • Computers will save money, conserve energy and improve the quality of our environment. Note: The statement above is committed to www.energystar.gov. Long work periods, bad posture, poor work habits, stress, inadequate working ...8226; Automatically go into "display sleep" and "computer sleep" mode after 10 and 30 minute of inactivity respectively. • Wake the computer from sleep mode by the U.S. marks Tips and information for comfortable use Computer users may appear in front of a computer. Acer is ENERGY STAR? ENERGY...
Generic User Guide
Page 7
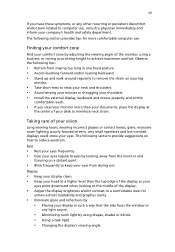
.... • Install the external display, keyboard and mouse properly and within comfortable reach. • If you have these symptoms, or any light source. • Minimizing room light by using a footrest, or raising your sitting height to a comfortable level for enhanced text readability and graphics clarity. • Eliminate glare and reflections by adjusting the viewing angle of the monitor, using drapes, shades...
.... • Install the external display, keyboard and mouse properly and within comfortable reach. • If you have these symptoms, or any light source. • Minimizing room light by using a footrest, or raising your sitting height to a comfortable level for enhanced text readability and graphics clarity. • Eliminate glare and reflections by adjusting the viewing angle of the monitor, using drapes, shades...
Generic User Guide
Page 9
... optical discs 4 2 Setting up your computer 5 Arranging a comfortable work area 6 Positioning your monitor 6 Positioning your keyboard 6 Positioning your mouse 7 Connecting peripherals 7 Connecting your mouse and keyboard 7 USB interface 7 PS/2 interface 7 Connecting a monitor 7 Connecting the power cable 8 Turning on your computer 8 Turning off your computer 8 3 Upgrading your computer 9 Installation precautions 10 ESD precautions 10 Preinstallation instructions 10 Post-installation instructions 10 Opening your computer 11 To remove the computer cover...
... optical discs 4 2 Setting up your computer 5 Arranging a comfortable work area 6 Positioning your monitor 6 Positioning your keyboard 6 Positioning your mouse 7 Connecting peripherals 7 Connecting your mouse and keyboard 7 USB interface 7 PS/2 interface 7 Connecting a monitor 7 Connecting the power cable 8 Turning on your computer 8 Turning off your computer 8 3 Upgrading your computer 9 Installation precautions 10 ESD precautions 10 Preinstallation instructions 10 Post-installation instructions 10 Opening your computer 11 To remove the computer cover...
Generic User Guide
Page 12
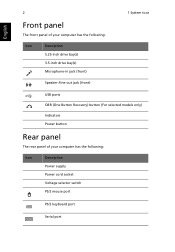
English 2 1 System tour Front panel The front panel of your computer has the following: Icon Description 5.25-inch drive bay(s) 3.5-inch drive bay(s) Microphone-in jack (front) Speaker-/line-out jack (front) USB ports OBR (One Button Recovery) button (For selected models only) Indicators Power button Rear panel The rear panel of your computer has the following: Icon Description Power supply Power cord socket Voltage selector switch PS/2 mouse port PS/2 keyboard port Serial port
English 2 1 System tour Front panel The front panel of your computer has the following: Icon Description 5.25-inch drive bay(s) 3.5-inch drive bay(s) Microphone-in jack (front) Speaker-/line-out jack (front) USB ports OBR (One Button Recovery) button (For selected models only) Indicators Power button Rear panel The rear panel of your computer has the following: Icon Description Power supply Power cord socket Voltage selector switch PS/2 mouse port PS/2 keyboard port Serial port
Generic User Guide
Page 13
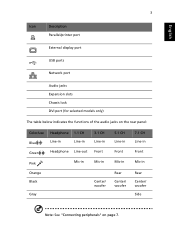
English 3 Icon Description Parallel/printer port External display port USB ports Network port Audio jacks Expansion slots Chassis lock DVI port (for selected models only) The table below indicates the functions of the audio jacks on the rear panel: Color/use Blue Green Pink Headphone 1.1 CH Line-in Line-in Headphone Line-out Mic-in 3.1 CH Line-in Front Mic-in Orange Black Gray Center/ woofer 5.1 CH Line-in Front Mic-in Rear Center/ woofer 7.1 CH Line-in Front Mic-in Rear Center/ woofer Side Note: See "Connecting peripherals" on page 7.
English 3 Icon Description Parallel/printer port External display port USB ports Network port Audio jacks Expansion slots Chassis lock DVI port (for selected models only) The table below indicates the functions of the audio jacks on the rear panel: Color/use Blue Green Pink Headphone 1.1 CH Line-in Line-in Headphone Line-out Mic-in 3.1 CH Line-in Front Mic-in Orange Black Gray Center/ woofer 5.1 CH Line-in Front Mic-in Rear Center/ woofer 7.1 CH Line-in Front Mic-in Rear Center/ woofer Side Note: See "Connecting peripherals" on page 7.
Generic User Guide
Page 14
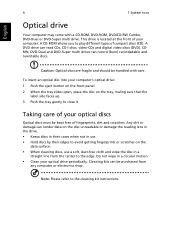
CDRW, DVD-Dual and DVD-Super multi drives can read CDs, CD-I discs, video-CDs and digital video discs (DVD). Caution: Optical discs are fragile and should be kept free of your computer's optical drive: 1 Push the eject button on the front panel. 2 When the tray slides open, place the disc on the data surface. • When cleaning discs, use a soft, dust-free cloth and wipe the disc in a straight line from any...
CDRW, DVD-Dual and DVD-Super multi drives can read CDs, CD-I discs, video-CDs and digital video discs (DVD). Caution: Optical discs are fragile and should be kept free of your computer's optical drive: 1 Push the eject button on the front panel. 2 When the tray slides open, place the disc on the data surface. • When cleaning discs, use a soft, dust-free cloth and wipe the disc in a straight line from any...
Generic User Guide
Page 16
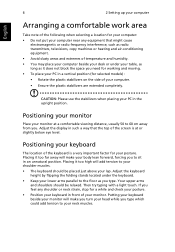
... need for working and moving. • To place your PC in front of your monitor. Then try typing with a light touch. CAUTION: Please use the stabilizers when placing your PC in such a way that might cause electromagnetic or radio frequency interference, such as radio transmitters, televisions, copy machines or... as it too far away will make you turn your head while you feel any equipment that the top of the screen is a very important factor for a while and check your posture. • Position your keyboard in a vertical position (for selected models) : • Rotate the plastic...
... need for working and moving. • To place your PC in front of your monitor. Then try typing with a light touch. CAUTION: Please use the stabilizers when placing your PC in such a way that might cause electromagnetic or radio frequency interference, such as radio transmitters, televisions, copy machines or... as it too far away will make you turn your head while you feel any equipment that the top of the screen is a very important factor for a while and check your posture. • Position your keyboard in a vertical position (for selected models) : • Rotate the plastic...
Generic User Guide
Page 17
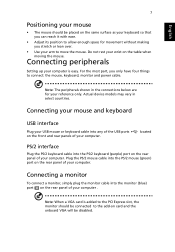
... rear panels of your computer. Connecting your mouse and keyboard USB interface Plug your USB mouse or keyboard cable into the monitor (blue) port on the rear panel of the USB ports on the table when moving the mouse. Note: When a VGA card is easy. English 7 Positioning your mouse • The mouse should be disabled. Connecting a monitor To connect a monitor, simply plug the monitor cable into any of your computer. Actual device models may vary in the connections below are for movement without making...
... rear panels of your computer. Connecting your mouse and keyboard USB interface Plug your USB mouse or keyboard cable into the monitor (blue) port on the rear panel of the USB ports on the table when moving the mouse. Note: When a VGA card is easy. English 7 Positioning your mouse • The mouse should be disabled. Connecting a monitor To connect a monitor, simply plug the monitor cable into any of your computer. Actual device models may vary in the connections below are for movement without making...
Generic User Guide
Page 18
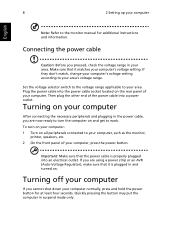
Plug the power cable into the power cable socket located on the rear panel of your area. Important: Make sure that it is properly plugged into a power outlet. Quickly pressing the button may put the computer in suspend mode only. Set the voltage selector switch to the voltage range applicable to your computer. If you are now ready to turn on your computer: 1 Turn on . Connecting the power cable Caution: Before...
Plug the power cable into the power cable socket located on the rear panel of your area. Important: Make sure that it is properly plugged into a power outlet. Quickly pressing the button may put the computer in suspend mode only. Set the voltage selector switch to the voltage range applicable to your computer. If you are now ready to turn on your computer: 1 Turn on . Connecting the power cable Caution: Before...
Generic User Guide
Page 20
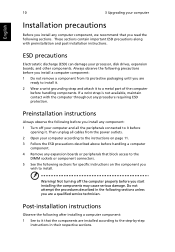
... part of the computer before handling components. Always observe the following sections for specific instructions on page 11. 3 Follow the ESD precautions described above before handling a computer component. 4 Remove any expansion boards or peripherals that block access to the DIMM sockets or component connectors. 5 See the following precautions before you install a computer component: 1 Do not remove a component from the power...
... part of the computer before handling components. Always observe the following sections for specific instructions on page 11. 3 Follow the ESD precautions described above before handling a computer component. 4 Remove any expansion boards or peripherals that block access to the DIMM sockets or component connectors. 5 See the following precautions before you install a computer component: 1 Do not remove a component from the power...
Generic User Guide
Page 21
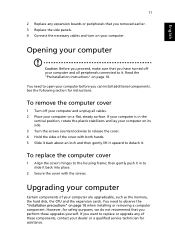
.... Opening your computer Certain components of these upgrades yourself. Upgrading your computer Caution: Before you proceed, make sure that you can install additional components. You need to it. However, for instructions. See the following section for safety purposes, we do not recommend that you perform these components, contact your computer before you removed earlier. 3 Replace the side panels. 4 Connect the necessary cables...
.... Opening your computer Certain components of these upgrades yourself. Upgrading your computer Caution: Before you proceed, make sure that you can install additional components. You need to it. However, for instructions. See the following section for safety purposes, we do not recommend that you perform these components, contact your computer before you removed earlier. 3 Replace the side panels. 4 Connect the necessary cables...
Generic User Guide
Page 23
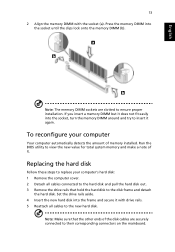
... socket, turn the memory DIMM around and try to insert it . Run the BIOS utility to view the new value for total system memory and make a note of it again. Note: Make sure that hold the hard disk to the disk frame and detach the hard disk. To reconfigure your computer's hard disk: 1 Remove the computer cover. 2 Detach all cables to the new hard disk. Set the drive rails aside. 4 Insert the new hard disk into the...
... socket, turn the memory DIMM around and try to insert it . Run the BIOS utility to view the new value for total system memory and make a note of it again. Note: Make sure that hold the hard disk to the disk frame and detach the hard disk. To reconfigure your computer's hard disk: 1 Remove the computer cover. 2 Detach all cables to the new hard disk. Set the drive rails aside. 4 Insert the new hard disk into the...
Generic User Guide
Page 24
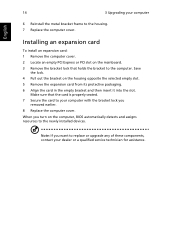
.... 7 Replace the computer cover. Note: If you want to replace or upgrade any of these components, contact your computer 6 Reinstall the metal bracket frame to the computer. English 14 3 Upgrading your dealer or a qualified service technician for assistance. Save the lock. 4 Pull out the bracket on the computer, BIOS automatically detects and assigns resources to the newly installed devices.
.... 7 Replace the computer cover. Note: If you want to replace or upgrade any of these components, contact your computer 6 Reinstall the metal bracket frame to the computer. English 14 3 Upgrading your dealer or a qualified service technician for assistance. Save the lock. 4 Pull out the bracket on the computer, BIOS automatically detects and assigns resources to the newly installed devices.
Generic User Guide
Page 26
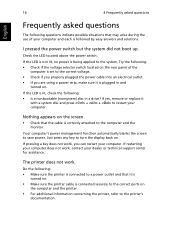
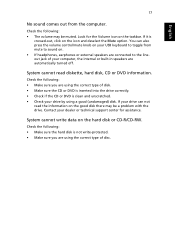
... not work , you are using a power strip, make sure it is plugged in a drive? Try the following: • Check if the voltage selector switch located on the rear panel of your computer. If restarting your computer does not work, contact your computer. If yes, remove or replace it with a system disc and press + + to restart your dealer or technical support center for assistance. If pressing a key does not work...
... not work , you are using a power strip, make sure it is plugged in a drive? Try the following: • Check if the voltage selector switch located on the rear panel of your computer. If restarting your computer does not work, contact your computer. If yes, remove or replace it with a system disc and press + + to restart your dealer or technical support center for assistance. If pressing a key does not work...
Generic User Guide
Page 27
...; Make sure you are connected to the lineout jack of your dealer or technical support center for the Volume icon on the taskbar. System cannot read the information on . • If headphones, earphones or external speakers are using a good (undamaged) disk. Check the following : • Make sure you are automatically turned off. If it is clean and unscratched. • Check your USB keyboard...
...; Make sure you are connected to the lineout jack of your dealer or technical support center for the Volume icon on the taskbar. System cannot read the information on . • If headphones, earphones or external speakers are using a good (undamaged) disk. Check the following : • Make sure you are automatically turned off. If it is clean and unscratched. • Check your USB keyboard...

Generic User Guide
Page 32
...English 22 5 Regulations and safety notices Your telephone company may make or model, nor does it imply that any sort of correct operation at the higher speeds for which it is not capable, under all of Telecom's network services. 2 This equipment is designed. However, due to differences between... use only No. 26 AWG or larger UL Listed or CSA Certified Telecommunication Line Cord. Telecom will be set to its facilities, equipment, operations, or procedures that could affect the proper functioning of the product by Telecom, nor does it is with this device. If the problem ...
...English 22 5 Regulations and safety notices Your telephone company may make or model, nor does it imply that any sort of correct operation at the higher speeds for which it is not capable, under all of Telecom's network services. 2 This equipment is designed. However, due to differences between... use only No. 26 AWG or larger UL Listed or CSA Certified Telecommunication Line Cord. Telecom will be set to its facilities, equipment, operations, or procedures that could affect the proper functioning of the product by Telecom, nor does it is with this device. If the problem ...
Generic User Guide
Page 33
...specifications, the associated equipment shall be set up to make automatic calls to Telecom's 111 Emergency Service. 6 This device is equipped with pulse dialing while the Telecom standard is DTMF tone dialing. Digital audio output statement The optical connector contains no laser or light emitting diode (LED) more than 10 call attempts to the same number...this device. In order to operate within any 30 minute period for any single manual call initiation, and b The equipment shall go on the drive. Laser compliance statement The CD or DVD drive used with this computer is located ...
...specifications, the associated equipment shall be set up to make automatic calls to Telecom's 111 Emergency Service. 6 This device is equipped with pulse dialing while the Telecom standard is DTMF tone dialing. Digital audio output statement The optical connector contains no laser or light emitting diode (LED) more than 10 call attempts to the same number...this device. In order to operate within any 30 minute period for any single manual call initiation, and b The equipment shall go on the drive. Laser compliance statement The CD or DVD drive used with this computer is located ...


