Generic User Guide
Page 2
All Rights Reserved. Veriton Series User Guide Original Issue: 04/2012 Veriton Series Desktop Computer Model number Serial number Purchase date Place of purchase Visit http://registration.acer.com and discover the benefits of being an Acer customer. Copyright © 2012.
All Rights Reserved. Veriton Series User Guide Original Issue: 04/2012 Veriton Series Desktop Computer Model number Serial number Purchase date Place of purchase Visit http://registration.acer.com and discover the benefits of being an Acer customer. Copyright © 2012.
Generic User Guide
Page 3
Turning the product off before cleaning. Warnings • Do not use liquid cleaners or aerosol cleaners. Never spill liquid of any kind into this product, make sure that the total ampere rating of the equipment plugged into the product. • To avoid damage of internal components and to prevent battery leakage, do not place the product on a vibrating surface. Using electrical power • This product should never be placed near water. • Do not place this product from the wall outlet before cleaning Unplug this product on a bed, sofa, rug or other similar ...
Turning the product off before cleaning. Warnings • Do not use liquid cleaners or aerosol cleaners. Never spill liquid of any kind into this product, make sure that the total ampere rating of the equipment plugged into the product. • To avoid damage of internal components and to prevent battery leakage, do not place the product on a vibrating surface. Using electrical power • This product should never be placed near water. • Do not place this product from the wall outlet before cleaning Unplug this product on a bed, sofa, rug or other similar ...

Generic User Guide
Page 4
Make sure the power outlet is a safety feature. Contact your electrician for service. • The product does not operate normally after following requirements: detachable type, UL listed/CSA certified, VDE approved or its equivalent, 4.5 meters (15 feet) maximum length. Refer all servicing to replace the power cord set . Unplug this product from unexpected noise produced by a qualified technician to restore the product to qualified service personnel when: • The power cord or plug is not properly grounded may interfere with the performance of other risks. Replace only ...
Make sure the power outlet is a safety feature. Contact your electrician for service. • The product does not operate normally after following requirements: detachable type, UL listed/CSA certified, VDE approved or its equivalent, 4.5 meters (15 feet) maximum length. Refer all servicing to replace the power cord set . Unplug this product from unexpected noise produced by a qualified technician to restore the product to qualified service personnel when: • The power cord or plug is not properly grounded may interfere with the performance of other risks. Replace only ...
Generic User Guide
Page 5
.... Disposal instructions Do not throw this product contain mercury and must be recycled or disposed of climate change. Acer is ENERGY STAR? Acer is committed to www.energystar.gov. For more information on the Waste from Electrical and Electronics Equipment (WEEE)... regulations, visit http://www.acer-group.com/public/Sustainability/sustainability01.htm http://www.acer-group.com/public/Sustainability/sustainability04.htm Mercury advisory For projectors or electronic products containing an LCD/CRT...
.... Disposal instructions Do not throw this product contain mercury and must be recycled or disposed of climate change. Acer is ENERGY STAR? Acer is committed to www.energystar.gov. For more information on the Waste from Electrical and Electronics Equipment (WEEE)... regulations, visit http://www.acer-group.com/public/Sustainability/sustainability01.htm http://www.acer-group.com/public/Sustainability/sustainability04.htm Mercury advisory For projectors or electronic products containing an LCD/CRT...
Generic User Guide
Page 6
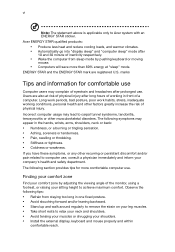
...use , consult a physician immediately and inform your shoulders. • Install the external display, keyboard and mouse properly and within comfortable reach. Acer ENERGY STAR qualified products: • Produce less heat and reduce cooling loads, and warmer climates. • Automatically go into "display sleep"..., tendonitis, tenosynovitis or other factors greatly increase the risk of the monitor, using a footrest, or raising your sitting height to Acer system with an ENERGY STAR sticker. The following symptoms may lead to computer use . The following tips: • Refrain from...
...use , consult a physician immediately and inform your shoulders. • Install the external display, keyboard and mouse properly and within comfortable reach. Acer ENERGY STAR qualified products: • Produce less heat and reduce cooling loads, and warmer climates. • Automatically go into "display sleep"..., tendonitis, tenosynovitis or other factors greatly increase the risk of the monitor, using a footrest, or raising your sitting height to Acer system with an ENERGY STAR sticker. The following symptoms may lead to computer use . The following tips: • Refrain from...
Generic User Guide
Page 7
Eyes • Rest your eyes frequently. • Give your eyes regular breaks by using the computer on a couch or bed. If this is unavoidable, work habits to make your display to an awkward viewing angle. • Avoid looking at the middle of time. The following work for only short periods, take breaks regularly, and do not recommend using drapes, shades or blinds. • Using a task light. • Changing the display's viewing angle. • Using a glare-reduction filter. • Using a display visor, such as a piece of cardboard extended from the display's top front ...
Eyes • Rest your eyes frequently. • Give your eyes regular breaks by using the computer on a couch or bed. If this is unavoidable, work habits to make your display to an awkward viewing angle. • Avoid looking at the middle of time. The following work for only short periods, take breaks regularly, and do not recommend using drapes, shades or blinds. • Using a task light. • Changing the display's viewing angle. • Using a glare-reduction filter. • Using a display visor, such as a piece of cardboard extended from the display's top front ...
Generic User Guide
Page 9
Contents Information for your safety and comfort iii Safety instructions iii Disposal instructions v Tips and information for comfortable use vi 1 System tour 1 Front panel 2 Rear panel 2 Optical drive 4 Taking care of your optical discs 4 2 Setting up your computer 5 Arranging a comfortable work area 6 Positioning your monitor 6 Positioning your keyboard 6 Positioning your mouse 7 Connecting peripherals 7 Connecting your mouse and keyboard 7 USB interface 7 PS/2 interface 7 Connecting a monitor 7 Connecting the power cable 8 Turning on your computer 8...
Contents Information for your safety and comfort iii Safety instructions iii Disposal instructions v Tips and information for comfortable use vi 1 System tour 1 Front panel 2 Rear panel 2 Optical drive 4 Taking care of your optical discs 4 2 Setting up your computer 5 Arranging a comfortable work area 6 Positioning your monitor 6 Positioning your keyboard 6 Positioning your mouse 7 Connecting peripherals 7 Connecting your mouse and keyboard 7 USB interface 7 PS/2 interface 7 Connecting a monitor 7 Connecting the power cable 8 Turning on your computer 8...

Generic User Guide
Page 10
4 Frequently asked questions 15 Frequently asked questions 16 5 Regulations and safety notices 19 FCC notice 20 Modem notices 21 Laser compliance statement 23 Digital audio output statement 23 Radio device regulatory notice 23 Canada - Actual configuration may vary. Low-power license-exempt radio communication devices (RSS-210) 24 Federal Communications Commission 27 Remark: All images are for reference purposes only.
4 Frequently asked questions 15 Frequently asked questions 16 5 Regulations and safety notices 19 FCC notice 20 Modem notices 21 Laser compliance statement 23 Digital audio output statement 23 Radio device regulatory notice 23 Canada - Actual configuration may vary. Low-power license-exempt radio communication devices (RSS-210) 24 Federal Communications Commission 27 Remark: All images are for reference purposes only.

Generic User Guide
Page 12
English 2 Front panel The front panel of your computer has the following: Icon Description Microphone-in jack (front) Headphone jack USB ports USB 3.0 USB 3.0 ports (selected models only) Recovery button Network / hard disk drive indicators Power button Rear panel The rear panel of your computer has the following: Icon Description PS/2 mouse port PS/2 keyboard port Serial port VGA port USB ports 1 System tour
English 2 Front panel The front panel of your computer has the following: Icon Description Microphone-in jack (front) Headphone jack USB ports USB 3.0 USB 3.0 ports (selected models only) Recovery button Network / hard disk drive indicators Power button Rear panel The rear panel of your computer has the following: Icon Description PS/2 mouse port PS/2 keyboard port Serial port VGA port USB ports 1 System tour
Generic User Guide
Page 13
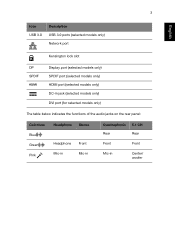
3 English Icon USB 3.0 Description USB 3.0 ports (selected models only) Network port Kensington lock slot DP SPDIF Display port (selected models only) SPDIF port (selected models only) HDMI port (selected models only) DC-in jack (selected models only) DVI port (for selected models only) The table below indicates the functions of the audio jacks on the rear panel: Color/use Blue Green Pink Headphone Stereo Headphone Front Mic-in Mic-in Quadraphonic 5.1 CH Rear Rear Front Front Mic-in Center/ woofer
3 English Icon USB 3.0 Description USB 3.0 ports (selected models only) Network port Kensington lock slot DP SPDIF Display port (selected models only) SPDIF port (selected models only) HDMI port (selected models only) DC-in jack (selected models only) DVI port (for selected models only) The table below indicates the functions of the audio jacks on the rear panel: Color/use Blue Green Pink Headphone Stereo Headphone Front Mic-in Mic-in Quadraphonic 5.1 CH Rear Rear Front Front Mic-in Center/ woofer
Generic User Guide
Page 14
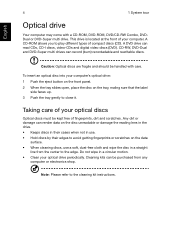
A CD-ROM allows you to the cleaning kit instructions. CD-RW, DVD-Dual and DVD-Super multi drives can read CDs, CD-I discs, video-CDs and digital video discs (DVD). Taking care of compact discs (CD). Note: Please refer to play different types of your optical drive periodically. A DVD drive can record (burn) recordadable and rewritable discs. Do not wipe in a circular motion. • Clean your optical discs Optical discs must be kept free of your computer's optical drive: 1 Push the eject button on the front panel. 2 When the tray slides open, place the disc on the ...
A CD-ROM allows you to the cleaning kit instructions. CD-RW, DVD-Dual and DVD-Super multi drives can read CDs, CD-I discs, video-CDs and digital video discs (DVD). Taking care of compact discs (CD). Note: Please refer to play different types of your optical drive periodically. A DVD drive can record (burn) recordadable and rewritable discs. Do not wipe in a circular motion. • Clean your optical discs Optical discs must be kept free of your computer's optical drive: 1 Push the eject button on the front panel. 2 When the tray slides open, place the disc on the ...
Generic User Guide
Page 15
2 Setting up your computer
2 Setting up your computer
Generic User Guide
Page 16
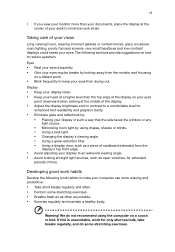
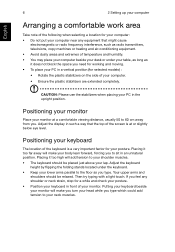
Adjust the keyboard height by flipping the folding stands located under your table, as long as it does not block the space you to your neck muscles. CAUTION: Please use the stabilizers when placing your PC in an unnatural position. Positioning your monitor Place your monitor at or slightly below eye level. Positioning your keyboard The location of your computer. • Ensure the plastic stabilizers are extended completely. Your upper arms and shoulders should be relaxed. Putting your keyboard beside your monitor will make your body lean forward, forcing you need ...
Adjust the keyboard height by flipping the folding stands located under your table, as long as it does not block the space you to your neck muscles. CAUTION: Please use the stabilizers when placing your PC in an unnatural position. Positioning your monitor Place your monitor at or slightly below eye level. Positioning your keyboard The location of your computer. • Ensure the plastic stabilizers are extended completely. Your upper arms and shoulders should be relaxed. Putting your keyboard beside your monitor will make your body lean forward, forcing you need ...
Generic User Guide
Page 17
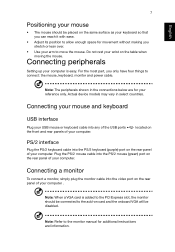
For the most part, you stretch or lean over. • Use your arm to move the mouse. located on PS/2 interface Plug the PS/2 keyboard cable into the video port on the rear panel of your computer. Connecting a monitor To connect a monitor, simply plug the monitor cable into the PS/2 keyboard (purple) port on the rear panel of your computer . Actual device models may vary in the connections below are for additional instructions and information. Note: Refer to the monitor manual for your reference only. Plug the PS/2 mouse cable into any of the USB ports the front and rear panels...
For the most part, you stretch or lean over. • Use your arm to move the mouse. located on PS/2 interface Plug the PS/2 keyboard cable into the video port on the rear panel of your computer. Connecting a monitor To connect a monitor, simply plug the monitor cable into the PS/2 keyboard (purple) port on the rear panel of your computer . Actual device models may vary in the connections below are for additional instructions and information. Note: Refer to the monitor manual for your reference only. Plug the PS/2 mouse cable into any of the USB ports the front and rear panels...
Generic User Guide
Page 18
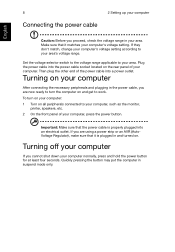
Make sure that it matches your computer's voltage setting. Important: Make sure that the power cable is plugged in your area. Plug the power cable into a power outlet. Turning off your computer If you cannot shut down your computer, press the power button. To turn the computer on and get to your area's voltage range. Quickly pressing the button may put the computer in the power cable, you are using a power strip or an AVR (AutoVoltage Regulator), make sure that it is properly plugged into an electrical outlet. Turning on your computer After connecting the necessary ...
Make sure that it matches your computer's voltage setting. Important: Make sure that the power cable is plugged in your area. Plug the power cable into a power outlet. Turning off your computer If you cannot shut down your computer, press the power button. To turn the computer on and get to your area's voltage range. Quickly pressing the button may put the computer in the power cable, you are using a power strip or an AVR (AutoVoltage Regulator), make sure that it is properly plugged into an electrical outlet. Turning on your computer After connecting the necessary ...

Generic User Guide
Page 19
3 Upgrading your computer
3 Upgrading your computer
Generic User Guide
Page 20
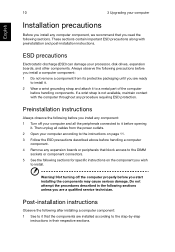
Warning! Always observe the following precautions before you install a computer component: 1 Do not remove a component from the power outlets. 2 Open your computer Installation precautions Before you install any computer component, we recommend that you read the following sections. Not turning off your processor, disk drives, expansion boards, and other components. These sections contain important ESD precautions along with the computer throughout any procedure requiring ESD protection. If a wrist strap is not available, maintain contact with preinstallation and post-installation ...
Warning! Always observe the following precautions before you install a computer component: 1 Do not remove a component from the power outlets. 2 Open your computer Installation precautions Before you install any computer component, we recommend that you read the following sections. Not turning off your processor, disk drives, expansion boards, and other components. These sections contain important ESD precautions along with the computer throughout any procedure requiring ESD protection. If a wrist strap is not available, maintain contact with preinstallation and post-installation ...
Generic User Guide
Page 21
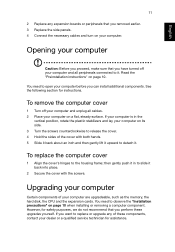
See the following section for safety purposes, we do not recommend that you removed earlier. 3 Replace the side panels. 4 Connect the necessary cables and turn on your computer. then gently push it in the vertical position, rotate the plastic stabilizers and lay your computer on page 10 when installing or removing a computer component. If you want to observe the "Installation precautions" on its side. 3 Turn the screws counterclockwise to release the cover. 4 Hold the sides of the cover with the screws. You need to replace or upgrade any expansion boards or peripherals that you ...
See the following section for safety purposes, we do not recommend that you removed earlier. 3 Replace the side panels. 4 Connect the necessary cables and turn on your computer. then gently push it in the vertical position, rotate the plastic stabilizers and lay your computer on page 10 when installing or removing a computer component. If you want to observe the "Installation precautions" on its side. 3 Turn the screws counterclockwise to release the cover. 4 Hold the sides of the cover with the screws. You need to replace or upgrade any expansion boards or peripherals that you ...

Generic User Guide
Page 22
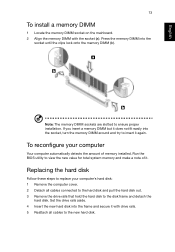
Gently pull the memory DIMM out of the memory DIMM socket outward to release the memory DIMM (a). 12 To remove a memory DIMM 3 Upgrading your computer English Note: The memory DIMM has only one notch located toward the center of the module. 1 Remove the side panel. 2 Locate the memory DIMM socket on the mainboard. 3 Press the holding clips on both sides of the socket (b).
Gently pull the memory DIMM out of the memory DIMM socket outward to release the memory DIMM (a). 12 To remove a memory DIMM 3 Upgrading your computer English Note: The memory DIMM has only one notch located toward the center of the module. 1 Remove the side panel. 2 Locate the memory DIMM socket on the mainboard. 3 Press the holding clips on both sides of the socket (b).
Generic User Guide
Page 23
To reconfigure your computer's hard disk: 1 Remove the computer cover. 2 Detach all cables to the new hard disk. Set the drive rails aside. 4 Insert the new hard disk into the frame and secure it with the socket (a). Replacing the hard disk Follow these steps to replace your computer Your computer automatically detects the amount of it again. Note: The memory DIMM sockets are slotted to insert it . If you insert a memory DIMM but it does not fit easily into the socket until the clips lock onto the memory DIMM (b). Run the BIOS utility to view the new value for total system ...
To reconfigure your computer's hard disk: 1 Remove the computer cover. 2 Detach all cables to the new hard disk. Set the drive rails aside. 4 Insert the new hard disk into the frame and secure it with the socket (a). Replacing the hard disk Follow these steps to replace your computer Your computer automatically detects the amount of it again. Note: The memory DIMM sockets are slotted to insert it . If you insert a memory DIMM but it does not fit easily into the socket until the clips lock onto the memory DIMM (b). Run the BIOS utility to view the new value for total system ...