User Manual
Page 9
... for your safety and comfort iii Safety instructions iii Disposal instructions v Tips and information for comfortable use vi 1 System tour 1 Front panel 2 Rear panel 2 Optical drive 3 Taking care of your optical discs 4 2 Setting up your computer 5 Arranging a comfortable work area 6 Positioning your monitor 6 Positioning your keyboard 6 Positioning your mouse 6 Connecting peripherals... the computer cover 11 Upgrading your computer 11 To remove a memory DIMM 12 To install a memory DIMM 12 To reconfigure your computer 13 Replacing the hard disk 13
... for your safety and comfort iii Safety instructions iii Disposal instructions v Tips and information for comfortable use vi 1 System tour 1 Front panel 2 Rear panel 2 Optical drive 3 Taking care of your optical discs 4 2 Setting up your computer 5 Arranging a comfortable work area 6 Positioning your monitor 6 Positioning your keyboard 6 Positioning your mouse 6 Connecting peripherals... the computer cover 11 Upgrading your computer 11 To remove a memory DIMM 12 To install a memory DIMM 12 To reconfigure your computer 13 Replacing the hard disk 13
User Manual
Page 23
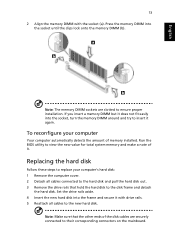
... to their corresponding connectors on the mainboard. If you insert a memory DIMM but it with the socket (a). Set the drive rails aside. 4 Insert the new hard disk into the frame and secure it does not fit easily into the socket until the clips lock onto the memory DIMM (b). Press the.... Run the BIOS utility to ensure proper installation. English 13 2 Align the memory DIMM with drive rails. 5 Reattach all cables connected to the hard disk and pull the hard disk out. 3 Remove the drive rails that the other ends of the disk cables are slotted to view the new value for total ...
... to their corresponding connectors on the mainboard. If you insert a memory DIMM but it with the socket (a). Set the drive rails aside. 4 Insert the new hard disk into the frame and secure it does not fit easily into the socket until the clips lock onto the memory DIMM (b). Press the.... Run the BIOS utility to ensure proper installation. English 13 2 Align the memory DIMM with drive rails. 5 Reattach all cables connected to the hard disk and pull the hard disk out. 3 Remove the drive rails that the other ends of the disk cables are slotted to view the new value for total ...
User Manual
Page 27
... or CD-R/CD-RW. System cannot write data on the good disk there may be a problem with the drive. If your drive can not read diskette, hard disk, CD or DVD information. Contact your drive by using the correct type of disc. English 17 press the volume control/mute knob on your USB keyboard... computer, the internal or built-in speakers are using the correct type of disk. • Make sure the CD or DVD is inserted into the drive correctly. • Check if the CD or DVD is not write-protected. • Make sure you are automatically turned off. Check the following : • Make...
... or CD-R/CD-RW. System cannot write data on the good disk there may be a problem with the drive. If your drive can not read diskette, hard disk, CD or DVD information. Contact your drive by using the correct type of disc. English 17 press the volume control/mute knob on your USB keyboard... computer, the internal or built-in speakers are using the correct type of disk. • Make sure the CD or DVD is inserted into the drive correctly. • Check if the CD or DVD is not write-protected. • Make sure you are automatically turned off. Check the following : • Make...


