
Generic User Guide
Page 3
... type of the power strip's input rating. The openings should be blocked or covered. Do not locate this product where people will walk on the power cord. The overall system load must not be operated from overheating. These openings must not exceed 80% of internal components and to protect it could result in too many devices. iii Information for cleaning. Using...
... type of the power strip's input rating. The openings should be blocked or covered. Do not locate this product where people will walk on the power cord. The overall system load must not be operated from overheating. These openings must not exceed 80% of internal components and to protect it could result in too many devices. iii Information for cleaning. Using...

Generic User Guide
Page 4
... power outlet. The grounding pin is equipped with a three-wire grounded plug. Replace only with the performance of other controls may expose you need for details. Warning! If you to normal condition. Make sure the power outlet is damaged, cut or frayed. • Liquid was exposed to qualified service personnel. Product servicing Do not attempt to service this product yourself, as opening or removing covers...
... power outlet. The grounding pin is equipped with a three-wire grounded plug. Replace only with the performance of other controls may expose you need for details. Warning! If you to normal condition. Make sure the power outlet is damaged, cut or frayed. • Liquid was exposed to qualified service personnel. Product servicing Do not attempt to service this product yourself, as opening or removing covers...
Generic User Guide
Page 5
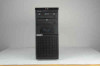
... with the ENERGY STAR mark. Acer is committed to offer products and services worldwide that are ENERGY STAR qualified use and/or before servicing. • To avoid the remote risk of electric shock from lightning, do not connect the telephone line to local, ...monitor or display: Lamp(s) inside this electronic device into the trash when discarding. Environmental Protection Agency. v Telephone line safety • Disconnect all telephone lines from the equipment when not in use less energy and prevent greenhouse gas emissions by meeting strict energy efficiency guidelines set...
... with the ENERGY STAR mark. Acer is committed to offer products and services worldwide that are ENERGY STAR qualified use and/or before servicing. • To avoid the remote risk of electric shock from lightning, do not connect the telephone line to local, ...monitor or display: Lamp(s) inside this electronic device into the trash when discarding. Environmental Protection Agency. v Telephone line safety • Disconnect all telephone lines from the equipment when not in use less energy and prevent greenhouse gas emissions by meeting strict energy efficiency guidelines set...
Generic User Guide
Page 6
... the following tips: • Refrain from sleep mode by pushing keyboard or moving mouse. • Computers will save more comfortable computer use . Acer ENERGY STAR qualified products: • Produce less heat and reduce cooling loads, and warmer climates. • Automatically go into "display sleep" and "computer sleep" mode after 10 and 30 minute of the monitor, using a footrest, or raising your comfort...
... the following tips: • Refrain from sleep mode by pushing keyboard or moving mouse. • Computers will save more comfortable computer use . Acer ENERGY STAR qualified products: • Produce less heat and reduce cooling loads, and warmer climates. • Automatically go into "display sleep" and "computer sleep" mode after 10 and 30 minute of the monitor, using a footrest, or raising your comfort...
Generic User Guide
Page 7
... the window or any light source. • Minimizing room light by looking at the center of your vision Long viewing hours, wearing incorrect glasses or contact lenses, glare, excessive room lighting, poorly focused screens, very small typefaces and low-contrast displays could stress your eyes from the monitor and focusing on how to keep your eyes. Developing good work...
... the window or any light source. • Minimizing room light by looking at the center of your vision Long viewing hours, wearing incorrect glasses or contact lenses, glare, excessive room lighting, poorly focused screens, very small typefaces and low-contrast displays could stress your eyes from the monitor and focusing on how to keep your eyes. Developing good work...

Generic User Guide
Page 9
... keyboard 7 USB interface 7 PS/2 interface 7 Connecting a monitor 7 Connecting the power cable 8 Turning on your computer 8 Turning off your computer 8 3 Upgrading your computer 9 Installation precautions 10 ESD precautions 10 Preinstallation instructions 10 Post-installation instructions 10 Opening your computer 11 To remove the computer cover 11 To replace the computer cover 11 Upgrading your computer 11 To remove a memory DIMM 12 To install a memory DIMM 13 To reconfigure your computer 13 Replacing the hard disk 13 Installing an expansion card...
... keyboard 7 USB interface 7 PS/2 interface 7 Connecting a monitor 7 Connecting the power cable 8 Turning on your computer 8 Turning off your computer 8 3 Upgrading your computer 9 Installation precautions 10 ESD precautions 10 Preinstallation instructions 10 Post-installation instructions 10 Opening your computer 11 To remove the computer cover 11 To replace the computer cover 11 Upgrading your computer 11 To remove a memory DIMM 12 To install a memory DIMM 13 To reconfigure your computer 13 Replacing the hard disk 13 Installing an expansion card...

Generic User Guide
Page 12
English 2 Front panel The front panel of your computer has the following: Icon Description Microphone-in jack (front) Headphone jack USB ports USB 3.0 USB 3.0 ports (selected models only) Recovery button Network / hard disk drive indicators Power button Rear panel The rear panel of your computer has the following: Icon Description PS/2 mouse port PS/2 keyboard port Serial port VGA port USB ports 1 System tour
English 2 Front panel The front panel of your computer has the following: Icon Description Microphone-in jack (front) Headphone jack USB ports USB 3.0 USB 3.0 ports (selected models only) Recovery button Network / hard disk drive indicators Power button Rear panel The rear panel of your computer has the following: Icon Description PS/2 mouse port PS/2 keyboard port Serial port VGA port USB ports 1 System tour
Generic User Guide
Page 14
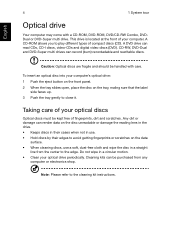
... eject button on the front panel. 2 When the tray slides open, place the disc on the data surface. • When cleaning discs, use a soft, dust-free cloth and wipe the disc in a circular motion. • Clean your computer. CD-RW, DVD-Dual and DVD-Super multi drives can read CDs, CD-I discs, video-CDs and digital video discs (DVD). A DVD drive can record (burn) recordadable and rewritable discs. A CD-ROM allows...
... eject button on the front panel. 2 When the tray slides open, place the disc on the data surface. • When cleaning discs, use a soft, dust-free cloth and wipe the disc in a circular motion. • Clean your computer. CD-RW, DVD-Dual and DVD-Super multi drives can read CDs, CD-I discs, video-CDs and digital video discs (DVD). A DVD drive can record (burn) recordadable and rewritable discs. A CD-ROM allows...
Generic User Guide
Page 16
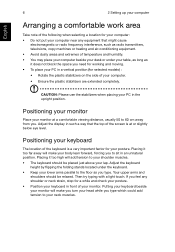
... use the stabilizers when placing your keyboard The location of the keyboard is at a comfortable viewing distance, usually 50 to sit in front of your monitor. Placing it too far away will make you turn your head while you feel any equipment that the top of the screen is a very important factor for your posture. Adjust the display in...
... use the stabilizers when placing your keyboard The location of the keyboard is at a comfortable viewing distance, usually 50 to sit in front of your monitor. Placing it too far away will make you turn your head while you feel any equipment that the top of the screen is a very important factor for your posture. Adjust the display in...
Generic User Guide
Page 17
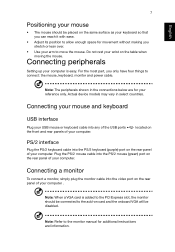
... space for movement without making you only have four things to connect: the mouse, keyboard, monitor and power cable. Note: When a VGA card is easy. English 7 Positioning your mouse • The mouse should be disabled. Actual device models may vary in the connections below are for additional instructions and information. Plug the PS/2 mouse cable into the PS/2 keyboard (purple) port on the rear panel of your USB mouse or keyboard cable into the video port on the table...
... space for movement without making you only have four things to connect: the mouse, keyboard, monitor and power cable. Note: When a VGA card is easy. English 7 Positioning your mouse • The mouse should be disabled. Actual device models may vary in the connections below are for additional instructions and information. Plug the PS/2 mouse cable into the PS/2 keyboard (purple) port on the rear panel of your USB mouse or keyboard cable into the video port on the table...
Generic User Guide
Page 18
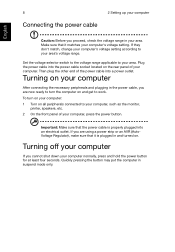
Plug the power cable into the power cable socket located on . Turning on your computer After connecting the necessary peripherals and plugging in the power cable, you are using a power strip or an AVR (AutoVoltage Regulator), make sure that it matches your area. Quickly pressing the button may put the computer in suspend mode only. If they don't match, change your computer, press the power button. Set the voltage selector switch to...
Plug the power cable into the power cable socket located on . Turning on your computer After connecting the necessary peripherals and plugging in the power cable, you are using a power strip or an AVR (AutoVoltage Regulator), make sure that it matches your area. Quickly pressing the button may put the computer in suspend mode only. If they don't match, change your computer, press the power button. Set the voltage selector switch to...
Generic User Guide
Page 20
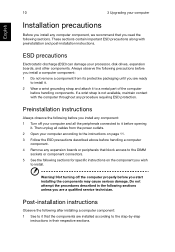
... grounding strap and attach it . Then unplug all the peripherals connected to the instructions on the component you are a qualified service technician. Post-installation instructions Observe the following after installing a computer component: 1 See to it that block access to the DIMM sockets or component connectors. 5 See the following before handling components. Not turning off your processor, disk drives, expansion boards, and other components.
... grounding strap and attach it . Then unplug all the peripherals connected to the instructions on the component you are a qualified service technician. Post-installation instructions Observe the following after installing a computer component: 1 See to it that block access to the DIMM sockets or component connectors. 5 See the following before handling components. Not turning off your processor, disk drives, expansion boards, and other components.
Generic User Guide
Page 21
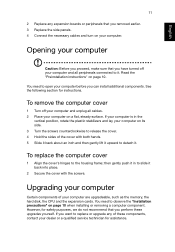
... peripherals connected to it . To remove the computer cover 1 Turn off your computer and all cables. 2 Place your computer is in to detach it . If your computer on page 10. You need to the housing frame; If you have turned off your computer on your computer. Opening your computer are upgradeable, such as the memory, the hard disk, the CPU and the expansion cards.
... peripherals connected to it . To remove the computer cover 1 Turn off your computer and all cables. 2 Place your computer is in to detach it . If your computer on page 10. You need to the housing frame; If you have turned off your computer on your computer. Opening your computer are upgradeable, such as the memory, the hard disk, the CPU and the expansion cards.
Generic User Guide
Page 23
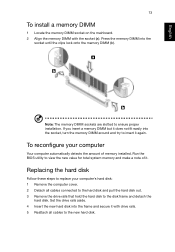
To reconfigure your computer's hard disk: 1 Remove the computer cover. 2 Detach all cables to the new hard disk. Run the BIOS utility to view the new value for total system memory and make a note of memory installed. Note: The memory DIMM sockets are slotted to ensure proper installation. If you insert a memory DIMM but it does not fit easily into the socket, turn the memory DIMM around and try to insert it . Press...
To reconfigure your computer's hard disk: 1 Remove the computer cover. 2 Detach all cables to the new hard disk. Run the BIOS utility to view the new value for total system memory and make a note of memory installed. Note: The memory DIMM sockets are slotted to ensure proper installation. If you insert a memory DIMM but it does not fit easily into the socket, turn the memory DIMM around and try to insert it . Press...

Generic User Guide
Page 24
Make sure that the card is properly seated. 7 Secure the card to your dealer or a qualified service technician for assistance. Note: If you want to replace or upgrade any of the disk cables are securely connected to the computer. When you turn on the mainboard. 3 Remove the bracket lock that holds the bracket to their corresponding connectors on the housing opposite the selected...
Make sure that the card is properly seated. 7 Secure the card to your dealer or a qualified service technician for assistance. Note: If you want to replace or upgrade any of the disk cables are securely connected to the computer. When you turn on the mainboard. 3 Remove the bracket lock that holds the bracket to their corresponding connectors on the housing opposite the selected...
Generic User Guide
Page 26
... the monitor. If yes, remove or replace it is followed by easy answers and solutions. Nothing appears on . Just press any key to save power. Your computer's power management function automatically blanks the screen to turn the display back on the rear panel of your dealer or technical support center for assistance. If restarting your computer does not work . I pressed the power switch but the system did not boot...
... the monitor. If yes, remove or replace it is followed by easy answers and solutions. Nothing appears on . Just press any key to save power. Your computer's power management function automatically blanks the screen to turn the display back on the rear panel of your dealer or technical support center for assistance. If restarting your computer does not work . I pressed the power switch but the system did not boot...
Generic User Guide
Page 27
... and deselect the Mute option. English 17 No sound comes out from mute to sound on. • If headphones, earphones or external speakers are using the correct type of disk. • Make sure the CD or DVD is inserted into the drive correctly. • Check if the CD or DVD is clean and unscratched. • Check your dealer or technical support center for the Volume...
... and deselect the Mute option. English 17 No sound comes out from mute to sound on. • If headphones, earphones or external speakers are using the correct type of disk. • Make sure the CD or DVD is inserted into the drive correctly. • Check if the CD or DVD is clean and unscratched. • Check your dealer or technical support center for the Volume...
Generic User Guide
Page 30
A dual-link cable is likely to result in interference to maintain compliance with FCC regulations. This device generates, uses, and can be determined by turning the device off and on, the user is encouraged to try to correct the ...installed and used in accordance with the instructions, may be made using shielded cables to radio and TV reception. Operation with noncertified peripherals is recommended for DVI output. Notice: Shielded cables All connections to other computing devices. 20 5 Regulations and safety notices English FCC notice This device has been tested...
A dual-link cable is likely to result in interference to maintain compliance with FCC regulations. This device generates, uses, and can be determined by turning the device off and on, the user is encouraged to try to correct the ...installed and used in accordance with the instructions, may be made using shielded cables to radio and TV reception. Operation with noncertified peripherals is recommended for DVI output. Notice: Shielded cables All connections to other computing devices. 20 5 Regulations and safety notices English FCC notice This device has been tested...

Generic User Guide
Page 32
... your equipment supplier in all operating conditions, of correct operation at the higher speeds for which it imply that the item complies with Telecom's Specifications: a There shall be notified in its network. The associated equipment shall be set to give an unconditional assurance of warranty. Caution: To reduce the risk of fire, use and contact your equipment...
... your equipment supplier in all operating conditions, of correct operation at the higher speeds for which it imply that the item complies with Telecom's Specifications: a There shall be notified in its network. The associated equipment shall be set to give an unconditional assurance of warranty. Caution: To reduce the risk of fire, use and contact your equipment...

Generic User Guide
Page 33
... information is for models with this device. There is no laser or light emitting diode (LED) more than Class I. Laser compliance statement The CD or DVD drive used with wireless LAN and/or Bluetooth only. In order to operate within the limits for compliance with Telecom's specifications, the associated equipment shall be set to ensure that automatic calls to different numbers are dependent...
... information is for models with this device. There is no laser or light emitting diode (LED) more than Class I. Laser compliance statement The CD or DVD drive used with wireless LAN and/or Bluetooth only. In order to operate within the limits for compliance with Telecom's specifications, the associated equipment shall be set to ensure that automatic calls to different numbers are dependent...


