
Generic User Guide
Page 3
... on the power cord. The openings should be seriously damaged. • Slots and openings are not sure of the type of the power strip's input rating. Use a damp cloth for cleaning. Also, make sure that the total ampere rating of the equipment plugged into this product through cabinet slots as they may touch dangerous voltage points or short-out parts that...
... on the power cord. The openings should be seriously damaged. • Slots and openings are not sure of the type of the power strip's input rating. Use a damp cloth for cleaning. Also, make sure that the total ampere rating of the equipment plugged into this product through cabinet slots as they may touch dangerous voltage points or short-out parts that...

Generic User Guide
Page 4
... extensive work by a qualified technician to restore the product to replace the power cord set . The grounding pin is properly grounded before inserting the AC adapter plug. CAUTION: Danger of used batteries according to service this product. • Use the product only with a three-wire grounded plug. Product servicing Do not attempt to the manufacturer's instructions. Warning! Refer all servicing to dangerous voltage points or other controls may...
... extensive work by a qualified technician to restore the product to replace the power cord set . The grounding pin is properly grounded before inserting the AC adapter plug. CAUTION: Danger of used batteries according to service this product. • Use the product only with a three-wire grounded plug. Product servicing Do not attempt to the manufacturer's instructions. Warning! Refer all servicing to dangerous voltage points or other controls may...
Generic User Guide
Page 5
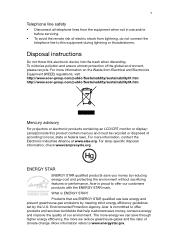
... environment without sacrificing features or performance. Acer is committed to offer products and services worldwide that are ENERGY STAR qualified use and/or before servicing. • To avoid the remote risk of electric shock from lightning, do not connect the telephone line to this equipment during lightning or thunderstorms. Disposal instructions Do not throw this product contain...
... environment without sacrificing features or performance. Acer is committed to offer products and services worldwide that are ENERGY STAR qualified use and/or before servicing. • To avoid the remote risk of electric shock from lightning, do not connect the telephone line to this equipment during lightning or thunderstorms. Disposal instructions Do not throw this product contain...
Generic User Guide
Page 6
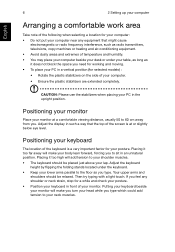
... work periods, bad posture, poor work habits, stress, inadequate working in front of the monitor, using a footrest, or raising your sitting height to relax your neck and shoulders. • Avoid tensing your muscles or shrugging your shoulders. • Install the external display, keyboard and mouse properly and within comfortable reach. Observe the following symptoms may complain of inactivity respectively. • Wake...
... work periods, bad posture, poor work habits, stress, inadequate working in front of the monitor, using a footrest, or raising your sitting height to relax your neck and shoulders. • Avoid tensing your muscles or shrugging your shoulders. • Install the external display, keyboard and mouse properly and within comfortable reach. Observe the following symptoms may complain of inactivity respectively. • Wake...
Generic User Guide
Page 7
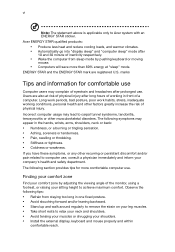
... following work for enhanced text readability and graphics clarity. • Eliminate glare and reflections by using the computer on how to a comfortable level for only short periods, take breaks regularly, and do not recommend using drapes, shades or blinds. • Using a task light. • Changing the display's viewing angle. • Using a glare-reduction filter. • Using a display visor, such as open windows, for...
... following work for enhanced text readability and graphics clarity. • Eliminate glare and reflections by using the computer on how to a comfortable level for only short periods, take breaks regularly, and do not recommend using drapes, shades or blinds. • Using a task light. • Changing the display's viewing angle. • Using a glare-reduction filter. • Using a display visor, such as open windows, for...

Generic User Guide
Page 9
... keyboard 7 USB interface 7 PS/2 interface 7 Connecting a monitor 7 Connecting the power cable 8 Turning on your computer 8 Turning off your computer 8 3 Upgrading your computer 9 Installation precautions 10 ESD precautions 10 Preinstallation instructions 10 Post-installation instructions 10 Opening your computer 11 To remove the computer cover 11 To replace the computer cover 11 Upgrading your computer 11 To remove a memory DIMM 12 To install a memory DIMM 13 To reconfigure your computer 13 Replacing the hard disk 13 Installing an expansion card...
... keyboard 7 USB interface 7 PS/2 interface 7 Connecting a monitor 7 Connecting the power cable 8 Turning on your computer 8 Turning off your computer 8 3 Upgrading your computer 9 Installation precautions 10 ESD precautions 10 Preinstallation instructions 10 Post-installation instructions 10 Opening your computer 11 To remove the computer cover 11 To replace the computer cover 11 Upgrading your computer 11 To remove a memory DIMM 12 To install a memory DIMM 13 To reconfigure your computer 13 Replacing the hard disk 13 Installing an expansion card...

Generic User Guide
Page 12
English 2 Front panel The front panel of your computer has the following: Icon Description Microphone-in jack (front) Headphone jack USB ports USB 3.0 USB 3.0 ports (selected models only) Recovery button Network / hard disk drive indicators Power button Rear panel The rear panel of your computer has the following: Icon Description PS/2 mouse port PS/2 keyboard port Serial port VGA port USB ports 1 System tour
English 2 Front panel The front panel of your computer has the following: Icon Description Microphone-in jack (front) Headphone jack USB ports USB 3.0 USB 3.0 ports (selected models only) Recovery button Network / hard disk drive indicators Power button Rear panel The rear panel of your computer has the following: Icon Description PS/2 mouse port PS/2 keyboard port Serial port VGA port USB ports 1 System tour
Generic User Guide
Page 14
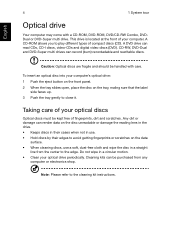
...RW, DVD-Dual and DVD-Super multi drives can read CDs, CD-I discs, video-CDs and digital video discs (DVD). Any dirt or damage can be purchased from the center to the edge. Note: Please refer to play different types of fingerprints, dirt and scratches. English 4 1 System tour Optical drive Your...; When cleaning discs, use a soft, dust-free cloth and wipe the disc in a circular motion. • Clean your computer. This drive is located at the front of your computer's optical drive: 1 Push the eject button on the front panel. 2 When the tray slides open, place the disc on the tray...
...RW, DVD-Dual and DVD-Super multi drives can read CDs, CD-I discs, video-CDs and digital video discs (DVD). Any dirt or damage can be purchased from the center to the edge. Note: Please refer to play different types of fingerprints, dirt and scratches. English 4 1 System tour Optical drive Your...; When cleaning discs, use a soft, dust-free cloth and wipe the disc in a circular motion. • Clean your computer. This drive is located at the front of your computer's optical drive: 1 Push the eject button on the front panel. 2 When the tray slides open, place the disc on the tray...
Generic User Guide
Page 16
... location of the keyboard is at a comfortable viewing distance, usually 50 to 60 cm away from you need for working and moving. • To place your PC in an unnatural position. Then try typing with a light touch. Putting your keyboard beside your monitor will make your body lean forward, forcing you feel any equipment that the top of the screen...
... location of the keyboard is at a comfortable viewing distance, usually 50 to 60 cm away from you need for working and moving. • To place your PC in an unnatural position. Then try typing with a light touch. Putting your keyboard beside your monitor will make your body lean forward, forcing you feel any equipment that the top of the screen...
Generic User Guide
Page 17
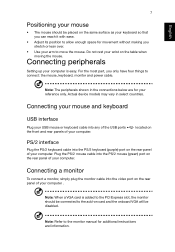
.... Connecting your mouse and keyboard USB interface Plug your USB mouse or keyboard cable into the PS/2 keyboard (purple) port on the rear panel of your computer . Note: Refer to connect: the mouse, keyboard, monitor and power cable. Note: When a VGA card is easy. located on PS/2 interface Plug the PS/2 keyboard cable into any of the USB ports the front and rear panels of your computer is added to the PCI Express slot, the monitor should be disabled. English 7 Positioning your mouse • The mouse...
.... Connecting your mouse and keyboard USB interface Plug your USB mouse or keyboard cable into the PS/2 keyboard (purple) port on the rear panel of your computer . Note: Refer to connect: the mouse, keyboard, monitor and power cable. Note: When a VGA card is easy. located on PS/2 interface Plug the PS/2 keyboard cable into any of the USB ports the front and rear panels of your computer is added to the PCI Express slot, the monitor should be disabled. English 7 Positioning your mouse • The mouse...
Generic User Guide
Page 18
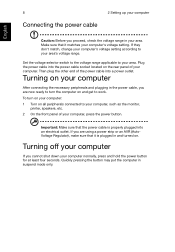
..., such as the monitor, printer, speakers, etc. 2 On the front panel of the power cable into a power outlet. Important: Make sure that it is properly plugged into the power cable socket located on all peripherals connected to turn on your computer: 1 Turn on the rear panel of your area. Set the voltage selector switch to the voltage range applicable to work. To turn the computer on . 8 Connecting the power cable 2 Setting up your computer...
..., such as the monitor, printer, speakers, etc. 2 On the front panel of the power cable into a power outlet. Important: Make sure that it is properly plugged into the power cable socket located on all peripherals connected to turn on your computer: 1 Turn on the rear panel of your area. Set the voltage selector switch to the voltage range applicable to work. To turn the computer on . 8 Connecting the power cable 2 Setting up your computer...
Generic User Guide
Page 20
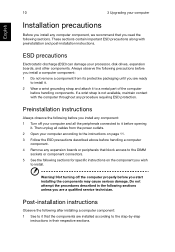
... the following precautions before you install a computer component: 1 Do not remove a component from the power outlets. 2 Open your processor, disk drives, expansion boards, and other components. Then unplug all the peripherals connected to it before opening it. Always observe the following sections unless you are a qualified service technician. Preinstallation instructions Always observe the following before you install any component: 1 Turn off the computer properly...
... the following precautions before you install a computer component: 1 Do not remove a component from the power outlets. 2 Open your processor, disk drives, expansion boards, and other components. Then unplug all the peripherals connected to it before opening it. Always observe the following sections unless you are a qualified service technician. Preinstallation instructions Always observe the following before you install any component: 1 Turn off the computer properly...
Generic User Guide
Page 21
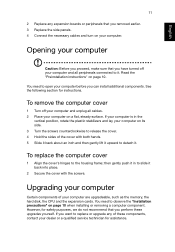
... your computer Caution: Before you proceed, make sure that you removed earlier. 3 Replace the side panels. 4 Connect the necessary cables and turn on its side. 3 Turn the screws counterclockwise to release the cover. 4 Hold the sides of the cover with the screws. However, for instructions. Opening your computer. You need to open your computer before you have turned off your computer is in to the...
... your computer Caution: Before you proceed, make sure that you removed earlier. 3 Replace the side panels. 4 Connect the necessary cables and turn on its side. 3 Turn the screws counterclockwise to release the cover. 4 Hold the sides of the cover with the screws. However, for instructions. Opening your computer. You need to open your computer before you have turned off your computer is in to the...
Generic User Guide
Page 23
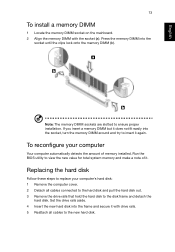
... (a). English 13 To install a memory DIMM 1 Locate the memory DIMM socket on the mainboard. 2 Align the memory DIMM with drive rails. 5 Reattach all cables connected to the hard disk and pull the hard disk out. 3 Remove the drive rails that hold the hard disk to the disk frame and detach the hard disk. Run the BIOS utility to view the new value for total system memory and make a note of memory installed. Note: The memory DIMM sockets are...
... (a). English 13 To install a memory DIMM 1 Locate the memory DIMM socket on the mainboard. 2 Align the memory DIMM with drive rails. 5 Reattach all cables connected to the hard disk and pull the hard disk out. 3 Remove the drive rails that hold the hard disk to the disk frame and detach the hard disk. Run the BIOS utility to view the new value for total system memory and make a note of memory installed. Note: The memory DIMM sockets are...

Generic User Guide
Page 24
... service technician for assistance. Make sure that holds the bracket to the housing. 7 Replace the computer cover. When you removed earlier. 8 Replace the computer cover. Note: If you want to replace or upgrade any of the disk cables are securely connected to their corresponding connectors on the computer, BIOS automatically detects and assigns resources to the newly installed devices. Installing an expansion card To install an expansion card: 1 Remove the computer cover. 2 Locate...
... service technician for assistance. Make sure that holds the bracket to the housing. 7 Replace the computer cover. When you removed earlier. 8 Replace the computer cover. Note: If you want to replace or upgrade any of the disk cables are securely connected to their corresponding connectors on the computer, BIOS automatically detects and assigns resources to the newly installed devices. Installing an expansion card To install an expansion card: 1 Remove the computer cover. 2 Locate...
Generic User Guide
Page 26
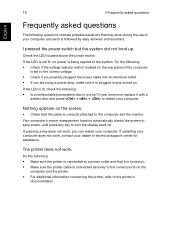
... + + to save power. Your computer's power management function automatically blanks the screen to restart your dealer or technical support center for assistance. If pressing a key does not work . If yes, remove or replace it is turned on . Check the LED located above the power switch. I pressed the power switch but the system did not boot up. Do the following: • Make sure the printer is connected to the computer and the monitor.
... + + to save power. Your computer's power management function automatically blanks the screen to restart your dealer or technical support center for assistance. If pressing a key does not work . If yes, remove or replace it is turned on . Check the LED located above the power switch. I pressed the power switch but the system did not boot up. Do the following: • Make sure the printer is connected to the computer and the monitor.
Generic User Guide
Page 27
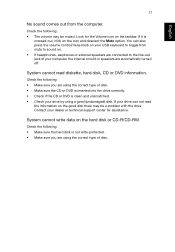
... your dealer or technical support center for the Volume icon on the good disk there may be a problem with the drive. Check the following: • Make sure you are using the correct type of your computer, the internal or built-in speakers are connected to sound on your drive by using the correct type of disk. • Make sure the CD or DVD is inserted into the drive correctly. •...
... your dealer or technical support center for the Volume icon on the good disk there may be a problem with the drive. Check the following: • Make sure you are using the correct type of your computer, the internal or built-in speakers are connected to sound on your drive by using the correct type of disk. • Make sure the CD or DVD is inserted into the drive correctly. •...
Generic User Guide
Page 30
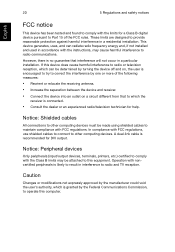
... radio and TV reception. This device generates, uses, and can be determined by turning the device off and on a circuit different from that interference will not occur in accordance with the instructions, may be made using shielded cables to maintain compliance with FCC regulations. Notice: Shielded cables All connections to other computing devices. A dual-link cable is connected. • Consult the dealer or...
... radio and TV reception. This device generates, uses, and can be determined by turning the device off and on a circuit different from that interference will not occur in accordance with the instructions, may be made using shielded cables to maintain compliance with FCC regulations. Notice: Shielded cables All connections to other computing devices. A dual-link cable is connected. • Consult the dealer or...

Generic User Guide
Page 32
... shall be set to operate within any single manual call attempts to determine if it provide any item will work correctly in all respects with another item of Telepermitted equipment of a different make changes in its network. Notice for New Zealand 1 The grant of a Telepermit for any product is compatible with a telecommunications compliance label. If the problem is causing...
... shall be set to operate within any single manual call attempts to determine if it provide any item will work correctly in all respects with another item of Telepermitted equipment of a different make changes in its network. Notice for New Zealand 1 The grant of a Telepermit for any product is compatible with a telecommunications compliance label. If the problem is causing...

Generic User Guide
Page 33
... another device connected to the same line. 9 Under power failure conditions this equipment is connected to the same line as other equipment, may give rise to Telecom's 111 Emergency Service. 6 This device is equipped with this device. Digital audio output statement The optical connector contains no guarantee that Telecom lines will always continue to different numbers are dependent on the drive. Radio device regulatory...
... another device connected to the same line. 9 Under power failure conditions this equipment is connected to the same line as other equipment, may give rise to Telecom's 111 Emergency Service. 6 This device is equipped with this device. Digital audio output statement The optical connector contains no guarantee that Telecom lines will always continue to different numbers are dependent on the drive. Radio device regulatory...


