

Veriton 3700G/5700G/7700G User's Guide (EN)
Page 3
...System specifications Package contents Accessing the user's guide 2 System tour Features Performance Multimedia Connectivity Front panel Rear panel Keyboard Internet/E-mail/Search keys Multimedia keys Volume control/Mute keys Lock keys Cursor keys Windows keys Function keys Palm rest Optical drive To take care of your CDs and DVDs Hard disk 3 Setting up your computer Arranging a comfortable work area Adjusting your chair Positioning your PC Positioning your monitor Positioning your keyboard Positioning your mouse Connecting peripherals Connecting your mouse USB mouse PS/2 mouse Connecting your...
...System specifications Package contents Accessing the user's guide 2 System tour Features Performance Multimedia Connectivity Front panel Rear panel Keyboard Internet/E-mail/Search keys Multimedia keys Volume control/Mute keys Lock keys Cursor keys Windows keys Function keys Palm rest Optical drive To take care of your CDs and DVDs Hard disk 3 Setting up your computer Arranging a comfortable work area Adjusting your chair Positioning your PC Positioning your monitor Positioning your keyboard Positioning your mouse Connecting peripherals Connecting your mouse USB mouse PS/2 mouse Connecting your...
Veriton 3700G/5700G/7700G User's Guide (EN)
Page 4
...modem (optional) Connecting to the network Connecting multimedia devices Connecting USB devices 4 Upgrading your computer Installation precautions ESD precautions Preinstallation instructions Installation precautions ESD precautions Preinstallation instructions Post-installation instructions Opening your computer To remove the side panel To replace the side panel Internal components System boards Mainboard layout Audio board Upgrading your computer Installing additional memory To remove a DDR DIMM To install a DDR DIMM To reconfigure your system Acer Desktop Manager Using Backup (Windows®...
...modem (optional) Connecting to the network Connecting multimedia devices Connecting USB devices 4 Upgrading your computer Installation precautions ESD precautions Preinstallation instructions Installation precautions ESD precautions Preinstallation instructions Post-installation instructions Opening your computer To remove the side panel To replace the side panel Internal components System boards Mainboard layout Audio board Upgrading your computer Installing additional memory To remove a DDR DIMM To install a DDR DIMM To reconfigure your system Acer Desktop Manager Using Backup (Windows®...
Veriton 3700G/5700G/7700G User's Guide (EN)
Page 9
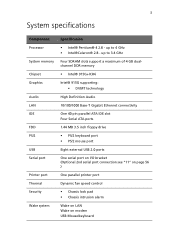
...-T Gigabit Ethernet connectivity IDE One 40 pin parallel ATA IDE slot Four Serial ATA ports FDD 1.44 MB 3.5 inch floppy drive PS/2 • PS/2 keyboard port • PS/2 mouse port USB Eight external USB 2.0 ports Serial port One serial port on I/O bracket (Optional 2nd serial port connection see "11" on page 56 ) Printer port One parallel printer port Thermal Dynamic fan speed control Security • Chassis lock pad • Chassis intrusion alarm Wake system Wake on LAN Wake on modem USB Mouse/keyboard 3 System specifications Component Specification Processor...
...-T Gigabit Ethernet connectivity IDE One 40 pin parallel ATA IDE slot Four Serial ATA ports FDD 1.44 MB 3.5 inch floppy drive PS/2 • PS/2 keyboard port • PS/2 mouse port USB Eight external USB 2.0 ports Serial port One serial port on I/O bracket (Optional 2nd serial port connection see "11" on page 56 ) Printer port One parallel printer port Thermal Dynamic fan speed control Security • Chassis lock pad • Chassis intrusion alarm Wake system Wake on LAN Wake on modem USB Mouse/keyboard 3 System specifications Component Specification Processor...

Veriton 3700G/5700G/7700G User's Guide (EN)
Page 15
... them at the same time. Connectivity • Two PS/2 interfaces for mouse and keyboard • One serial port (Optional 2nd serial port connection see "11" on page 56) • One parallel port • One VGA port • Eight Universal Serial Bus (USB) 2.0 ports (four on the front and four on the rear panel) • High-speed V.92, 56K Fax/modem (optional) • Gigabit Ethernet LAN support with remote wake-up to 800 /533MHz and...
... them at the same time. Connectivity • Two PS/2 interfaces for mouse and keyboard • One serial port (Optional 2nd serial port connection see "11" on page 56) • One parallel port • One VGA port • Eight Universal Serial Bus (USB) 2.0 ports (four on the front and four on the rear panel) • High-speed V.92, 56K Fax/modem (optional) • Gigabit Ethernet LAN support with remote wake-up to 800 /533MHz and...
Veriton 3700G/5700G/7700G User's Guide (EN)
Page 19
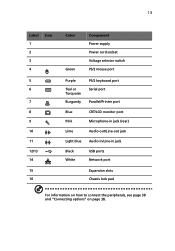
13 Label Icon 1 2 3 4 5 6 7 8 9 10 11 12/13 14 15 16 Color Green Component Power supply Power cord socket Voltage selector switch PS/2 mouse port Purple Teal or Turquoise Burgundy PS/2 keyboard port Serial port Parallel/Printer port Blue CRT/LCD monitor port Pink Microphone-in jack (rear) Lime Audio-out/Line-out jack Light blue Audio-in/Line-in jack Black White USB ports Network port Expansion slots Chassis lock pad For information on how to connect the peripherals, see page 30 and "Connecting options" on page 38.
13 Label Icon 1 2 3 4 5 6 7 8 9 10 11 12/13 14 15 16 Color Green Component Power supply Power cord socket Voltage selector switch PS/2 mouse port Purple Teal or Turquoise Burgundy PS/2 keyboard port Serial port Parallel/Printer port Blue CRT/LCD monitor port Pink Microphone-in jack (rear) Lime Audio-out/Line-out jack Light blue Audio-in/Line-in jack Black White USB ports Network port Expansion slots Chassis lock pad For information on how to connect the peripherals, see page 30 and "Connecting options" on page 38.
Veriton 3700G/5700G/7700G User's Guide (EN)
Page 36
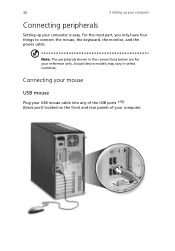
30 3 Setting up your computer Connecting peripherals Setting up your computer. Actual device models may vary in the connections below are for your reference only. Connecting your mouse USB mouse Plug your USB mouse cable into any of the USB ports (black port) located on the front and rear panels of your computer is easy. Note: The peripherals shown in select countries. For the most part, you only have four things to connect: the mouse, the keyboard, the monitor, and the power cable.
30 3 Setting up your computer Connecting peripherals Setting up your computer. Actual device models may vary in the connections below are for your reference only. Connecting your mouse USB mouse Plug your USB mouse cable into any of the USB ports (black port) located on the front and rear panels of your computer is easy. Note: The peripherals shown in select countries. For the most part, you only have four things to connect: the mouse, the keyboard, the monitor, and the power cable.

Veriton 3700G/5700G/7700G User's Guide (EN)
Page 40
Note: Refer to the PCI-E slot, the monitor should be disabled. a b 34 3 Setting up your computer Connecting a monitor To connect a monitor, simply plug the monitor cable into the monitor port (blue port) located on -board VGA(a) will be connected to the add-on card(b) and the on the rear panel of your computer(a). When a VGA card is added to the monitor manual for additonal instructions and information.
Note: Refer to the PCI-E slot, the monitor should be disabled. a b 34 3 Setting up your computer Connecting a monitor To connect a monitor, simply plug the monitor cable into the monitor port (blue port) located on -board VGA(a) will be connected to the add-on card(b) and the on the rear panel of your computer(a). When a VGA card is added to the monitor manual for additonal instructions and information.

Veriton 3700G/5700G/7700G User's Guide (EN)
Page 46
Note: Consult your network system administrator or operating system manual for information on the rear panel of your computer. To do so, simply plug the network cable into the network port (white port) on how to configure your computer to the network You can connect your network setup. 40 3 Setting up your computer Connecting to a Local Area Network (LAN) using a network cable.
Note: Consult your network system administrator or operating system manual for information on the rear panel of your computer. To do so, simply plug the network cable into the network port (white port) on how to configure your computer to the network You can connect your network setup. 40 3 Setting up your computer Connecting to a Local Area Network (LAN) using a network cable.
Veriton 3700G/5700G/7700G User's Guide (EN)
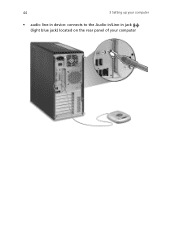
Page 50
44 3 Setting up your computer • audio line-in device: connects to the Audio-in/Line-in jack (light blue jack) located on the rear panel of your computer
44 3 Setting up your computer • audio line-in device: connects to the Audio-in/Line-in jack (light blue jack) located on the rear panel of your computer
Veriton 3700G/5700G/7700G User's Guide (EN)
Page 55
... recommend that block access to the DIMM sockets or component connectors. 5 See the following before you install any component: 1 Turn off the computer properly before handling components. Not turning off your computer and all cables from the power outlets. 2 Open your processor, disk drives, expansion boards, and other components. Then unplug all the peripherals connected to it before opening it to install it. 2 Wear a wrist...
... recommend that block access to the DIMM sockets or component connectors. 5 See the following before you install any component: 1 Turn off the computer properly before handling components. Not turning off your computer and all cables from the power outlets. 2 Open your processor, disk drives, expansion boards, and other components. Then unplug all the peripherals connected to it before opening it to install it. 2 Wear a wrist...
Veriton 3700G/5700G/7700G User's Guide (EN)
Page 56
50 4 Upgrading your computer Post-installation instructions Observe the following after installing a computer component: 1 See to it that the components are installed according to the step-by-step instructions in their respective sections. 2 Replace any expansion boards or peripherals that you removed earlier. 3 Replace the side panels. 4 Connect the necessary cables and turn on your computer.
50 4 Upgrading your computer Post-installation instructions Observe the following after installing a computer component: 1 See to it that the components are installed according to the step-by-step instructions in their respective sections. 2 Replace any expansion boards or peripherals that you removed earlier. 3 Replace the side panels. 4 Connect the necessary cables and turn on your computer.
Veriton 3700G/5700G/7700G User's Guide (EN)
Page 62
...5 6 7 8 9 10 11 12 13 14 15 16 17 18 19 20(J8J4) 4 Upgrading your computer Component CD-ROM connector PCI Express x1 connector S/PDIF output connector Front panel audio connector PCI Conventional bus connectors (2) PCI Express x16 connector Processor fan connector ATX12V power connector Alternate power connector Not used Serial port B connector Not used Not used One Button Recovery connector Main power connector Diskette drive connector Parallel ATA IDE connector Battery Jumper Settings Chassis intrusion connector BIOS Configuration jumper Item 1-2 Normal (Default) 2-3 Configure None Recovery
...5 6 7 8 9 10 11 12 13 14 15 16 17 18 19 20(J8J4) 4 Upgrading your computer Component CD-ROM connector PCI Express x1 connector S/PDIF output connector Front panel audio connector PCI Conventional bus connectors (2) PCI Express x16 connector Processor fan connector ATX12V power connector Alternate power connector Not used Serial port B connector Not used Not used One Button Recovery connector Main power connector Diskette drive connector Parallel ATA IDE connector Battery Jumper Settings Chassis intrusion connector BIOS Configuration jumper Item 1-2 Normal (Default) 2-3 Configure None Recovery

Veriton 3700G/5700G/7700G User's Guide (EN)
Page 65
... the other. Installing additional memory The four 184-pin sockets on the mainboard support Double Data Rate (DDR) Synchronous Dynamic Random Access Memory (SDRAM)-type DIMMs. You may not be exactly the same with different capacities to replace or upgrade any of these upgrades yourself. Contact your computer are upgradeable such as the memory, the hard disk, the CPU and the expansion cards. To remove a DDR DIMM...
... the other. Installing additional memory The four 184-pin sockets on the mainboard support Double Data Rate (DDR) Synchronous Dynamic Random Access Memory (SDRAM)-type DIMMs. You may not be exactly the same with different capacities to replace or upgrade any of these upgrades yourself. Contact your computer are upgradeable such as the memory, the hard disk, the CPU and the expansion cards. To remove a DDR DIMM...

Veriton 3700G/5700G/7700G User's Guide (EN)
Page 67
61 To reconfigure your computer's hard disk: 1 Remove the side panel (see page 51). 2 (a) Detach the power and hard disk cables from the hard disk. (b) Detach the hard disk from the drive frame. Replacing the hard disk Follow these steps to view the new value for total system memory and make a note of memory installed. Run the BIOS utility to replace your computer Your computer automatically detects the amount of it.
61 To reconfigure your computer's hard disk: 1 Remove the side panel (see page 51). 2 (a) Detach the power and hard disk cables from the hard disk. (b) Detach the hard disk from the drive frame. Replacing the hard disk Follow these steps to view the new value for total system memory and make a note of memory installed. Run the BIOS utility to replace your computer Your computer automatically detects the amount of it.
Veriton 3700G/5700G/7700G User's Guide (EN)
Page 68
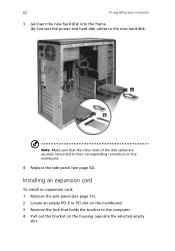
Note: Make sure that holds the bracket to the new hard disk. Installing an expansion card To install an expansion card: 1 Remove the side panel (see page 52). 62 4 Upgrading your computer 3 (a) Insert the new hard disk into the frame. (b) Connect the power and hard disk cables to the computer. 4 Pull out the bracket on the mainboard. 4 Replace the side panel (see page 51). 2 Locate an empty PCI-E or PCI slot on the mainboard. 3 Remove the lock...
Note: Make sure that holds the bracket to the new hard disk. Installing an expansion card To install an expansion card: 1 Remove the side panel (see page 52). 62 4 Upgrading your computer 3 (a) Insert the new hard disk into the frame. (b) Connect the power and hard disk cables to the computer. 4 Pull out the bracket on the mainboard. 4 Replace the side panel (see page 51). 2 Locate an empty PCI-E or PCI slot on the mainboard. 3 Remove the lock...
Veriton 3700G/5700G/7700G User's Guide (EN)
Page 80
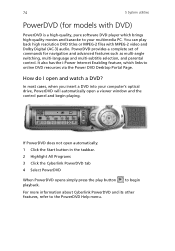
... control. to the PowerDVD Help menu. It also has the i-Power Internet Enabling feature, which brings high-quality movies and karaoke to your computer's optical drive, PowerDVD will automatically open and watch a DVD? PowerDVD provides a complete set of commands for models with MPEG-2 video and Dolby Digital (AC-3) audio. In most cases, when you insert a DVD into your multimedia PC. How do I open a viewer window and the control panel...
... control. to the PowerDVD Help menu. It also has the i-Power Internet Enabling feature, which brings high-quality movies and karaoke to your computer's optical drive, PowerDVD will automatically open and watch a DVD? PowerDVD provides a complete set of commands for models with MPEG-2 video and Dolby Digital (AC-3) audio. In most cases, when you insert a DVD into your multimedia PC. How do I open a viewer window and the control panel...

Veriton 3700G/5700G/7700G User's Guide (EN)
Page 83
... Button Recovery) button, a feature that contains all onscreen instructions. OBR works from system backup. You can press Alt + F10 after the BIOS finishes running will restore your system. There are lost or damaged, the recovery process will result in abnormal shutdown and may make your system quick and easy. Warning: Initiating the recovery operation while the operating system is from a hidden partition on your hard drive...
... Button Recovery) button, a feature that contains all onscreen instructions. OBR works from system backup. You can press Alt + F10 after the BIOS finishes running will restore your system. There are lost or damaged, the recovery process will result in abnormal shutdown and may make your system quick and easy. Warning: Initiating the recovery operation while the operating system is from a hidden partition on your hard drive...

Veriton 3700G/5700G/7700G User's Guide (EN)
Page 95
... its original default factory settings. Q: I pressed the power switch but the system did not boot up. If the LED is not lit, no power is plugged in the floppy drive? However, if the diagnostic utility still reports a problem, then you are possible situations that it with a system diskette and press Ctrl + Alt + Del to page 77. Insert the startup disk you created during the use of...
... its original default factory settings. Q: I pressed the power switch but the system did not boot up. If the LED is not lit, no power is plugged in the floppy drive? However, if the diagnostic utility still reports a problem, then you are possible situations that it with a system diskette and press Ctrl + Alt + Del to page 77. Insert the startup disk you created during the use of...

Veriton 3700G/5700G/7700G User's Guide (EN)
Page 111
... and close the cover. To clean your pointing device To clean a regular mouse (with rubber ball) 1 Open the circular cover underneath the mouse. 2 Take out the rubber ball and wipe it with your monitor. For cleaning instructions, refer to replace or upgrade any of the computer and the keyboard. Do not use liquid or aerosol cleaners. When to contact a service technician • If...
... and close the cover. To clean your pointing device To clean a regular mouse (with rubber ball) 1 Open the circular cover underneath the mouse. 2 Take out the rubber ball and wipe it with your monitor. For cleaning instructions, refer to replace or upgrade any of the computer and the keyboard. Do not use liquid or aerosol cleaners. When to contact a service technician • If...
Veriton 3700G/5700G/7700G User's Guide (EN)
Page 114
108 USB mouse 30 keyboard 28 monitor 28 mouse 29 software 67 Norton AntiVirus 70 system boards 55 audio board 58 mainboard 55 system utilities Acrobat Reader 68 Norton AntiVirus 70 NTI CD-Maker 72 PowerDVD 74 reinstalling programs 76 T turning off computer 37 software shutdown 37 suspend mode 37 Index turning on computer 36 power button 36 U upgrade add memory 59 install DDR DIMM 60 reconfigure computer 61 computer 59 installation precautions 49 ESD 49 post-installation 50 preinstallation 49 open computer reinstall side panel 52 replace components memory 59 V Veriton 7700G mainboard layout 55
108 USB mouse 30 keyboard 28 monitor 28 mouse 29 software 67 Norton AntiVirus 70 system boards 55 audio board 58 mainboard 55 system utilities Acrobat Reader 68 Norton AntiVirus 70 NTI CD-Maker 72 PowerDVD 74 reinstalling programs 76 T turning off computer 37 software shutdown 37 suspend mode 37 Index turning on computer 36 power button 36 U upgrade add memory 59 install DDR DIMM 60 reconfigure computer 61 computer 59 installation precautions 49 ESD 49 post-installation 50 preinstallation 49 open computer reinstall side panel 52 replace components memory 59 V Veriton 7700G mainboard layout 55


