

Veriton 7200D
Page 10
x Network 36 USB devices 37 Multimedia devices 39 4 Upgrading your computer 43 Installation precautions 45 ESD precautions 45 Preinstallation instructions 45 Post-installation instructions 46 Opening your computer 47 To... card 54 System boards 56 Mainboard layout 56 Veriton 7200 mainboard layout 57 Veriton 7200D mainboard layout 58 Audio board 61 Upgrading the memory 62 Installing additional memory for Veriton 7200 62 Installing additional memory for Veriton 7200D 62 Removing and installing a DIMM for the Veriton 7200 series 63 To install a DIMM 64 ...
x Network 36 USB devices 37 Multimedia devices 39 4 Upgrading your computer 43 Installation precautions 45 ESD precautions 45 Preinstallation instructions 45 Post-installation instructions 46 Opening your computer 47 To... card 54 System boards 56 Mainboard layout 56 Veriton 7200 mainboard layout 57 Veriton 7200D mainboard layout 58 Audio board 61 Upgrading the memory 62 Installing additional memory for Veriton 7200 62 Installing additional memory for Veriton 7200D 62 Removing and installing a DIMM for the Veriton 7200 series 63 To install a DIMM 64 ...
Veriton 7200D
Page 31
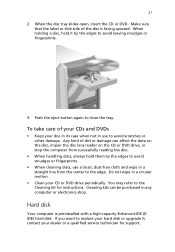
... DVD. Make sure that the label or title side of dirt or damage can be purchased in a circular motion. • Clean your hard disk or upgrade it by the edges to avoid smudges or fingerprints. • When cleaning discs, use to replace your CD or DVD drive periodically. Cleaning kits can...
... DVD. Make sure that the label or title side of dirt or damage can be purchased in a circular motion. • Clean your hard disk or upgrade it by the edges to avoid smudges or fingerprints. • When cleaning discs, use to replace your CD or DVD drive periodically. Cleaning kits can...

Veriton 7200D
Page 53
4 Upgrading your computer
4 Upgrading your computer

Veriton 7200D
Page 54
This chapter contains instructions on how to upgrade your computer and basic information about your system boards that you will find helpful when performing the upgrade process.
This chapter contains instructions on how to upgrade your computer and basic information about your system boards that you will find helpful when performing the upgrade process.

Veriton 7200D
Page 56
Replace the computer cover. 4. 46 4 Upgrading your computer. Connect the necessary cables and turn on your computer Post-installation instructions Observe the following after installing a computer component: 1. See to the step- Replace any expansion boards or peripherals that the components are installed according to it that you removed earlier. 3. by-step instructions in their respective sections. 2.
Replace the computer cover. 4. 46 4 Upgrading your computer. Connect the necessary cables and turn on your computer Post-installation instructions Observe the following after installing a computer component: 1. See to the step- Replace any expansion boards or peripherals that the components are installed according to it that you removed earlier. 3. by-step instructions in their respective sections. 2.

Veriton 7200D
Page 58
Slide it back about an inch and then gently pull it . Hold one side panel with both hands. Do the same to detach it outward to the other side. To reinstall the side panel 1. Do the same to slide it in to the other side. Align the side panel's hinges to the housing frame and then push it back into place. 48 4 Upgrading your computer 4.
Slide it back about an inch and then gently pull it . Hold one side panel with both hands. Do the same to detach it outward to the other side. To reinstall the side panel 1. Do the same to slide it in to the other side. Align the side panel's hinges to the housing frame and then push it back into place. 48 4 Upgrading your computer 4.
Veriton 7200D
Page 60
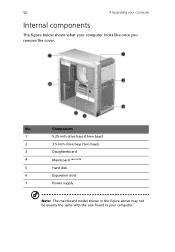
Component 1 5.25-inch drive bays (three bays) 2 3.5-inch drive bays (two bays) 3 Daughterboard 4 Mainboard see note 5 Hard disk 6 Expansion slots 7 Power supply Note: The mainboard model shown in the figure above may not be exactly the same with the one found in your computer looks like once you remove the cover: No. 50 4 Upgrading your computer Internal components The figure below shows what your computer.
Component 1 5.25-inch drive bays (three bays) 2 3.5-inch drive bays (two bays) 3 Daughterboard 4 Mainboard see note 5 Hard disk 6 Expansion slots 7 Power supply Note: The mainboard model shown in the figure above may not be exactly the same with the one found in your computer looks like once you remove the cover: No. 50 4 Upgrading your computer Internal components The figure below shows what your computer.

Veriton 7200D
Page 62
52 4 Upgrading your computer 3. (a) Detach the power and hard disk cables from the hard disk. (b) Detach the hard disk from the drive frame. 4. (a) Insert the new hard disk into the frame. (b) Connect the power and hard disk cables to the new hard disk.
52 4 Upgrading your computer 3. (a) Detach the power and hard disk cables from the hard disk. (b) Detach the hard disk from the drive frame. 4. (a) Insert the new hard disk into the frame. (b) Connect the power and hard disk cables to the new hard disk.

Veriton 7200D
Page 64
... the expansion card from its protective packaging. 6. Remove the side panel (see page 47). 2. Pull out the bracket on the mainboard. 3. Save the screw. 4. 54 4 Upgrading your computer. 1. To install an expansion card: Note: The mainboard model shown in your computer Installing an expansion card Note: Observe the "Installation precautions" on...
... the expansion card from its protective packaging. 6. Remove the side panel (see page 47). 2. Pull out the bracket on the mainboard. 3. Save the screw. 4. 54 4 Upgrading your computer. 1. To install an expansion card: Note: The mainboard model shown in your computer Installing an expansion card Note: Observe the "Installation precautions" on...

Veriton 7200D
Page 66
56 System boards 4 Upgrading your computer Mainboard layout The mainboard becomes accessible once you open your Veriton 7200 series computer model. Refer to the section below for the corresponding mainboard layout of your computer.
56 System boards 4 Upgrading your computer Mainboard layout The mainboard becomes accessible once you open your Veriton 7200 series computer model. Refer to the section below for the corresponding mainboard layout of your computer.
Veriton 7200D
Page 70
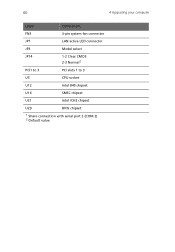
60 4 Upgrading your computer Label Component FN3 3-pin system fan connector JP1 LAN active LED connector JP3 Model select JP14 1-2 Clear CMOS 2-3 Normal2 PCI1 to 3 PCI slots 1 to 3 U5 CPU socket U12 Intel 845 chipset U16 SMSC chipset U21 Intel ICH2 chipset U29 BIOS chipset 1 Share connection with serial port 2 (COM 2) 2 Default value
60 4 Upgrading your computer Label Component FN3 3-pin system fan connector JP1 LAN active LED connector JP3 Model select JP14 1-2 Clear CMOS 2-3 Normal2 PCI1 to 3 PCI slots 1 to 3 U5 CPU socket U12 Intel 845 chipset U16 SMSC chipset U21 Intel ICH2 chipset U29 BIOS chipset 1 Share connection with serial port 2 (COM 2) 2 Default value
Veriton 7200D
Page 72
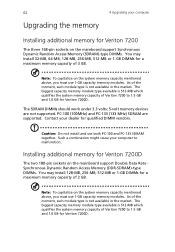
... volts; 5-volt memory devices are supported. Such a combination might cause your computer to 1.5 GB and 1.0 GB for Veriton 7200D. Note: To capitalize on the system memory capacity mentioned above , you must use both PC-100 and PC-133 SDRAM...Upgrading the memory 4 Upgrading your computer Installing additional memory for Veriton 7200 The three 168-pin sockets on the mainboard support Synchronous Dynamic Random Access Memory (SDRAM)-type DIMMs. You may install 128-MB, 256-MB, 512-MB or 1-GB DIMMs for a maximum memory capacity of 2 GB. Installing additional memory for Veriton 7200D...
... volts; 5-volt memory devices are supported. Such a combination might cause your computer to 1.5 GB and 1.0 GB for Veriton 7200D. Note: To capitalize on the system memory capacity mentioned above , you must use both PC-100 and PC-133 SDRAM...Upgrading the memory 4 Upgrading your computer Installing additional memory for Veriton 7200 The three 168-pin sockets on the mainboard support Synchronous Dynamic Random Access Memory (SDRAM)-type DIMMs. You may install 128-MB, 256-MB, 512-MB or 1-GB DIMMs for a maximum memory capacity of 2 GB. Installing additional memory for Veriton 7200D...
Veriton 7200D
Page 74
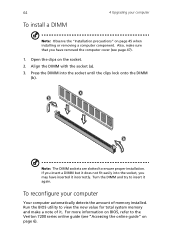
64 To install a DIMM 4 Upgrading your computer Your computer automatically detects the amount of it does not fit easily into the socket until the clips lock onto the DIMM (b). If ... it . To reconfigure your computer Note: Observe the "Installation precautions" on page 45 when installing or removing a computer component. Run the BIOS utility to the Veriton 7200 series online guide (see page 47). 1. Press the DIMM into the socket, you have inserted it again. Also, make a note of memory installed. Note...
64 To install a DIMM 4 Upgrading your computer Your computer automatically detects the amount of it does not fit easily into the socket until the clips lock onto the DIMM (b). If ... it . To reconfigure your computer Note: Observe the "Installation precautions" on page 45 when installing or removing a computer component. Run the BIOS utility to the Veriton 7200 series online guide (see page 47). 1. Press the DIMM into the socket, you have inserted it again. Also, make a note of memory installed. Note...
Veriton 7200D
Page 92
82 USB mouse 28 keyboard 26 monitor 26 mouse 26 software 67 73 Acrobat Reader 68 LDCM 69 Norton AntiVirus 70 NTI CD-Maker 71 PowerDVD 72 reinstalling programs 74 system boards 56 audio board 61 mainboard 56, 57, 58 T turning off computer 33 software shutdown 33 Index suspend mode 33 turning on computer 31 power button 31 U upgrade add memory 62 install DIMM 64 reconfigure computer 64 computer 56, 62 installation precautions 45 ESD 45 post-installation 46 preinstallation 45 open computer reinstall side panel 48 remove side panel 47 replace components 56, 62 USB devices 37
82 USB mouse 28 keyboard 26 monitor 26 mouse 26 software 67 73 Acrobat Reader 68 LDCM 69 Norton AntiVirus 70 NTI CD-Maker 71 PowerDVD 72 reinstalling programs 74 system boards 56 audio board 61 mainboard 56, 57, 58 T turning off computer 33 software shutdown 33 Index suspend mode 33 turning on computer 31 power button 31 U upgrade add memory 62 install DIMM 64 reconfigure computer 64 computer 56, 62 installation precautions 45 ESD 45 post-installation 46 preinstallation 45 open computer reinstall side panel 48 remove side panel 47 replace components 56, 62 USB devices 37


