

Veriton 7200D
Page 10
x Network 36 USB devices 37 Multimedia devices 39 4 Upgrading your computer 43 Installation precautions 45 ESD precautions 45 Preinstallation instructions 45 Post-installation instructions 46 Opening your computer... expansion card 54 System boards 56 Mainboard layout 56 Veriton 7200 mainboard layout 57 Veriton 7200D mainboard layout 58 Audio board 61 Upgrading the memory 62 Installing additional memory for Veriton 7200 62 Installing additional memory for Veriton 7200D 62 Removing and installing a DIMM for the Veriton 7200 series 63 To install a DIMM 64 To...
x Network 36 USB devices 37 Multimedia devices 39 4 Upgrading your computer 43 Installation precautions 45 ESD precautions 45 Preinstallation instructions 45 Post-installation instructions 46 Opening your computer... expansion card 54 System boards 56 Mainboard layout 56 Veriton 7200 mainboard layout 57 Veriton 7200D mainboard layout 58 Audio board 61 Upgrading the memory 62 Installing additional memory for Veriton 7200 62 Installing additional memory for Veriton 7200D 62 Removing and installing a DIMM for the Veriton 7200 series 63 To install a DIMM 64 To...
Veriton 7200D
Page 72
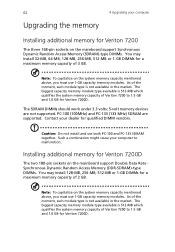
... in the market. PC-100 (100MHz) and PC-133 (133 MHz) SDRAM are not supported. Installing additional memory for Veriton 7200D The two 180-pin sockets on the system memory capacity mentioned above , you must use both PC-100 and PC-133 SDRAM together. Note: To capitalize on ... Access Memory (DDR-SDRAM)-type DIMMs. You may install 32-MB, 64-MB, 128-MB, 256-MB, 512-MB or 1-GB DIMMs for a maximum memory capacity of 2 GB. 62 Upgrading the memory 4 Upgrading your dealer for qualified DIMM vendors. Such a combination might cause your computer to 1.5 GB and 1.0 GB for Veriton 7200D.
... in the market. PC-100 (100MHz) and PC-133 (133 MHz) SDRAM are not supported. Installing additional memory for Veriton 7200D The two 180-pin sockets on the system memory capacity mentioned above , you must use both PC-100 and PC-133 SDRAM together. Note: To capitalize on ... Access Memory (DDR-SDRAM)-type DIMMs. You may install 32-MB, 64-MB, 128-MB, 256-MB, 512-MB or 1-GB DIMMs for a maximum memory capacity of 2 GB. 62 Upgrading the memory 4 Upgrading your dealer for qualified DIMM vendors. Such a combination might cause your computer to 1.5 GB and 1.0 GB for Veriton 7200D.
Veriton 7200D
Page 74
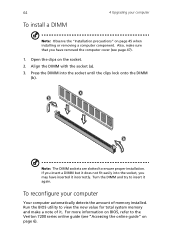
...have removed the computer cover (see "Accessing the online guide" on BIOS, refer to view the new value for total system memory and make a note of memory installed. If you insert a DIMM but it does not fit easily into the socket until the clips lock onto the DIMM (b).... try to ensure proper installation. To reconfigure your computer Note: Observe the "Installation precautions" on the socket. 2. 64 To install a DIMM 4 Upgrading your computer Your computer automatically detects the amount of it. Press the DIMM into the socket, you have inserted it again. Run the BIOS utility...
...have removed the computer cover (see "Accessing the online guide" on BIOS, refer to view the new value for total system memory and make a note of memory installed. If you insert a DIMM but it does not fit easily into the socket until the clips lock onto the DIMM (b).... try to ensure proper installation. To reconfigure your computer Note: Observe the "Installation precautions" on the socket. 2. 64 To install a DIMM 4 Upgrading your computer Your computer automatically detects the amount of it. Press the DIMM into the socket, you have inserted it again. Run the BIOS utility...
Veriton 7200D
Page 92
82 USB mouse 28 keyboard 26 monitor 26 mouse 26 software 67 73 Acrobat Reader 68 LDCM 69 Norton AntiVirus 70 NTI CD-Maker 71 PowerDVD 72 reinstalling programs 74 system boards 56 audio board 61 mainboard 56, 57, 58 T turning off computer 33 software shutdown 33 Index suspend mode 33 turning on computer 31 power button 31 U upgrade add memory 62 install DIMM 64 reconfigure computer 64 computer 56, 62 installation precautions 45 ESD 45 post-installation 46 preinstallation 45 open computer reinstall side panel 48 remove side panel 47 replace components 56, 62 USB devices 37
82 USB mouse 28 keyboard 26 monitor 26 mouse 26 software 67 73 Acrobat Reader 68 LDCM 69 Norton AntiVirus 70 NTI CD-Maker 71 PowerDVD 72 reinstalling programs 74 system boards 56 audio board 61 mainboard 56, 57, 58 T turning off computer 33 software shutdown 33 Index suspend mode 33 turning on computer 31 power button 31 U upgrade add memory 62 install DIMM 64 reconfigure computer 64 computer 56, 62 installation precautions 45 ESD 45 post-installation 46 preinstallation 45 open computer reinstall side panel 48 remove side panel 47 replace components 56, 62 USB devices 37


