Acer Veriton 6900Pro Research
View Results Below
Free Acer Veriton 6900Pro manuals!
Problems with Acer Veriton 6900Pro?
Ask a Question
Free Acer Veriton 6900Pro manuals!
Problems with Acer Veriton 6900Pro?
Ask a Question
Related Manual Pages

Similar Questions

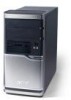
Installed Sata Hard Driver In Pc But Pc Not Install Inside. So Can Setup The Pc
can you show the way installed hd then setup pc.although i know to install the hd but pc ddn't
can you show the way installed hd then setup pc.although i know to install the hd but pc ddn't
(Posted by vienviechuynh 10 years ago)


Connect To 2 Monitors.
Can Acer Aspire X1430 connect to 2 monitors?
Can Acer Aspire X1430 connect to 2 monitors?
(Posted by cgjeffery 11 years ago)
Related Terms
The following terms were also used when searching for Acer Veriton 6900Pro Research:- acer veriton 6900pro
- veriton 6900pro
- acer veriton 6900pro drivers
- veriton 6900pro drivers
- veriton 6900pro lan driver
- veriton 6900pro bios
- veriton 6900pro ethernet drivers
- veriton 6900pro ethernet driver
- veriton 6900pro drivers xp
- veriton 6900pro drivers windows 7
- veriton 6900pro driver download
- veriton 6900pro driver
- veriton 6900pro desktop
- veriton 6900pro celeron
- veriton 6900pro casing
- veriton 6900pro bios update
- veriton 6900pro bios driver
- veriton 6900pro xp drivers
- veriton 6900pro lan drivers
- veriton 6900pro manual
- veriton 6900pro memory
- veriton 6900pro motherboard
- veriton 6900pro motherboard specs
- veriton 6900pro ram
- veriton 6900pro recovery
- veriton 6900pro specification
- veriton 6900pro specifications
- veriton 6900pro specs
- veriton 6900pro support
- veriton 6900pro usb driver
- veriton 6900pro user manual
- veriton 6900pro vga driver
- veriton 6900pro windows xp
- acer veriton 6900pro motherboard
- acer veriton 6900pro bios
- acer veriton 6900pro bios update
- acer veriton 6900pro casing
- acer veriton 6900pro celeron
- acer veriton 6900pro desktop
- acer veriton 6900pro driver
- acer veriton 6900pro driver download
- acer veriton 6900pro drivers windows 7
- acer veriton 6900pro ethernet driver
- acer veriton 6900pro ethernet drivers
- acer veriton 6900pro lan driver
- acer veriton 6900pro lan drivers
- acer veriton 6900pro manual
- acer veriton 6900pro memory
- veriton 6900pro audio driver
- acer veriton 6900pro motherboard specs
- acer veriton 6900pro ram
- acer veriton 6900pro recovery
- acer veriton 6900pro specification
- acer veriton 6900pro specifications
- acer veriton 6900pro specs
- acer veriton 6900pro usb driver
- acer veriton 6900pro vga driver
- acer veriton 6900pro windows xp
- acer veriton 6900pro xp drivers
- controladores acer veriton 6900pro
- controladores veriton 6900pro
- download driver acer veriton 6900pro
- download driver veriton 6900pro