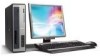
Acer Veriton 3900/5900/6900/7900 User's Guide EN
Page 11
...To install a DDR2 DIMM 61 To reconfigure your computer 62 Replacing the Veriton 3900Pro's hard disk 62 Installing an expansion card 65 Replacing the Veriton 5900Pro's hard disk 65 Installing an expansion card 66 Replacing the Veriton 69/7900Pro's hard disk 67 Installing an expansion card 68 5 System utilities... 69 Adobe Reader 71 NTI CD&DVD-Maker (for models with CD or DVD Burner) 72 PowerDVD (for models with DVD) 74 How do I open and watch a DVD? 74 BIOS utility 75 ...
Acer Veriton 3900/5900/6900/7900 User's Guide EN
Page 16
Acer eSettings Management also: • Provides a simple graphical user interface for navigation. • Displays general system status and advanced monitoring for power users on Acer computer. 4 Empowering Technology Acer eSettings Management Acer eSettings Management allows you to inspect hardware specifications, change BIOS passwords or other Windows settings, and to monitor the system health status.
Acer Veriton 3900/5900/6900/7900 User's Guide EN
Page 74
To reconfigure your computer's hard disk: 1 Remove the computer cover (see page 55). 2 Detach all cables connected to the CD or DVD drive, the 3.5-inch floppy drive and hard disk. Replacing the Veriton 3900Pro's hard disk Follow these steps to replace your computer Your computer automatically detects the amount of it again. Run the BIOS utility to view the new value for total system memory and make a note of memory installed. 62 4 Upgrading your computer into the socket, turn the DDR2 DIMM around and try to insert it .
Acer Veriton 3900/5900/6900/7900 User's Guide EN
Page 77
Save the bracket lock. 4 Pull out the bracket on the computer, BIOS (Basic Input/Output System) automatically detects and assigns resources to the newly-installed devices. Replacing the Veriton 5900Pro's hard disk Follow these steps to replace your computer with the bracket lock you turn on the housing opposite the selected empty slot...
Acer Veriton 3900/5900/6900/7900 User's Guide EN
Page 78
.... 3 Remove the bracket lock that the card is properly seated. 7 Secure the card to your computer with the bracket lock you turn on the computer, BIOS automatically detects and assigns resources to the computer. Make sure that holds the bracket to the newly installed devices. Save the lock. 4 Pull out the...
Acer Veriton 3900/5900/6900/7900 User's Guide EN
Page 80
... opposite the selected empty slot. 5 Remove the expansion card from its protective packaging. 6 Align the card with the bracket lock you turn on the computer, BIOS automatically detects and assigns resources to their corresponding connectors on the mainboard. 3 Remove the lock that holds the bracket to your computer Note: Make sure...
Acer Veriton 3900/5900/6900/7900 User's Guide EN
Page 83
... select Adobe Reader. 2 Once the program is configured with Microsoft Windows XP, the following : • Adobe Reader • NTI CD-Maker • PowerDVD • BIOS utility • Acer Empowering Technology If your computer's operations. However, if you need more information about Adobe Reader, you can be used to monitor and maintain system...
Acer Veriton 3900/5900/6900/7900 User's Guide EN
Page 87
...that you finish the installation. To run this utility. Reinstalling programs If you uninstall one of the preinstalled programs and want to run BIOS, make sure that you exit Setup. Since most computers are already properly configured and optimized, there is turned on your computer's Basic... Input/Output System (BIOS). However, if you encounter configuration problems and get the "Run Setup" message, you will need to run the BIOS utility, press the Del key on . 2 Insert the System CD into your ...
Acer Veriton 3900/5900/6900/7900 User's Guide EN
Page 88
...that makes restoring your system quick and easy. Follow all the information required to recovery your system. Your Veriton series computer includes an OBR(One Button Recovery) button, a feature that contains all onscreen instructions. OBR... works from system backup. You can press Alt + F10 after the BIOS finishes running will restore your system's original factory default settings or last system backup. There are lost ... runs, Press Alt + F10 combine key during BIOS to enter hidden partition. This utility has same password protection with...
Acer Veriton 3900/5900/6900/7900 User's Guide EN
Page 111
99 Index A accessing the online User's Guide 17 applications 71 B BIOS utility 75 C computer cover remove 57 replace 57 connecting options multimedia devices 47 audio line-in device 49 earphones/headphones 48 external speakers 47 microphone ...