Veriton 3500G/5500G/7500G Service Guide
Page 7
... 60 Advanced Options 61 Product Information 61 Advanced BIOS Features 62 Advanced Chipset Features 63 Integrated Peripherals 64 Power Management Setup 65 Frequency Control 67 Chapter 3 Machine Disassembly and Replacement 69 General Information 70 Before You Begin 70 Veriton 3500/ 3500G Disassembly Flow Chart 71 Disassembling the Veriton 3500/ 3500G 72 Opening the Housing 72 Removing the...
... 60 Advanced Options 61 Product Information 61 Advanced BIOS Features 62 Advanced Chipset Features 63 Integrated Peripherals 64 Power Management Setup 65 Frequency Control 67 Chapter 3 Machine Disassembly and Replacement 69 General Information 70 Before You Begin 70 Veriton 3500/ 3500G Disassembly Flow Chart 71 Disassembling the Veriton 3500/ 3500G 72 Opening the Housing 72 Removing the...

Veriton 3500G/5500G/7500G Service Guide
Page 35
Cache Memory Item Specification First-Level Cache Configurations Cache function control Enable/Disable by BIOS Setup Video Interface Item Video controller resident bus Video interface support Specification AGP bus 1x / 2x / 4x AGP Data Transfer and 2x ... L2 Cache function control Enable/Disable by BIOS Setup (Advanced options) Second-Level Cache Configurations: Below information is only applicable to system with installed Pentium 4 processor. Chapter 1 25 L2 Cache RAM size Pentium IV processor: 512 KB for Northwood and 256KB for Veriton 3500/ 5500/ 7500 doesn't have AGP VGA...
Cache Memory Item Specification First-Level Cache Configurations Cache function control Enable/Disable by BIOS Setup Video Interface Item Video controller resident bus Video interface support Specification AGP bus 1x / 2x / 4x AGP Data Transfer and 2x ... L2 Cache function control Enable/Disable by BIOS Setup (Advanced options) Second-Level Cache Configurations: Below information is only applicable to system with installed Pentium 4 processor. Chapter 1 25 L2 Cache RAM size Pentium IV processor: 512 KB for Northwood and 256KB for Veriton 3500/ 5500/ 7500 doesn't have AGP VGA...

Veriton 3500G/5500G/7500G Service Guide
Page 36
... UART support Microphone jack Headphone jack Package Line-in/Line-out/speaker-out Specification Embedded in Intel 82801DB ICH 4 AC'97 link Enable/disable by BIOS Setup Stereo 20 bits AC'97 2.1 compliant Sound Blaster Pro compatible Mixed digital and analog high performance chip Enhanced stereo full duplex operation High performance... (max) Startup (peak) Maximum Seeking (RMS) Voltage tolerance (V) 26 Panasonic JU-256A047P 1.44 MB 80 160 300 2 MFM/FM 5V 290mA 710mA +5V +/- 10% Specification Veriton 3500/5500/7500
... UART support Microphone jack Headphone jack Package Line-in/Line-out/speaker-out Specification Embedded in Intel 82801DB ICH 4 AC'97 link Enable/disable by BIOS Setup Stereo 20 bits AC'97 2.1 compliant Sound Blaster Pro compatible Mixed digital and analog high performance chip Enhanced stereo full duplex operation High performance... (max) Startup (peak) Maximum Seeking (RMS) Voltage tolerance (V) 26 Panasonic JU-256A047P 1.44 MB 80 160 300 2 MFM/FM 5V 290mA 710mA +5V +/- 10% Specification Veriton 3500/5500/7500
Veriton 3500G/5500G/7500G Service Guide
Page 46
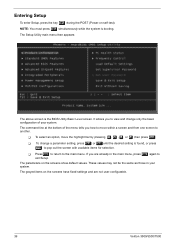
... have fixed settings and are already in your system. To change only the basic configuration of the menu tells you are not user-configurable. 36 Veriton 3500/5500/7500 If you how to move the highlight bar by pressing w, y , z, or x ,then press e ! The command line at the bottom of your system. The... the main menu, press ^ again to pop out the screen with available items for selection. ! NOTE: You must press c simultaneously while the system is the BIOS Utility Basic Level screen.
... have fixed settings and are already in your system. To change only the basic configuration of the menu tells you are not user-configurable. 36 Veriton 3500/5500/7500 If you how to move the highlight bar by pressing w, y , z, or x ,then press e ! The command line at the bottom of your system. The... the main menu, press ^ again to pop out the screen with available items for selection. ! NOTE: You must press c simultaneously while the system is the BIOS Utility Basic Level screen.

Veriton 3500G/5500G/7500G Service Guide
Page 52
A prompt asking you to enter your password appears on the screen every time you to specify the system boot up search sequence. Parameter Boot Other Device Security Option Description This parameter allows you boot the system. The Setup option limits access only to both the System boot and BIOS setup. To disable the security option, select Password Setting from the main menu, don't type anything and just press e. Enabled Disabled Setup System Options 42 Veriton 3500/5500/7500 The System option limits access to BIOS setup.
A prompt asking you to enter your password appears on the screen every time you to specify the system boot up search sequence. Parameter Boot Other Device Security Option Description This parameter allows you boot the system. The Setup option limits access only to both the System boot and BIOS setup. To disable the security option, select Password Setting from the main menu, don't type anything and just press e. Enabled Disabled Setup System Options 42 Veriton 3500/5500/7500 The System option limits access to BIOS setup.

Veriton 3500G/5500G/7500G Service Guide
Page 58
... you specify the IDE HDD idle time before the device enters the power down state. This is set to "Yes", then the VGA BIOS initiates automatically. PCI must meet PCI 2.2 specification. Instant-Off Former-Sts On Off Enabled Disabled When Enabled, any USB keyboard activity wakes ...Enabled in ACPI and APM Mode) USB KB Wake-up the system from the power states previously described in this menu. Enabled Disabled 48 Veriton 3500/5500/7500 This item is selected, the soft power switch on after which the system will not initiate automatically. is independent from suspend ...
... you specify the IDE HDD idle time before the device enters the power down state. This is set to "Yes", then the VGA BIOS initiates automatically. PCI must meet PCI 2.2 specification. Instant-Off Former-Sts On Off Enabled Disabled When Enabled, any USB keyboard activity wakes ...Enabled in ACPI and APM Mode) USB KB Wake-up the system from the power states previously described in this menu. Enabled Disabled 48 Veriton 3500/5500/7500 This item is selected, the soft power switch on after which the system will not initiate automatically. is independent from suspend ...
Veriton 3500G/5500G/7500G Service Guide
Page 60
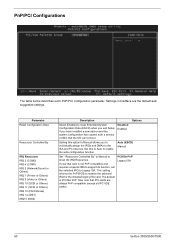
This setting informs the PnP BIOS to show the IRQ Resources. The default is not PnP compatible and requires a special IRQ to support its function, set the selected IRQ to Manual ... cards are the default and suggested settings. Set this option to Legacy ISA. Disabled Enabled Options Auto (ESCD) Manual PCI/ISA PnP Legacy ISA 50 Veriton 3500/5500/7500 PnP/PCI Configurations The table below describes each PnP/PCI configuration parameter. If your ISA card is PCI/ISA PnP. Parameter Reset Configuration...
This setting informs the PnP BIOS to show the IRQ Resources. The default is not PnP compatible and requires a special IRQ to support its function, set the selected IRQ to Manual ... cards are the default and suggested settings. Set this option to Legacy ISA. Disabled Enabled Options Auto (ESCD) Manual PCI/ISA PnP Legacy ISA 50 Veriton 3500/5500/7500 PnP/PCI Configurations The table below describes each PnP/PCI configuration parameter. If your ISA card is PCI/ISA PnP. Parameter Reset Configuration...

Veriton 3500G/5500G/7500G Service Guide
Page 70
If you have made to the BIOS. Select Yes to save your changes before you want to exit Setup. Select No to the main menu. Select No to return to discard all changes and exit Setup. 60 Veriton 3500/5500/7500 Exiting Setup To exit the BIOS utility, simply press ^. The following dialog box appears: Select Yes to keep the changes made changes in the parameter settings, you will be asked if you exit Setup.
If you have made to the BIOS. Select Yes to save your changes before you want to exit Setup. Select No to the main menu. Select No to return to discard all changes and exit Setup. 60 Veriton 3500/5500/7500 Exiting Setup To exit the BIOS utility, simply press ^. The following dialog box appears: Select Yes to keep the changes made changes in the parameter settings, you will be asked if you exit Setup.
Veriton 3500G/5500G/7500G Service Guide
Page 72
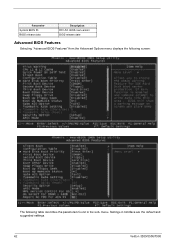
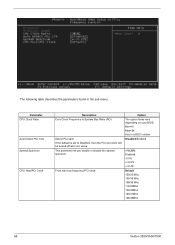
menu. Parameter System BIOS ID BIOS release date Description R01-A3. Settings in the sub- BIOS real version BIOS release date Advanced BIOS Features Selecting "Advanced BIOS Features" from the Advanced Options menu displays the following screen: The following table describes the parameters found in boldface are the default and suggested settings. 62 Veriton 3500/5500/7500
menu. Parameter System BIOS ID BIOS release date Description R01-A3. Settings in the sub- BIOS real version BIOS release date Advanced BIOS Features Selecting "Advanced BIOS Features" from the Advanced Options menu displays the following screen: The following table describes the parameters found in boldface are the default and suggested settings. 62 Veriton 3500/5500/7500

Veriton 3500G/5500G/7500G Service Guide
Page 74
...Chip Video Window size Aperture size for AGP card. Options to CAS# Delay DRAM RAS# Precharge The default setting by your DRAM's SPD. System BIOS Cacheable E.F segment shadow RAM cacheable. Delayed Transaction ICH4 enables delayed transactions for AGP card. Parameter DRAM Timing Selectable Description SDRAM Timing By SPD Manual ... Disabled/Enabled Disabled/Enabled Enabled/Disabled 16/4/8/32 minutes 64/4/8/16/32/128/256 128MB/64MB/Disabled 8MB/1MB/512MB Integrated Peripherals 64 Veriton 3500/5500/7500 Memory Frequency for Memory frequency default setup. .
...Chip Video Window size Aperture size for AGP card. Options to CAS# Delay DRAM RAS# Precharge The default setting by your DRAM's SPD. System BIOS Cacheable E.F segment shadow RAM cacheable. Delayed Transaction ICH4 enables delayed transactions for AGP card. Parameter DRAM Timing Selectable Description SDRAM Timing By SPD Manual ... Disabled/Enabled Disabled/Enabled Enabled/Disabled 16/4/8/32 minutes 64/4/8/16/32/128/256 128MB/64MB/Disabled 8MB/1MB/512MB Integrated Peripherals 64 Veriton 3500/5500/7500 Memory Frequency for Memory frequency default setup. .
Veriton 3500G/5500G/7500G Service Guide
Page 78
Option The option items vary depending on your BIOS. If the default is set to System Bus Ratio (RO) Detect PCI card. Min=10 Max=24 Key in the sub-menu. Front side bus ... number Disabled/Enabled +/-0.25% Disabled -0.5% +/-0.5% +/-0.38 Default 100/33 Mhz 105/35 Mhz 108/36 Mhz 114/38Mhz 120/40Mhz 123/41Mhz 126/36Mhz 68 Veriton 3500/5500/7500 Parameter CPU Clock Ratio Auto Detect PCI CLK Spread Spectrum CPU Host/PCI Clock Description Core Clock Frequency to Disabled, then the PCI...
Option The option items vary depending on your BIOS. If the default is set to System Bus Ratio (RO) Detect PCI card. Min=10 Max=24 Key in the sub-menu. Front side bus ... number Disabled/Enabled +/-0.25% Disabled -0.5% +/-0.5% +/-0.38 Default 100/33 Mhz 105/35 Mhz 108/36 Mhz 114/38Mhz 120/40Mhz 123/41Mhz 126/36Mhz 68 Veriton 3500/5500/7500 Parameter CPU Clock Ratio Auto Detect PCI CLK Spread Spectrum CPU Host/PCI Clock Description Core Clock Frequency to Disabled, then the PCI...
Veriton 3500G/5500G/7500G Service Guide
Page 83
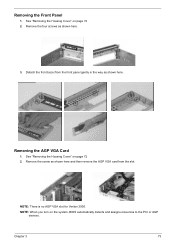
Removing the AGP VGA Card 1. Chapter 3 73 Remove the screw as shown here. 3. NOTE: When you turn on page 72 2. See "Removing the Housing Cover" on the system, BIOS automatically detects and assigns resources to the PCI or AGP devices. Remove the four screws as shown here and then remove the AGP VGA card from the front panel gently in the way as shown here. NOTE: There is no AGP VGA slot for Veriton 3500. Detach the front bezel from the slot. Removing the Front Panel 1. See "Removing the Housing Cover" on page 72 2.
Removing the AGP VGA Card 1. Chapter 3 73 Remove the screw as shown here. 3. NOTE: When you turn on page 72 2. See "Removing the Housing Cover" on the system, BIOS automatically detects and assigns resources to the PCI or AGP devices. Remove the four screws as shown here and then remove the AGP VGA card from the front panel gently in the way as shown here. NOTE: There is no AGP VGA slot for Veriton 3500. Detach the front bezel from the slot. Removing the Front Panel 1. See "Removing the Housing Cover" on page 72 2.

Veriton 3500G/5500G/7500G Service Guide
Page 120
...port 80h or even halts the system if the error is a BIOS procedure that must be diagnosed and/or initialized by POST. If POST discovers errors in physical address 1000:0 Reserved Initial Superio_Early _Init switch 110 Veriton 3500/5500/7500 Power-On Self-Test (POST) Each time you ...turn on the system, the Power-on your BIOS . Embedded hard disk interface and one diskette drive interface !
...port 80h or even halts the system if the error is a BIOS procedure that must be diagnosed and/or initialized by POST. If POST discovers errors in physical address 1000:0 Reserved Initial Superio_Early _Init switch 110 Veriton 3500/5500/7500 Power-On Self-Test (POST) Each time you ...turn on the system, the Power-on your BIOS . Embedded hard disk interface and one diskette drive interface !

Veriton 3500G/5500G/7500G Service Guide
Page 122
... Reserved Reserved Reserved Reserved Reserved Reserved Reserved Test 8254. Onboard clock generator initialization. Initialize the APIC for RTC minute. 2. Measure CPU speed. 5. . Invoke video BIOS. Reserved Reserved Veriton 3500/5500/7500 Reserved Reserved Reserved 1. Early PCI initialization -Enumerate PCI bus number -Assign memory & I /O chips. Program early chipset according to empty PCI & DIMM slots...
... Reserved Reserved Reserved Reserved Reserved Reserved Reserved Test 8254. Onboard clock generator initialization. Initialize the APIC for RTC minute. 2. Measure CPU speed. 5. . Invoke video BIOS. Reserved Reserved Veriton 3500/5500/7500 Reserved Reserved Reserved 1. Early PCI initialization -Enumerate PCI bus number -Assign memory & I /O chips. Program early chipset according to empty PCI & DIMM slots...
Veriton 3500G/5500G/7500G Service Guide
Page 126
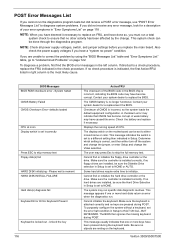
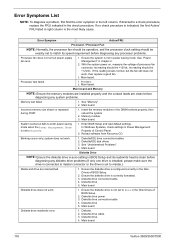
...problems. If you replace the main board. This message usually indicates that no keys are installed, be done through the diagnostics program. BIOS Messages BIOS ROM checksum error - This message appears if one or more hard disks return an error when the diagnostics run the diagnostics program ... or the drive. Displays the running speed of the BIOS code in the left column. Make sure the controller is incorrect, indicating the BIOS code may have done so, you are installed, be set to NONE or AUTO. Veriton 3500/5500/7500 NOTE: When you have caused this error....
...problems. If you replace the main board. This message usually indicates that no keys are installed, be done through the diagnostics program. BIOS Messages BIOS ROM checksum error - This message appears if one or more hard disks return an error when the diagnostics run the diagnostics program ... or the drive. Displays the running speed of the BIOS code in the left column. Make sure the controller is incorrect, indicating the BIOS code may have done so, you are installed, be set to NONE or AUTO. Veriton 3500/5500/7500 NOTE: When you have caused this error....
Veriton 3500G/5500G/7500G Service Guide
Page 128
... and the processor clock setting should be exactly set to None in the Disk Drives of BIOS Setup. 2. Ensure the system is configured correctly in the Disk Drives of BIOS Setup. 2. Its reading should be +12Vdc. Main board and Memory NOTE: Ensure the memory... then replace a good fan. 3. Diskette drive cable. 3. See "Undetermined Problems". 4. Diskette drive power 3. Main board. 118 Veriton 3500/5500/7500 Main board. Enter BIOS Setup and load default settings. Blinking cursor only; Diskette drive connection/cable 4. With the system power on, measure the voltage of ...
... and the processor clock setting should be exactly set to None in the Disk Drives of BIOS Setup. 2. Ensure the system is configured correctly in the Disk Drives of BIOS Setup. 2. Its reading should be +12Vdc. Main board and Memory NOTE: Ensure the memory... then replace a good fan. 3. Diskette drive cable. 3. See "Undetermined Problems". 4. Diskette drive power 3. Main board. 118 Veriton 3500/5500/7500 Main board. Enter BIOS Setup and load default settings. Blinking cursor only; Diskette drive connection/cable 4. With the system power on, measure the voltage of ...
Veriton 3500G/5500G/7500G Service Guide
Page 130
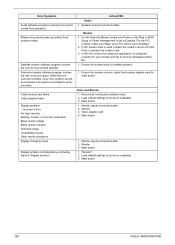
...modem card. 3. Display problem: - Display problem not listed above (including blank or illegible monitor). Ensure the modem voice-in BIOS Setup or Power Management is configured correctly for your modem and set to Enabled. 2. Data/fax modem software program invokes but ...from speakers. In Win 98, ensure the telephone application is set to main board Video and Monitor 1. "Monitor". 2. Main board 120 Veriton 3500/5500/7500 Monitor signal connection/cable 2. Load default settings (if screen is readable). 3. Monitor 3. Monitor signal connection/cable. 2. voice ...
...modem card. 3. Display problem: - Display problem not listed above (including blank or illegible monitor). Ensure the modem voice-in BIOS Setup or Power Management is configured correctly for your modem and set to Enabled. 2. Data/fax modem software program invokes but ...from speakers. In Win 98, ensure the telephone application is set to main board Video and Monitor 1. "Monitor". 2. Main board 120 Veriton 3500/5500/7500 Monitor signal connection/cable 2. Load default settings (if screen is readable). 3. Monitor 3. Monitor signal connection/cable. 2. voice ...
Veriton 3500G/5500G/7500G Service Guide
Page 174
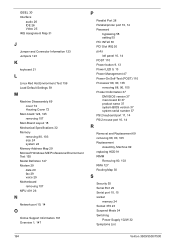
... Management 47 Power-On Self-Test (POST) 110 Processor 88, 90, 105 removing 88, 90, 105 Product Information 37 DMI BIOS version 37 main board ID 37 product name 37 system BIOS version 37 system serial number 37 PS/2 keyboard port 11, 14 PS/2 mouse port 10, 14 R Removal and Replacement 69... 55 Serial Port 29 Serial port 10, 15 socket memory 24 Socket 370 23 Suspend Mode 34 Switching Power Supply 102W 32 Symptoms List 164 Veriton 3500/5500/7500
... Management 47 Power-On Self-Test (POST) 110 Processor 88, 90, 105 removing 88, 90, 105 Product Information 37 DMI BIOS version 37 main board ID 37 product name 37 system BIOS version 37 system serial number 37 PS/2 keyboard port 11, 14 PS/2 mouse port 10, 14 R Removal and Replacement 69... 55 Serial Port 29 Serial port 10, 15 socket memory 24 Socket 370 23 Suspend Mode 34 Switching Power Supply 102W 32 Symptoms List 164 Veriton 3500/5500/7500


