
Veriton 5800/6800/7800 User"s Guide (EN)
Page 5
... first 11 Specifications 13 Package contents 15 Accessing the User's Guide 15 3 System tour 17 Features 19 Performance 19 Multimedia 19 Connectivity 19 Front panel 20 Rear panel 22 Keyboard 25 Internet/Email/Search keys 26 Multimedia keys 26 Volume control/mute keys 27 Lock keys 27 Cursor keys 28 Windows keys 28 Function keys 29 Palm rest 29 Optical drive 30 Taking care of your CDs and DVDs 32 Hard disk 32 4 Setting up...
... first 11 Specifications 13 Package contents 15 Accessing the User's Guide 15 3 System tour 17 Features 19 Performance 19 Multimedia 19 Connectivity 19 Front panel 20 Rear panel 22 Keyboard 25 Internet/Email/Search keys 26 Multimedia keys 26 Volume control/mute keys 27 Lock keys 27 Cursor keys 28 Windows keys 28 Function keys 29 Palm rest 29 Optical drive 30 Taking care of your CDs and DVDs 32 Hard disk 32 4 Setting up...
Veriton 5800/6800/7800 User"s Guide (EN)
Page 6
... 37 Connecting a monitor 38 Connecting the power cable 39 Turning on your computer 40 Turning off your computer 40 Connecting options 41 Connecting your printer 41 Connecting the modem (optional) 42 Connecting to the network 42 Connecting multimedia devices 43 Connecting USB devices 45 5 Upgrading your computer 47 Installation precautions 49 ESD precautions 49 Preinstallation instructions 49 Post-installation instructions 50 Opening your Veriton 5800 51 To remove the computer cover 51 To replace the computer cover 51 Opening your...
... 37 Connecting a monitor 38 Connecting the power cable 39 Turning on your computer 40 Turning off your computer 40 Connecting options 41 Connecting your printer 41 Connecting the modem (optional) 42 Connecting to the network 42 Connecting multimedia devices 43 Connecting USB devices 45 5 Upgrading your computer 47 Installation precautions 49 ESD precautions 49 Preinstallation instructions 49 Post-installation instructions 50 Opening your Veriton 5800 51 To remove the computer cover 51 To replace the computer cover 51 Opening your...

Veriton 5800/6800/7800 User"s Guide (EN)
Page 13
... Acer Customer Service Center. Note: If you do not set without any reboot necessary, and will remain locked after rebooting, until unlocked. Lock(s) will reset back to the initial status with all locks removed. Be sure to remember or write down your password. includes USB disk drives, USB pen drives, USB flash drives, USB MP3 drives, USB memory card readers, IEEE 1394 disk drives and any of the three kinds of CD-ROM or DVD-ROM drives • Floppy disk drives...
... Acer Customer Service Center. Note: If you do not set without any reboot necessary, and will remain locked after rebooting, until unlocked. Lock(s) will reset back to the initial status with all locks removed. Be sure to remember or write down your password. includes USB disk drives, USB pen drives, USB flash drives, USB MP3 drives, USB memory card readers, IEEE 1394 disk drives and any of the three kinds of CD-ROM or DVD-ROM drives • Floppy disk drives...

Veriton 5800/6800/7800 User"s Guide (EN)
Page 16
... inspect hardware specifications and to optimize your Windows operating system, so your computer runs faster, smoother and better. Furthermore, Acer eSettings Management enables you to migrate personal settings • Keeps a history log of all alerts that were previously issued Acer eSettings Management also: • Provides a simple graphical user interface letting you navigate through the program effortlessly • Displays general system status and advanced monitoring for power users...
... inspect hardware specifications and to optimize your Windows operating system, so your computer runs faster, smoother and better. Furthermore, Acer eSettings Management enables you to migrate personal settings • Keeps a history log of all alerts that were previously issued Acer eSettings Management also: • Provides a simple graphical user interface letting you navigate through the program effortlessly • Displays general system status and advanced monitoring for power users...
Veriton 5800/6800/7800 User"s Guide (EN)
Page 21
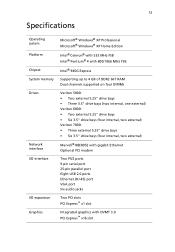
... RAM Dual channels supported on four DIMMs Veriton 5800: • Two external 5.25" drive bays • Three 3.5" drive bays (two internal, one external) Veriton 6800: • Two external 5.25" drive bays • Six 3.5" drive bays (four internal, two external) Veriton 7800: • Three external 5.25" drive bays • Six 3.5" drive bays (four internal, two external) Marvell® 88E8052 with gigabit Ethernet Optional PCI modem Two PS/2 ports 9-pin serial port 25-pin parallel port Eight USB 2.0 ports Ethernet (RJ-45) port VGA port...
... RAM Dual channels supported on four DIMMs Veriton 5800: • Two external 5.25" drive bays • Three 3.5" drive bays (two internal, one external) Veriton 6800: • Two external 5.25" drive bays • Six 3.5" drive bays (four internal, two external) Veriton 7800: • Three external 5.25" drive bays • Six 3.5" drive bays (four internal, two external) Marvell® 88E8052 with gigabit Ethernet Optional PCI modem Two PS/2 ports 9-pin serial port 25-pin parallel port Eight USB 2.0 ports Ethernet (RJ-45) port VGA port...
Veriton 5800/6800/7800 User"s Guide (EN)
Page 27
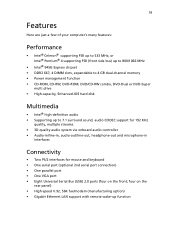
.../2 interfaces for mouse and keyboard • One serial port (optional 2nd serial port connection) • One parallel port • One VGA port • Eight Universal Serial Bus (USB) 2.0 ports (four on the rear panel) • High-speed V.92, 56K fax/modem (manufacturing option) • Gigabit Ethernet LAN support with remote wake-up to 4 GB dual-channel memory • Power management function • CD-ROM, CD-RW, DVD-ROM, DVD/CD-RW combo, DVD-Dual or DVD-Super multi drive • High-capacity, Enhanced-IDE hard disk Multimedia...
.../2 interfaces for mouse and keyboard • One serial port (optional 2nd serial port connection) • One parallel port • One VGA port • Eight Universal Serial Bus (USB) 2.0 ports (four on the rear panel) • High-speed V.92, 56K fax/modem (manufacturing option) • Gigabit Ethernet LAN support with remote wake-up to 4 GB dual-channel memory • Power management function • CD-ROM, CD-RW, DVD-ROM, DVD/CD-RW combo, DVD-Dual or DVD-Super multi drive • High-capacity, Enhanced-IDE hard disk Multimedia...

Veriton 5800/6800/7800 User"s Guide (EN)
Page 45
... device models may vary in the connections below are for your computer. Note: The peripherals shown in select countries. located PS/2 interface Plug the PS/2 mouse and keyboard cable into any of the USB ports on the rear panel of your reference only. For the most part, you only have four things to connect: the mouse, the keyboard, the monitor, and the power cable. Connecting your mouse and keyboard USB interface Plug your USB mouse or keyboard cable...
... device models may vary in the connections below are for your computer. Note: The peripherals shown in select countries. located PS/2 interface Plug the PS/2 mouse and keyboard cable into any of the USB ports on the rear panel of your reference only. For the most part, you only have four things to connect: the mouse, the keyboard, the monitor, and the power cable. Connecting your mouse and keyboard USB interface Plug your USB mouse or keyboard cable...

Veriton 5800/6800/7800 User"s Guide (EN)
Page 46
Note: Refer to the add-on the rear panel of your computer . Note: When a VGA card is added to the PCI Express slot, the monitor should be connected to the monitor manual for additional instructions and information. 38 4 Setting up your computer Connecting a monitor To connect a monitor, simply plug the monitor cable into the monitor port (blue port) located on card and the onboard VGA will be disabled.
Note: Refer to the add-on the rear panel of your computer . Note: When a VGA card is added to the PCI Express slot, the monitor should be connected to the monitor manual for additional instructions and information. 38 4 Setting up your computer Connecting a monitor To connect a monitor, simply plug the monitor cable into the monitor port (blue port) located on card and the onboard VGA will be disabled.
Veriton 5800/6800/7800 User"s Guide (EN)
Page 50
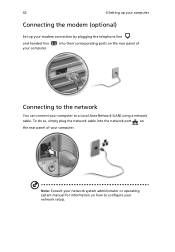
into the network port on the rear panel of Connecting to the network You can connect your computer to configure your network system administrator or operating system manual for information on the rear panel of your computer. Note: Consult your network setup. To do so, simply plug the network cable into their corresponding ports on how to a Local Area Network (LAN) using a network cable. 42 4 Setting up your computer Connecting the modem (optional) Set up your modem connection by plugging the telephone line and handset line your computer.
into the network port on the rear panel of Connecting to the network You can connect your computer to configure your network system administrator or operating system manual for information on the rear panel of your computer. Note: Consult your network setup. To do so, simply plug the network cable into their corresponding ports on how to a Local Area Network (LAN) using a network cable. 42 4 Setting up your computer Connecting the modem (optional) Set up your modem connection by plugging the telephone line and handset line your computer.

Veriton 5800/6800/7800 User"s Guide (EN)
Page 53
... ports support USB 2.0 high-performance external devices such as a digital camera, keyboard, mouse, joystick, scanner, printer and modem. With USB, complex cable connections can be eliminated. To connect a USB device, simply plug the device cable into any of the USB ports (black) located on the front and rear panels of cascading peripherals such as webcams and digital still cameras. They also allow you to connect additional USB devices to the audio-in/line-in jack jack) located...
... ports support USB 2.0 high-performance external devices such as a digital camera, keyboard, mouse, joystick, scanner, printer and modem. With USB, complex cable connections can be eliminated. To connect a USB device, simply plug the device cable into any of the USB ports (black) located on the front and rear panels of cascading peripherals such as webcams and digital still cameras. They also allow you to connect additional USB devices to the audio-in/line-in jack jack) located...
Veriton 5800/6800/7800 User"s Guide (EN)
Page 57
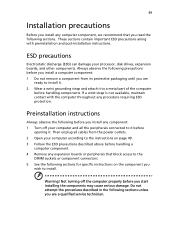
... connected to a metal part of the computer before handling components. Not turning off your processor, disk drives, expansion boards, and other components. 49 Installation precautions Before you install any computer component, we recommend that block access to the DIMM sockets or component connectors. 5 See the following sections for specific instructions on page 49. 3 Follow the ESD precautions described above before handling a computer component. 4 Remove...
... connected to a metal part of the computer before handling components. Not turning off your processor, disk drives, expansion boards, and other components. 49 Installation precautions Before you install any computer component, we recommend that block access to the DIMM sockets or component connectors. 5 See the following sections for specific instructions on page 49. 3 Follow the ESD precautions described above before handling a computer component. 4 Remove...

Veriton 5800/6800/7800 User"s Guide (EN)
Page 58
50 5 Upgrading your computer Post-installation instructions Observe the following after installing a computer component: 1 See to it that the components are installed according to the step-by-step instructions in their respective sections. 2 Replace any expansion boards or peripherals that you removed earlier. 3 Replace the side panels. 4 Connect the necessary cables and turn on your computer.
50 5 Upgrading your computer Post-installation instructions Observe the following after installing a computer component: 1 See to it that the components are installed according to the step-by-step instructions in their respective sections. 2 Replace any expansion boards or peripherals that you removed earlier. 3 Replace the side panels. 4 Connect the necessary cables and turn on your computer.

Veriton 5800/6800/7800 User"s Guide (EN)
Page 64
.... Installing additional memory The four 240-pin sockets on the mainboard support Double Data Rate 2 (DDR2) Synchronous Dynamic Random Access Memory (SDRAM)-type DIMMs. You may not be exactly the same as the memory, the hard disk, the CPU and the expansion cards. To remove a DDR2 DIMM Note: The DDR2 DIMM has only one found in the DDR2 DIMM sockets. 56 5 Upgrading your computer Upgrading...
.... Installing additional memory The four 240-pin sockets on the mainboard support Double Data Rate 2 (DDR2) Synchronous Dynamic Random Access Memory (SDRAM)-type DIMMs. You may not be exactly the same as the memory, the hard disk, the CPU and the expansion cards. To remove a DDR2 DIMM Note: The DDR2 DIMM has only one found in the DDR2 DIMM sockets. 56 5 Upgrading your computer Upgrading...
Veriton 5800/6800/7800 User"s Guide (EN)
Page 66
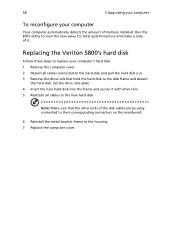
... cover. Replacing the Veriton 5800's hard disk Follow these steps to replace your computer Your computer automatically detects the amount of memory installed. Run the BIOS utility to the new hard disk. 58 5 Upgrading your computer To reconfigure your computer's hard disk: 1 Remove the computer cover. 2 Detach all cables to view the new value for total system memory and make a note of it with drive rails. 5 Reattach all cables connected to the hard disk and pull the hard disk...
... cover. Replacing the Veriton 5800's hard disk Follow these steps to replace your computer Your computer automatically detects the amount of memory installed. Run the BIOS utility to the new hard disk. 58 5 Upgrading your computer To reconfigure your computer's hard disk: 1 Remove the computer cover. 2 Detach all cables to view the new value for total system memory and make a note of it with drive rails. 5 Reattach all cables connected to the hard disk and pull the hard disk...

Veriton 5800/6800/7800 User"s Guide (EN)
Page 69
... Installing an expansion card To install an expansion card: 1 Remove the side panel (see page 52). 2 Locate an empty PCI Express or PCI slot on the mainboard. 3 Remove the lock that the card is properly seated. 7 Secure the card to your computer with the empty bracket and then insert it into the slot. Make sure that holds the bracket to the newly installed devices. When you removed earlier. 8 Replace...
... Installing an expansion card To install an expansion card: 1 Remove the side panel (see page 52). 2 Locate an empty PCI Express or PCI slot on the mainboard. 3 Remove the lock that the card is properly seated. 7 Secure the card to your computer with the empty bracket and then insert it into the slot. Make sure that holds the bracket to the newly installed devices. When you removed earlier. 8 Replace...

Veriton 5800/6800/7800 User"s Guide (EN)
Page 76
... a complete set of commands for models with MPEG-2 video and Dolby Digital (AC-3) audio. For more information about Cyberlink PowerDVD and its other features, refer to online DVD resources via the Power DVD Desktop Portal Page. You can play button to your computer's optical drive, PowerDVD will automatically open a viewer window and the control panel and begin playback. In most cases, when you insert a DVD into your...
... a complete set of commands for models with MPEG-2 video and Dolby Digital (AC-3) audio. For more information about Cyberlink PowerDVD and its other features, refer to online DVD resources via the Power DVD Desktop Portal Page. You can play button to your computer's optical drive, PowerDVD will automatically open a viewer window and the control panel and begin playback. In most cases, when you insert a DVD into your...

Veriton 5800/6800/7800 User"s Guide (EN)
Page 83
... your system, see "Acer Empowering Technology" on . If yes, remove or replace it is plugged in the floppy drive? This will automatically diagnose your computer and each is followed by easy answers and solutions. Your computer's power management function automatically blanks the screen to turn the display back on page 3. Insert the startup disk you are using a power strip or AVR, make necessary fixes. 75...
... your system, see "Acer Empowering Technology" on . If yes, remove or replace it is plugged in the floppy drive? This will automatically diagnose your computer and each is followed by easy answers and solutions. Your computer's power management function automatically blanks the screen to turn the display back on page 3. Insert the startup disk you are using a power strip or AVR, make necessary fixes. 75...

Veriton 5800/6800/7800 User"s Guide (EN)
Page 84
... "Connecting your drive by using the correct type of disk or diskette. No sound comes out from mute to the system's parallel or USB port and the corresponding port on the printer. Contact your drive can also press the volume control/mute knob on your computer, the internal or built-in speakers are automatically turned off. If it is turned on. • Make sure the printer cable...
... "Connecting your drive by using the correct type of disk or diskette. No sound comes out from mute to the system's parallel or USB port and the corresponding port on the printer. Contact your drive can also press the volume control/mute knob on your computer, the internal or built-in speakers are automatically turned off. If it is turned on. • Make sure the printer cable...

Veriton 5800/6800/7800 User"s Guide (EN)
Page 99
91 Index A accessing the online User's Guide 15 applications 65 B BIOS utility 69 C computer cover remove 51 replace 51 computer maintenance 88 cleaning 88 servicing 88 connecting options multimedia devices 43 audio line-in device 45 earphones/headphones 44 external speakers 43 microphone 43 network 41, 42 printer 41 serial mouse 42 USB devices 45 D disk drives CD-ROM/DVD-ROM/CD-RW drive inserting CDs/DVDs 30 taking care CDs/DVDs 32 hard disk 32 F features 19 connectivity 19 multimedia 19 performance 19...
91 Index A accessing the online User's Guide 15 applications 65 B BIOS utility 69 C computer cover remove 51 replace 51 computer maintenance 88 cleaning 88 servicing 88 connecting options multimedia devices 43 audio line-in device 45 earphones/headphones 44 external speakers 43 microphone 43 network 41, 42 printer 41 serial mouse 42 USB devices 45 D disk drives CD-ROM/DVD-ROM/CD-RW drive inserting CDs/DVDs 30 taking care CDs/DVDs 32 hard disk 32 F features 19 connectivity 19 multimedia 19 performance 19...
Brochure
Page 2
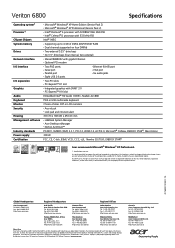
... Specifications Operating system1 Processor1 Chipset Chipset System memory Drives Network interface I/O interface I/O expansion Graphics Audio Keyboard Monitor Security Housing Management software Industry standards Power supply Certification . Intel® Celeron® D processor with gigabit Ethernet . Six 3.5" drive bays (four internal, two external) . Marvell 88E8052 with 533 MHz FSB Intel® 945G . Two PS/2 ports . VGA port . Integrated graphics with 533/800/1066 MHz FSB . Acer eLock . Images shown are only representations of some of Acer Inc. Acer...
... Specifications Operating system1 Processor1 Chipset Chipset System memory Drives Network interface I/O interface I/O expansion Graphics Audio Keyboard Monitor Security Housing Management software Industry standards Power supply Certification . Intel® Celeron® D processor with gigabit Ethernet . Six 3.5" drive bays (four internal, two external) . Marvell 88E8052 with 533 MHz FSB Intel® 945G . Two PS/2 ports . VGA port . Integrated graphics with 533/800/1066 MHz FSB . Acer eLock . Images shown are only representations of some of Acer Inc. Acer...


