
User Manual
Page 3
... screen may remain after switching the image, when the same image is displayed for video and visual display of information obtained from the power supplies. Connecting/disconnecting the device Observe the following are turned off before cleaning. • Use a soft cloth to make sure the flicker disappears. • You may find slightly uneven brightness on the screen depending on the desktop pattern you use . iii Special notes on LCD monitors...
... screen may remain after switching the image, when the same image is displayed for video and visual display of information obtained from the power supplies. Connecting/disconnecting the device Observe the following are turned off before cleaning. • Use a soft cloth to make sure the flicker disappears. • You may find slightly uneven brightness on the screen depending on the desktop pattern you use . iii Special notes on LCD monitors...

User Manual
Page 4
... protect your hearing, follow these instructions. • Gradually increase the volume until you can 't hear people speaking near you need to disconnect power from overheating. iv Accessibility Be sure that the power outlet you plug the power cord into is used with this product, make sure that could be seriously damaged. • Slots and openings are not sure of the type...
... protect your hearing, follow these instructions. • Gradually increase the volume until you can 't hear people speaking near you need to disconnect power from overheating. iv Accessibility Be sure that the power outlet you plug the power cord into is used with this product, make sure that could be seriously damaged. • Slots and openings are not sure of the type...
User Manual
Page 5
... the case has been damaged • the product exhibits a distinct change in too many devices. If power strips are used, the load should not exceed 80% of the power strip's input rating. • This product's power cord is properly grounded before inserting the power cord plug. Contact your electrician for service • the product does not operate normally after following requirements: detachable...
... the case has been damaged • the product exhibits a distinct change in too many devices. If power strips are used, the load should not exceed 80% of the power strip's input rating. • This product's power cord is properly grounded before inserting the power cord plug. Contact your electrician for service • the product does not operate normally after following requirements: detachable...

User Manual
Page 6
... controls may contain small parts. IT Equipment Recycling Information Acer is strongly committed to environmental protection and views recycling, in the form of salvaging and disposal of used equipment, as grain, dust or metal powders. Switch off the device near gas pumps at Acer are covered ... the best working procedures to reduce the environmental impact of our products. For more information and help when recycling, please go to turn off your vehicle engine. acer-group .com for further information on boats, chemical transfer or storage facilities, vehicles using liquefied ...
... controls may contain small parts. IT Equipment Recycling Information Acer is strongly committed to environmental protection and views recycling, in the form of salvaging and disposal of used equipment, as grain, dust or metal powders. Switch off the device near gas pumps at Acer are covered ... the best working procedures to reduce the environmental impact of our products. For more information and help when recycling, please go to turn off your vehicle engine. acer-group .com for further information on boats, chemical transfer or storage facilities, vehicles using liquefied ...

User Manual
Page 8
... Find your comfort zone by adjusting the viewing angle of the monitor, using a footrest, or raising your leg muscles Long work periods, bad posture, poor work habits, stress, inadequate working in one fixed posture • avoid slouching forward and/or leaning backward • stand up and walk around regularly to remove the strain on your sitting height to carpal tunnel syndrome...
... Find your comfort zone by adjusting the viewing angle of the monitor, using a footrest, or raising your leg muscles Long work periods, bad posture, poor work habits, stress, inadequate working in one fixed posture • avoid slouching forward and/or leaning backward • stand up and walk around regularly to remove the strain on your sitting height to carpal tunnel syndrome...

User Manual
Page 9
...; Adjust the display brightness and/or contrast to a comfortable level for extended periods of cardboard extended from drying out. Developing good work habits to keep your display in such a way that the side faces the window or any light source • minimizing room light by looking away from the monitor and focusing on how to an awkward viewing angle. • Avoid looking at bright light sources...
...; Adjust the display brightness and/or contrast to a comfortable level for extended periods of cardboard extended from drying out. Developing good work habits to keep your display in such a way that the side faces the window or any light source • minimizing room light by looking away from the monitor and focusing on how to an awkward viewing angle. • Avoid looking at bright light sources...

User Manual
Page 10
TABLE OF CONTENTS UNPACKING 1 ATTACHING / REMOVING THE BASE 2 SCREEN POSITION ADJUSTMENT 3 CONNECTING THE POWER CORD 4 SAFETY PRECAUTION 4 CLEANING YOUR MONITOR 4 POWER SAVING 5 DDC...5 CONNECTOR PIN ASSIGNMENT 6 STANDARD TIMING TABLE 7 INSTALLATION 8 USER CONTROLS 9 TROUBLESHOOTING 19
TABLE OF CONTENTS UNPACKING 1 ATTACHING / REMOVING THE BASE 2 SCREEN POSITION ADJUSTMENT 3 CONNECTING THE POWER CORD 4 SAFETY PRECAUTION 4 CLEANING YOUR MONITOR 4 POWER SAVING 5 DDC...5 CONNECTOR PIN ASSIGNMENT 6 STANDARD TIMING TABLE 7 INSTALLATION 8 USER CONTROLS 9 TROUBLESHOOTING 19

User Manual
Page 11
UNPACKING Please check the following items are present when you unpack the box, and save the packing materials in case you will need to ship or transport the monitor in future. LCD Monitor Quick Start Guide AC Power Cord DP Cable (Optional) HDMI Cable (Optional) EN-1
UNPACKING Please check the following items are present when you unpack the box, and save the packing materials in case you will need to ship or transport the monitor in future. LCD Monitor Quick Start Guide AC Power Cord DP Cable (Optional) HDMI Cable (Optional) EN-1
User Manual
Page 14
... the monitor by its base. CONNECTING THE POWER CORD Check first to make sure that the power cord you use of any other end into an AC outlet. For unit using at 120 V AC: Use a UL Listed Cord Set, Type SVT wire and plug rated 10 A/125 V. For unit using at 220/240 V AC (outside of U.S.): Use a Cord Set consisting of H05VV-F cord and plug rated 10 A, 250 V. CLEANING YOUR MONITOR Please...
... the monitor by its base. CONNECTING THE POWER CORD Check first to make sure that the power cord you use of any other end into an AC outlet. For unit using at 120 V AC: Use a UL Listed Cord Set, Type SVT wire and plug rated 10 A/125 V. For unit using at 220/240 V AC (outside of U.S.): Use a Cord Set consisting of H05VV-F cord and plug rated 10 A, 250 V. CLEANING YOUR MONITOR Please...

User Manual
Page 15
... from the display controller, as indicated by the control signal from Active OFF state back to Plug and Play with your system if your installation easier, the monitor is able to ON state is around 3 seconds. DDC To make your system also supports DDC protocol. POWER SAVING The monitor will be driven into "Power Saving" mode by the amber-color power LED. State LED Light ON Blue Power Saving Mode Amber The power saving states will...
... from the display controller, as indicated by the control signal from Active OFF state back to Plug and Play with your system if your installation easier, the monitor is able to ON state is around 3 seconds. DDC To make your system also supports DDC protocol. POWER SAVING The monitor will be driven into "Power Saving" mode by the amber-color power LED. State LED Light ON Blue Power Saving Mode Amber The power saving states will...

User Manual
Page 17
... Adaptive-Sync (DP) supported graphics source to dynamically adjust display refresh rate based on typical content frame rates in order to eliminate stuttering and enhance low-latency display. STANDARD TIMING TABLE Mode Resolution 1 VGA 640 x 480 2 MAC 640 x 480 3 VESA 720 x 400 4 SVGA 800 x 600 5 SVGA 800 x 600 6 XGA 1024 x 768 7 XGA 1024 x 768 8 VESA 1152 x 864 9 SXGA 1280 x 1024 10 VESA 1280...60 Hz 60 Hz 60 Hz 85 Hz 120 Hz 144 Hz Remark Note: The DisplayPort of this monitor is purposely supporting the G-Sync compatible/Adaptive-Sync support technology.
... Adaptive-Sync (DP) supported graphics source to dynamically adjust display refresh rate based on typical content frame rates in order to eliminate stuttering and enhance low-latency display. STANDARD TIMING TABLE Mode Resolution 1 VGA 640 x 480 2 MAC 640 x 480 3 VESA 720 x 400 4 SVGA 800 x 600 5 SVGA 800 x 600 6 XGA 1024 x 768 7 XGA 1024 x 768 8 VESA 1152 x 864 9 SXGA 1280 x 1024 10 VESA 1280...60 Hz 60 Hz 60 Hz 85 Hz 120 Hz 144 Hz Remark Note: The DisplayPort of this monitor is purposely supporting the G-Sync compatible/Adaptive-Sync support technology.

User Manual
Page 19
Press to activate the OSD menu, then use it again to highlight the desired function. Press to toggle input sources. EN-9 Press to activate user defined hotkey function. USER CONTROLS Base Controls 1 2 3 4 1 No. Item 1 Power button/indicator 2 Hotkey 1, 2 buttons 3 Input button 4 Navi/OK button Description Turns the monitor on . Press it as a directional key to enter a selection. Amber indicates standby/power saving mode. Blue indicates power on /off.
Press to activate the OSD menu, then use it again to highlight the desired function. Press to toggle input sources. EN-9 Press to activate user defined hotkey function. USER CONTROLS Base Controls 1 2 3 4 1 No. Item 1 Power button/indicator 2 Hotkey 1, 2 buttons 3 Input button 4 Navi/OK button Description Turns the monitor on . Press it as a directional key to enter a selection. Amber indicates standby/power saving mode. Blue indicates power on /off.
User Manual
Page 20
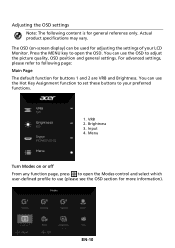
Menu Turn Modes on -screen display) can use the OSD to open the OSD. You can be used for adjusting the settings of your preferred functions. 1. Brightness 3. Input 4. EN-10 The OSD (on or off From any function page, press to adjust the picture quality, OSD position and general settings. Press the MENU key to open the Modes control and select which user-defined profile to use the Hot Key Assignment function to set these buttons to following content...
Menu Turn Modes on -screen display) can use the OSD to open the OSD. You can be used for adjusting the settings of your preferred functions. 1. Brightness 3. Input 4. EN-10 The OSD (on or off From any function page, press to adjust the picture quality, OSD position and general settings. Press the MENU key to open the Modes control and select which user-defined profile to use the Hot Key Assignment function to set these buttons to following content...
User Manual
Page 22
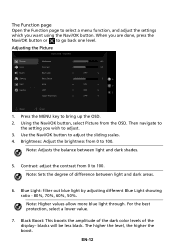
... values allow more blue light through. Contrast: adjust the contrast from 0 to select a menu function, and adjust the settings which you want using the Navi/OK button. Black Boost: This boosts the amplitude of the dark color levels of difference between light and dark shades. 5. EN-12 The Function page Open the Function page to 100. Brightness: Adjust the brightness from the OSD. blacks will be less black. Then navigate...
... values allow more blue light through. Contrast: adjust the contrast from 0 to select a menu function, and adjust the settings which you want using the Navi/OK button. Black Boost: This boosts the amplitude of the dark color levels of difference between light and dark shades. 5. EN-12 The Function page Open the Function page to 100. Brightness: Adjust the brightness from the OSD. blacks will be less black. Then navigate...
User Manual
Page 23
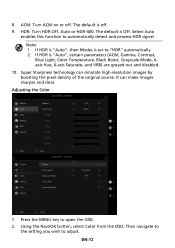
...: Turn HDR Off, Auto or HDR-400. The default is "Auto", certain parameters (ACM, Gamma, Contrast, Blue Light, Color Temperature, Black Boost, Grayscale Mode, 6axis Hue, 6-axis Saturate, and VRB) are grayed out and disabled. 10. Press the MENU key to adjust. Super Sharpness technology can make images sharper and clear. EN-13 Adjusting the Color 1. It can simulate high-resolution images by boosting the pixel density of the original source...
...: Turn HDR Off, Auto or HDR-400. The default is "Auto", certain parameters (ACM, Gamma, Contrast, Blue Light, Color Temperature, Black Boost, Grayscale Mode, 6axis Hue, 6-axis Saturate, and VRB) are grayed out and disabled. 10. Press the MENU key to adjust. Super Sharpness technology can make images sharper and clear. EN-13 Adjusting the Color 1. It can simulate high-resolution images by boosting the pixel density of the original source...
User Manual
Page 24
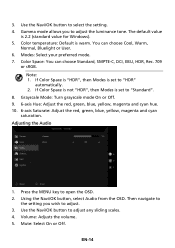
... to the setting you to adjust the luminance tone. Modes: Select your preferred mode. 7. Adjusting the Audio 1. Volume: Adjusts the volume. 5. 3. Color Space: You can choose Cool, Warm, Normal, Bluelight or User. 6. Press the MENU key to adjust any sliding scales. 4. The default value is set to adjust. 3. Grayscale Mode: Turn grayscale mode On or Off. 9. 6-axis Hue: Adjust the red, green, blue, yellow, magenta and cyan hue. 10. 6-axis Saturate: Adjust the red, green, blue, yellow...
... to the setting you to adjust the luminance tone. Modes: Select your preferred mode. 7. Adjusting the Audio 1. Volume: Adjusts the volume. 5. 3. Color Space: You can choose Cool, Warm, Normal, Bluelight or User. 6. Press the MENU key to adjust any sliding scales. 4. The default value is set to adjust. 3. Grayscale Mode: Turn grayscale mode On or Off. 9. 6-axis Hue: Adjust the red, green, blue, yellow, magenta and cyan hue. 10. 6-axis Saturate: Adjust the red, green, blue, yellow...
User Manual
Page 25
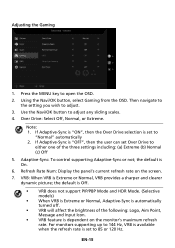
.... If Adaptive-Sync is "ON", then the Over Drive selection is On. 6. Adjusting the Gaming 1. Press the MENU key to adjust. 3. Note: 1. the default is set to 85 or 120 Hz. Then navigate to the setting you wish to open the OSD. 2. Refresh Rate Num: Display the panel's current refresh rate on the monitor's maximum refresh rate. Using the Navi/OK button, select Gaming from the OSD. EN-15 For monitors supporting up to...
.... If Adaptive-Sync is "ON", then the Over Drive selection is On. 6. Adjusting the Gaming 1. Press the MENU key to adjust. 3. Note: 1. the default is set to 85 or 120 Hz. Then navigate to the setting you wish to open the OSD. 2. Refresh Rate Num: Display the panel's current refresh rate on the monitor's maximum refresh rate. Using the Navi/OK button, select Gaming from the OSD. EN-15 For monitors supporting up to...
User Manual
Page 26
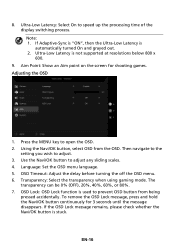
... Adaptive-Sync is "ON", then the Ultra-Low Latency is stuck. Then navigate to the setting you wish to open the OSD. 2. Transparency: Select the transparency when using gaming mode. Language: Set the OSD menu language. 5. OSD Lock: OSD Lock function is not supported at resolutions below 800 x 600. 9. Aim Point: Show an Aim point on the screen for 3 seconds until the message disappears. If the OSD Lock message remains, please check...
... Adaptive-Sync is "ON", then the Ultra-Low Latency is stuck. Then navigate to the setting you wish to open the OSD. 2. Transparency: Select the transparency when using gaming mode. Language: Set the OSD menu language. 5. OSD Lock: OSD Lock function is not supported at resolutions below 800 x 600. 9. Aim Point: Show an Aim point on the screen for 3 seconds until the message disappears. If the OSD Lock message remains, please check...
User Manual
Page 27
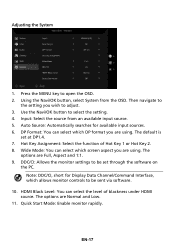
... be set at DP1.4. 7. Use the Navi/OK button to open the OSD. 2. Wide Mode: You can select which screen aspect you are using . HDMI Black Level: You can select which allows monitor controls to the setting you are using . Quick Start Mode: Enable monitor rapidly. Input: Select the source from the OSD. Press the MENU key to select the setting. 4. The default is set through the software on the PC. EN-17 Auto Source: Automatically searches for Display Data...
... be set at DP1.4. 7. Use the Navi/OK button to open the OSD. 2. Wide Mode: You can select which screen aspect you are using . HDMI Black Level: You can select which allows monitor controls to the setting you are using . Quick Start Mode: Enable monitor rapidly. Input: Select the source from the OSD. Press the MENU key to select the setting. 4. The default is set through the software on the PC. EN-17 Auto Source: Automatically searches for Display Data...
User Manual
Page 29
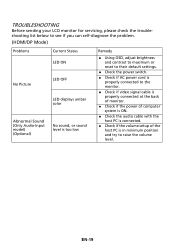
... LCD monitor for servicing, please check the troubleshooting list below to see if you can self-diagnose the problem. (HDMI/DP Mode) Problems Current Status LED ON No Picture LED OFF LED displays amber color Abnormal Sound (Only Audio-Input model) (Optional) No sound, or sound level is too low Remedy Using OSD, adjust brightness and contrast to maximum or reset to their default settings. Check the power switch. Check if AC power cord is properly connected to the monitor. Check if video signal cable is properly connected...
... LCD monitor for servicing, please check the troubleshooting list below to see if you can self-diagnose the problem. (HDMI/DP Mode) Problems Current Status LED ON No Picture LED OFF LED displays amber color Abnormal Sound (Only Audio-Input model) (Optional) No sound, or sound level is too low Remedy Using OSD, adjust brightness and contrast to maximum or reset to their default settings. Check the power switch. Check if AC power cord is properly connected to the monitor. Check if video signal cable is properly connected...


