

User Manual
Page 3
... instructions Read these guidelines when cleaning the monitor: • Always unplug the monitor before cleaning. • Use a soft cloth to make sure the flicker disappears. • You may find slightly uneven brightness on the screen depending on the desktop pattern you use . Keep this case, the screen is displayed for hours. Connecting/disconnecting the device Observe the following are turned off before connecting any cable or unplugging the power cord...
... instructions Read these guidelines when cleaning the monitor: • Always unplug the monitor before cleaning. • Use a soft cloth to make sure the flicker disappears. • You may find slightly uneven brightness on the screen depending on the desktop pattern you use . Keep this case, the screen is displayed for hours. Connecting/disconnecting the device Observe the following are turned off before connecting any cable or unplugging the power cord...
User Manual
Page 4
... high volume. • Avoid turning up the volume to block out noisy surroundings. • Turn the volume down if you can hear it after your hearing, follow these instructions. • Gradually increase the volume until you can 't hear people speaking near water. • Do not place this product, make sure that could be seriously damaged. • Slots and openings...
... high volume. • Avoid turning up the volume to block out noisy surroundings. • Turn the volume down if you can hear it after your hearing, follow these instructions. • Gradually increase the volume until you can 't hear people speaking near water. • Do not place this product, make sure that could be seriously damaged. • Slots and openings...

User Manual
Page 5
.... Also, make sure that the new power cord meets the following the operating instructions Refer all servicing to qualified service personnel when: • the power cord or plug is equipped with the supplied power supply cord set , make sure that the total rating of all products plugged into a non-grounded power outlet. The overall system load must not exceed 80% of the power strip's input rating. • This product's power cord is damaged...
.... Also, make sure that the new power cord meets the following the operating instructions Refer all servicing to qualified service personnel when: • the power cord or plug is equipped with the supplied power supply cord set , make sure that the total rating of all products plugged into a non-grounded power outlet. The overall system load must not exceed 80% of the power strip's input rating. • This product's power cord is damaged...

User Manual
Page 6
... our other controls may contain small parts. or where blasting operations are often, but not always, marked. Switch off the device near gas pumps at Acer are covered by the operating instructions, since improper adjustment of other products. Additional safety information Your device and its enhancements may result in damage and will often require extensive work by a qualified...
... our other controls may contain small parts. or where blasting operations are often, but not always, marked. Switch off the device near gas pumps at Acer are covered by the operating instructions, since improper adjustment of other products. Additional safety information Your device and its enhancements may result in damage and will often require extensive work by a qualified...

User Manual
Page 8
... viii This product has been shipped enabled for comfortable use . Tips and information for power management: • Activate display's Sleep mode within 15 minutes of user inactivity. • Activate computer's Sleep mode within 30 minutes of working conditions, personal health and other recurring or persistent discomfort... use Computer users may lead to achieve maximum comfort. Observe the following symptoms may appear in one fixed posture • avoid slouching forward and/or leaning backward • stand up and walk around regularly to remove the strain on your sitting height ...
... viii This product has been shipped enabled for comfortable use . Tips and information for power management: • Activate display's Sleep mode within 15 minutes of user inactivity. • Activate computer's Sleep mode within 30 minutes of working conditions, personal health and other recurring or persistent discomfort... use Computer users may lead to achieve maximum comfort. Observe the following symptoms may appear in one fixed posture • avoid slouching forward and/or leaning backward • stand up and walk around regularly to remove the strain on your sitting height ...

User Manual
Page 9
... the window or any light source • minimizing room light by looking at the middle of the display. • Adjust the display brightness and/or contrast to a comfortable level for extended periods of time. ix Taking care of your vision Long viewing hours, wearing incorrect glasses or contact lenses, glare, excessive room lighting, poorly focused screens, very small typefaces and low-contrast displays could...
... the window or any light source • minimizing room light by looking at the middle of the display. • Adjust the display brightness and/or contrast to a comfortable level for extended periods of time. ix Taking care of your vision Long viewing hours, wearing incorrect glasses or contact lenses, glare, excessive room lighting, poorly focused screens, very small typefaces and low-contrast displays could...

User Manual
Page 10
TABLE OF CONTENTS UNPACKING 1 ATTACHING / REMOVING THE BASE 2 SCREEN POSITION ADJUSTMENT 3 CONNECTING THE POWER CORD 4 SAFETY PRECAUTION 4 CLEANING YOUR MONITOR 4 POWER SAVING 5 DDC...5 CONNECTOR PIN ASSIGNMENT 6 STANDARD TIMING TABLE 7 INSTALLATION 8 USER CONTROLS 9 TROUBLESHOOTING 19
TABLE OF CONTENTS UNPACKING 1 ATTACHING / REMOVING THE BASE 2 SCREEN POSITION ADJUSTMENT 3 CONNECTING THE POWER CORD 4 SAFETY PRECAUTION 4 CLEANING YOUR MONITOR 4 POWER SAVING 5 DDC...5 CONNECTOR PIN ASSIGNMENT 6 STANDARD TIMING TABLE 7 INSTALLATION 8 USER CONTROLS 9 TROUBLESHOOTING 19

User Manual
Page 11
UNPACKING Please check the following items are present when you unpack the box, and save the packing materials in case you will need to ship or transport the monitor in future. LCD Monitor Quick Start Guide AC Power Cord DP Cable (Optional) HDMI Cable (Optional) EN-1
UNPACKING Please check the following items are present when you unpack the box, and save the packing materials in case you will need to ship or transport the monitor in future. LCD Monitor Quick Start Guide AC Power Cord DP Cable (Optional) HDMI Cable (Optional) EN-1

User Manual
Page 14
... screen is adequate ventilation. Avoid placing the monitor against a bright background or where sun-light or other end into an AC outlet. For unit using at 120 V AC: Use a UL Listed Cord Set, Type SVT wire and plug rated 10 A/125 V. For unit using at 220/240 V AC (outside of U.S.): Use a Cord Set consisting of the monitor. EN-4 CONNECTING THE POWER CORD Check first to make...
... screen is adequate ventilation. Avoid placing the monitor against a bright background or where sun-light or other end into an AC outlet. For unit using at 120 V AC: Use a UL Listed Cord Set, Type SVT wire and plug rated 10 A/125 V. For unit using at 220/240 V AC (outside of U.S.): Use a Cord Set consisting of the monitor. EN-4 CONNECTING THE POWER CORD Check first to make...
User Manual
Page 15
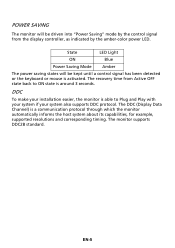
... amber-color power LED. EN-5 DDC To make your installation easier, the monitor is activated. The monitor supports DDC2B standard. State LED Light ON Blue Power Saving Mode Amber The power saving states will be kept until a control signal has been detected or the keyboard or mouse is able to ON state is a communication protocol through which the monitor automatically informs the host system about its capabilities, for example, supported resolutions...
... amber-color power LED. EN-5 DDC To make your installation easier, the monitor is activated. The monitor supports DDC2B standard. State LED Light ON Blue Power Saving Mode Amber The power saving states will be kept until a control signal has been detected or the keyboard or mouse is able to ON state is a communication protocol through which the monitor automatically informs the host system about its capabilities, for example, supported resolutions...

User Manual
Page 16
...(p) * only for certain models 20-Pin Color Display Signal Cable* PIN Description 1. on device) SCL SDA DDC/CEC Ground +5V Power Hot Plug Detect Description GND Lane3(n) Config1 Config2 AUX_CH (n) GND AUX_CH (p) Hot Plug Detect DP Power_Return DP Power TMDS Data2+ 10. 2....models PIN 11. 12. 13. 14. 15. 16. 17. 18. 19. 20. CEC Reserved (N.C. Lane1(p) 5. EN-6 Meaning TMDS Clock+ TMDS Clock Shield TMDS Clock- Lane0(n) 4. Lane1(n) 7. Lane3(n) 10. GND 3. TMDS Data1 Shield 14. 6. CONNECTOR PIN ASSIGNMENT 19-Pin Color Display Signal Cable...
...(p) * only for certain models 20-Pin Color Display Signal Cable* PIN Description 1. on device) SCL SDA DDC/CEC Ground +5V Power Hot Plug Detect Description GND Lane3(n) Config1 Config2 AUX_CH (n) GND AUX_CH (p) Hot Plug Detect DP Power_Return DP Power TMDS Data2+ 10. 2....models PIN 11. 12. 13. 14. 15. 16. 17. 18. 19. 20. CEC Reserved (N.C. Lane1(p) 5. EN-6 Meaning TMDS Clock+ TMDS Clock Shield TMDS Clock- Lane0(n) 4. Lane1(n) 7. Lane3(n) 10. GND 3. TMDS Data1 Shield 14. 6. CONNECTOR PIN ASSIGNMENT 19-Pin Color Display Signal Cable...

User Manual
Page 19
Blue indicates power on /off. USER CONTROLS Base Controls 1 2 3 4 1 No. Amber indicates standby/power saving mode. Press it as a directional key to enter a selection. Press to activate user defined hotkey function. Press to toggle input sources. Press to activate the OSD menu, then use it again to highlight the desired function. EN-9 Item 1 Power button/indicator 2 Hotkey 1, 2 buttons 3 Input button 4 Navi/OK button Description Turns the monitor on .
Blue indicates power on /off. USER CONTROLS Base Controls 1 2 3 4 1 No. Amber indicates standby/power saving mode. Press it as a directional key to enter a selection. Press to activate user defined hotkey function. Press to toggle input sources. Press to activate the OSD menu, then use it again to highlight the desired function. EN-9 Item 1 Power button/indicator 2 Hotkey 1, 2 buttons 3 Input button 4 Navi/OK button Description Turns the monitor on .
User Manual
Page 20
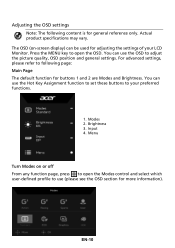
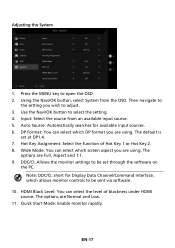
... Assignment function to set these buttons to open the OSD. Modes 2. Input 4. Brightness 3. You can use (please see the OSD section for adjusting the settings of your preferred functions. 1. Actual product specifications may vary. Menu Turn Modes on -screen display) can use the OSD to following content is for buttons 1 and 2 are Modes and Brightness. You can be used for more information). Adjusting the OSD settings Note: The following page: Main Page The default function for general...
... Assignment function to set these buttons to open the OSD. Modes 2. Input 4. Brightness 3. You can use (please see the OSD section for adjusting the settings of your preferred functions. 1. Actual product specifications may vary. Menu Turn Modes on -screen display) can use the OSD to following content is for buttons 1 and 2 are Modes and Brightness. You can be used for more information). Adjusting the OSD settings Note: The following page: Main Page The default function for general...
User Manual
Page 22
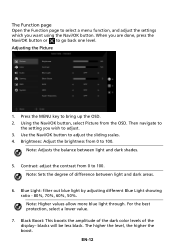
... of the dark color levels of difference between light and dark shades. 5. blacks will be less black. Using the Navi/OK button, select Picture from 0 to adjust. 3. Use the Navi/OK button to go back one level. Brightness: Adjust the brightness from 0 to select a menu function, and adjust the settings which you wish to 100. Note: Sets the degree of the display- The Function page Open the Function page...
... of the dark color levels of difference between light and dark shades. 5. blacks will be less black. Using the Navi/OK button, select Picture from 0 to adjust. 3. Use the Navi/OK button to go back one level. Brightness: Adjust the brightness from 0 to select a menu function, and adjust the settings which you wish to 100. Note: Sets the degree of the display- The Function page Open the Function page...
User Manual
Page 23
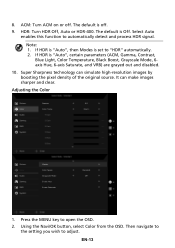
...: Turn ACM on or off . 9. If HDR is "Auto", then Modes is "Auto", certain parameters (ACM, Gamma, Contrast, Blue Light, Color Temperature, Black Boost, Grayscale Mode, 6axis Hue, 6-axis Saturate, and VRB) are grayed out and disabled. 10. Super Sharpness technology can make images sharper and clear. Press the MENU key to "HDR" automatically. 2. The default is off . Using the Navi/OK button, select Color from the OSD. The default...
...: Turn ACM on or off . 9. If HDR is "Auto", then Modes is "Auto", certain parameters (ACM, Gamma, Contrast, Blue Light, Color Temperature, Black Boost, Grayscale Mode, 6axis Hue, 6-axis Saturate, and VRB) are grayed out and disabled. 10. Super Sharpness technology can make images sharper and clear. Press the MENU key to "HDR" automatically. 2. The default is off . Using the Navi/OK button, select Color from the OSD. The default...
User Manual
Page 24
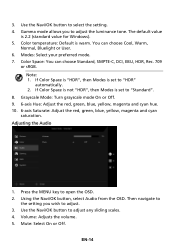
... or User. 6. Using the Navi/OK button, select Audio from the OSD. Mute: Select On or Off. Color temperature: Default is 2.2 (standard value for Windows). 5. Grayscale Mode: Turn grayscale mode On or Off. 9. 6-axis Hue: Adjust the red, green, blue, yellow, magenta and cyan hue. 10. 6-axis Saturate: Adjust the red, green, blue, yellow, magenta and cyan saturation. Volume: Adjusts the volume. 5. Then navigate to the setting you to adjust the luminance tone. Modes: Select...
... or User. 6. Using the Navi/OK button, select Audio from the OSD. Mute: Select On or Off. Color temperature: Default is 2.2 (standard value for Windows). 5. Grayscale Mode: Turn grayscale mode On or Off. 9. 6-axis Hue: Adjust the red, green, blue, yellow, magenta and cyan hue. 10. 6-axis Saturate: Adjust the red, green, blue, yellow, magenta and cyan saturation. Volume: Adjusts the volume. 5. Then navigate to the setting you to adjust the luminance tone. Modes: Select...
User Manual
Page 25
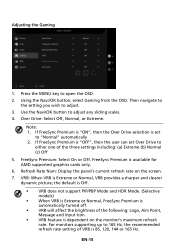
... automatically turned off. • VRB will affect the brightness of the following: Logo, Aim Point, Message and Input Icon. • VRB feature is set Over Drive to "Normal" automatically 2. Then navigate to the setting you wish to adjust any sliding scales. 4. EN-15 Use the Navi/OK button to adjust. 3. Refresh Rate Num: Display the panel's current refresh rate on the monitor's maximum refresh rate. Press the MENU key...
... automatically turned off. • VRB will affect the brightness of the following: Logo, Aim Point, Message and Input Icon. • VRB feature is set Over Drive to "Normal" automatically 2. Then navigate to the setting you wish to adjust any sliding scales. 4. EN-15 Use the Navi/OK button to adjust. 3. Refresh Rate Num: Display the panel's current refresh rate on the monitor's maximum refresh rate. Press the MENU key...
User Manual
Page 26
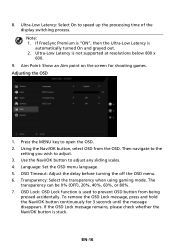
... of the display switching process. OSD Lock: OSD Lock function is not supported at resolutions below 800 x 600. 9. If the OSD Lock message remains, please check whether the Navi/OK button is automatically turned On and grayed out. 2. Use the Navi/OK button to prevent OSD button from the OSD. Transparency: Select the transparency when using gaming mode. Press the MENU key to open the OSD. 2. Ultra-Low Latency is used to adjust any sliding...
... of the display switching process. OSD Lock: OSD Lock function is not supported at resolutions below 800 x 600. 9. If the OSD Lock message remains, please check whether the Navi/OK button is automatically turned On and grayed out. 2. Use the Navi/OK button to prevent OSD button from the OSD. Transparency: Select the transparency when using gaming mode. Press the MENU key to open the OSD. 2. Ultra-Low Latency is used to adjust any sliding...
User Manual
Page 27
... MENU key to select the setting. 4. Input: Select the source from the OSD. The options are Normal and Low. 11. The options are Full, Aspect and 1:1. 9. Use the Navi/OK button to open the OSD. 2. The default is set through the software on the PC. DDC/CI: Allows the monitor settings to the setting you are using . Quick Start Mode: Enable monitor rapidly. Then navigate to be sent via software. 10. HDMI Black...
... MENU key to select the setting. 4. Input: Select the source from the OSD. The options are Normal and Low. 11. The options are Full, Aspect and 1:1. 9. Use the Navi/OK button to open the OSD. 2. The default is set through the software on the PC. DDC/CI: Allows the monitor settings to the setting you are using . Quick Start Mode: Enable monitor rapidly. Then navigate to be sent via software. 10. HDMI Black...
User Manual
Page 29
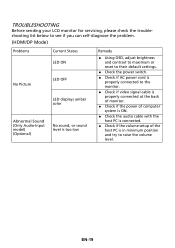
... LCD monitor for servicing, please check the troubleshooting list below to see if you can self-diagnose the problem. (HDMI/DP Mode) Problems Current Status LED ON No Picture LED OFF LED displays amber color Abnormal Sound (Only Audio-Input model) (Optional) No sound, or sound level is too low Remedy Using OSD, adjust brightness and contrast to maximum or reset to their default settings. Check the power switch. Check if AC power cord is properly connected to the monitor. Check if video signal cable is properly connected...
... LCD monitor for servicing, please check the troubleshooting list below to see if you can self-diagnose the problem. (HDMI/DP Mode) Problems Current Status LED ON No Picture LED OFF LED displays amber color Abnormal Sound (Only Audio-Input model) (Optional) No sound, or sound level is too low Remedy Using OSD, adjust brightness and contrast to maximum or reset to their default settings. Check the power switch. Check if AC power cord is properly connected to the monitor. Check if video signal cable is properly connected...

