
User Manual
Page 1
TABLE OF CONTENTS Special notes on LCD monitors 1 Information for your safety and comfort 2 Unpacking 5 Attaching/Removing the base 6 Screen position adjustment 6 Connecting the power cord 7 Safety precaution 7 Cleaning your monitor 7 Power saving 8 DDC 8 Connector Pin Assignment 9 Standard Timing Table 11 Installation 12 User controls 13 Troubleshooting 19
TABLE OF CONTENTS Special notes on LCD monitors 1 Information for your safety and comfort 2 Unpacking 5 Attaching/Removing the base 6 Screen position adjustment 6 Connecting the power cord 7 Safety precaution 7 Cleaning your monitor 7 Power saving 8 DDC 8 Connector Pin Assignment 9 Standard Timing Table 11 Installation 12 User controls 13 Troubleshooting 19

User Manual
Page 2
... screen may remain after switching the image, when the same image is recovered slowly by changing the image or turning off the Power Switch and then turn it on the desktop pattern you use . EN-1 NOTES · Due to make sure the flicker disappears. · You may flicker during initial use . · The LCD screen has effective pixels of the fluorescent light, the screen may find slightly uneven brightness on the screen...
... screen may remain after switching the image, when the same image is recovered slowly by changing the image or turning off the Power Switch and then turn it on the desktop pattern you use . EN-1 NOTES · Due to make sure the flicker disappears. · You may flicker during initial use . · The LCD screen has effective pixels of the fluorescent light, the screen may find slightly uneven brightness on the screen...
User Manual
Page 3
... ears adjust. • Limit the amount of time listening to music at high volume. • Avoid turning up the volume to the equipment operator as possible. When you plug the power cord into is provided. • Never push objects of any kind into the product. • To avoid damage of the following power supplies: Manufacturer: FSP Technology Inc., Model: FSP040...
... ears adjust. • Limit the amount of time listening to music at high volume. • Avoid turning up the volume to the equipment operator as possible. When you plug the power cord into is provided. • Never push objects of any kind into the product. • To avoid damage of the following power supplies: Manufacturer: FSP Technology Inc., Model: FSP040...
User Manual
Page 4
... power cord or plug is produced with high-precision manufacturing techniques. Refer all servicing to carpal tunnel syndrome, tendonitis, tenosynovitis or other risks. Incorrect computer usage may lead to qualified service personnel. Nevertheless, some pixels may result in damage and will often require extensive work habits, stress, inadequate working in performance, indicating a need for more comfortable computer use . Users are covered by...
... power cord or plug is produced with high-precision manufacturing techniques. Refer all servicing to carpal tunnel syndrome, tendonitis, tenosynovitis or other risks. Incorrect computer usage may lead to qualified service personnel. Nevertheless, some pixels may result in damage and will often require extensive work habits, stress, inadequate working in performance, indicating a need for more comfortable computer use . Users are covered by...
User Manual
Page 5
... • using a task light • changing the display's viewing angle • using a glare-reduction filter • using the product on a couch or bed. If this is unavoidable, work habits to reduce eyestrain. For more than the top edge of the display so your eyes point downward when looking at the middle of the display. • Adjust the display brightness and/or contrast to keep your...
... • using a task light • changing the display's viewing angle • using a glare-reduction filter • using the product on a couch or bed. If this is unavoidable, work habits to reduce eyestrain. For more than the top edge of the display so your eyes point downward when looking at the middle of the display. • Adjust the display brightness and/or contrast to keep your...
User Manual
Page 6
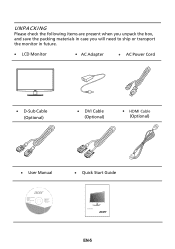
UNPACKING Please check the following items are present when you unpack the box, and save the packing materials in case you will need to ship or transport the monitor in future. · LCD Monitor · AC Adapter · AC Power Cord · D-Sub Cable (Optional) · DVI Cable (Optional) · HDMI Cable (Optional) · User Manual · Quick Start Guide V185HL/V195HQL V205HL V235HL LCD monitor P/N:MU.LV200.001 EN-5
UNPACKING Please check the following items are present when you unpack the box, and save the packing materials in case you will need to ship or transport the monitor in future. · LCD Monitor · AC Adapter · AC Power Cord · D-Sub Cable (Optional) · DVI Cable (Optional) · HDMI Cable (Optional) · User Manual · Quick Start Guide V185HL/V195HQL V205HL V235HL LCD monitor P/N:MU.LV200.001 EN-5
User Manual
Page 7
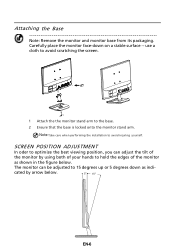
Note:Take care when performing the installation to the base. 2 Ensure that the base is locked onto the monitor stand arm. use a cloth to avoid scratching the screen. 1 Attach the the monitor stand arm to avoid injuring yourself. SCREEN POSITION ADJUSTMENT In oder to optimize the best viewing position, you can be adjusted to hold the edges of the monitor as indi- Carefully place the monitor face-down as shown in...
Note:Take care when performing the installation to the base. 2 Ensure that the base is locked onto the monitor stand arm. use a cloth to avoid scratching the screen. 1 Attach the the monitor stand arm to avoid injuring yourself. SCREEN POSITION ADJUSTMENT In oder to optimize the best viewing position, you can be adjusted to hold the edges of the monitor as indi- Carefully place the monitor face-down as shown in...
User Manual
Page 8
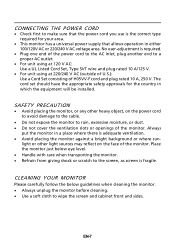
... end to the screen, as screen is adequate ventilation. · Avoid placing the monitor against a bright background or where sun- Place the monitor just below guidelines when cleaning the monitor. · Always unplug the monitor before cleaning. · Use a soft cloth to make sure that the power cord you use is required. · Plug one end of H05VV-F cord and plug rated 10 A, 250 V. No user-adjustment is the correct...
... end to the screen, as screen is adequate ventilation. · Avoid placing the monitor against a bright background or where sun- Place the monitor just below guidelines when cleaning the monitor. · Always unplug the monitor before cleaning. · Use a soft cloth to make sure that the power cord you use is required. · Plug one end of H05VV-F cord and plug rated 10 A, 250 V. No user-adjustment is the correct...
User Manual
Page 9
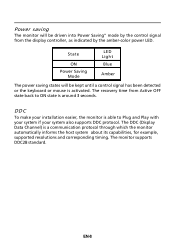
... amber-color power LED. DDC To make your installation easier, the monitor is able to ON state is around 3 seconds. The DDC (Display Data Channel) is a communication protocol through which the monitor automatically informs the host system about its capabilities, for example, supported resolutions and corresponding timing. Power saving The monitor will be driven into Power Saving" mode by the control signal from Active OFF state back to Plug...
... amber-color power LED. DDC To make your installation easier, the monitor is able to ON state is around 3 seconds. The DDC (Display Data Channel) is a communication protocol through which the monitor automatically informs the host system about its capabilities, for example, supported resolutions and corresponding timing. Power saving The monitor will be driven into Power Saving" mode by the control signal from Active OFF state back to Plug...
User Manual
Page 10
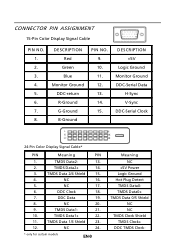
...- 21. 10. NC 24. * only for certain models EN-9 Meaning NC +5V Power Logic Ground Hot Plug Detect TMDS Data0TMDS Data0+ TMDS Data 0/5 Shield NC NC TMDS Clock Shield TMDS Clock+ DDC TMDS Clock- CONNECTOR PIN ASSIGNMENT 15-Pin Color Display Signal Cable PIN NO. 1. 2. 3. 4. 5. 6. 7. 8. TMDS Data1+ 22. 11. DESCRIPTION Red Green Blue Monitor Ground DDC-return R-Ground G-Ground B-Ground PIN NO...
...- 21. 10. NC 24. * only for certain models EN-9 Meaning NC +5V Power Logic Ground Hot Plug Detect TMDS Data0TMDS Data0+ TMDS Data 0/5 Shield NC NC TMDS Clock Shield TMDS Clock+ DDC TMDS Clock- CONNECTOR PIN ASSIGNMENT 15-Pin Color Display Signal Cable PIN NO. 1. 2. 3. 4. 5. 6. 7. 8. TMDS Data1+ 22. 11. DESCRIPTION Red Green Blue Monitor Ground DDC-return R-Ground G-Ground B-Ground PIN NO...
User Manual
Page 11
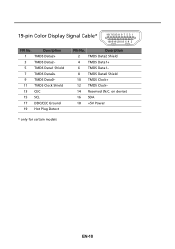
Description 1 TMDS Data2+ 3 TMDS Data2- 5 TMDS Data1 Shield 7 TMDS Data0+ 9 TMDS Data0- 11 TMDS Clock Shield 13 CEC 15 SCL 17 DDC/CEC Ground 19 Hot Plug Detect PIN No. on device) 16 SDA 18 +5V Power * only for certain models EN-10 19-pin Color Display Signal Cable* 1917151311 9 7 5 3 1 1816141210 8 6 4 2 PIN No. Description 2 TMDS Data2 Shield 4 TMDS Data1+ 6 TMDS Data1- 8 TMDS Data0 Shield 10 TMDS Clock+ 12 TMDS Clock- 14 Reserved (N.C.
Description 1 TMDS Data2+ 3 TMDS Data2- 5 TMDS Data1 Shield 7 TMDS Data0+ 9 TMDS Data0- 11 TMDS Clock Shield 13 CEC 15 SCL 17 DDC/CEC Ground 19 Hot Plug Detect PIN No. on device) 16 SDA 18 +5V Power * only for certain models EN-10 19-pin Color Display Signal Cable* 1917151311 9 7 5 3 1 1816141210 8 6 4 2 PIN No. Description 2 TMDS Data2 Shield 4 TMDS Data1+ 6 TMDS Data1- 8 TMDS Data0 Shield 10 TMDS Clock+ 12 TMDS Clock- 14 Reserved (N.C.
User Manual
Page 13
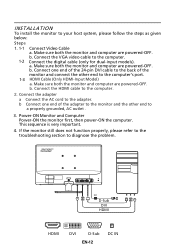
... 24-pin DVI cable to the back of the adapter to the monitor and the other end to the computer's port. 1-3 HDMI Cable (Only HDMI-Input Model) a. Make sure both the monitor and computer are powered-OFF. Connect the VGA video cable to your host system, please follow the steps as given below: Steps 1. 1-1 Connect Video Cable a. Power-ON Monitor and Computer Power-ON the monitor first, then power-ON the computer. INSTALLATION To install the monitor to...
... 24-pin DVI cable to the back of the adapter to the monitor and the other end to the computer's port. 1-3 HDMI Cable (Only HDMI-Input Model) a. Make sure both the monitor and computer are powered-OFF. Connect the VGA video cable to your host system, please follow the steps as given below: Steps 1. 1-1 Connect Video Cable a. Power-ON Monitor and Computer Power-ON the monitor first, then power-ON the computer. INSTALLATION To install the monitor to...
User Manual
Page 14
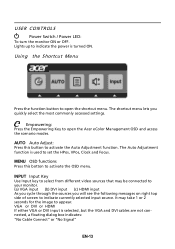
... currently selected input source. MENU OSD functions Press this button to activate the OSD menu. The Auto Adjustment function is selected ,but the VGA and DVI cables are not connected, a floating dialog box indicates: "No Cable Connect" or "No Signal" EN-13 AUTO Auto Adjust: Press this botton to activate the Auto Adjustment function. VGA or DVI or HDMI If either VGA or DVI input is used to open the Acer eColor Management OSD and access the scenario modes. USER CONTROLS Power Switch / Power LED: To turn the monitor ON...
... currently selected input source. MENU OSD functions Press this button to activate the OSD menu. The Auto Adjustment function is selected ,but the VGA and DVI cables are not connected, a floating dialog box indicates: "No Cable Connect" or "No Signal" EN-13 AUTO Auto Adjust: Press this botton to activate the Auto Adjustment function. VGA or DVI or HDMI If either VGA or DVI input is used to open the Acer eColor Management OSD and access the scenario modes. USER CONTROLS Power Switch / Power LED: To turn the monitor ON...
User Manual
Page 15
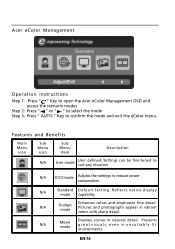
... instructions Step 1: Press " " Key to open the Acer eColor Management OSD and access the scenario modes Step 2: Press " " or " " to select the mode Step 3: Press " AUTO " Key to reduce power consumption. Settings can be fine-tuned to suit any situation N/A ECO mode Adjusts the settings to confirm the mode and exit the eColor menu. Features and Benefits Main Menu icon Sub Menu icon Sub Menu item Description N/A User mode User...
... instructions Step 1: Press " " Key to open the Acer eColor Management OSD and access the scenario modes Step 2: Press " " or " " to select the mode Step 3: Press " AUTO " Key to reduce power consumption. Settings can be fine-tuned to suit any situation N/A ECO mode Adjusts the settings to confirm the mode and exit the eColor menu. Features and Benefits Main Menu icon Sub Menu icon Sub Menu item Description N/A User mode User...
User Manual
Page 16
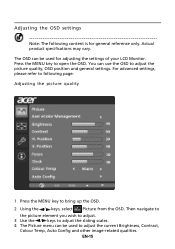
... adjust the picture quality, OSD position and general settings. Actual product specifications may vary. For advanced settings, please refer to following content is for adjusting the settings of your LCD Monitor. Adjusting the OSD settings Note: The following page: Adjusting the picture quality 1 Press the MENU key to bring up the OSD. 2 Using the / keys, select Picture from the OSD. Press the MENU key to adjust the current Brightness, Contrast, Colour Temp, Auto Config and other image...
... adjust the picture quality, OSD position and general settings. Actual product specifications may vary. For advanced settings, please refer to following content is for adjusting the settings of your LCD Monitor. Adjusting the OSD settings Note: The following page: Adjusting the picture quality 1 Press the MENU key to bring up the OSD. 2 Using the / keys, select Picture from the OSD. Press the MENU key to adjust the current Brightness, Contrast, Colour Temp, Auto Config and other image...
User Manual
Page 18
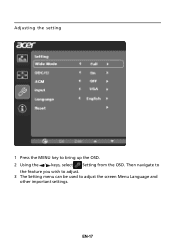
EN-17 Then navigate to the feature you wish to adjust. 3 The Setting menu can be used to bring up the OSD. 2 Using the / keys, select Setting from the OSD. Adjusting the setting 1 Press the MENU key to adjust the screen Menu Language and other important settings.
EN-17 Then navigate to the feature you wish to adjust. 3 The Setting menu can be used to bring up the OSD. 2 Using the / keys, select Setting from the OSD. Adjusting the setting 1 Press the MENU key to adjust the screen Menu Language and other important settings.
User Manual
Page 20
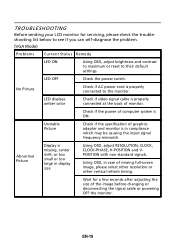
...-standard signals. No Picture · Check if AC power cord is properly connected to their default settings. Unstable Picture · Check if the specification of graphics adapter and monitor is in case of missing full-screen size image, please select other resolution or other vertical refresh timing. · Wait for servicing, please check the troubleshooting list below to see if you can self-diagnose the problem. (VGA Mode) Problems Current Status Remedy LED ON · Using OSD, adjust brightness and contrast to...
...-standard signals. No Picture · Check if AC power cord is properly connected to their default settings. Unstable Picture · Check if the specification of graphics adapter and monitor is in case of missing full-screen size image, please select other resolution or other vertical refresh timing. · Wait for servicing, please check the troubleshooting list below to see if you can self-diagnose the problem. (VGA Mode) Problems Current Status Remedy LED ON · Using OSD, adjust brightness and contrast to...
User Manual
Page 21
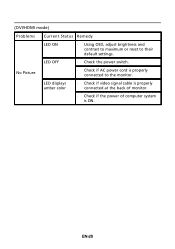
(DVI/HDMI mode) Problems Current Status Remedy LED ON · Using OSD, adjust brightness and contrast to maximum or reset to the monitor. LED displays amber color · Check if video signal cable is properly connected at the back of monitor. · Check if the power of computer system is properly connected to their default settings. No Picture · Check if AC power cord is ON. EN-20 LED OFF · Check the power switch.
(DVI/HDMI mode) Problems Current Status Remedy LED ON · Using OSD, adjust brightness and contrast to maximum or reset to the monitor. LED displays amber color · Check if video signal cable is properly connected at the back of monitor. · Check if the power of computer system is properly connected to their default settings. No Picture · Check if AC power cord is ON. EN-20 LED OFF · Check the power switch.
User Manual
Page 22
... -. RU Jan / Sr. Manager Regulation, Acer Inc. EN61000-3-2, Class D -. EN55024 -. Jan. 1, 2012 Date EN60950-1 RoHS Directive 2002/95/EC on the Restriction of the Use of ecodesign requirements for the setting of certain Hazardous Substances in force to begin affixing...(MI) Italy Tel: +39-02-939-921 ,Fax: +39-02 9399-2913 www.acer.it Hereby declare that: Product: LCD Monitor Trade Name: Acer Model Number: V185HL/V195HQL,V205HL,V235HL SKU Number: V185HL xxxxxx /V195HQL xxxxxx, V205HL xxxxxx, V235HL xxxxxx; ("x" = 0~9, a ~ z, A ~ Z, or blank) Is compliant with ...
... -. RU Jan / Sr. Manager Regulation, Acer Inc. EN61000-3-2, Class D -. EN55024 -. Jan. 1, 2012 Date EN60950-1 RoHS Directive 2002/95/EC on the Restriction of the Use of ecodesign requirements for the setting of certain Hazardous Substances in force to begin affixing...(MI) Italy Tel: +39-02-939-921 ,Fax: +39-02 9399-2913 www.acer.it Hereby declare that: Product: LCD Monitor Trade Name: Acer Model Number: V185HL/V195HQL,V205HL,V235HL SKU Number: V185HL xxxxxx /V195HQL xxxxxx, V205HL xxxxxx, V235HL xxxxxx; ("x" = 0~9, a ~ z, A ~ Z, or blank) Is compliant with ...
User Manual
Page 24
... guidelines set by reducing energy costs and helps protect the environment without sacrificing features or performance. Products that help customers save through energy efficiency, the more than 80% energy at "sleep" mode. What is proud to offer products and services worldwide that are registered U.S. The more energy we reduce greenhouse gases and the risks of climate change. Acer is...
... guidelines set by reducing energy costs and helps protect the environment without sacrificing features or performance. Products that help customers save through energy efficiency, the more than 80% energy at "sleep" mode. What is proud to offer products and services worldwide that are registered U.S. The more energy we reduce greenhouse gases and the risks of climate change. Acer is...

