
TravelMate C300 Service Guide
Page 7
...50 Removing the HDD Module/Optical Module/Wireless LAN Card/ Keyboard and LCD Module 51 Disassembling the Main Unit 54 Disassembling the LCD Module 57 Disassembling the External Modules 60 Assemble the Hinge Caps 62 Chapter 4 Troubleshooting 63 System Check Procedures 64 Power-On Self... Locations 81 Top View 81 Bottom View 82 Chapter 6 FRU (Field Replaceable Unit) List 83 Appendix A Model Definition and Configuration 94 TravelMate C300 Series 94 Appendix B Test Compatible Components 95 Microsoft® Windows® XP Pro Environment Test 96 Microsoft® Windows® XP...
...50 Removing the HDD Module/Optical Module/Wireless LAN Card/ Keyboard and LCD Module 51 Disassembling the Main Unit 54 Disassembling the LCD Module 57 Disassembling the External Modules 60 Assemble the Hinge Caps 62 Chapter 4 Troubleshooting 63 System Check Procedures 64 Power-On Self... Locations 81 Top View 81 Bottom View 82 Chapter 6 FRU (Field Replaceable Unit) List 83 Appendix A Model Definition and Configuration 94 TravelMate C300 Series 94 Appendix B Test Compatible Components 95 Microsoft® Windows® XP Pro Environment Test 96 Microsoft® Windows® XP...
TravelMate C300 Service Guide
Page 18
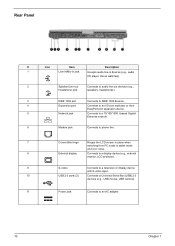
... port Connects to an I/O port replicator or Acer EasyPort port expansion device. 5 Network jack Connects to a 10/100/1000 t-based Gigabit Ethernet network. 6 Modem jack Connects to phone line. 7 Convertible hinge Hinges the LCD screen in place when switching from PC mode ...to tablet mode and vice versa. 8 External display Connects to a display device (e.g., external monitor, LCD projector). 9 S-video Connects to a television or display device ...
... port Connects to an I/O port replicator or Acer EasyPort port expansion device. 5 Network jack Connects to a 10/100/1000 t-based Gigabit Ethernet network. 6 Modem jack Connects to phone line. 7 Convertible hinge Hinges the LCD screen in place when switching from PC mode ...to tablet mode and vice versa. 8 External display Connects to a display device (e.g., external monitor, LCD projector). 9 S-video Connects to a television or display device ...

TravelMate C300 Service Guide
Page 57
...M3L4*1 HDD Cover ODD Module M2.5L6*1 Keyboard *1 DIMM Cover *2 Mini PCI Cover HDD Module HDD Holder M2L3*4 ODD Bracket Hinge Covers HDD Drive Optical Drive Optical Device Board ODD Connector M2L4*2 Touchpad Upper Assembly Toucpad Cover Touchpad Scroll Key Touchpad Button M2L8*3...M2L4.5*2 M2.5L6*2 M2L6*12 Lower case left cover Lower Assembly M2L4*2 Lower case right cover LCD/w cable, brakets M2L3*8 for CMO LCD Brackets LCD M2L4*1 Main Board Assembly LCD Panel LCD Coaxial Cable Touchpad Cable M2L4*2 Speaker Module M2L4*1 Extension Board *4 Heatsink Module CPU Main Board ...
...M3L4*1 HDD Cover ODD Module M2.5L6*1 Keyboard *1 DIMM Cover *2 Mini PCI Cover HDD Module HDD Holder M2L3*4 ODD Bracket Hinge Covers HDD Drive Optical Drive Optical Device Board ODD Connector M2L4*2 Touchpad Upper Assembly Toucpad Cover Touchpad Scroll Key Touchpad Button M2L8*3...M2L4.5*2 M2.5L6*2 M2L6*12 Lower case left cover Lower Assembly M2L4*2 Lower case right cover LCD/w cable, brakets M2L3*8 for CMO LCD Brackets LCD M2L4*1 Main Board Assembly LCD Panel LCD Coaxial Cable Touchpad Cable M2L4*2 Speaker Module M2L4*1 Extension Board *4 Heatsink Module CPU Main Board ...
TravelMate C300 Service Guide
Page 60
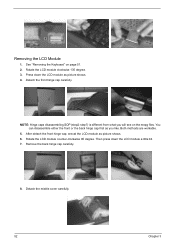
... you will see on page 51. 2. Remove the back hinge cap carefully. 8. Both methods are workable. 5. Then press down the LCD module as picture shows. 4. See "Removing the Keyboard" on the mepg files. Detach the front hinge cap carefully. Removing the LCD Module 1. Press down the LCD module a little bit. 7. Detach the middle cover carefully...
... you will see on page 51. 2. Remove the back hinge cap carefully. 8. Both methods are workable. 5. Then press down the LCD module as picture shows. 4. See "Removing the Keyboard" on the mepg files. Detach the front hinge cap carefully. Removing the LCD Module 1. Press down the LCD module a little bit. 7. Detach the middle cover carefully...

TravelMate C300 Service Guide
Page 70
Rotate the LCD module clockwise 135 degree. Rotate the LCD module counter-clockwise 90 degree. Press down the back hinge cap until you hear a click. 62 Chapter 3 Press the front hinge cap until you hear a click. 4. Then press down the LCD module as picture shows. 2. Place the back hinge cap back the unit as picture shows. 5. Place the front hinge cap back to its original position. 3. After attach the front hinge cap, erecat the LCD module as picture shows. 7. Assemble the Hinge Caps 1. Press down the LCD module a little bit. 6.
Rotate the LCD module clockwise 135 degree. Rotate the LCD module counter-clockwise 90 degree. Press down the back hinge cap until you hear a click. 62 Chapter 3 Press the front hinge cap until you hear a click. 4. Then press down the LCD module as picture shows. 2. Place the back hinge cap back the unit as picture shows. 5. Place the front hinge cap back to its original position. 3. After attach the front hinge cap, erecat the LCD module as picture shows. 7. Assemble the Hinge Caps 1. Press down the LCD module a little bit. 6.

TravelMate C300 Service Guide
Page 97
... BOARD NS LED BOARD NS LCD COAXIAL CABLE 14.1" LCD COAXIAL CABLE 14.1" Part Number 55.T28V1.003 55.T28V1.004 50.T28V1.006 50.T28V1.008 NS INVERTER CABLE 50.T28V1.007 NS DIGITIZER TOUCHPAD PANEL FOR 14.1 IN. 56.T33V1.001 WACOM SU-015 NS LCD BEZEL W/ICON LABEL & NAME ...PLATE & 60.T28V1.007 WIRELESS LAN ANTENNA NS LCD PANEL W/ANTENNA & HINGE & LOGO 60.T28V1.008 Main Board NS HINGE ASSEMBLY 33.T28V1.005 18 MAINBOARD W/O CPU W/PCMCIA SLOT & RTC BATTERY & SMART CARD ...
... BOARD NS LED BOARD NS LCD COAXIAL CABLE 14.1" LCD COAXIAL CABLE 14.1" Part Number 55.T28V1.003 55.T28V1.004 50.T28V1.006 50.T28V1.008 NS INVERTER CABLE 50.T28V1.007 NS DIGITIZER TOUCHPAD PANEL FOR 14.1 IN. 56.T33V1.001 WACOM SU-015 NS LCD BEZEL W/ICON LABEL & NAME ...PLATE & 60.T28V1.007 WIRELESS LAN ANTENNA NS LCD PANEL W/ANTENNA & HINGE & LOGO 60.T28V1.008 Main Board NS HINGE ASSEMBLY 33.T28V1.005 18 MAINBOARD W/O CPU W/PCMCIA SLOT & RTC BATTERY & SMART CARD ...
TravelMate C300 User Guide
Page 15
Connect to a television or display device with S-video input. English 7 # Item Description 7 Convertible hinge Hinges the LCD screen in place when switching from PC mode to tablet mode and vice versa. 8 External display port Connects to a display device (e.g., external monitor, LCD projector) . 9 S-video 10 USB 2.0 ports (2) 11 Power jack Connect to Universal Serial Bus (USB) 2.0 devices (e.g., USB mouse, USB camera). Connects to an AC adapter.
Connect to a television or display device with S-video input. English 7 # Item Description 7 Convertible hinge Hinges the LCD screen in place when switching from PC mode to tablet mode and vice versa. 8 External display port Connects to a display device (e.g., external monitor, LCD projector) . 9 S-video 10 USB 2.0 ports (2) 11 Power jack Connect to Universal Serial Bus (USB) 2.0 devices (e.g., USB mouse, USB camera). Connects to an AC adapter.


