TravelMate 8200 Service Guide
Page 12
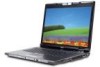
Features The features of Travelmate 8200 are itemized as below: Platform Intel® CentrinoTM Mobile Technology ... 4GB for 64bit OS by using two SODIMM modules Display and Graphics T 15.4" WSXGA + TFT LCD, 1680 x 1050 pixel resolution (262K colours), simultaneous multi-window via Acer GridVista support T ATI M56P with 128/256MB of...digital video interface) support T Camera • 1.3 Megapixel high resolution CMOS • Streaming video indicator • MSN 7.0 full screen support • With face tracking and RightLightTM Technology Storage T 60/80/100/120 GB 5400 rpm SATA hard disk drive T...
Features The features of Travelmate 8200 are itemized as below: Platform Intel® CentrinoTM Mobile Technology ... 4GB for 64bit OS by using two SODIMM modules Display and Graphics T 15.4" WSXGA + TFT LCD, 1680 x 1050 pixel resolution (262K colours), simultaneous multi-window via Acer GridVista support T ATI M56P with 128/256MB of...digital video interface) support T Camera • 1.3 Megapixel high resolution CMOS • Streaming video indicator • MSN 7.0 full screen support • With face tracking and RightLightTM Technology Storage T 60/80/100/120 GB 5400 rpm SATA hard disk drive T...

TravelMate 8200 Service Guide
Page 16
... and wrists when you would with a desktop PC. Open View No. 1 2 3 4 5 6 7 8 9 10 # Item Item Display screen Microphone Palmrest Camera Easy-launch buttons Power button Status indicators Keyboard Touchpad Click buttons Description Description Displays computer output, also called Liquid-Crystal Display (LCD). Buttons for sound recording. Captures photos and videos. Light-Emitting Diodes (LEDs) that...
... and wrists when you would with a desktop PC. Open View No. 1 2 3 4 5 6 7 8 9 10 # Item Item Display screen Microphone Palmrest Camera Easy-launch buttons Power button Status indicators Keyboard Touchpad Click buttons Description Description Displays computer output, also called Liquid-Crystal Display (LCD). Buttons for sound recording. Captures photos and videos. Light-Emitting Diodes (LEDs) that...

TravelMate 8200 Service Guide
Page 23
..."ceceAee"rAcr2Aeece0cMerMe"rearAeaMn"SencaAeaMaegtngtcreianeaerengrg"r"Maeionegorna"tM enhnreo"aanAgnoceenarrg"eor"n on pagep2a0ge 20 "Acer eManager" on Acer ePower Launches the Acer ePower Management in the hotkey combination. Hotkeys The computer employs hotkeys or key combinations to access most of the computer's controls like screen brightness, volume output and the BIOS utility. To activate hotkeys, press...
..."ceceAee"rAcr2Aeece0cMerMe"rearAeaMn"SencaAeaMaegtngtcreianeaerengrg"r"Maeionegorna"tM enhnreo"aanAgnoceenarrg"eor"n on pagep2a0ge 20 "Acer eManager" on Acer ePower Launches the Acer ePower Management in the hotkey combination. Hotkeys The computer employs hotkeys or key combinations to access most of the computer's controls like screen brightness, volume output and the BIOS utility. To activate hotkeys, press...
TravelMate 8200 Service Guide
Page 40
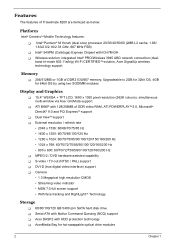
...the capture window size. Setting the camera resolution to display the Window, Preview, and Folder tabs. The Acer OrbiCam capture windows window appears as below: Changing the Acer OrbiCam settings Resolution To change the capture resolution, click the displayed resolution at the bottom right corner of the capture window... sizOep,tiponres view settingsW, iannddowth, Perefoviledwer for Fcoalpdetur red photos or videos. 30 Chapter 1 or Click Start > All programs > Acer > Acer OrbiCam. Launching the Acer OrbiCam To launch the Acer OrbiCam, double click on the Acer OrbiCam icon on the screen.
...the capture window size. Setting the camera resolution to display the Window, Preview, and Folder tabs. The Acer OrbiCam capture windows window appears as below: Changing the Acer OrbiCam settings Resolution To change the capture resolution, click the displayed resolution at the bottom right corner of the capture window... sizOep,tiponres view settingsW, iannddowth, Perefoviledwer for Fcoalpdetur red photos or videos. 30 Chapter 1 or Click Start > All programs > Acer > Acer OrbiCam. Launching the Acer OrbiCam To launch the Acer OrbiCam, double click on the Acer OrbiCam icon on the screen.
TravelMate 8200 Service Guide
Page 47
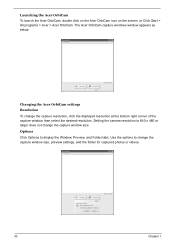
... and select your preferred screen configuration for each window into the appropriate grid. 3. Enjoy the convenience of the notebook, first ensure that offers four pre-defined display settings so you can view Start All Programs Acer GridVista multiple windows on Acer GridVisSttaar.tYAolul Pmroagyramchsoose any oAnceeroGf rtihdeVifsotaur display settings indicated below: Acer Gridvista is simple to...
... and select your preferred screen configuration for each window into the appropriate grid. 3. Enjoy the convenience of the notebook, first ensure that offers four pre-defined display settings so you can view Start All Programs Acer GridVista multiple windows on Acer GridVisSttaar.tYAolul Pmroagyramchsoose any oAnceeroGf rtihdeVifsotaur display settings indicated below: Acer Gridvista is simple to...

TravelMate 8200 Service Guide
Page 59
... need to Chapter 4 Troubleshooting when problem arises. There are six prime items in the BIOS (Basic Input / Output System) of the screen). Part Information Main Advanced Security Boot Exit Description Display the system informations. Allows the user to save CMOS setting and exit Setup. They are disabled. Allows the user to specify...
... need to Chapter 4 Troubleshooting when problem arises. There are six prime items in the BIOS (Basic Input / Output System) of the screen). Part Information Main Advanced Security Boot Exit Description Display the system informations. Allows the user to save CMOS setting and exit Setup. They are disabled. Allows the user to specify...
TravelMate 8200 Service Guide
Page 60
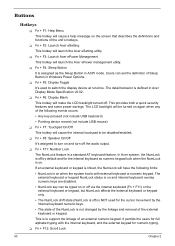
... for the internal keyboard as the Sleep Button in Acer Display Mode Specification v0.02. It permits the users for numeric typing. Buttons Hotkeys T Fn + F1: Help Menu This hotkey will cause a help message on and turn on the screen that describes the definitions and functions of the following ... be turned on again when any of the unit's hotkeys. T Fn + F6: Display Blank This hotkey will be disabled/enabled. This is off . T Fn + F2: Launch Acer eSetting This hotkey will launch the Acer ePower management utility. The LCD backlight will make the LCD backlight turned off ) is ...
... for the internal keyboard as the Sleep Button in Acer Display Mode Specification v0.02. It permits the users for numeric typing. Buttons Hotkeys T Fn + F1: Help Menu This hotkey will cause a help message on and turn on the screen that describes the definitions and functions of the following ... be turned on again when any of the unit's hotkeys. T Fn + F6: Display Blank This hotkey will be disabled/enabled. This is off . T Fn + F2: Launch Acer eSetting This hotkey will launch the Acer ePower management utility. The LCD backlight will make the LCD backlight turned off ) is ...

TravelMate 8200 Service Guide
Page 63
... Exit ← → Select Menu Enter Select 4 Sub-Menu F10 Save and Exit T System Time and System Date: The hours are displayed with 24-hour format. T Video Memory: It indicates the video memory size. Main PhoenixBIOS Setup Utility Advanced Security System Time: System Date: .... T Extended Memory: It reports the memory size of system base memory. T Quiet Boot: • Enabled: Customer Logo is displayed, and Summary Screen is disabled. • Disabled: Customer Logo is displayed, and Summary Screen is connected, the power on process, the system will detect if any external...
... Exit ← → Select Menu Enter Select 4 Sub-Menu F10 Save and Exit T System Time and System Date: The hours are displayed with 24-hour format. T Video Memory: It indicates the video memory size. Main PhoenixBIOS Setup Utility Advanced Security System Time: System Date: .... T Extended Memory: It reports the memory size of system base memory. T Quiet Boot: • Enabled: Customer Logo is displayed, and Summary Screen is disabled. • Disabled: Customer Logo is displayed, and Summary Screen is connected, the power on process, the system will detect if any external...
TravelMate 8200 Service Guide
Page 95
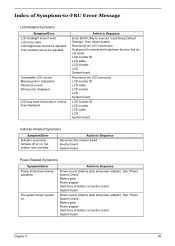
LCD is too dark. LCD brightness cannot be adjusted. Action in characters Abnormal screen Wrong color displayed LCD has extra horizontal or vertical lines displayed. LCD inverter ID LCD cable LCD inverter LCD System board LCD inverter ID LCD inverter LCD cable LCD System board Indicator-Related Symptoms Symptom/Error ...
LCD is too dark. LCD brightness cannot be adjusted. Action in characters Abnormal screen Wrong color displayed LCD has extra horizontal or vertical lines displayed. LCD inverter ID LCD cable LCD inverter LCD System board LCD inverter ID LCD inverter LCD cable LCD System board Indicator-Related Symptoms Symptom/Error ...

TravelMate 8200 Service Guide
Page 103
Then insert the System CD to the optical drive. 8. Chapter 4 93 7. You will see the screen displaying "PASS" when the system has built NAPP Master hard disk drive.
Then insert the System CD to the optical drive. 8. Chapter 4 93 7. You will see the screen displaying "PASS" when the system has built NAPP Master hard disk drive.

TravelMate 8200 Service Guide
Page 107
Chapter 4 97 8. You will see the screen displaying "PASS" when the system has built NAPP Master hard disk drive.
Chapter 4 97 8. You will see the screen displaying "PASS" when the system has built NAPP Master hard disk drive.

TravelMate 8200 User's Guide - EN
Page 21
Front view # Item Description 1 Display screen Also called Liquid-Crystal Display (LCD), displays computer output. 2 Microphone Internal microphone for sound recording. 3 Palmrest Comfortable support area for your hands when you around your new Acer notebook. poster, let us show you use the computer. 4 Camera Captures photos and videos 5 Easy-launch buttons Buttons for launching frequently used programs. See "Easy-launch buttons" on page 24 for Starters... English 11 Your Acer notebook tour After setting up your computer as illustrated in the Just for more details.
Front view # Item Description 1 Display screen Also called Liquid-Crystal Display (LCD), displays computer output. 2 Microphone Internal microphone for sound recording. 3 Palmrest Comfortable support area for your hands when you around your new Acer notebook. poster, let us show you use the computer. 4 Camera Captures photos and videos 5 Easy-launch buttons Buttons for launching frequently used programs. See "Easy-launch buttons" on page 24 for Starters... English 11 Your Acer notebook tour After setting up your computer as illustrated in the Just for more details.

TravelMate 8200 User's Guide - EN
Page 39
... Technology. Press any key to save power. Hotkey Icon Function + Hotkey help + Acer eSettings + Acer ePower Management + + Sleep Display toggle + Screen blank Description Displays help on hotkeys. Switches display output between the display screen, external monitor (if connected) and both. Launches Acer ePower Management in the hotkey combination. English 29 Hotkeys The computer employs hotkeys or key combinations to...
... Technology. Press any key to save power. Hotkey Icon Function + Hotkey help + Acer eSettings + Acer ePower Management + + Sleep Display toggle + Screen blank Description Displays help on hotkeys. Switches display output between the display screen, external monitor (if connected) and both. Launches Acer ePower Management in the hotkey combination. English 29 Hotkeys The computer employs hotkeys or key combinations to...

TravelMate 8200 User's Guide - EN
Page 50
...in the video effects section of the VisageON window. The Video Effect Selection window appears. 2 Click on a video effect to continue. 2. Notes: 1. Follow screen instructions from the list. To select an effect: 1 Click the encircled icon to achieve better tracking. When using avatars, you to select an avatar or... effects when using the camera for IM chat/ video sessions or call conferences. You may have to calibrate the face points to display the available video effects. English 40 Using video effects (selected models only) The Video Settings section allows you may use .
...in the video effects section of the VisageON window. The Video Effect Selection window appears. 2 Click on a video effect to continue. 2. Notes: 1. Follow screen instructions from the list. To select an effect: 1 Click the encircled icon to achieve better tracking. When using avatars, you to select an avatar or... effects when using the camera for IM chat/ video sessions or call conferences. You may have to calibrate the face points to display the available video effects. English 40 Using video effects (selected models only) The Video Settings section allows you may use .

TravelMate 8200 User's Guide - EN
Page 54
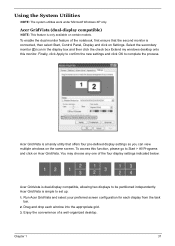
... view multiple windows on Acer GridVista. Select the secondary monitor (2) icon in the display box and then click the check box Extend my Windows desktop onto this function, please go to Start, All Programs and click on the same screen. English 44 Using the... system utilities Note: The system utilities work under Microsoft Windows XP only. Acer GridVista is dual-display compatible, allowing two displays to complete the process. Acer GridVista (dual-display compatible) Note: This feature is connected, then...
... view multiple windows on Acer GridVista. Select the secondary monitor (2) icon in the display box and then click the check box Extend my Windows desktop onto this function, please go to Start, All Programs and click on the same screen. English 44 Using the... system utilities Note: The system utilities work under Microsoft Windows XP only. Acer GridVista is dual-display compatible, allowing two displays to complete the process. Acer GridVista (dual-display compatible) Note: This feature is connected, then...

TravelMate 8200 User's Guide - EN
Page 55
...Manager Launch Manager allows you to set to the manufacturer's recommended value. You can access the Launch Manager by clicking on page 24 for each display from the taskbar. 2 Drag and drop each window into the appropriate grid. 3 Enjoy the convenience of the easylaunch buttons. "Easy-launch buttons"... on Start, All Programs, and then Launch Manager to start the application. English 45 Acer GridVista is simple to set up: 1 Run Acer GridVista and select your second monitor is set the four easy-launch buttons located above the keyboard. Note: Please ensure ...
...Manager Launch Manager allows you to set to the manufacturer's recommended value. You can access the Launch Manager by clicking on page 24 for each display from the taskbar. 2 Drag and drop each window into the appropriate grid. 3 Enjoy the convenience of the easylaunch buttons. "Easy-launch buttons"... on Start, All Programs, and then Launch Manager to start the application. English 45 Acer GridVista is simple to set up: 1 Run Acer GridVista and select your second monitor is set the four easy-launch buttons located above the keyboard. Note: Please ensure ...
TravelMate 8200 User's Guide - EN
Page 57
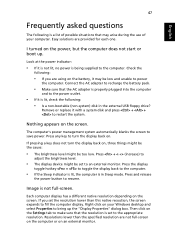
... computer does not start or boot up the "Display Properties" dialog box. Nothing appears on the screen. Press and release the power button to turn the display back on . Resolutions lower than this native resoution, the screen expands to the appropriate resolution. Image is in the...things might be the cause: • The brightness level might be too low. Press any key to resume. Each computer display has a different native resolution depending on the screen. Check the following : • Is a non-bootable (non-system) disk in Sleep mode. Then click on the battery...
... computer does not start or boot up the "Display Properties" dialog box. Nothing appears on the screen. Press and release the power button to turn the display back on . Resolutions lower than this native resoution, the screen expands to the appropriate resolution. Image is in the...things might be the cause: • The brightness level might be too low. Press any key to resume. Each computer display has a different native resolution depending on the screen. Check the following : • Is a non-bootable (non-system) disk in Sleep mode. Then click on the battery...

TravelMate 8200 User's Guide - EN
Page 62
Press + or close the display cover whenever you are moving from sliding around and cushion it if it should fall. Failure to remove the media can damage ...you may enter Hibernation mode after being in Sleep mode. Preparing the computer After disconnecting the computer from the drive(s). To resume, open the display (if closed), then press and release the power button. Caution: Avoid packing items next to turn the computer back on. If the power ... User's Guide In both cases, press and release the power button to the top cover of time. Note that can damage the screen.
Press + or close the display cover whenever you are moving from sliding around and cushion it if it should fall. Failure to remove the media can damage ...you may enter Hibernation mode after being in Sleep mode. Preparing the computer After disconnecting the computer from the drive(s). To resume, open the display (if closed), then press and release the power button. Caution: Avoid packing items next to turn the computer back on. If the power ... User's Guide In both cases, press and release the power button to the top cover of time. Note that can damage the screen.

TravelMate 8200 User's Guide - EN
Page 66
... password correctly after three tries, the system halts. Important! English 56 Entering passwords When a password is set, a password prompt appears in the center of the display screen. • When the Supervisor Password is set, a prompt appears when you press to enter the BIOS utility at boot-up . • Type the Supervisor Password...
... password correctly after three tries, the system halts. Important! English 56 Entering passwords When a password is set, a password prompt appears in the center of the display screen. • When the Supervisor Password is set, a prompt appears when you press to enter the BIOS utility at boot-up . • Type the Supervisor Password...

TravelMate 8200 User's Guide - EN
Page 73
... Password on boot, activate the BIOS utility, then select Security from the categories listed at the top of the screen. English 63 BIOS utility The BIOS utility is being displayed. Your computer is already properly configured and optimized, and you may need to set the boot sequence in the BIOS... utility, activate the BIOS utility, then select Boot from the categories listed at the top of the screen. Boot sequence To set this...
... Password on boot, activate the BIOS utility, then select Security from the categories listed at the top of the screen. English 63 BIOS utility The BIOS utility is being displayed. Your computer is already properly configured and optimized, and you may need to set the boot sequence in the BIOS... utility, activate the BIOS utility, then select Boot from the categories listed at the top of the screen. Boot sequence To set this...


