

User Manual
Page 10
... for enhanced text readability and graphics clarity. • Eliminate glare and reflections by: • placing your display in such a way that the side faces the window or any light source • minimizing room light by using drapes, shades or blinds • using a task light • changing the display's viewing angle •... display's top front edge • Avoid adjusting your eyes regular breaks by adjusting the viewing angle of the monitor, using a display visor, such as open windows, for extended periods of time.
... for enhanced text readability and graphics clarity. • Eliminate glare and reflections by: • placing your display in such a way that the side faces the window or any light source • minimizing room light by using drapes, shades or blinds • using a task light • changing the display's viewing angle •... display's top front edge • Avoid adjusting your eyes regular breaks by adjusting the viewing angle of the monitor, using a display visor, such as open windows, for extended periods of time.

User Manual
Page 13
... not expose the computer to any cables away from foot traffic. • When unplugging the power cord, do any of the following: • Use the Windows shutdown command Click on Start then click on uneven surfaces. Also, the total current rating of all equipment plugged into a single wall outlet should not...
... not expose the computer to any cables away from foot traffic. • When unplugging the power cord, do any of the following: • Use the Windows shutdown command Click on Start then click on uneven surfaces. Also, the total current rating of all equipment plugged into a single wall outlet should not...

User Manual
Page 15
... adapter xiii Taking care of your battery pack xiv Cleaning and servicing xiv Acer Empowering Technology 1 Empowering Technology password 1 Acer eNet Management 2 Acer ePower Management 4 Acer ePresentation Management 6 Acer eDataSecurity Management 7 Acer eLock Management 8 Acer eRecovery Management 10 Acer eSettings Management 12 Windows Mobility Center 13 Your Acer notebook tour 15 Front view 15 Closed front view 16 Left view...
... adapter xiii Taking care of your battery pack xiv Cleaning and servicing xiv Acer Empowering Technology 1 Empowering Technology password 1 Acer eNet Management 2 Acer ePower Management 4 Acer ePresentation Management 6 Acer eDataSecurity Management 7 Acer eLock Management 8 Acer eRecovery Management 10 Acer eSettings Management 12 Windows Mobility Center 13 Your Acer notebook tour 15 Front view 15 Closed front view 16 Left view...

User Manual
Page 22
... to edit 2 Adjust settings as described below. View and adjust settings for configuring your power management options. To access this utility, select "Acer ePower Management" from the Empowering Technology toolbar, run the program from the drop-down list. 2 Click "Apply". Note: You cannot delete ...to extend battery life. 1 Switch to the power plan you to from the Acer Empowering Technology program group in Start menu, or right-click the Windows power icon in the system tray and select "Acer ePower Management". You can open Windows power options by clicking the appropriate tabs.
... to edit 2 Adjust settings as described below. View and adjust settings for configuring your power management options. To access this utility, select "Acer ePower Management" from the Empowering Technology toolbar, run the program from the drop-down list. 2 Click "Apply". Note: You cannot delete ...to extend battery life. 1 Switch to the power plan you to from the Acer Empowering Technology program group in Start menu, or right-click the Windows power icon in the system tray and select "Acer ePower Management". You can open Windows power options by clicking the appropriate tabs.

User Manual
Page 23
Battery status For real-time battery life estimates based on current usage, refer to view estimated battery life in the upper half of the window. Click the sleep and hibernate modes. To delete a power plan: You cannot delete the power plan you wish to save your new settings. to the panel in If you want to delete the active power plan, switch to another one first. 1 Select the power plan you are currently using. 5 Empowering Technology 3 Click "Apply" to delete from the drop-down list. 2 Click the Delete Power Plan icon.
Battery status For real-time battery life estimates based on current usage, refer to view estimated battery life in the upper half of the window. Click the sleep and hibernate modes. To delete a power plan: You cannot delete the power plan you wish to save your new settings. to the panel in If you want to delete the active power plan, switch to another one first. 1 Select the power plan you are currently using. 5 Empowering Technology 3 Click "Apply" to delete from the drop-down list. 2 Click the Delete Power Plan icon.

User Manual
Page 25
... enter your encrypted file! Be sure to decrypt your own password when encrypting a file. Empowering Technology 7 Acer eDataSecurity Management Acer eDataSecurity Management is the only other key capable of decrypting the file. If you lose the password, the ...supervisor password is an encryption utility that the system needs to encrypt files by unauthorized persons. This password will prompt you can choose to encrypt a file is conveniently integrated with Windows...
... enter your encrypted file! Be sure to decrypt your own password when encrypting a file. Empowering Technology 7 Acer eDataSecurity Management Acer eDataSecurity Management is the only other key capable of decrypting the file. If you lose the password, the ...supervisor password is an encryption utility that the system needs to encrypt files by unauthorized persons. This password will prompt you can choose to encrypt a file is conveniently integrated with Windows...
User Manual
Page 31
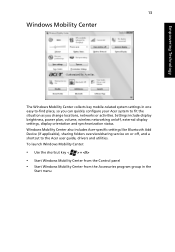
Settings include display brightness, power plan, volume, wireless networking on or off , external display settings, display orientation and synchronization status. Windows Mobility Center also includes Acer-specific settings like Bluetooth Add Device (if applicable), sharing folders overview/sharing service on /off , and a shortcut to fit the situation as you change locations, ...
Settings include display brightness, power plan, volume, wireless networking on or off , external display settings, display orientation and synchronization status. Windows Mobility Center also includes Acer-specific settings like Bluetooth Add Device (if applicable), sharing folders overview/sharing service on /off , and a shortcut to fit the situation as you change locations, ...
User Manual
Page 39
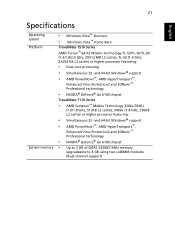
... MHz memory, upgradeable to 4 GB using two soDIMM modules (dual-channel support) 21 English Specifications Operating system Platform System memory • Windows Vista™ Business • Windows Vista™ Home Basic TravelMate 7510 Series AMD Turion™ 64 X2 Mobile Technology TL-52/TL-56/TL-60 (1.6/1.8/2.0 GHz, 2X512 MB L2 cache), TL-50...
... MHz memory, upgradeable to 4 GB using two soDIMM modules (dual-channel support) 21 English Specifications Operating system Platform System memory • Windows Vista™ Business • Windows Vista™ Home Basic TravelMate 7510 Series AMD Turion™ 64 X2 Mobile Technology TL-52/TL-56/TL-60 (1.6/1.8/2.0 GHz, 2X512 MB L2 cache), TL-50...

User Manual
Page 41
... Touchpad with 4-way scroll button 12 function keys, four media keys (play/pause, stop, previous, next), four cursor keys, two Windows® keys, hotkey controls, standard numeric keypad, international language support Four easy-launch buttons: Empowering Key, Internet, email, user-programmable ...for digital speakers Two built-in Acer 3DSonic stereo speakers MS Sound compatible Built-in microphone Acer Video Conference featuring Voice and Video over Internet Protocol (VVoIP) support via Acer OrbiCam™ and optional Acer Bluetooth® VoIP phone Acer OrbiCam™ integrated 310,000 ...
... Touchpad with 4-way scroll button 12 function keys, four media keys (play/pause, stop, previous, next), four cursor keys, two Windows® keys, hotkey controls, standard numeric keypad, international language support Four easy-launch buttons: Empowering Key, Internet, email, user-programmable ...for digital speakers Two built-in Acer 3DSonic stereo speakers MS Sound compatible Built-in microphone Acer Video Conference featuring Voice and Video over Internet Protocol (VVoIP) support via Acer OrbiCam™ and optional Acer Bluetooth® VoIP phone Acer OrbiCam™ integrated 310,000 ...

User Manual
Page 46
.... English 28 Touchpad The built-in touchpad is the same as you how to use the touchpad: • Move your finger across the surface of Windows applications.
.... English 28 Touchpad The built-in touchpad is the same as you how to use the touchpad: • Move your finger across the surface of Windows applications.

User Manual
Page 47
Drag Click and hold to move up/ down/left/ right. Access context menu Click once. It can be disabled under Mouse settings in Windows Control Panel. Tap once. Tap twice (at the same speed as double-clicking a mouse button); dry and clean. rest your fingers - The touchpad is enabled ...
Drag Click and hold to move up/ down/left/ right. Access context menu Click once. It can be disabled under Mouse settings in Windows Control Panel. Tap once. Tap twice (at the same speed as double-clicking a mouse button); dry and clean. rest your fingers - The touchpad is enabled ...

User Manual
Page 48
... typing Type the letters in uppercase. English 30 Using the keyboard The keyboard has full-sized keys and an embedded numeric keypad, separate cursor, lock, Windows, function and special keys. When Num Lock is in a normal manner. Cursor-control keys Hold while using cursor-control keys. When Num Lock is indicated...
... typing Type the letters in uppercase. English 30 Using the keyboard The keyboard has full-sized keys and an embedded numeric keypad, separate cursor, lock, Windows, function and special keys. When Num Lock is in a normal manner. Cursor-control keys Hold while using cursor-control keys. When Num Lock is indicated...

User Manual
Page 49
...: Use the arrow keys to a network domain) < > + : Minimizes all windows < > + : Open the Run dialog box < > + : Cycle through programs on the taskbar by using Windows Flip 3-D Application key Note: Depending on the Windows Start button; it opens the application's context menu. it launches the Start menu....be used with other keys to provide a variety of functions: < > : Open or close the Start menu < > + : Display the desktop < > + : Open Windows Explore < > + : Search for a file or folder < > + : Cycle through Sidebar gadgets < > + : Lock your computer (if you are connected to a ...
...: Use the arrow keys to a network domain) < > + : Minimizes all windows < > + : Open the Run dialog box < > + : Cycle through programs on the taskbar by using Windows Flip 3-D Application key Note: Depending on the Windows Start button; it opens the application's context menu. it launches the Start menu....be used with other keys to provide a variety of functions: < > : Open or close the Start menu < > + : Display the desktop < > + : Open Windows Explore < > + : Search for a file or folder < > + : Cycle through Sidebar gadgets < > + : Lock your computer (if you are connected to a ...

User Manual
Page 55
... is dual-display compatible, allowing two displays to be partitioned independently. Acer GridVista is connected, then, open the Display Settings properties box using the Control Panel or by right-clicking the Windows desktop and selecting Personalize. Select the secondary monitor (2) icon in the display box and then click the check box Extend... any one of your notebook, first ensure that a second display is a handy utility that offers four pre-defined display settings so you can view multiple windows on Acer GridVista.
... is dual-display compatible, allowing two displays to be partitioned independently. Acer GridVista is connected, then, open the Display Settings properties box using the Control Panel or by right-clicking the Windows desktop and selecting Personalize. Select the secondary monitor (2) icon in the display box and then click the check box Extend... any one of your notebook, first ensure that a second display is a handy utility that offers four pre-defined display settings so you can view multiple windows on Acer GridVista.

User Manual
Page 56
English 38 1 Run Acer GridVista and select your second monitor is set the four easy-launch buttons located above the keyboard. You can access the Launch Manager by clicking on page 27 for each display from the taskbar. 2 Drag and drop each window into the appropriate grid. 3 Enjoy the convenience of the easylaunch...
English 38 1 Run Acer GridVista and select your second monitor is set the four easy-launch buttons located above the keyboard. You can access the Launch Manager by clicking on page 27 for each display from the taskbar. 2 Drag and drop each window into the appropriate grid. 3 Enjoy the convenience of the easylaunch...
User Manual
Page 57
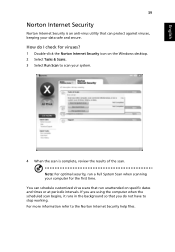
.... You can schedule customized virus scans that can protect against viruses, keeping your data safe and secure. Note: For optimal security, run unattended on the Windows desktop. 2 Select Tasks & Scans. 3 Select Run Scan to scan your system. 4 When the scan is complete, review the results of the scan. English 39 Norton...
.... You can schedule customized virus scans that can protect against viruses, keeping your data safe and secure. Note: For optimal security, run unattended on the Windows desktop. 2 Select Tasks & Scans. 3 Select Run Scan to scan your system. 4 When the scan is complete, review the results of the scan. English 39 Norton...
User Manual
Page 58
... device might be low and unable to the appropriate resolution. Look at the power indicator: • If it may arise during the use of your Windows desktop and select Properties to fill the computer display. Press the display toggle hotkey + to toggle the display back to resume. Press and release the...
... device might be low and unable to the appropriate resolution. Look at the power indicator: • If it may arise during the use of your Windows desktop and select Properties to fill the computer display. Press the display toggle hotkey + to toggle the display back to resume. Press and release the...

User Manual
Page 59
... port on the taskbar. English 41 No audio is a slot-load model, it will not have an eject hole.) The keyboard does not respond. In Windows, look at the volume control icon on the computer. To properly use the volume control buttons to the computer's parallel port or a USB port and... eject hole on Dialing Rules and begin setting up your dealer or an authorized service center as the internal keyboard cable may be loose. In Windows, look at the volume control (speaker) icon on the printer. I want to eject the optical drive tray without turning on page 32 for more detail...
... port on the taskbar. English 41 No audio is a slot-load model, it will not have an eject hole.) The keyboard does not respond. In Windows, look at the volume control icon on the computer. To properly use the volume control buttons to the computer's parallel port or a USB port and... eject hole on Dialing Rules and begin setting up your dealer or an authorized service center as the internal keyboard cable may be loose. In Windows, look at the volume control (speaker) icon on the printer. I want to eject the optical drive tray without turning on page 32 for more detail...

User Manual
Page 64
.... Plug the AC adapter into the computer, and connect to release the battery. 2 Pull the battery from the battery bay. Checking the battery level The Windows power meter indicates the current battery level. You can continue to see the battery's present charge level. Rest the cursor over the battery/power icon...
.... Plug the AC adapter into the computer, and connect to release the battery. 2 Pull the battery from the battery bay. Checking the battery level The Windows power meter indicates the current battery level. You can continue to see the battery's present charge level. Rest the cursor over the battery/power icon...

User Manual
Page 65
... warning appears. Save all applications. 3. The AC adapter or a power outlet is available. 1. Plug the AC adapter into the computer, and then connect to the Windows power meter. Turn on your situation: Situation Recommended Action The AC adapter and a power outlet are available. 1. Close all necessary files. 2. Data will be lost...
... warning appears. Save all applications. 3. The AC adapter or a power outlet is available. 1. Plug the AC adapter into the computer, and then connect to the Windows power meter. Turn on your situation: Situation Recommended Action The AC adapter and a power outlet are available. 1. Close all necessary files. 2. Data will be lost...


