
Acer TravelMate 5760 Notebook Service Guide
Page 6
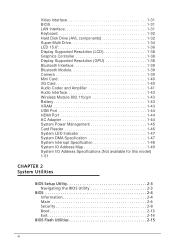
... BIOS 1-31 LAN Interface 1-31 Keyboard 1-32 Hard Disk Drive (AVL components 1-32 Super-Multi Drive 1-34 LED 15.6 1-36 Display Supported Resolution (LCD 1-38 Graphics Controller 1-38 Display Supported Resolution (GPU 1-38 Bluetooth Interface 1-39 Bluetooth Module 1-39 Camera 1-39 Mini Card 1-40 3G Card 1-40 Audio Codec and Amplifier 1-41 Audio Interface 1-43 Wireless Module 802.11b/g/n 1-43 Battery 1-43 VRAM 1-43 USB Port 1-44 HDMI Port 1-44 AC Adapter 1-44 System Power Management 1-45 Card Reader 1-46 System LED Indicator 1-47 System DMA Specification...
... BIOS 1-31 LAN Interface 1-31 Keyboard 1-32 Hard Disk Drive (AVL components 1-32 Super-Multi Drive 1-34 LED 15.6 1-36 Display Supported Resolution (LCD 1-38 Graphics Controller 1-38 Display Supported Resolution (GPU 1-38 Bluetooth Interface 1-39 Bluetooth Module 1-39 Camera 1-39 Mini Card 1-40 3G Card 1-40 Audio Codec and Amplifier 1-41 Audio Interface 1-43 Wireless Module 802.11b/g/n 1-43 Battery 1-43 VRAM 1-43 USB Port 1-44 HDMI Port 1-44 AC Adapter 1-44 System Power Management 1-45 Card Reader 1-46 System LED Indicator 1-47 System DMA Specification...
Acer TravelMate 5760 Notebook Service Guide
Page 7
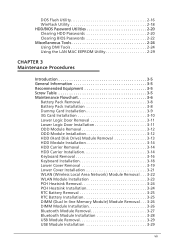
... 3-5 Maintenance Flowchart 3-6 Battery Pack Removal 3-8 Battery Pack Installation 3-8 Dummy Card Installation 3-9 3G Card Installation 3-10 Lower Logic Door Removal 3-11 Lower Logic Door Installation 3-11 ODD Module Removal 3-12 ODD Module Installation 3-12 HDD (Hard Disk Drive) Module Removal 3-13 HDD Module Installation 3-14 HDD Carrier Removal 3-14 HDD Carrier Installation 3-14 Keyboard Removal 3-16 Keyboard Installation 3-18 Lower Cover Removal 3-19 Lower Cover Installation 3-21 WLAN (Wireless Local Area Network) Module Removal . . . 3-22 WLAN Module Installation 3-23...
... 3-5 Maintenance Flowchart 3-6 Battery Pack Removal 3-8 Battery Pack Installation 3-8 Dummy Card Installation 3-9 3G Card Installation 3-10 Lower Logic Door Removal 3-11 Lower Logic Door Installation 3-11 ODD Module Removal 3-12 ODD Module Installation 3-12 HDD (Hard Disk Drive) Module Removal 3-13 HDD Module Installation 3-14 HDD Carrier Removal 3-14 HDD Carrier Installation 3-14 Keyboard Removal 3-16 Keyboard Installation 3-18 Lower Cover Removal 3-19 Lower Cover Installation 3-21 WLAN (Wireless Local Area Network) Module Removal . . . 3-22 WLAN Module Installation 3-23...
Acer TravelMate 5760 Notebook Service Guide
Page 18
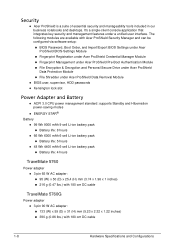
It's a single-client console application that integrates key security and management features under Acer ProShield Data Removal Module BIOS user, supervisor, HDD passwords Kensington lock slot Power Adapter and Battery 0 ACPI 3.0 CPU power management standard: supports Standby and Hibernation power-saving modes ENERGY STAR® Battery 99 Wh 9000 mAh 9-cell Li-ion battery pack Battery life: 8 hours 66 Wh...
It's a single-client console application that integrates key security and management features under Acer ProShield Data Removal Module BIOS user, supervisor, HDD passwords Kensington lock slot Power Adapter and Battery 0 ACPI 3.0 CPU power management standard: supports Standby and Hibernation power-saving modes ENERGY STAR® Battery 99 Wh 9000 mAh 9-cell Li-ion battery pack Battery life: 8 hours 66 Wh...
Acer TravelMate 5760 Notebook Service Guide
Page 23
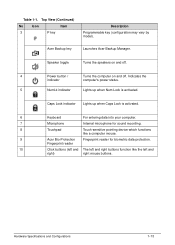
... 1-1. Acer Backup key Launches Acer Backup Manager. Indicates the indicator computer's power status. 5 NumLk indicator Lights up when Caps Lock is activated. Fingerprint reader 10 Click buttons (left and The left and right buttons function like a computer mouse. 9 Acer Bio-Protection Fingerprint reader for biometric data protection. Hardware Specifications and Configurations 1-13 Caps Lock indicator Lights up when Num Lock is activated. 6 Keyboard For entering data into your computer. 7 Microphone Internal microphone for sound recording. 8 Touchpad Touch...
... 1-1. Acer Backup key Launches Acer Backup Manager. Indicates the indicator computer's power status. 5 NumLk indicator Lights up when Caps Lock is activated. Fingerprint reader 10 Click buttons (left and The left and right buttons function like a computer mouse. 9 Acer Bio-Protection Fingerprint reader for biometric data protection. Hardware Specifications and Configurations 1-13 Caps Lock indicator Lights up when Num Lock is activated. 6 Keyboard For entering data into your computer. 7 Microphone Internal microphone for sound recording. 8 Touchpad Touch...
Acer TravelMate 5760 Notebook Service Guide
Page 24
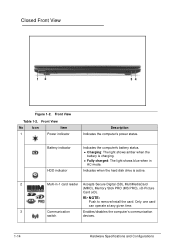
Indicates when the hard disk drive is charging. Fully charged: The light shows blue when in -1 card reader Accepts Secure Digital (SD), MultiMediaCard (MMC), Memory Stick PRO (MS PRO), xD-Picture Card (xD). Only one card can operate at any given time. 3 Communication Enables/disables the computer's communication switch devices. 1-14 Hardware Specifications and Configurations Front View No Icon Item 1 Power indicator Description Indicates the computer's power status. Closed Front View 0 12 34 Figure 1-2. Battery indicator HDD indicator Indicates the computer...
Indicates when the hard disk drive is charging. Fully charged: The light shows blue when in -1 card reader Accepts Secure Digital (SD), MultiMediaCard (MMC), Memory Stick PRO (MS PRO), xD-Picture Card (xD). Only one card can operate at any given time. 3 Communication Enables/disables the computer's communication switch devices. 1-14 Hardware Specifications and Configurations Front View No Icon Item 1 Power indicator Description Indicates the computer's power status. Closed Front View 0 12 34 Figure 1-2. Battery indicator HDD indicator Indicates the computer...
Acer TravelMate 5760 Notebook Service Guide
Page 26
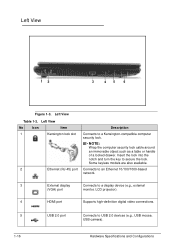
... to an Ethernet 10/100/1000-based network. 3 External display Connects to a display device (e.g., external (VGA) port monitor, LCD projector). 4 HDMI port Supports high-definition digital video connections. 5 USB 2.0 port Connects to a Kensington-compatible computer security lock. Left View No Icon Item 1 Kensington lock slot 2 Ethernet (RJ-45) port Description Connects to USB 2.0 devices (e.g., USB mouse, USB camera). 1-16 Hardware Specifications and Configurations NOTE: Wrap the computer security lock cable around an immovable object such as a table or handle...
... to an Ethernet 10/100/1000-based network. 3 External display Connects to a display device (e.g., external (VGA) port monitor, LCD projector). 4 HDMI port Supports high-definition digital video connections. 5 USB 2.0 port Connects to a Kensington-compatible computer security lock. Left View No Icon Item 1 Kensington lock slot 2 Ethernet (RJ-45) port Description Connects to USB 2.0 devices (e.g., USB mouse, USB camera). 1-16 Hardware Specifications and Configurations NOTE: Wrap the computer security lock cable around an immovable object such as a table or handle...
Acer TravelMate 5760 Notebook Service Guide
Page 31
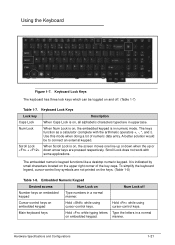
... keys function as a calculator (complete with some applications. Use this mode when doing a lot of the key caps. Scroll Lock When Scroll Lock is indicated by small characters located on the upper right corner of numeric data entry. manner. Hardware Specifications and Configurations 1-21 The embedded numeric keypad functions like a desktop numeric keypad. It is on , all alphabetic characters typed are in numeric mode. Using the Keyboard 0 Figure 1-7. Num Lock...
... keys function as a calculator (complete with some applications. Use this mode when doing a lot of the key caps. Scroll Lock When Scroll Lock is indicated by small characters located on the upper right corner of numeric data entry. manner. Hardware Specifications and Configurations 1-21 The embedded numeric keypad functions like a desktop numeric keypad. It is on , all alphabetic characters typed are in numeric mode. Using the Keyboard 0 Figure 1-7. Num Lock...
Acer TravelMate 5760 Notebook Service Guide
Page 32
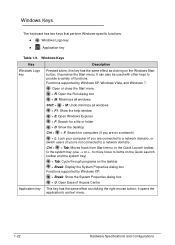
... a variety of Access Center Application key This key has the same effect as clicking the right mouse button; It can also be used with other keys to items on the Quick Launch toolbar and the system tray) + Tab: Cycle through programs on the taskbar + Break: Display the System Properties dialog box Functions supported by Windows XP, Windows Vista, and Windows 7: : Open or close the Start menu + R: Open the Run...
... a variety of Access Center Application key This key has the same effect as clicking the right mouse button; It can also be used with other keys to items on the Quick Launch toolbar and the system tray) + Tab: Cycle through programs on the taskbar + Break: Display the System Properties dialog box Functions supported by Windows XP, Windows Vista, and Windows 7: : Open or close the Start menu + R: Open the Run...
Acer TravelMate 5760 Notebook Service Guide
Page 33
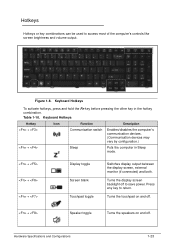
Keyboard Hotkeys Hotkey Icon Function Description + Communication switch Enables/disables the computer's communication devices. (Communication devices may vary by configuration.) + Sleep Puts the computer in the hotkey combination. Hardware Specifications and Configurations 1-23 Turns the touchpad on and off. + Speaker toggle Turns the speakers on and off to return. Figure 1-8. Table 1-10. Press any key to save power. Turns the display screen backlight off . Hotkeys 0 Hotkeys or key combinations can be used to access most of the computer's controls like...
Keyboard Hotkeys Hotkey Icon Function Description + Communication switch Enables/disables the computer's communication devices. (Communication devices may vary by configuration.) + Sleep Puts the computer in the hotkey combination. Hardware Specifications and Configurations 1-23 Turns the touchpad on and off. + Speaker toggle Turns the speakers on and off to return. Figure 1-8. Table 1-10. Press any key to save power. Turns the display screen backlight off . Hotkeys 0 Hotkeys or key combinations can be used to access most of the computer's controls like...

Acer TravelMate 5760 Notebook Service Guide
Page 56
... Compliant with Memory Stick HG Micro Format Specification Version 1.00-00 Compliant with Memory Stick PRO Standard Format Specification Version 1.05-00 Compliant with Memory Stick Standard Format Specification Version 1.43 Compliant with xD-Picture Card Specifications Version 1.2 Support the following memory card interfaces: Secure Digital TM (SD), SDXC, SDHC, MultiMediaCard TM (MMC), Mini-SD, Micro-SD (T-flash), 1-46 Hardware Specifications and Configurations
... Compliant with Memory Stick HG Micro Format Specification Version 1.00-00 Compliant with Memory Stick PRO Standard Format Specification Version 1.05-00 Compliant with Memory Stick Standard Format Specification Version 1.43 Compliant with xD-Picture Card Specifications Version 1.2 Support the following memory card interfaces: Secure Digital TM (SD), SDXC, SDHC, MultiMediaCard TM (MMC), Mini-SD, Micro-SD (T-flash), 1-46 Hardware Specifications and Configurations
Acer TravelMate 5760 Notebook Service Guide
Page 65
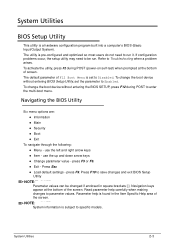
... value - System Utilities BIOS Setup Utility 0 This utility is pre-configured and optimized so most users do not need to be changed if enclosed in the Item Specific Help area of screen. The utility is a hardware configuration program built into a computer's BIOS (Basic Input/Output System). To activate the utility, press F2 during POST to Disabled. The default parameter of the screen. To change the boot device without entering BIOS Setup Utility, set to enter the multi-boot menu. press F5...
... value - System Utilities BIOS Setup Utility 0 This utility is pre-configured and optimized so most users do not need to be changed if enclosed in the Item Specific Help area of screen. The utility is a hardware configuration program built into a computer's BIOS (Basic Input/Output System). To activate the utility, press F2 during POST to Disabled. The default parameter of the screen. To change the boot device without entering BIOS Setup Utility, set to enter the multi-boot menu. press F5...
Acer TravelMate 5760 Notebook Service Guide
Page 73
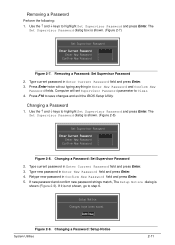
... typing anything in Enter New Password field and press Enter. 4. If new password and confirm new password strings match, The Setup Notice dialog is not shown, go to step 6. If it is shown (Figure 2-9). Removing a Password 0 Perform the following: 1. Removing a Password: Set Supervisor Password 2. Changing a Password 0 1. Use the and keys to Clear. 4. Type new password in Enter New Password and Confirm New Password fields. Retype new password in Confirm New Password field and press Enter. 5. Changing a Password: Setup Notice System Utilities...
... typing anything in Enter New Password field and press Enter. 4. If new password and confirm new password strings match, The Setup Notice dialog is not shown, go to step 6. If it is shown (Figure 2-9). Removing a Password 0 Perform the following: 1. Removing a Password: Set Supervisor Password 2. Changing a Password 0 1. Use the and keys to Clear. 4. Type new password in Enter New Password and Confirm New Password fields. Retype new password in Confirm New Password field and press Enter. 5. Changing a Password: Setup Notice System Utilities...
Acer TravelMate 5760 Notebook Service Guide
Page 85
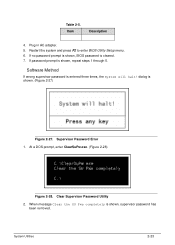
... to enter BIOS Utility Setup menu. 6. Item Description 4. When message Clear the SU Pws completely is shown. (Figure 2-27) Figure 2-27. dialog is shown, supervisor password has been removed. If no password prompt is shown, BIOS password is shown, repeat steps 1 through 5. Clear Supervisor Password Utility 2. If password prompt is cleared. 7. Software Method 0 If wrong supervisor password is entered three times, the System will halt! Table 2-5. Plug in AC adapter. 5.
... to enter BIOS Utility Setup menu. 6. Item Description 4. When message Clear the SU Pws completely is shown. (Figure 2-27) Figure 2-27. dialog is shown, supervisor password has been removed. If no password prompt is shown, BIOS password is shown, repeat steps 1 through 5. Clear Supervisor Password Utility 2. If password prompt is cleared. 7. Software Method 0 If wrong supervisor password is entered three times, the System will halt! Table 2-5. Plug in AC adapter. 5.

Acer TravelMate 5760 Notebook Service Guide
Page 155
... Ext. Switching between the internal display and Troubleshooting 4-5 Hold the power button for specific model procedures. 2. Connect an external monitor to Power On Issues. 3. DDRRAM module well No connected? Make sure that internal display is selected. Connect the power and reboot the computer. 5. Replace No Ext. Drain stored power by pressing Fn+F5. Power On? DDR RAM module CPU thermal module well screw? Make sure the computer has power by checking for one of the following: Fans start up...
... Ext. Switching between the internal display and Troubleshooting 4-5 Hold the power button for specific model procedures. 2. Connect an external monitor to Power On Issues. 3. DDRRAM module well No connected? Make sure that internal display is selected. Connect the power and reboot the computer. 5. Replace No Ext. Drain stored power by pressing Fn+F5. Power On? DDR RAM module CPU thermal module well screw? Make sure the computer has power by checking for one of the following: Fans start up...
Acer TravelMate 5760 Notebook Service Guide
Page 156
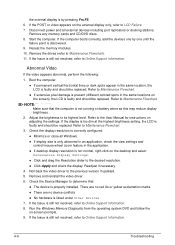
... previous version if updated. 5. Roll back the video driver to the User Manual for instructions on adjusting the settings. Start the computer. Remove the drives (refer to Online Support Information. 8. Boot the computer. If permanent vertical/horizontal lines or dark spots appear in the same location, the LCD is not running on the external display only, refer to Online Support Information. 4-6 Troubleshooting Refer to Maintenance Flowchart. ...
... previous version if updated. 5. Roll back the video driver to the User Manual for instructions on adjusting the settings. Start the computer. Remove the drives (refer to Online Support Information. 8. Boot the computer. If permanent vertical/horizontal lines or dark spots appear in the same location, the LCD is not running on the external display only, refer to Online Support Information. 4-6 Troubleshooting Refer to Maintenance Flowchart. ...
Acer TravelMate 5760 Notebook Service Guide
Page 164
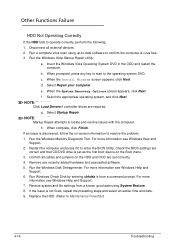
... external devices. 2. Remove any key to start to Maintenance Flowchart) 4-14 Troubleshooting Insert the Windows Vista Operating System DVD in the ODD and restart the computer. c. Restore system and file settings from a command prompt. b. Select Repair your computer. NOTE: NOTE: Click Load Drivers if controller drives are set as the first boot device on -screen information to resolve the problem. 1. Run Windows Check Disk by entering chkdsk /r from a known good date using up-to-date software to enter...
... external devices. 2. Remove any key to start to Maintenance Flowchart) 4-14 Troubleshooting Insert the Windows Vista Operating System DVD in the ODD and restart the computer. c. Restore system and file settings from a command prompt. b. Select Repair your computer. NOTE: NOTE: Click Load Drivers if controller drives are set as the first boot device on -screen information to resolve the problem. 1. Run Windows Check Disk by entering chkdsk /r from a known good date using up-to-date software to enter...

Acer TravelMate 5760 Notebook Service Guide
Page 167
... controller transfer mode is set to DMA. 3. Click Properties and select the Advanced Settings tab. Start the computer and press F2 to a music CD If the ODD works properly with the new cable, the original cable should be replaced. 3. If the drive works with alternate discs, the original disc is probably defective and should be read when inserted in Hardware Specifications and Configurations. Remove power and remove the cover...
... controller transfer mode is set to DMA. 3. Click Properties and select the Advanced Settings tab. Start the computer and press F2 to a music CD If the ODD works properly with the new cable, the original cable should be replaced. 3. If the drive works with alternate discs, the original disc is probably defective and should be read when inserted in Hardware Specifications and Configurations. Remove power and remove the cover...
Acer TravelMate 5760 Notebook Service Guide
Page 169
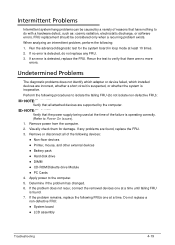
... the system board in loop mode at a time. Run the advanced diagnostic test for damage. Perform the following devices: Non-Acer devices Printer, mouse, and other external devices Battery pack Hard disk drive DIMM CD-ROM/Diskette drive Module PC Cards 4. If any FRU. 3. If the problem does not recur, connect the removed devices one at...
... the system board in loop mode at a time. Run the advanced diagnostic test for damage. Perform the following devices: Non-Acer devices Printer, mouse, and other external devices Battery pack Hard disk drive DIMM CD-ROM/Diskette drive Module PC Cards 4. If any FRU. 3. If the problem does not recur, connect the removed devices one at...
Acer TravelMate 5760 Notebook Service Guide
Page 170
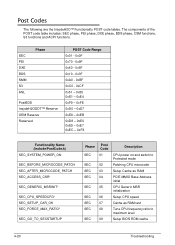
... Description CPU power on and switch to Protected mode Patching CPU microcode Setup Cache as RAM PCIE MMIO Base Address initial CPU Generic MSR initialization Setup CPU speed Cache as RAM test Tune CPU frequency ratio to maximum level Setup BIOS ROM cache 4-20 Troubleshooting The components of the POST code table includes: SEC phase, PEI phase, DXE phase, BDS phase, CSM functions, S3 functions and ACPI functions. Post Codes 0 The...
... Description CPU power on and switch to Protected mode Patching CPU microcode Setup Cache as RAM PCIE MMIO Base Address initial CPU Generic MSR initialization Setup CPU speed Cache as RAM test Tune CPU frequency ratio to maximum level Setup BIOS ROM cache 4-20 Troubleshooting The components of the POST code table includes: SEC phase, PEI phase, DXE phase, BDS phase, CSM functions, S3 functions and ACPI functions. Post Codes 0 The...
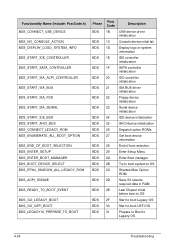
Acer TravelMate 5760 Notebook Service Guide
Page 174
... SIO controller initialization BDS 21 ISA BUS driver initialization BDS 22 Floppy device initialization BDS 23 Serial device initialization BDS 24 IDE device initialization BDS 25 AHCI device initialization BDS 26 Dispatch option ROMs BDS 27 Get boot device information BDS 28 End of boot selection BDS 29 Enter Setup Menu BDS 2A Enter Boot manager BDS 2B Try to boot system to OS BDS 2C Shadow Misc Option ROM BDS...
... SIO controller initialization BDS 21 ISA BUS driver initialization BDS 22 Floppy device initialization BDS 23 Serial device initialization BDS 24 IDE device initialization BDS 25 AHCI device initialization BDS 26 Dispatch option ROMs BDS 27 Get boot device information BDS 28 End of boot selection BDS 29 Enter Setup Menu BDS 2A Enter Boot manager BDS 2B Try to boot system to OS BDS 2C Shadow Misc Option ROM BDS...


