
TravelMate 4730/4730G Quick Guide
Page 12
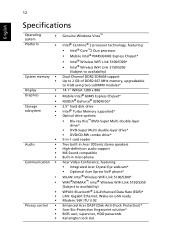
...; DVD/CD-RW combo drive* 5-in-1 card reader Two built-in Acer 3DSonic stereo speakers High-definition audio support MS-Sound compatible Built-in microphone Acer Video Conference, featuring: • Integrated Acer Crystal Eye webcam* • Optional Acer Xpress VoIP phone* WLAN: Intel® Wireless WiFi Link 5100/5300* ... availability) WPAN: Bluetooth® 2.0+Enhanced Data Rate (EDR)* LAN: Gigabit Ethernet, Wake-on-LAN ready Modem: 56K ITU V.92 Enhanced Acer DASP (Disk Anti-Shock Protection)* Acer Bio-Protection fingerprint solution* BIOS user, supervisor, HDD passwords Kensington lock slot
...; DVD/CD-RW combo drive* 5-in-1 card reader Two built-in Acer 3DSonic stereo speakers High-definition audio support MS-Sound compatible Built-in microphone Acer Video Conference, featuring: • Integrated Acer Crystal Eye webcam* • Optional Acer Xpress VoIP phone* WLAN: Intel® Wireless WiFi Link 5100/5300* ... availability) WPAN: Bluetooth® 2.0+Enhanced Data Rate (EDR)* LAN: Gigabit Ethernet, Wake-on-LAN ready Modem: 56K ITU V.92 Enhanced Acer DASP (Disk Anti-Shock Protection)* Acer Bio-Protection fingerprint solution* BIOS user, supervisor, HDD passwords Kensington lock slot
TravelMate 4730/4730G Quick Guide
Page 13
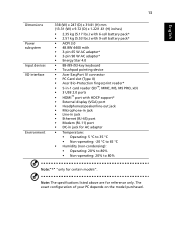
... adapter* • 3-pin 90 W AC adapter* • Energy Star 4.0 • 88-/89-/93-key keyboard • Touchpad pointing device • Acer EasyPort IV connector • PC Card slot (Type II) • Acer Bio-Protection fingerprint reader* • 5-in-1 card reader (SD™, MMC, MS, MS PRO, xD) • 3 USB 2.0 ports • HDMI™...
... adapter* • 3-pin 90 W AC adapter* • Energy Star 4.0 • 88-/89-/93-key keyboard • Touchpad pointing device • Acer EasyPort IV connector • PC Card slot (Type II) • Acer Bio-Protection fingerprint reader* • 5-in-1 card reader (SD™, MMC, MS, MS PRO, xD) • 3 USB 2.0 ports • HDMI™...

TravelMate 4730/4730G Service Guide
Page 7
...13 Hot Keys 14 Special Key 15 Using the System Utilities 16 Acer GridVista (dual-display compatible 16 Hardware Specifications and Configurations 18 System Utilities 25 BIOS Setup Utility 25 Navigating the BIOS Utility 25 Information 26 Main 27 Advanced 28 Security 30 Power 33... Boot 35 Exit 36 BIOS Flash Utility 37 Remove HDD/BIOS Utility 39 Machine Disassembly and Replacement 43 Disassembly...
...13 Hot Keys 14 Special Key 15 Using the System Utilities 16 Acer GridVista (dual-display compatible 16 Hardware Specifications and Configurations 18 System Utilities 25 BIOS Setup Utility 25 Navigating the BIOS Utility 25 Information 26 Main 27 Advanced 28 Security 30 Power 33... Boot 35 Exit 36 BIOS Flash Utility 37 Remove HDD/BIOS Utility 39 Machine Disassembly and Replacement 43 Disassembly...
TravelMate 4730/4730G Service Guide
Page 9
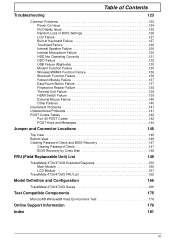
Table of Contents Troubleshooting 123 Common Problems 123 Power On Issue 124 No Display Issue 125 Random Loss of BIOS Settings 126 LCD Failure 127 Built-In Keyboard Failure 127 Touchpad Failure 128 Internal Speaker Failure 128 Internal Microphone... Password Check and BIOS Recovery 147 Clearing Password Check 147 BIOS Recovery by Crisis Disk 148 FRU (Field Replaceable Unit) List 149 TravelMate 4730/4730G Exploded Diagrams 150 Main Module 150 LCD Module 151 TravelMate 4730/4730G FRU List 152 Model Definition and Configuration 166 TravelMate 4730/4730G Series 166 Test ...
Table of Contents Troubleshooting 123 Common Problems 123 Power On Issue 124 No Display Issue 125 Random Loss of BIOS Settings 126 LCD Failure 127 Built-In Keyboard Failure 127 Touchpad Failure 128 Internal Speaker Failure 128 Internal Microphone... Password Check and BIOS Recovery 147 Clearing Password Check 147 BIOS Recovery by Crisis Disk 148 FRU (Field Replaceable Unit) List 149 TravelMate 4730/4730G Exploded Diagrams 150 Main Module 150 LCD Module 151 TravelMate 4730/4730G FRU List 152 Model Definition and Configuration 166 TravelMate 4730/4730G Series 166 Test ...
TravelMate 4730/4730G Service Guide
Page 12
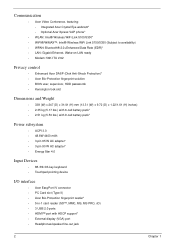
...; LAN: Gigabit Ethernet, Wake-on-LAN ready • Modem: 56K ITU V.92 Privacy control • Enhanced Acer DASP (Disk Anti-Shock Protection)* • Acer Bio-Protection fingerprint solution • BIOS user, supervisor, HDD passwords • Kensington lock slot Dimensions and Weight • 338 (W) x 247 (D) ...Energy Star 4.0 Input Devices • 88-/89-/93-key keyboard • Touchpad pointing device I/O interface • Acer EasyPort IV connector • PC Card slot (Type II) • Acer Bio-Protection fingerprint reader* • 5-in-1 card reader (SD™, MMC, MS, MS PRO, xD) &#...
...; LAN: Gigabit Ethernet, Wake-on-LAN ready • Modem: 56K ITU V.92 Privacy control • Enhanced Acer DASP (Disk Anti-Shock Protection)* • Acer Bio-Protection fingerprint solution • BIOS user, supervisor, HDD passwords • Kensington lock slot Dimensions and Weight • 338 (W) x 247 (D) ...Energy Star 4.0 Input Devices • 88-/89-/93-key keyboard • Touchpad pointing device I/O interface • Acer EasyPort IV connector • PC Card slot (Type II) • Acer Bio-Protection fingerprint reader* • 5-in-1 card reader (SD™, MMC, MS, MS PRO, xD) &#...
TravelMate 4730/4730G Service Guide
Page 21
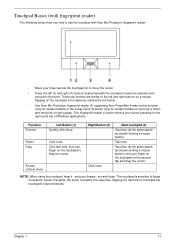
...Main touchpad (2) Tap twice (at the same speed as double-clicking a mouse button); Click and hold, then use the touchpad with Acer Bio-Protection fingerprint reader: • Move your finger on the touchpad on the second tap and drag the cursor. The touchpad is the same...touchpad to perform selection and execution functions. Tap twice (at the same speed as clicking the left button. • Use Acer Bio-Protection fingerprint reader (3) supporting Acer FingerNav 4-way control function (only for certain models) or the 4-way scroll (3) button (only for certain models) to scroll...
...Main touchpad (2) Tap twice (at the same speed as double-clicking a mouse button); Click and hold, then use the touchpad with Acer Bio-Protection fingerprint reader: • Move your finger on the touchpad on the second tap and drag the cursor. The touchpad is the same...touchpad to perform selection and execution functions. Tap twice (at the same speed as clicking the left button. • Use Acer Bio-Protection fingerprint reader (3) supporting Acer FingerNav 4-way control function (only for certain models) or the 4-way scroll (3) button (only for certain models) to scroll...
TravelMate 4730/4730G Service Guide
Page 24
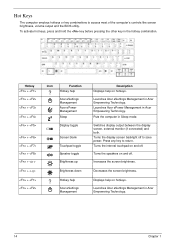
...+ + + + + + + < > + < > + + Icon Function Hotkey help Acer eSettings Management Acer ePower Management Sleep Display toggle Screen blank Touchpad toggle Speaker toggle Brightness up Brightness down Hotkey help...Acer eSettings Management in the hotkey combination. Turns the internal touchpad on and off to save power. Displays help on hotkeys. Decreases the screen brightness. Launches Acer eSettings Management in Acer Empowering Technology. 14 Chapter 1 Press any key to access most of the computer's controls like screen brightness, volume output and the BIOS...
...+ + + + + + + < > + < > + + Icon Function Hotkey help Acer eSettings Management Acer ePower Management Sleep Display toggle Screen blank Touchpad toggle Speaker toggle Brightness up Brightness down Hotkey help...Acer eSettings Management in the hotkey combination. Turns the internal touchpad on and off to save power. Displays help on hotkeys. Decreases the screen brightness. Launches Acer eSettings Management in Acer Empowering Technology. 14 Chapter 1 Press any key to access most of the computer's controls like screen brightness, volume output and the BIOS...
TravelMate 4730/4730G Service Guide
Page 26
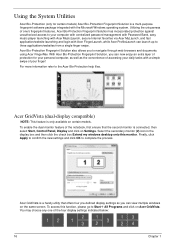
...this function, please go to navigate through web browsers and documents using Acer FingerNav. Finally, click Apply to confirm the new settings and click OK to the Acer Bio-Protection help files. Acer GridVista (dual-display compatible) NOTE: This feature is a multi-...of protection for certain models) Acer Bio-Protection Fingerprint Solution is only available on Settings. With Acer Bio-Protection Fingerprint Solution, you to Start´ All Programs and click on Acer GridVista. You may choose any one 's fingerprint features, Acer Bio-Protection Fingerprint Solution has incorporated...
...this function, please go to navigate through web browsers and documents using Acer FingerNav. Finally, click Apply to confirm the new settings and click OK to the Acer Bio-Protection help files. Acer GridVista (dual-display compatible) NOTE: This feature is a multi-...of protection for certain models) Acer Bio-Protection Fingerprint Solution is only available on Settings. With Acer Bio-Protection Fingerprint Solution, you to Start´ All Programs and click on Acer GridVista. You may choose any one 's fingerprint features, Acer Bio-Protection Fingerprint Solution has incorporated...
TravelMate 4730/4730G Service Guide
Page 28
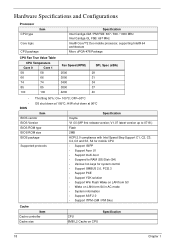
V1.07 latest version up to 0718.) BIOS ROM type Flash BIOS ROM size 2MB BIOS package ACPI 2.0 compliance with Intel Speed Step Support C1, C2, C3, C4, C6 and S3, S4 for mobile CPU Supported protocols • Support ISIPP • Support Acer UI • Support multi-boot • Suspend to RAM (S3)/Disk (S4... 3000 3400 3800 4200 SPL Spec (dBA) 29 31 34 37 40 • Throttling 50%: On= 100°C; H/W shut down at 96°C Item Specification BIOS vendor Insyde BIOS Version V1.00 (MP first release version; OFF=90°C •...
V1.07 latest version up to 0718.) BIOS ROM type Flash BIOS ROM size 2MB BIOS package ACPI 2.0 compliance with Intel Speed Step Support C1, C2, C3, C4, C6 and S3, S4 for mobile CPU Supported protocols • Support ISIPP • Support Acer UI • Support multi-boot • Suspend to RAM (S3)/Disk (S4... 3000 3400 3800 4200 SPL Spec (dBA) 29 31 34 37 40 • Throttling 50%: On= 100°C; H/W shut down at 96°C Item Specification BIOS vendor Insyde BIOS Version V1.00 (MP first release version; OFF=90°C •...
TravelMate 4730/4730G Service Guide
Page 35
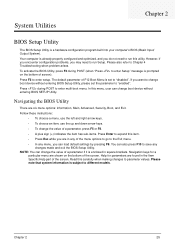
... a particular menu are in any of the menu options to go to enter Setup" message is subject to enter multi-boot menu. To activate the BIOS Utility, press F2 during POST to different models. NOTE: You can change the value of a parameter, press F5 or F6. • A plus sign .... Your computer is set the parameter to run this item. • Press Esc while you can also press F10 to "disabled". Navigating the BIOS Utility There are found in square brackets. You can load default settings by pressing F9. Read this carefully when making changes to run Setup. Chapter...
... a particular menu are in any of the menu options to go to enter Setup" message is subject to enter multi-boot menu. To activate the BIOS Utility, press F2 during POST to different models. NOTE: You can change the value of a parameter, press F5 or F6. • A plus sign .... Your computer is set the parameter to run this item. • Press Esc while you can also press F10 to "disabled". Navigating the BIOS Utility There are found in square brackets. You can load default settings by pressing F9. Read this carefully when making changes to run Setup. Chapter...
TravelMate 4730/4730G Service Guide
Page 36
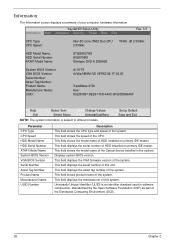
...F9 Setup Default F10 Save and Exit Parameter CPU Type CPU Speed HDD Model Name HDD Serial Number ATAPI Model Name System BIOS Version VGA BIOS Version Serial Number Asset Tag Number Product Name Manufacturer Name UUID Number Description This field shows the CPU type and speed of ...Number: ATAPI Model Name: ST9250827AS 5RG01NK8 Slimtype DVD A DS8A2S System BIOS Version: VGA BIOS Version: Serial Number: Asset Tag Number: Product Name: Manufacturer Name: UUID: v0.16-T6 nVidia NB9M-GS VER62.98.1F.00.00 TravelMate 4730 Acer DCEB0597-DE29-11D3-444C-001B38D96A6F F1 Help ESC Exit ↑↓ ...
...F9 Setup Default F10 Save and Exit Parameter CPU Type CPU Speed HDD Model Name HDD Serial Number ATAPI Model Name System BIOS Version VGA BIOS Version Serial Number Asset Tag Number Product Name Manufacturer Name UUID Number Description This field shows the CPU type and speed of ...Number: ATAPI Model Name: ST9250827AS 5RG01NK8 Slimtype DVD A DS8A2S System BIOS Version: VGA BIOS Version: Serial Number: Asset Tag Number: Product Name: Manufacturer Name: UUID: v0.16-T6 nVidia NB9M-GS VER62.98.1F.00.00 TravelMate 4730 Acer DCEB0597-DE29-11D3-444C-001B38D96A6F F1 Help ESC Exit ↑↓ ...

TravelMate 4730/4730G Service Guide
Page 38
... you have experience adjusting these items, we recommend that you leave these pages causes your system to malfunction or prevents the system from booting, open BIOS and choose Load Optimal Defaults in the Exit menu to items on these settings at the default values. IMPORTANT:Making incorrect settings to boot up...; Lan • IDE Controller • HDC Configure as • ACHI Option ROM Support • SATA Port 0, 1, 4, and 5 Hotplug • Channel 1 to configure the various advanced BIOS options.
... you have experience adjusting these items, we recommend that you leave these pages causes your system to malfunction or prevents the system from booting, open BIOS and choose Load Optimal Defaults in the Exit menu to items on these settings at the default values. IMPORTANT:Making incorrect settings to boot up...; Lan • IDE Controller • HDC Configure as • ACHI Option ROM Support • SATA Port 0, 1, 4, and 5 Hotplug • Channel 1 to configure the various advanced BIOS options.

TravelMate 4730/4730G Service Guide
Page 39
... • CER • CTO • SEFE • SENFE • SECE • PME Interrupt • PME SCI • Hot Plug SCI • Mini Watchdog Timeout • BIOS Boot Timeout • OS Boot Timeout • Power-on wait time Chapter 2 29 Chipset Configuration Enter the Chipset Configuration menu. ASF Configuration Enter the ASF...
... • CER • CTO • SEFE • SENFE • SECE • PME Interrupt • PME SCI • Hot Plug SCI • Mini Watchdog Timeout • BIOS Boot Timeout • OS Boot Timeout • Power-on wait time Chapter 2 29 Chipset Configuration Enter the Chipset Configuration menu. ASF Configuration Enter the ASF...
TravelMate 4730/4730G Service Guide
Page 40
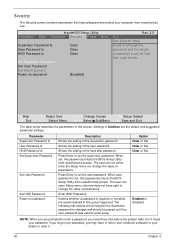
... Enter HDD Password. Security The Security screen contains parameters that help safeguard and protect your password. Settings in this password protects the BIOS Setup Utility from unauthorized access. Don't forget your computer from unauthorized access. The user can not either enter the Setup menu nor...F6 Change Values F9 Setup Default Enter SelectXSubMenu F10 Save and Exit The table below describes the parameters in this password protects the BIOS Setup Utility from unauthorized use. When set , this group happened. When user password is required or not while the events ...
... Enter HDD Password. Security The Security screen contains parameters that help safeguard and protect your password. Settings in this password protects the BIOS Setup Utility from unauthorized access. Don't forget your computer from unauthorized access. The user can not either enter the Setup menu nor...F6 Change Values F9 Setup Default Enter SelectXSubMenu F10 Save and Exit The table below describes the parameters in this password protects the BIOS Setup Utility from unauthorized use. When set , this group happened. When user password is required or not while the events ...
TravelMate 4730/4730G Service Guide
Page 41
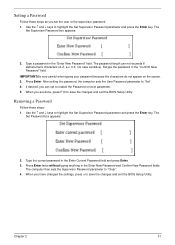
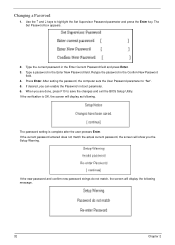
... a Password Follow these steps as you are done, press F10 to save the changes and exit the BIOS Setup Utility. If desired, you have changed the settings, press u to save the changes and exit the BIOS Setup Utility. When you can not exceeds 8 alphanumeric characters (A-Z, a-z, 0-9, not case sensitive). After setting the password...
... a Password Follow these steps as you are done, press F10 to save the changes and exit the BIOS Setup Utility. If desired, you have changed the settings, press u to save the changes and exit the BIOS Setup Utility. When you can not exceeds 8 alphanumeric characters (A-Z, a-z, 0-9, not case sensitive). After setting the password...
TravelMate 4730/4730G Service Guide
Page 42
... can enable the Password on boot parameter. 6. After setting the password, the computer sets the User Password parameter to save the changes and exit the BIOS Setup Utility. If the current password entered does not match the actual current password, the screen will display the following . Retype the password in the...
... can enable the Password on boot parameter. 6. After setting the password, the computer sets the User Password parameter to save the changes and exit the BIOS Setup Utility. If the current password entered does not match the actual current password, the screen will display the following . Retype the password in the...
TravelMate 4730/4730G Service Guide
Page 46
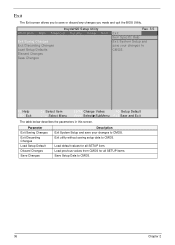
Exit The Exit screen allows you made and quit the BIOS Utility. Load previous values from CMOS for all SETUP items. Save Setup Data to CMOS. Exit utility without saving setup data to CMOS. 36 Chapter 2 ...
Exit The Exit screen allows you made and quit the BIOS Utility. Load previous values from CMOS for all SETUP items. Save Setup Data to CMOS. Exit utility without saving setup data to CMOS. 36 Chapter 2 ...
TravelMate 4730/4730G Service Guide
Page 47
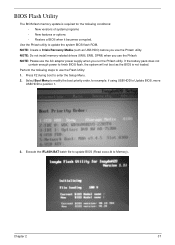
... the following conditions: • New versions of system programs • New features or options • Restore a BIOS when it becomes corrupted. Chapter 2 37 BIOS Flash Utility The BIOS flash memory update is not loaded. Press F2 during boot to Memory). Execute the IFLASH.BAT batch file to update...XMS, EMS, DPMI) when you use the Phlash utility. Select Boot Menu to modify the boot priority order, for the following steps to finish BIOS flash, the system will not boot as USB HDD) before you run the Phlash utility. Use the Phlash utility to position 1. 3. NOTE: Create...
... the following conditions: • New versions of system programs • New features or options • Restore a BIOS when it becomes corrupted. Chapter 2 37 BIOS Flash Utility The BIOS flash memory update is not loaded. Press F2 during boot to Memory). Execute the IFLASH.BAT batch file to update...XMS, EMS, DPMI) when you use the Phlash utility. Select Boot Menu to modify the boot priority order, for the following steps to finish BIOS flash, the system will not boot as USB HDD) before you run the Phlash utility. Use the Phlash utility to position 1. 3. NOTE: Create...
TravelMate 4730/4730G Service Guide
Page 48
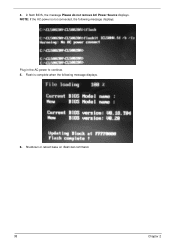
4. Shutdown or reboot base on iflash.bat command. 38 Chapter 2 Plug in the AC power to continue. 5. Flash is not connected, the following message displays. 6. NOTE: If the AC power is complete when the following message displays. In flash BIOS, the message Please do not remove AC Power Source displays.
4. Shutdown or reboot base on iflash.bat command. 38 Chapter 2 Plug in the AC power to continue. 5. Flash is not connected, the following message displays. 6. NOTE: If the AC power is complete when the following message displays. In flash BIOS, the message Please do not remove AC Power Source displays.
TravelMate 4730/4730G Service Guide
Page 49
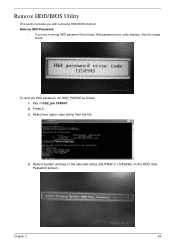
Chapter 2 39 Press 2. 3. Reboot system and key in hdd_pw 15494 0 2. See the image below. Key in the selected string (0KJFN42 or UVEIQ96) on the HDD User Password screen. Select one upper-case string from the list. 4. To reset the HDD password, run HDD_PW.EXE as follows: 1. Remove HDD/BIOS Utility This section provide you with removing HDD/BIOS method: Remove HDD Password: • If you key in wrong HDD password three times, Hdd password error code displays.
Chapter 2 39 Press 2. 3. Reboot system and key in hdd_pw 15494 0 2. See the image below. Key in the selected string (0KJFN42 or UVEIQ96) on the HDD User Password screen. Select one upper-case string from the list. 4. To reset the HDD password, run HDD_PW.EXE as follows: 1. Remove HDD/BIOS Utility This section provide you with removing HDD/BIOS method: Remove HDD Password: • If you key in wrong HDD password three times, Hdd password error code displays.


