
TravelMate 4230/4530 Quick Guide
Page 7
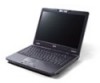
...buttons function like the left and (left, center* and right mouse buttons. right) *The center button serves as Acer BioProtect fingerprint reader supporting Acer FingerNav 4-way control function. 9 Status indicators Light-Emitting Diodes (LEDs) that light up to show the status of ...the computer's functions and components. 10 Acer BioProtection fingerprint reader The center button serves as Acer Bio-Protection fingerprint reader supporting Acer FingerNav 4-way control function (only for certain models). 11 Power button Turns the computer ...
...buttons function like the left and (left, center* and right mouse buttons. right) *The center button serves as Acer BioProtect fingerprint reader supporting Acer FingerNav 4-way control function. 9 Status indicators Light-Emitting Diodes (LEDs) that light up to show the status of ...the computer's functions and components. 10 Acer BioProtection fingerprint reader The center button serves as Acer Bio-Protection fingerprint reader supporting Acer FingerNav 4-way control function (only for certain models). 11 Power button Turns the computer ...

TravelMate 4230/4530 Quick Guide
Page 13
...; AMD Turion™ Dual-Core Processor* • AMD Athlon™ Dual-Core Processor* • Acer InviLink™ 802.11b/g* • Acer InviLink™ Nplify™ 802.11b/g/Draft-N* Dual-Channel DDR2 support Up to 2 GB of DDR2 667...Acer Video Conference, featuring: • Integrated Acer Crystal Eye webcam • Optional Acer Xpress VoIP phone WLAN: • Acer InviLink™ 802.11b/g* • Acer InviLink™ Nplify™ 802.11b/g/Draft-N* WPAN: Bluetooth® 2.0+EDR LAN: Gigabit Ethernet, Wake-on-LAN ready Modem: 56K ITU V.92 Acer Bio-Protection fingerprint solution* BIOS...
...; AMD Turion™ Dual-Core Processor* • AMD Athlon™ Dual-Core Processor* • Acer InviLink™ 802.11b/g* • Acer InviLink™ Nplify™ 802.11b/g/Draft-N* Dual-Channel DDR2 support Up to 2 GB of DDR2 667...Acer Video Conference, featuring: • Integrated Acer Crystal Eye webcam • Optional Acer Xpress VoIP phone WLAN: • Acer InviLink™ 802.11b/g* • Acer InviLink™ Nplify™ 802.11b/g/Draft-N* WPAN: Bluetooth® 2.0+EDR LAN: Gigabit Ethernet, Wake-on-LAN ready Modem: 56K ITU V.92 Acer Bio-Protection fingerprint solution* BIOS...

Service Guide
Page 25
...printer at http://printer1.blogspot.com Turns the internal touchpad on and off to save power. Acer eSetting Launches the Acer eSetting in the Acer eManager set by the Acer Empowering key. Fn-F5 Fn-F6 Fn-F7 Display toggle Screen blank Touchpad toggle Switches ...display output between the display screen, external monitor (if connected) and both the display screen and external monitor. Press any key to access most of the computer's controls like sreen brightness, volume output and the BIOS...
...printer at http://printer1.blogspot.com Turns the internal touchpad on and off to save power. Acer eSetting Launches the Acer eSetting in the Acer eManager set by the Acer Empowering key. Fn-F5 Fn-F6 Fn-F7 Display toggle Screen blank Touchpad toggle Switches ...display output between the display screen, external monitor (if connected) and both the display screen and external monitor. Press any key to access most of the computer's controls like sreen brightness, volume output and the BIOS...

Service Guide
Page 32
... at 1.8GHz (Dothan) for TravelMate 4500 InteI® 855GME+ICH4 for TravelMate 4000/4500 Intel® 852GM+ICH4 for TravelMate 2300 Intel socketable 478pin Micro-BGA 1.308V (highest frequency mode) to 0.956V (low frequency mode) 0.748V (deeper sleep mode) BIOS Item BIOS vendor BIOS Version BIOS ROM type BIOS ROM size BIOS package Supported protocols BIOS password control Second Level...
... at 1.8GHz (Dothan) for TravelMate 4500 InteI® 855GME+ICH4 for TravelMate 4000/4500 Intel® 852GM+ICH4 for TravelMate 2300 Intel socketable 478pin Micro-BGA 1.308V (highest frequency mode) to 0.956V (low frequency mode) 0.748V (deeper sleep mode) BIOS Item BIOS vendor BIOS Version BIOS ROM type BIOS ROM size BIOS package Supported protocols BIOS password control Second Level...

Service Guide
Page 37
... location Supports ZV (Zoomed Video) port Supports 32 bit CardBus Specification ICH4-M 2.0 USB 1.1 and USB 2.0 Host controller 3 two on the front side Enable/Disable by BIOS Setup TI PC7411 1 Right side IEEE 1394 Specification TI PC7411 Type-II One type-II Right panel No ZV support Yes Specification Chapter 1 31 download...
... location Supports ZV (Zoomed Video) port Supports 32 bit CardBus Specification ICH4-M 2.0 USB 1.1 and USB 2.0 Host controller 3 two on the front side Enable/Disable by BIOS Setup TI PC7411 1 Right side IEEE 1394 Specification TI PC7411 Type-II One type-II Right panel No ZV support Yes Specification Chapter 1 31 download...

Service Guide
Page 43
... Number: MPAA01Q2G0746A HDD2 Model Name: HDD2 Serial Number: ATAPI Device: MATSHITADVD-RAM UJ-825S System BIOS Ver: VGA BIOS Ver: 3A01 Montara-GME3360 KBC Ver: PQ1A24 Serial Number 1234567890123456789012 Asset Tag Number: 1234567890 Product Aspire1680 Manufacturer Name: Acer UUID: xxxxxxxxxxxxxxxxxxxxxxxxxxxxxxxx F1 Help Esc Exit ↑ ↓ Select Item ← → Select Menu F5...
... Number: MPAA01Q2G0746A HDD2 Model Name: HDD2 Serial Number: ATAPI Device: MATSHITADVD-RAM UJ-825S System BIOS Ver: VGA BIOS Ver: 3A01 Montara-GME3360 KBC Ver: PQ1A24 Serial Number 1234567890123456789012 Asset Tag Number: 1234567890 Product Aspire1680 Manufacturer Name: Acer UUID: xxxxxxxxxxxxxxxxxxxxxxxxxxxxxxxx F1 Help Esc Exit ↑ ↓ Select Item ← → Select Menu F5...

Service Guide
Page 44
... found in models. 38 Chapter 2 download service manual and resetter printer at http://printer1.blogspot.com T In any changes made and exit the BIOS Setup Utility. Please note that system information vary in the Item Specific Help part of the screen. Follow these instructions: T To choose a ...menu, use the cursor up/down keys ( wy). Navigation keys for parameters are in square brackets. Navigating the BIOS Utility There are shown on the bottom of the screen. T To choose a parameter, use the cursor left/right keys (zx). You can also ...
... found in models. 38 Chapter 2 download service manual and resetter printer at http://printer1.blogspot.com T In any changes made and exit the BIOS Setup Utility. Please note that system information vary in the Item Specific Help part of the screen. Follow these instructions: T To choose a ...menu, use the cursor up/down keys ( wy). Navigation keys for parameters are in square brackets. Navigating the BIOS Utility There are shown on the bottom of the screen. T To choose a parameter, use the cursor left/right keys (zx). You can also ...

Service Guide
Page 45
...processor 1.70Ghz 1700 MHz HDD1 Model Name: HDD1 Serial Number: HDD2 Model Name: HDD2 Serial Number: ATAPI Device: System BIOS Ver: VGA BIOS Ver: KBC Ver: Serial Number Asset Tag Number: Product Manufacturer Name: UUID: IC25N080ATMR04-0 MPAA01Q2G0746A MATSHITADVD-RAM UJ-825S ...3A01 Montara-GME3360 PQ1A24 1234567890123456789012 1234567890 Aspire1680 Acer xxxxxxxxxxxxxxxxxxxxxxxxxxxxxxxx F1 Help Esc Exit ↑ ↓ Select Item ← →...
...processor 1.70Ghz 1700 MHz HDD1 Model Name: HDD1 Serial Number: HDD2 Model Name: HDD2 Serial Number: ATAPI Device: System BIOS Ver: VGA BIOS Ver: KBC Ver: Serial Number Asset Tag Number: Product Manufacturer Name: UUID: IC25N080ATMR04-0 MPAA01Q2G0746A MATSHITADVD-RAM UJ-825S ...3A01 Montara-GME3360 PQ1A24 1234567890123456789012 1234567890 Aspire1680 Acer xxxxxxxxxxxxxxxxxxxxxxxxxxxxxxxx F1 Help Esc Exit ↑ ↓ Select Item ← →...

Service Guide
Page 48
... Security Boot Exit Internal Touchpad: Infrared Port (FIR): [Both] [Enabled] Item Specific Help Configure Infrared Port using options: [Disable] No configuration [Enabled] User configuration [Auto] BIOS or OS chooses configuration (OS Controlled) Displayed when controlled by OS F1 Help Esc Exit ↑ ↓ Select Item ← → Select Menu F5/F6...
... Security Boot Exit Internal Touchpad: Infrared Port (FIR): [Both] [Enabled] Item Specific Help Configure Infrared Port using options: [Disable] No configuration [Enabled] User configuration [Auto] BIOS or OS chooses configuration (OS Controlled) Displayed when controlled by OS F1 Help Esc Exit ↑ ↓ Select Item ← → Select Menu F5/F6...

Service Guide
Page 51
.... If you forget your password because the characters do not appear on HDD is being set , this password protects the BIOS Setup Utility from unauthorized access. IMPORTANT:Be very careful when typing your password, you may have right to change the value... "Enter New Password" field. The table below describes the parameters in this group happened. When user password is set , this password protects the BIOS Setup Utility from unauthorized access. Type a password in the "Confirm New Password" field. Password can not exceeds 8 alphanumeric characters (A-Z, a-z, 0-9, ...
.... If you forget your password because the characters do not appear on HDD is being set , this password protects the BIOS Setup Utility from unauthorized access. IMPORTANT:Be very careful when typing your password, you may have right to change the value... "Enter New Password" field. The table below describes the parameters in this group happened. When user password is set , this password protects the BIOS Setup Utility from unauthorized access. Type a password in the "Confirm New Password" field. Password can not exceeds 8 alphanumeric characters (A-Z, a-z, 0-9, ...

Service Guide
Page 52
... box appears: 2. When you have changed the settings, press u to save the changes and exit the BIOS Setup Utility. Press e. When you are done, press u to save the changes and exit the BIOS Setup Utility. 46 Chapter 2 download service manual and resetter printer at http://printer1.blogspot.com Press e. Type...e. 3. The Set Password box appears: 2. After setting the password, the computer sets the User Password parameter to save the changes and exit the BIOS Setup Utility. Type a password in the Enter New Password field. If desired, you are done, press u to "Set". 5.
... box appears: 2. When you have changed the settings, press u to save the changes and exit the BIOS Setup Utility. Press e. When you are done, press u to save the changes and exit the BIOS Setup Utility. 46 Chapter 2 download service manual and resetter printer at http://printer1.blogspot.com Press e. Type...e. 3. The Set Password box appears: 2. After setting the password, the computer sets the User Password parameter to save the changes and exit the BIOS Setup Utility. Type a password in the Enter New Password field. If desired, you are done, press u to "Set". 5.

Service Guide
Page 56
...printer1.blogspot.com If the battery pack does not contain enough power to run the Phlash utility. Fellow the steps below to finish BIOS flash, you use the Phlash utility. The Phlash utility has auto-execution function. 50 Chapter 2 download service manual and resetter printer ...Recovery Diskette before you may not boot the system because the BIOS is required for the following conditions: T New versions of system programs T New features or options T Restore a BIOS when it becomes corrupted. BIOS Flash Utility The BIOS flash memory update is not completely loaded. Use the Phlash ...
...printer1.blogspot.com If the battery pack does not contain enough power to run the Phlash utility. Fellow the steps below to finish BIOS flash, you use the Phlash utility. The Phlash utility has auto-execution function. 50 Chapter 2 download service manual and resetter printer ...Recovery Diskette before you may not boot the system because the BIOS is required for the following conditions: T New versions of system programs T New features or options T Restore a BIOS when it becomes corrupted. BIOS Flash Utility The BIOS flash memory update is not completely loaded. Use the Phlash ...

Service Guide
Page 79
...it has been configured. Chapter 4 73 download service manual and resetter printer at http://printer1.blogspot.com The following lists the error messages that the BIOS displays on page 85. Some of them display information about a hardware device, e.g., the amount of the error messages occur during POST. The most... in the sequence shown in FRU/Action column, if the FRU replacement does not solve the problem, put the original part back in the BIOS Setup Utility menus, reset the computer, enter Setup and install Setup defaults or correct the error. NOTE: If the system fails after you...
...it has been configured. Chapter 4 73 download service manual and resetter printer at http://printer1.blogspot.com The following lists the error messages that the BIOS displays on page 85. Some of them display information about a hardware device, e.g., the amount of the error messages occur during POST. The most... in the sequence shown in FRU/Action column, if the FRU replacement does not solve the problem, put the original part back in the BIOS Setup Utility menus, reset the computer, enter Setup and install Setup defaults or correct the error. NOTE: If the system fails after you...

Service Guide
Page 80
... Invalid System Configuration Data Operating system not found FRU/Action in Sequence See "Keyboard or Auxiliary Input Device Check" on page 70 RTC battery Run BIOS Setup Utility to reconfigure system time, then reboot system. Default configuration used Real time clock error Previous boot incomplete - Main board Enter Setup and see... fixed disk and drive A are properly identified. Index of Error Messages Error Message List Error Messages Struck Key System CMOS checksum bad - RTC battery Run BIOS Setup Utility to reconfigure system, then reboot system. Main board "Load Default Settings" in...
... Invalid System Configuration Data Operating system not found FRU/Action in Sequence See "Keyboard or Auxiliary Input Device Check" on page 70 RTC battery Run BIOS Setup Utility to reconfigure system time, then reboot system. Default configuration used Real time clock error Previous boot incomplete - Main board Enter Setup and see... fixed disk and drive A are properly identified. Index of Error Messages Error Message List Error Messages Struck Key System CMOS checksum bad - RTC battery Run BIOS Setup Utility to reconfigure system, then reboot system. Main board "Load Default Settings" in...

Service Guide
Page 82
...registers with initial POST values Restore CPU control word during warm boot Initialize PCI Bus Mastering devices Initialize keyboard controller BIOS ROM checksum Initialize cache before memory autosize 8254 timer initialization 8237 DMA controller initialization Reset Programmable Interrupt Controller Test DRAM...high byte of memory bus Test CPU bus-clock frequency Initialize Phoenix Dispatch Manager Warm start shut down Shadow system BIOS ROM Autosize cache Advanced configuration of chipset registers Load alternate registers with CMOS values Initialize interrupt vectors POST device ...
...registers with initial POST values Restore CPU control word during warm boot Initialize PCI Bus Mastering devices Initialize keyboard controller BIOS ROM checksum Initialize cache before memory autosize 8254 timer initialization 8237 DMA controller initialization Reset Programmable Interrupt Controller Test DRAM...high byte of memory bus Test CPU bus-clock frequency Initialize Phoenix Dispatch Manager Warm start shut down Shadow system BIOS ROM Autosize cache Advanced configuration of chipset registers Load alternate registers with CMOS values Initialize interrupt vectors POST device ...

Service Guide
Page 83
...configuration against CMOS Initialize PCI bus and devices Initialize all video adapters in system QuietBoot start (optional) Shadow video BIOS ROM Display BIOS copyright notice Display CPU type and speed Initialize EISA board Test keyboard Set key click if enabled Test for unexpected... PC-compatible PnP ISA devices Re-initialize onboard I/O ports Configure Motherboard Configurable Devices (optional) Initialize BIOS Area Enable Non-Maskable Interrupts (NMIs) Initialize Extended BIOS Data Area Test and initialize PS/2 mouse Initialize floppy controller Chapter 4 77 download service manual and...
...configuration against CMOS Initialize PCI bus and devices Initialize all video adapters in system QuietBoot start (optional) Shadow video BIOS ROM Display BIOS copyright notice Display CPU type and speed Initialize EISA board Test keyboard Set key click if enabled Test for unexpected... PC-compatible PnP ISA devices Re-initialize onboard I/O ports Configure Motherboard Configurable Devices (optional) Initialize BIOS Area Enable Non-Maskable Interrupts (NMIs) Initialize Extended BIOS Data Area Test and initialize PS/2 mouse Initialize floppy controller Chapter 4 77 download service manual and...

Service Guide
Page 85
... 1 POST Routine Description Initialize the chipset Initialize the bridge Initialize the CPU Initialize the system timer Initialize system I/O Check force recovery boot Checksum BIOS ROM Go to BIOS Set Huge Segment Initialize Multi Processor Initialize OEM special code Initialize PIC and DMA Initialize Memory type Initialize Memory size Shadow Boot Block System...
... 1 POST Routine Description Initialize the chipset Initialize the bridge Initialize the CPU Initialize the system timer Initialize system I/O Check force recovery boot Checksum BIOS ROM Go to BIOS Set Huge Segment Initialize Multi Processor Initialize OEM special code Initialize PIC and DMA Initialize Memory type Initialize Memory size Shadow Boot Block System...

Service Guide
Page 86
... system cannot power-off , then the main board is overheat (Heat sink or fan). LCD cable LCD inverter LCD Main board Enter BIOS Utility to CRT port. Next, enter BIOS utility to running "Load Default Settings" then reboot the system. Reconnect the LCD connectors. Main board 80 Chapter 4 download service manual and...
... system cannot power-off , then the main board is overheat (Heat sink or fan). LCD cable LCD inverter LCD Main board Enter BIOS Utility to CRT port. Next, enter BIOS utility to running "Load Default Settings" then reboot the system. Reconnect the LCD connectors. Main board 80 Chapter 4 download service manual and...
Service Guide
Page 87
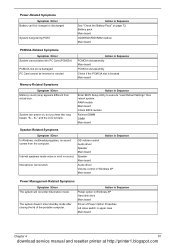
...81 download service manual and resetter printer at http://printer1.blogspot.com System can 't be inserted or ejected Action in Sequence Enter BIOS Setup Utility to execute "Load Default Settings" then reboot system. Action in Sequence PCMCIA slot assembly Main board PCMCIA slot assembly Check... sound comes from actual size. Power-Related Symptoms Symptom / Error Battery can power on page 72. RAM module Main board Check BIOS revision Reinsert DIMM DIMM Main board Speaker-Related Symptoms Symptom / Error In Windows, multimedia programs, no sound. Microphone cannot work Action...
...81 download service manual and resetter printer at http://printer1.blogspot.com System can 't be inserted or ejected Action in Sequence Enter BIOS Setup Utility to execute "Load Default Settings" then reboot system. Action in Sequence PCMCIA slot assembly Main board PCMCIA slot assembly Check... sound comes from actual size. Power-Related Symptoms Symptom / Error Battery can power on page 72. RAM module Main board Check BIOS revision Reinsert DIMM DIMM Main board Speaker-Related Symptoms Symptom / Error In Windows, multimedia programs, no sound. Microphone cannot work Action...

Service Guide
Page 88
...Main board The system doesn't resume from Standby/Hibernation mode. Run printer self-test. Printer driver Printer cable Printer Main board Enter BIOS Setup Utility to execute "Load Default Settings" then reboot the system. Main board Peripheral-Related Symptoms Symptom / Error System configuration ...computer. Touchpad does not work correctly. Main board Press Fn+F5, LCD/CRT/Both display switching Keyboard Main board Main board Enter BIOS Setup Utility to execute "Load Default Settings" then reboot the system. Touchpad board Main board 82 Chapter 4 download service manual ...
...Main board The system doesn't resume from Standby/Hibernation mode. Run printer self-test. Printer driver Printer cable Printer Main board Enter BIOS Setup Utility to execute "Load Default Settings" then reboot the system. Main board Peripheral-Related Symptoms Symptom / Error System configuration ...computer. Touchpad does not work correctly. Main board Press Fn+F5, LCD/CRT/Both display switching Keyboard Main board Main board Enter BIOS Setup Utility to execute "Load Default Settings" then reboot the system. Touchpad board Main board 82 Chapter 4 download service manual ...


