
TravelMate 4060 Service Guide
Page 7
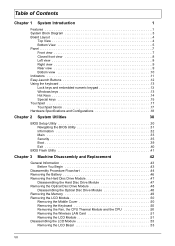
...View 5 Panel 7 Front view 7 Closed front view 8 Left view 8 Right view 9 Rear view 9 Bottom view 10 Indicators 11 Easy-Launch Buttons 12 Using the keyboard 13 Lock keys and embedded numeric keypad 13 Windows keys 13 Hot Keys 14 Special keys 15 Touchpad 17 Touchpad basics 17 Hardware Specifications and...48 Disassembling the Optical Disc Drive Module 48 Removing the Memory 49 Removing the LCD Module 50 Removing the Middle Cover 50 Removing the Keyboard 50 Removing the Fan, the CPU Thermal Module and the CPU 50 Removing the Wireless LAN Card 51 Removing the LCD Module 51 ...
...View 5 Panel 7 Front view 7 Closed front view 8 Left view 8 Right view 9 Rear view 9 Bottom view 10 Indicators 11 Easy-Launch Buttons 12 Using the keyboard 13 Lock keys and embedded numeric keypad 13 Windows keys 13 Hot Keys 14 Special keys 15 Touchpad 17 Touchpad basics 17 Hardware Specifications and...48 Disassembling the Optical Disc Drive Module 48 Removing the Memory 49 Removing the LCD Module 50 Removing the Middle Cover 50 Removing the Keyboard 50 Removing the Fan, the CPU Thermal Module and the CPU 50 Removing the Wireless LAN Card 51 Removing the LCD Module 51 ...
TravelMate 4060 Service Guide
Page 8
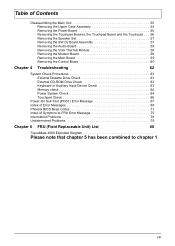
... Board 59 Removing the Control Board 60 Chapter 4 Troubleshooting 62 System Check Procedures 63 External Diskette Drive Check 63 External CD-ROM Drive Check 63 Keyboard or Auxiliary Input Device Check 63 Memory check 64 Power System Check 64 Touchpad Check 66 Power-On Self-Test (POST) Error Message 67 Index... BIOS Beep Codes 71 Index of Symptom-to-FRU Error Message 75 Intermittent Problems 78 Undetermined Problems 79 Chapter 6 FRU (Field Replaceable Unit) List 80 TravelMate 4060 Exploded Diagram Please note that chapter 5 has been combined to chapter 1 VIII
... Board 59 Removing the Control Board 60 Chapter 4 Troubleshooting 62 System Check Procedures 63 External Diskette Drive Check 63 External CD-ROM Drive Check 63 Keyboard or Auxiliary Input Device Check 63 Memory check 64 Power System Check 64 Touchpad Check 66 Power-On Self-Test (POST) Error Message 67 Index... BIOS Beep Codes 71 Index of Symptom-to-FRU Error Message 75 Intermittent Problems 78 Undetermined Problems 79 Chapter 6 FRU (Field Replaceable Unit) List 80 TravelMate 4060 Exploded Diagram Please note that chapter 5 has been combined to chapter 1 VIII
TravelMate 4060 Service Guide
Page 11
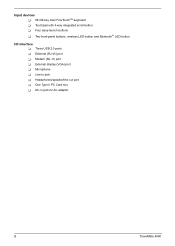
Input devices T 88-/89-key Acer FineTouchTM keyboard T Touchpad with 4-way integrated scroll button T Four easy-launch buttons T Two front-panel buttons: wireless LED-button and Bluetooth® LED-button I/O interface T Three USB 2.0 ports T Ethernet (RJ-45) port T Modem (RJ-11) port T External display (VGA) port T Microphone T Line-in jack T Headphones/speaker/line-out port T One Type II PC Card slot T DC-in jack for AC adaptor 2 TravelMate 4060
Input devices T 88-/89-key Acer FineTouchTM keyboard T Touchpad with 4-way integrated scroll button T Four easy-launch buttons T Two front-panel buttons: wireless LED-button and Bluetooth® LED-button I/O interface T Three USB 2.0 ports T Ethernet (RJ-45) port T Modem (RJ-11) port T External display (VGA) port T Microphone T Line-in jack T Headphones/speaker/line-out port T One Type II PC Card slot T DC-in jack for AC adaptor 2 TravelMate 4060
TravelMate 4060 Service Guide
Page 14
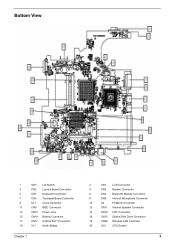
Bottom View 1 SW1 Lid Switch 3 CN2 Launch Board Connector 5 CN7 Keyboard Connector 7 CN5 Touchpad Board Connector 9 U17 Clock Generator 11 CN9 MDC Connector 13 CN13 Power Jack 15 CN14 Battery Connector 17 CN17 RJ45 & RJ11 Connector 19 U11 North Bridge Chapter 1 2 CN1 LCD Connector 4 CN3 Modem Connector 6 CN4 Bluetooth Module Connector 8 CN6 Internal Microphone Connector 10 U4 PCMCIA Connector 12 CN11 Internal Speaker Connector 14 CN12 CRT Connector 16 CN15 Optical Disk Drive Connector 18 CN26 Wireless LAN Controller 20 U13 CPU Socket 5
Bottom View 1 SW1 Lid Switch 3 CN2 Launch Board Connector 5 CN7 Keyboard Connector 7 CN5 Touchpad Board Connector 9 U17 Clock Generator 11 CN9 MDC Connector 13 CN13 Power Jack 15 CN14 Battery Connector 17 CN17 RJ45 & RJ11 Connector 19 U11 North Bridge Chapter 1 2 CN1 LCD Connector 4 CN3 Modem Connector 6 CN4 Bluetooth Module Connector 8 CN6 Internal Microphone Connector 10 U4 PCMCIA Connector 12 CN11 Internal Speaker Connector 14 CN12 CRT Connector 16 CN15 Optical Disk Drive Connector 18 CN26 Wireless LAN Controller 20 U13 CPU Socket 5
TravelMate 4060 Service Guide
Page 16
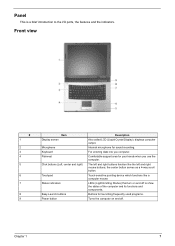
... mouse buttons; Touch-sensitive pointing device which functions like the left and right buttons function like a computer mouse. Chapter 1 7 Front view # 1 2 3 4 5 6 7 8 9 Item Display screen Microphone Keyboard Palmrest Click buttons (Left, center and right) Touchpad Status indicators Easy-Launch buttons Power button Description Also called LCD (Liquid Crystal Display), displays computer output...
... mouse buttons; Touch-sensitive pointing device which functions like the left and right buttons function like a computer mouse. Chapter 1 7 Front view # 1 2 3 4 5 6 7 8 9 Item Display screen Microphone Keyboard Palmrest Click buttons (Left, center and right) Touchpad Status indicators Easy-Launch buttons Power button Description Also called LCD (Liquid Crystal Display), displays computer output...

TravelMate 4060 Service Guide
Page 20
... Lights when the battery is on the front panel. Indicators The computer has three easy-to-read status icons on the upper-right above the keyboard, and four on . Bluetooth Indicates the status of Bluetooth communication. NOTE: 2. Charging: the light shows amber when the battery is activated. Lights when Numeric Lock...
... Lights when the battery is on the front panel. Indicators The computer has three easy-to-read status icons on the upper-right above the keyboard, and four on . Bluetooth Indicates the status of Bluetooth communication. NOTE: 2. Charging: the light shows amber when the battery is activated. Lights when Numeric Lock...

TravelMate 4060 Service Guide
Page 21
... page 23 12 TravelMate 4060 Fn> "Acer eManager" on page 23 23 Fn-F4 "Acer eManager" on page n Description Launch key P Default application User-programmable Acer eManager (user-programmable) eManager" on page 23 Web browser Mail "Acer Internet browser (user-programmable) Email application (user-programmable) "Acer eManager" on page... Icon Function Description DFens-cFr1iption Easy-Launch Buttons Fn-F2 Located at the upper-right, above the keyboard are mail, Web browser, Acer Empowering key " ", an"dAcoenr e user-programmable button. These buttons are called launch keys.
... page 23 12 TravelMate 4060 Fn> "Acer eManager" on page 23 23 Fn-F4 "Acer eManager" on page n Description Launch key P Default application User-programmable Acer eManager (user-programmable) eManager" on page 23 Web browser Mail "Acer Internet browser (user-programmable) Email application (user-programmable) "Acer eManager" on page... Icon Function Description DFens-cFr1iption Easy-Launch Buttons Fn-F2 Located at the upper-right, above the keyboard are mail, Web browser, Acer Empowering key " ", an"dAcoenr e user-programmable button. These buttons are called launch keys.

TravelMate 4060 Service Guide
Page 22
...When @is on , the embedded keypad is on the keys. A better solution would be to do a lot of the keycaps. Using the keyboard The keyboard has full-sized keys and an embedded keypad, separate cursor keys, two Windows keys and twelve function keys. Desired access Number keys on embedded keypad... Cursor-control keys on embedded keypad Main keyboard keys Num lock on embedded Type the letters in a normal manner. Hold while using cursor-control keys. Hold while typing letters on Type...
...When @is on , the embedded keypad is on the keys. A better solution would be to do a lot of the keycaps. Using the keyboard The keyboard has full-sized keys and an embedded keypad, separate cursor keys, two Windows keys and twelve function keys. Desired access Number keys on embedded keypad... Cursor-control keys on embedded keypad Main keyboard keys Num lock on embedded Type the letters in a normal manner. Hold while using cursor-control keys. Hold while typing letters on Type...

TravelMate 4060 Service Guide
Page 24
.... Fn-y Volume down Decreases the screen brightness. Special keys You can locate the Euro symbol at the upper-center (for European keyboard) and/or bottom-right (Chinese keyboard) of your keyboard. Volume up Increases the screen brightness. Brightness down Decreases the sound volume. Display toggle Screen blank Touchpad Toggle Speaker toggle Switches display...
.... Fn-y Volume down Decreases the screen brightness. Special keys You can locate the Euro symbol at the upper-center (for European keyboard) and/or bottom-right (Chinese keyboard) of your keyboard. Volume up Increases the screen brightness. Brightness down Decreases the sound volume. Display toggle Screen blank Touchpad Toggle Speaker toggle Switches display...
TravelMate 4060 Service Guide
Page 25
... according to www.microsoft.com/ typography/faq/faq12.htm for European keyboard, you can use both method). Please refer to the language settings. 16 TravelMate 4060 The Euro symbol 1. Either directly press the key at the bottom-right of the keyboard (for Chinese keyboard), or hold and then press the key at the upper-center...
... according to www.microsoft.com/ typography/faq/faq12.htm for European keyboard, you can use both method). Please refer to the language settings. 16 TravelMate 4060 The Euro symbol 1. Either directly press the key at the bottom-right of the keyboard (for Chinese keyboard), or hold and then press the key at the upper-center...
TravelMate 4060 Service Guide
Page 27
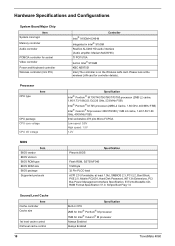
... Power and Keyboard controller Wireless controller (mini PCI) Controller Intel® 915GM+ICH6-M Integrated in Intel® 915GM RealTek ALC260 HD audio interface (Audio amplifer: Maxiam MAX9755) TI PCI1510A built-in CPU 2MB for Intel® Pentium® M processor 1MB for Intel® Celeron® M processor Always Enabled Always Enabled 18 TravelMate 4060
... Power and Keyboard controller Wireless controller (mini PCI) Controller Intel® 915GM+ICH6-M Integrated in Intel® 915GM RealTek ALC260 HD audio interface (Audio amplifer: Maxiam MAX9755) TI PCI1510A built-in CPU 2MB for Intel® Pentium® M processor 1MB for Intel® Celeron® M processor Always Enabled Always Enabled 18 TravelMate 4060
TravelMate 4060 Service Guide
Page 33
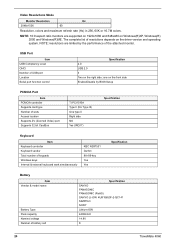
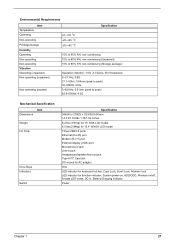
... battery cell Specification SANYO PANASONIC PANASONIC (RoHS) SANYO LI-ION 4UR18650F-2-QC141 SIMPPLO SONY Lithium-ION 4400mAH 14.8V 8 24 TravelMate 4060 NOTE: 16:9 aspect ratio monitors are limited by BIOS Setup PCMCIA Port Item PCMCIA controller Supports card type Number of slots Access...PCI1510A Type II (No Tpye III) One type II Right side NO Yes (IRQ17) Specification Keyboard Item Keyboard controller Keyboard vendor Total number of keypads Windows keys Internal & external keyboard work simultaneously KBC NS97551 Darfon 88-/89-key Yes Yes Specification Battery Item Vendor & model ...
... battery cell Specification SANYO PANASONIC PANASONIC (RoHS) SANYO LI-ION 4UR18650F-2-QC141 SIMPPLO SONY Lithium-ION 4400mAH 14.8V 8 24 TravelMate 4060 NOTE: 16:9 aspect ratio monitors are limited by BIOS Setup PCMCIA Port Item PCMCIA controller Supports card type Number of slots Access...PCI1510A Type II (No Tpye III) One type II Right side NO Yes (IRQ17) Specification Keyboard Item Keyboard controller Keyboard vendor Total number of keypads Windows keys Internal & external keyboard work simultaneously KBC NS97551 Darfon 88-/89-key Yes Yes Specification Battery Item Vendor & model ...
TravelMate 4060 Service Guide
Page 36
...-in jack Line-in jack Headphones/speaker/line-out jack Type II PC Card slot DC-in jack for AC adaptor One LED indicator for keyboard hot key: Caps Lock, Scroll Lock, NUmber lock LED indicator for function indicator: System power-on, HDD/ODD, Wireless on/off, Arcade LED mode, DC...
...-in jack Line-in jack Headphones/speaker/line-out jack Type II PC Card slot DC-in jack for AC adaptor One LED indicator for keyboard hot key: Caps Lock, Scroll Lock, NUmber lock LED indicator for function indicator: System power-on, HDD/ODD, Wireless on/off, Arcade LED mode, DC...
TravelMate 4060 Service Guide
Page 53
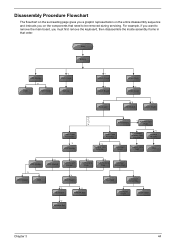
...flowchart on the succeeding page gives you a graphic representation on the entire disassembly sequence and instructs you must first remove the keyboard, then disassemble the inside assembly frame in that need to be removed during servicing. For example, if you want to remove... the components that order. Start Battery HDD Module *2 HDD HDD Holder *2 Dimm Cover Memory *1 Modem Cover *2 Modem Board Hinge Caps *2 Middle Cover Keyboard *6 LCD Module *2 Launch Board Lower Case Assembly *2 FDD Module *3 *3 *11 *4 RTC Battery *3 Mini PCI Card Plate Upper Case Assembly Disconnect ...
...flowchart on the succeeding page gives you a graphic representation on the entire disassembly sequence and instructs you must first remove the keyboard, then disassemble the inside assembly frame in that need to be removed during servicing. For example, if you want to remove... the components that order. Start Battery HDD Module *2 HDD HDD Holder *2 Dimm Cover Memory *1 Modem Cover *2 Modem Board Hinge Caps *2 Middle Cover Keyboard *6 LCD Module *2 Launch Board Lower Case Assembly *2 FDD Module *3 *3 *11 *4 RTC Battery *3 Mini PCI Card Plate Upper Case Assembly Disconnect ...
TravelMate 4060 Service Guide
Page 59
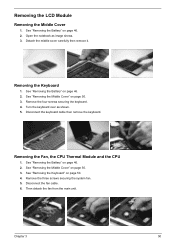
...and the CPU 1. See "Removing the Battery" on page 50. 3. Turn the keyboard over as image shows. 3. Remove the three screws securing the system fan. 5. See "Removing the Middle Cover" on page 46. 2. See "Removing the Keyboard" on page 46. 2. Then detach the fan from the main unit. Open ...the notebook as shown. 5. Remove the four screws securing the keyboard. 4. Detach the middle cover carefully then remove it. See "Removing the Battery" on page 50. 4. See "Removing the Middle Cover" on page 46. 2. Chapter...
...and the CPU 1. See "Removing the Battery" on page 50. 3. Turn the keyboard over as image shows. 3. Remove the three screws securing the system fan. 5. See "Removing the Middle Cover" on page 46. 2. See "Removing the Keyboard" on page 46. 2. Then detach the fan from the main unit. Open ...the notebook as shown. 5. Remove the four screws securing the keyboard. 4. Detach the middle cover carefully then remove it. See "Removing the Battery" on page 50. 4. See "Removing the Middle Cover" on page 46. 2. Chapter...
TravelMate 4060 Service Guide
Page 60
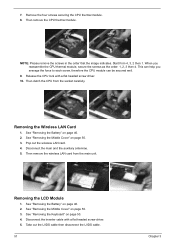
Start from the socket carefully. Then detch the CPU from 4, 3, 2 then 1. Then remove the wireless LAN card from the main unit. See "Removing the Keyboard" on page 46. 2. Disconnect the main and the auxiliary antennae. 5. NOTE: Please remove the screws in the order that the image indicates. Disconnect the inverter ...
Start from the socket carefully. Then detch the CPU from 4, 3, 2 then 1. Then remove the wireless LAN card from the main unit. See "Removing the Keyboard" on page 46. 2. Disconnect the main and the auxiliary antennae. 5. NOTE: Please remove the screws in the order that the image indicates. Disconnect the inverter ...
TravelMate 4060 Service Guide
Page 62
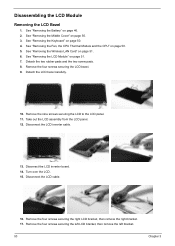
.... 14. Turn over the LCD. 15. Remove the four screws securing the left LCD bracket, then remove the left bracket. 53 Chapter 3 See "Removing the Keyboard" on page 51. 7. See "Removing the LCD Module" on page 50. 4. Detach the two rubber pads and the two screw pads. 8. See "Removing the Middle...
.... 14. Turn over the LCD. 15. Remove the four screws securing the left LCD bracket, then remove the left bracket. 53 Chapter 3 See "Removing the Keyboard" on page 51. 7. See "Removing the LCD Module" on page 50. 4. Detach the two rubber pads and the two screw pads. 8. See "Removing the Middle...
TravelMate 4060 Service Guide
Page 65
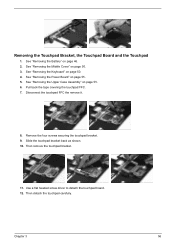
.... 4. Disconnect the touchpad FFC the remove it. 8. Slide the touchpad bracket back as shown. 10. Then detach the touchpad carefully. Chapter 3 56 See "Removing the Keyboard" on page 55. 6. See "Removing the Power Board" on page 46. 2. Pull back the tape covering the touchpad FFC. 7. Then remove the touchpad bracket. 11...
.... 4. Disconnect the touchpad FFC the remove it. 8. Slide the touchpad bracket back as shown. 10. Then detach the touchpad carefully. Chapter 3 56 See "Removing the Keyboard" on page 55. 6. See "Removing the Power Board" on page 46. 2. Pull back the tape covering the touchpad FFC. 7. Then remove the touchpad bracket. 11...

TravelMate 4060 Service Guide
Page 66
See "Removing the Keyboard" on page 50. 3. Then disconnect the audio board FFC cable. 9. See "Removing the Middle Cover" on page 50. 4. See "Removing the Upper Case Assembly" on ... the Power Board" on page 57. 7. See "Removing the Battery" on page 55. 6. See "Removing the Upper Case Assembly" on page 46. 2. See "Removing the Keyboard" on page 55. 5. See "Removing the Power Board" on page 50. 4. Removing the Speaker Set 1. Disconnect the SW DJ board cable. 7. Remove the two screws...
See "Removing the Keyboard" on page 50. 3. Then disconnect the audio board FFC cable. 9. See "Removing the Middle Cover" on page 50. 4. See "Removing the Upper Case Assembly" on ... the Power Board" on page 57. 7. See "Removing the Battery" on page 55. 6. See "Removing the Upper Case Assembly" on page 46. 2. See "Removing the Keyboard" on page 55. 5. See "Removing the Power Board" on page 50. 4. Removing the Speaker Set 1. Disconnect the SW DJ board cable. 7. Remove the two screws...

TravelMate 4060 Service Guide
Page 67
... DJ board assembly from the lower case. 9. See "Removing the Battery" on page 50. 3. See "Removing the Keyboard" on page 57. 8. See "Removing the SW DJ Board Assembly" on page 50. 4. See "Removing the Keyboard" on page 50. 3. Remove the two screws securing the SW DJ board and SW DJ board bracket...
... DJ board assembly from the lower case. 9. See "Removing the Battery" on page 50. 3. See "Removing the Keyboard" on page 57. 8. See "Removing the SW DJ Board Assembly" on page 50. 4. See "Removing the Keyboard" on page 50. 3. Remove the two screws securing the SW DJ board and SW DJ board bracket...


