
TravelMate 4060 Service Guide
Page 7
...Boot 39 Exit 40 BIOS Flash Utility 41 Chapter 3 Machine Disassembly and Replacement 42 General Information 43 Before You Begin 43 Disassembly Procedure Flowchart 44 Removing the Battery 46 Removing the Hard Disc Drive Module 47 Disassembling the Hard Disc Drive Module 47 Removing the Optical Disc ...Drive Module 48 Disassembling the Optical Disc Drive Module 48 Removing the Memory 49 Removing the LCD Module 50 Removing the Middle...
...Boot 39 Exit 40 BIOS Flash Utility 41 Chapter 3 Machine Disassembly and Replacement 42 General Information 43 Before You Begin 43 Disassembly Procedure Flowchart 44 Removing the Battery 46 Removing the Hard Disc Drive Module 47 Disassembling the Hard Disc Drive Module 47 Removing the Optical Disc ...Drive Module 48 Disassembling the Optical Disc Drive Module 48 Removing the Memory 49 Removing the LCD Module 50 Removing the Middle...
TravelMate 4060 Service Guide
Page 8
Table of Contents Disassembling the Main Unit 55 Removing the Upper Case Assembly 55 Removing the Power Board 55 Removing the Touchpad Bracket, the Touchpad Board and the Touchpad . . . .... BIOS Beep Codes 71 Index of Symptom-to-FRU Error Message 75 Intermittent Problems 78 Undetermined Problems 79 Chapter 6 FRU (Field Replaceable Unit) List 80 TravelMate 4060 Exploded Diagram Please note that chapter 5 has been combined to chapter 1 VIII
Table of Contents Disassembling the Main Unit 55 Removing the Upper Case Assembly 55 Removing the Power Board 55 Removing the Touchpad Bracket, the Touchpad Board and the Touchpad . . . .... BIOS Beep Codes 71 Index of Symptom-to-FRU Error Message 75 Intermittent Problems 78 Undetermined Problems 79 Chapter 6 FRU (Field Replaceable Unit) List 80 TravelMate 4060 Exploded Diagram Please note that chapter 5 has been combined to chapter 1 VIII
TravelMate 4060 Service Guide
Page 51
...-by-step procedures on how to avoid mismatch when putting back the components. During the disassembly process, group the screws with the corresponding components to disassemble the notebook computer for the different components vary in size. To disassemble the computer, you need the following tools: T Wrist grounding strap and conductive mat for preventing...
...-by-step procedures on how to avoid mismatch when putting back the components. During the disassembly process, group the screws with the corresponding components to disassemble the notebook computer for the different components vary in size. To disassemble the computer, you need the following tools: T Wrist grounding strap and conductive mat for preventing...
TravelMate 4060 Service Guide
Page 52
NOTE: Aspire 9100 series product uses mylar or tape to fasten the FFC/FPC/connectors/cable, you may need to the system and all power and signal cables from the system . Unplug the AC adapter and all peripherals. 2. Turn off the power to tear the tape or mylar before you do the following: 1. General Information Before You Begin Before proceeding with the disassembly procedure, make sure that you disconnect different FFC/FPC/connectors. 43 Chapter 3
NOTE: Aspire 9100 series product uses mylar or tape to fasten the FFC/FPC/connectors/cable, you may need to the system and all power and signal cables from the system . Unplug the AC adapter and all peripherals. 2. Turn off the power to tear the tape or mylar before you do the following: 1. General Information Before You Begin Before proceeding with the disassembly procedure, make sure that you disconnect different FFC/FPC/connectors. 43 Chapter 3
TravelMate 4060 Service Guide
Page 53
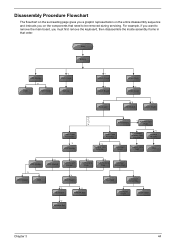
For example, if you must first remove the keyboard, then disassemble the inside assembly frame in that need to remove the main board, you want to be removed during servicing. Start Battery HDD Module *2 HDD HDD ... Plate Touchpad Button Pad *2 ODD Bracket ODD *4 Main Board Touchpad Touchpad Scroll Key *2 DC Board *4 PCMCIA Slot Touchpad Cable Upper Case *2 Speaker Set Chapter 3 44 Disassembly Procedure Flowchart The flowchart on the succeeding page gives you a graphic representation on the entire...
For example, if you must first remove the keyboard, then disassemble the inside assembly frame in that need to remove the main board, you want to be removed during servicing. Start Battery HDD Module *2 HDD HDD ... Plate Touchpad Button Pad *2 ODD Bracket ODD *4 Main Board Touchpad Touchpad Scroll Key *2 DC Board *4 PCMCIA Slot Touchpad Cable Upper Case *2 Speaker Set Chapter 3 44 Disassembly Procedure Flowchart The flowchart on the succeeding page gives you a graphic representation on the entire...
TravelMate 4060 Service Guide
Page 56
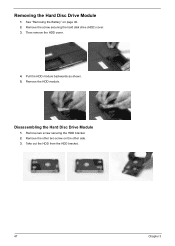
Disassembling the Hard Disc Drive Module 1. Remove the other two screw on page 46. 2. Pull the HDD module backwards as shown. 5. Take out the HDD from the HDD bracket. 47 Chapter 3 Remove two screw securing the HDD bracket. 2. Removing the Hard Disc Drive Module 1. Then remove the HDD cover. 4. See "Removing the Battery" on the other side. 3. Remove the screw securing the hard disk drive (HDD) cover. 3. Remove the HDD module.
Disassembling the Hard Disc Drive Module 1. Remove the other two screw on page 46. 2. Pull the HDD module backwards as shown. 5. Take out the HDD from the HDD bracket. 47 Chapter 3 Remove two screw securing the HDD bracket. 2. Removing the Hard Disc Drive Module 1. Then remove the HDD cover. 4. See "Removing the Battery" on the other side. 3. Remove the screw securing the hard disk drive (HDD) cover. 3. Remove the HDD module.
TravelMate 4060 Service Guide
Page 57
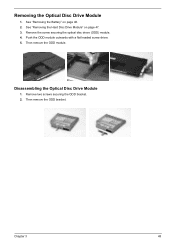
Push the ODD module outwards with a flat headed screw driver. 5. Remove two screws securing the ODD bracket. 2. Chapter 3 48 Then remove the ODD module. Then remove the ODD bracket. See "Removing the Hard Disc Drive Module" on page 46. 2. Disassembling the Optical Disc Drive Module 1. Remove the screw securing the optical disc drove (ODD) module. 4. Removing the Optical Disc Drive Module 1. See "Removing the Battery" on page 47. 3.
Push the ODD module outwards with a flat headed screw driver. 5. Remove two screws securing the ODD bracket. 2. Chapter 3 48 Then remove the ODD module. Then remove the ODD bracket. See "Removing the Hard Disc Drive Module" on page 46. 2. Disassembling the Optical Disc Drive Module 1. Remove the screw securing the optical disc drove (ODD) module. 4. Removing the Optical Disc Drive Module 1. See "Removing the Battery" on page 47. 3.
TravelMate 4060 Service Guide
Page 62
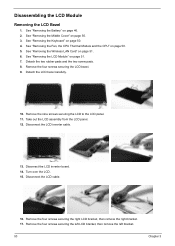
Disassembling the LCD Module Removing the LCD Bezel 1. See "Removing the Battery" on page 50. 3. See "Removing the Middle Cover" on page 46. 2. Detach the LCD ...
Disassembling the LCD Module Removing the LCD Bezel 1. See "Removing the Battery" on page 50. 3. See "Removing the Middle Cover" on page 46. 2. Detach the LCD ...
TravelMate 4060 Service Guide
Page 64
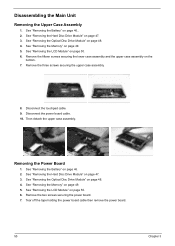
... 47. 3. Disconnect the power board cable. 10. See "Removing the Hard Disc Drive Module" on page 50. 6. See "Removing the LCD Module" on page 47. 3. Disassembling the Main Unit Removing the Upper Case Assembly 1. See "Removing the Optical Disc Drive Module" on the bottom. 7. Remove the fifteen screws securing the lower...
... 47. 3. Disconnect the power board cable. 10. See "Removing the Hard Disc Drive Module" on page 50. 6. See "Removing the LCD Module" on page 47. 3. Disassembling the Main Unit Removing the Upper Case Assembly 1. See "Removing the Optical Disc Drive Module" on the bottom. 7. Remove the fifteen screws securing the lower...
TravelMate 4060 User's Guide
Page 60
... cord set (provided in your accessories box) for service. 12 The notebook PC series uses lithium batteries. Do not disassemble or dispose of them away from the wall outlet before serving or disassembling this product through cabinet slots as they may result in the product specification list. Never spill liquid of any...
... cord set (provided in your accessories box) for service. 12 The notebook PC series uses lithium batteries. Do not disassemble or dispose of them away from the wall outlet before serving or disassembling this product through cabinet slots as they may result in the product specification list. Never spill liquid of any...
TravelMate 4060 User's Guide
Page 61
... RAYONS. VARO! This has no effect on the drive. Macrovision copyright protection notice This product incorporates copyright protection technology that is prohibited. Reverse engineering or disassembly is protected by U.S. Patent Nos. 4,631,603; 4,819,098; 4,907,093; 5,315,448; The CD or DVD drive's classification label (shown below) is intended for...
... RAYONS. VARO! This has no effect on the drive. Macrovision copyright protection notice This product incorporates copyright protection technology that is prohibited. Reverse engineering or disassembly is protected by U.S. Patent Nos. 4,631,603; 4,819,098; 4,907,093; 5,315,448; The CD or DVD drive's classification label (shown below) is intended for...


