

TravelMate 4060 Service Guide
Page 4
Gives precautionary measures to avoid possible hardware or software problems. Reminds you to any damage that appear on screen. Alerts you to do specific actions relevant to the current topic. Conventions The following conventions are used in this manual: SCREEN MESSAGES Denotes actual messages that might result from doing or not doing specific actions. NOTE WARNING CAUTION IMPORTANT Gives bits and pieces of additional information related to the accomplishment of procedures. IV
Gives precautionary measures to avoid possible hardware or software problems. Reminds you to any damage that appear on screen. Alerts you to do specific actions relevant to the current topic. Conventions The following conventions are used in this manual: SCREEN MESSAGES Denotes actual messages that might result from doing or not doing specific actions. NOTE WARNING CAUTION IMPORTANT Gives bits and pieces of additional information related to the accomplishment of procedures. IV
TravelMate 4060 Service Guide
Page 7
... Using the keyboard 13 Lock keys and embedded numeric keypad 13 Windows keys 13 Hot Keys 14 Special keys 15 Touchpad 17 Touchpad basics 17 Hardware Specifications and Configurations 18 Chapter 2 System Utilities 30 BIOS Setup Utility 30 Navigating the BIOS Utility 31 Information 32 Main 33 Security 35 Boot 39...
... Using the keyboard 13 Lock keys and embedded numeric keypad 13 Windows keys 13 Hot Keys 14 Special keys 15 Touchpad 17 Touchpad basics 17 Hardware Specifications and Configurations 18 Chapter 2 System Utilities 30 BIOS Setup Utility 30 Navigating the BIOS Utility 31 Information 32 Main 33 Security 35 Boot 39...
TravelMate 4060 Service Guide
Page 10
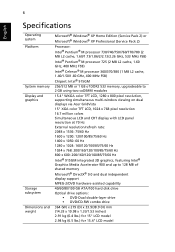
...533 memory, upgradeable to 128 MB of shared memory T Microsoft® DirectX® 7.0 and dual independent display support T MPEG-2/DVD hardware-assisted capability T Simultaneous LCD and CRT display with LCD panel resolution at -- 15" XGA (1024 X 768) -- 15.4" WXGA (...1280 X 800) supporting simultaneous multi-window viewing on -LAN ready T Wireless LAN (optional): integrated miniPCI Acer InviLinkTM 802.11b/g Wi-Fi CERTIFIEDTM solution T Acer SignalUP wireless technology support T Wireless PAN (optional): integrated Bluetooth® Audio T Audio system with two built-in speakers ...
...533 memory, upgradeable to 128 MB of shared memory T Microsoft® DirectX® 7.0 and dual independent display support T MPEG-2/DVD hardware-assisted capability T Simultaneous LCD and CRT display with LCD panel resolution at -- 15" XGA (1024 X 768) -- 15.4" WXGA (...1280 X 800) supporting simultaneous multi-window viewing on -LAN ready T Wireless LAN (optional): integrated miniPCI Acer InviLinkTM 802.11b/g Wi-Fi CERTIFIEDTM solution T Acer SignalUP wireless technology support T Wireless PAN (optional): integrated Bluetooth® Audio T Audio system with two built-in speakers ...
TravelMate 4060 Service Guide
Page 27
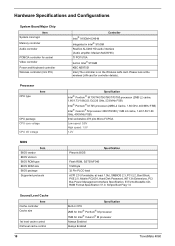
..., SST39VF040 512Kbyte 32 Pin PLCC-lead ACPI 2.0 (if available, at the wireless LAN card for Intel® Celeron® M processor Always Enabled Always Enabled 18 TravelMate 4060 Hardware Specifications and Configurations System Board Major Chip Item System core logic Memory controller Audio controller PCMCIA controller for socket Video controller Power and Keyboard controller...
..., SST39VF040 512Kbyte 32 Pin PLCC-lead ACPI 2.0 (if available, at the wireless LAN card for Intel® Celeron® M processor Always Enabled Always Enabled 18 TravelMate 4060 Hardware Specifications and Configurations System Board Major Chip Item System core logic Memory controller Audio controller PCMCIA controller for socket Video controller Power and Keyboard controller...

TravelMate 4060 Service Guide
Page 37
...VGA BIOS Version : Alviso 1219 KBC Version : Serial Number : 1A16 LXT123456705290116EF00 Asset Tag Number : N/A Produce Name Aspire 1640 Manufacturer Name: Acer UUID : xxxxxxxxxxxxxxxxxxxxxxxxxxxxxxxx F1 Help Esc Exit ↑ ↓ Select Item ← → Select Menu F5/F6 Change Values Enter Select 4...30 In this utility. PhoenixBIOS Setup Utility Info. Your computer is prompted on the bottom of F12 Boot Menu is a hardware configuration program built into your computer's BIOS (Basic Input/ Output System). If you want to change boot device without entering ...
...VGA BIOS Version : Alviso 1219 KBC Version : Serial Number : 1A16 LXT123456705290116EF00 Asset Tag Number : N/A Produce Name Aspire 1640 Manufacturer Name: Acer UUID : xxxxxxxxxxxxxxxxxxxxxxxxxxxxxxxx F1 Help Esc Exit ↑ ↓ Select Item ← → Select Menu F5/F6 Change Values Enter Select 4...30 In this utility. PhoenixBIOS Setup Utility Info. Your computer is prompted on the bottom of F12 Boot Menu is a hardware configuration program built into your computer's BIOS (Basic Input/ Output System). If you want to change boot device without entering ...
TravelMate 4060 Service Guide
Page 41
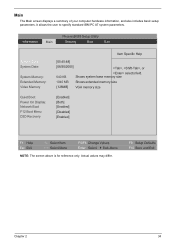
... F5/F6 Change Values Enter Select 4 Sub-Menu NOTE: The screen above is for reference only. Main The Main screen displays a summary of your computer hardware information, and also includes basic setup parameters. Actual values may differ.
... F5/F6 Change Values Enter Select 4 Sub-Menu NOTE: The screen above is for reference only. Main The Main screen displays a summary of your computer hardware information, and also includes basic setup parameters. Actual values may differ.

TravelMate 4060 Service Guide
Page 75
.... After you identify first the problem is applied to the touchpad pointer. If the voltage is not a hardware problem. If the charge indicator still does not light up , replace the DC/DC charger board. From Hardware: 1. If the battery status indicator does not light up, remove the battery pack and let it...
.... After you identify first the problem is applied to the touchpad pointer. If the voltage is not a hardware problem. If the charge indicator still does not light up , replace the DC/DC charger board. From Hardware: 1. If the battery status indicator does not light up, remove the battery pack and let it...
TravelMate 4060 Service Guide
Page 76
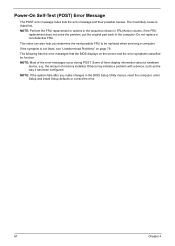
... BIOS Setup Utility menus, reset the computer, enter Setup and install Setup defaults or correct the error. 67 Chapter 4 Some of them display information about a hardware device, e.g., the amount of the error messages occur during POST. This index can also help you make changes in the computer. Others may indicate a problem...
... BIOS Setup Utility menus, reset the computer, enter Setup and install Setup defaults or correct the error. 67 Chapter 4 Some of them display information about a hardware device, e.g., the amount of the error messages occur during POST. This index can also help you make changes in the computer. Others may indicate a problem...
TravelMate 4060 Service Guide
Page 80
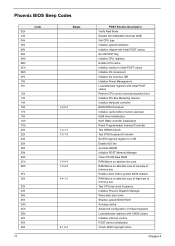
... 3Ah 3Ch 3Dh 42h 45h 46h 71 Code Beeps 1-2-2-3 1-3-1-1 1-3-1-3 1-3-4-1 1-3-4-3 1-4-1-1 2-1-2-3 POST Routine Description Verify Real Mode Disable Non-Maskable Interrupt (NMI) Get CPU type Initialize system hardware Initialize chipset with initial POST values Set IN POST flag Initialize CPU registers Enable CPU cache Initialize caches to initial POST values Initialize I/O component Initialize...
... 3Ah 3Ch 3Dh 42h 45h 46h 71 Code Beeps 1-2-2-3 1-3-1-1 1-3-1-3 1-3-4-1 1-3-4-3 1-4-1-1 2-1-2-3 POST Routine Description Verify Real Mode Disable Non-Maskable Interrupt (NMI) Get CPU type Initialize system hardware Initialize chipset with initial POST values Set IN POST flag Initialize CPU registers Enable CPU cache Initialize caches to initial POST values Initialize I/O component Initialize...
TravelMate 4060 Service Guide
Page 81
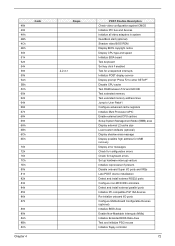
... (optional) Display shadow-area message Display possible high address for UMB recovery Display error messages Check for configuration errors Check for keyboard errors Set up hardware interrupt vectors Initialize coprocessor if present Disable onboard Super I/O ports and IRQs Late POST device initialization Detect and install external RS232 ports Configure non-MCD...
... (optional) Display shadow-area message Display possible high address for UMB recovery Display error messages Check for configuration errors Check for keyboard errors Set up hardware interrupt vectors Initialize coprocessor if present Disable onboard Super I/O ports and IRQs Late POST device initialization Detect and install external RS232 ports Configure non-MCD...
TravelMate 4060 Service Guide
Page 82
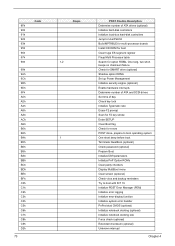
Check for SMART drive (optional) Shadow option ROMs Set up Power Management Initialize security engine (optional) Enable hardware interrupts Determine number of ATA and SCSI drives Set time of ATA drives (optional) Initialize hard-disk controllers Initialize local-bus hard-disk controllers Jump ...
Check for SMART drive (optional) Shadow option ROMs Set up Power Management Initialize security engine (optional) Enable hardware interrupts Determine number of ATA and SCSI drives Set time of ATA drives (optional) Initialize hard-disk controllers Initialize local-bus hard-disk controllers Jump ...

TravelMate 4060 Service Guide
Page 87
Rerun the test to verify that have nothing to do with a hardware defect, such as: cosmic radiation, electrostatic discharge, or software errors. Run the advanced diagnostic test for the system board in loop mode at least 10 ...
Rerun the test to verify that have nothing to do with a hardware defect, such as: cosmic radiation, electrostatic discharge, or software errors. Run the advanced diagnostic test for the system board in loop mode at least 10 ...
TravelMate 4060 User's Guide
Page 16
... 2 GB using two soDIMM modules 15.4" WXGA color TFT LCD, 1280 x 800 pixel resolution, supporting simultaneous multi-window viewing on dual displays via Acer GridVista 15" XGA color TFT LCD, 1024 x 768 pixel resolution 16.7 million colors Simultaneous LCD and CRT display with LCD panel resolution at 70 Hz...174; Graphics Media Accelerator 900 and up to 128 MB of shared memory Microsoft® DirectX® 9.0 and dual independent display support MPEG-2/DVD hardware-assisted capability 40/60/80/100 GB ATA/100 hard disk drive Optical drive options: • DVD-Dual double-layer drive • DVD/CD...
... 2 GB using two soDIMM modules 15.4" WXGA color TFT LCD, 1280 x 800 pixel resolution, supporting simultaneous multi-window viewing on dual displays via Acer GridVista 15" XGA color TFT LCD, 1024 x 768 pixel resolution 16.7 million colors Simultaneous LCD and CRT display with LCD panel resolution at 70 Hz...174; Graphics Media Accelerator 900 and up to 128 MB of shared memory Microsoft® DirectX® 9.0 and dual independent display support MPEG-2/DVD hardware-assisted capability 40/60/80/100 GB ATA/100 hard disk drive Optical drive options: • DVD-Dual double-layer drive • DVD/CD...

TravelMate 4060 User's Guide
Page 42
... boot-up and resume from Hibernation for maximum security. • Password on Boot secures your computer against unauthorized use of a locked drawer. Security features include hardware and software locks - Do not forget your computer. Once set, you need to protect and take care of your Supervisor Password! See "BIOS utility" on...
... boot-up and resume from Hibernation for maximum security. • Password on Boot secures your computer against unauthorized use of a locked drawer. Security features include hardware and software locks - Do not forget your computer. Once set, you need to protect and take care of your Supervisor Password! See "BIOS utility" on...
TravelMate 4060 User's Guide
Page 48
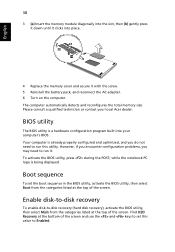
...being displayed. To activate the BIOS utility, press during the POST; Boot sequence To set this utility. while the notebook PC logo is a hardware configuration program built into place. 4 Replace the memory cover and secure it . Enable disk-to-disk recovery To enable disk-to set the...screen. English 38 3 (a) Insert the memory module diagonally into the slot, then (b) gently press it down until it clicks into your local Acer dealer. Your computer is already properly configured and optimized, and you may need to run this value to run it with the screw. 5 ...
...being displayed. To activate the BIOS utility, press during the POST; Boot sequence To set this utility. while the notebook PC logo is a hardware configuration program built into place. 4 Replace the memory cover and secure it . Enable disk-to-disk recovery To enable disk-to set the...screen. English 38 3 (a) Insert the memory module diagonally into the slot, then (b) gently press it down until it clicks into your local Acer dealer. Your computer is already properly configured and optimized, and you may need to run this value to run it with the screw. 5 ...


