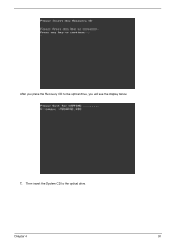
Travelmate 2300 User's Guide
Page 8
2 Customizing my computer 37 Expanding through options 39 Connectivity options 39 Upgrade options 45 Using system utilities 48 Acer eManager 48 Launch Manager 49 BIOS Utility 49 D to D Recovery (Disc to Disc) 50 Multilingual operating system installation 50 Restore without a Recovery CD 50 Setup password and exit 51 3 Troubleshooting my computer 53 Frequently-asked questions 55 Troubleshooting tips 58 Error messages 59 Requesting service 60 ITW 60 Before you call 61 Appendix A Specifications 63 Appendix B Regulation & safety notices 69 Index 85
Travelmate 2300 User's Guide
Page 58
Restore without a Recovery CD This recovery process helps you restore the C: drive with the original software content that is [Enabled]. a Check to Disc) English Note: This feature is only available on the system. 2 Acer multilingual operating system selection menu will be erased.) It is important to the language version you choose. Note: To activate BIOS...
TravelMate 2300/4000/4500 Service Guide
Page 93
Then boot up the system. 3. Select CD to Disk Recovery 1. Use NAPP CD to Build Master Hard Disc Drive CD to Disk Revocery. 86 Chapter 4 NAPP CD will ask you if you want to preload the system, please click [Y]. 5. The system will start to build NAPP Master HDD. Please press any key to continue. 4. Prepare NAPP CD, Recovery CD and System CD. 2. Put NAPP CD into the optical drive.
TravelMate 2300/4000/4500 Service Guide
Page 94
Place one Recovery CD to the optical drive, you finish all Recovery CDs. After you place the Recovery CD to the drive at one time till you will see the display below. Chapter 4 87 This step is to create image files to the system, you do not have to put the Recovery CD to the optical drive. 6. Put the Recovery CD to the optical drive in order.
TravelMate 2300/4000/4500 Service Guide
Page 96
Disk to continue. 4. Put NAPP CD into the optical drive. NAPP CD will ask you if you want to preload the system, please click [Y]. Please press any key to Disk Recovery 1. Chapter 4 89 Then boot up the system. 3. The system will start to build NAPP Master HDD. Prepare NAPP CD, Recovery CD and System CD. 2.
TravelMate 2300/4000/4500 Service Guide
Page 97
Place one Recovery CD to the optical drive. 5. Put the Recovery CD to the drive at one time till you do not have to put the Recovery CD to the system. 6. This step is to create image files to the system, you finish all Recovery CDs. 90 Chapter 4 Then choose Single Language or Multi-Languages Recovery. NOTE: For Multi-Languages Recovery, not more than five languages could be loaded to the optical drive in order. Select Disk to Disk Recovery.