
TravelMate 3000 Service Guide
Page 6
... Machine Disassembly and Replacement 45 General Information 46 Disassembly Procedure Flowchart 47 Removing the Battery Pack 49 Removing the miniPCI/Memory/HDD Module/Keyboard . . . 50 Seperate the LCD module and main unit 52 Disassemble the main unit 53 LCD module disassembly 56 HDD Disassembly ... Chapter 6 FRU (Field Replaceable Unit) List 79 Exploded Diagram 80 FRU List 84 Appendix A Model Definition and Configuration 90 TravelMate 3000 Series 90 Appendix B Test Compatible Components 91 Microsoft® Windows® XP Pro Environment Test 92 Appendix C Online Support Information 94 Chapter...
... Machine Disassembly and Replacement 45 General Information 46 Disassembly Procedure Flowchart 47 Removing the Battery Pack 49 Removing the miniPCI/Memory/HDD Module/Keyboard . . . 50 Seperate the LCD module and main unit 52 Disassemble the main unit 53 LCD module disassembly 56 HDD Disassembly ... Chapter 6 FRU (Field Replaceable Unit) List 79 Exploded Diagram 80 FRU List 84 Appendix A Model Definition and Configuration 90 TravelMate 3000 Series 90 Appendix B Test Compatible Components 91 Microsoft® Windows® XP Pro Environment Test 92 Appendix C Online Support Information 94 Chapter...

TravelMate 3000 Service Guide
Page 8
...keyboard T Built-in touchpad pointing device T Four cursosr keys, two Windows® keys, hot key controls, embedded numeric keypad T 6 easy-launch buttons ( internet, email, wireless LAN, Bluetooth® , Empowering key and one userprogrammable button) Expansion T T T T One Type II PCMCIA CardBus slot One type II miniPCI slot Upgradeable memory modules Acer.../MMC/SD) Acer ezDock4 support DC-in jack for AC adaptor Security T T Kensington lock slot BIOS user and supervisor password support Software T T T T T T T T Acer Launch Manager Acer eManager Acer System Recovery CD Acer disc-to-disc...
...keyboard T Built-in touchpad pointing device T Four cursosr keys, two Windows® keys, hot key controls, embedded numeric keypad T 6 easy-launch buttons ( internet, email, wireless LAN, Bluetooth® , Empowering key and one userprogrammable button) Expansion T T T T One Type II PCMCIA CardBus slot One type II miniPCI slot Upgradeable memory modules Acer.../MMC/SD) Acer ezDock4 support DC-in jack for AC adaptor Security T T Kensington lock slot BIOS user and supervisor password support Software T T T T T T T T Acer Launch Manager Acer eManager Acer System Recovery CD Acer disc-to-disc...

TravelMate 3000 Service Guide
Page 13
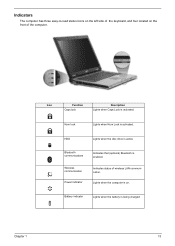
8 Keyboard Inputs data into your computer 9 Power button Turns the computer on and off Chapter 1 7
8 Keyboard Inputs data into your computer 9 Power button Turns the computer on and off Chapter 1 7
TravelMate 3000 Service Guide
Page 19
Battery indicator Lights when the battery is activated. Indicates status of the computer. Num lock Lights when Num Lock is being charged Chapter 1 13 HDD Lights when the disc drive is active Bluetooth communications Wireless communication Power indicator Indicates that (optional) Bluetooth is activated. Indicators The computer has three easy-to-read status icons on the left side of the keyboard, and four located on . Lights when the computer is on the front of wireless LAN communication. Icon Function Caps lock Description Lights when Caps Lock is enabled.
Battery indicator Lights when the battery is activated. Indicates status of the computer. Num lock Lights when Num Lock is being charged Chapter 1 13 HDD Lights when the disc drive is active Bluetooth communications Wireless communication Power indicator Indicates that (optional) Bluetooth is activated. Indicators The computer has three easy-to-read status icons on the left side of the keyboard, and four located on . Lights when the computer is on the front of wireless LAN communication. Icon Function Caps lock Description Lights when Caps Lock is enabled.
TravelMate 3000 Service Guide
Page 20
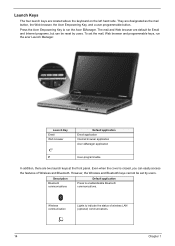
...and Web browser are designated as the mail button, the Web browser, the Acer Empowering Key, and a user programmable button. Wireless communication Lights to enable/disable Bluetooth communications. "Acer eManager" on page 24 "Launch Manager" on page 26 LaunLcahuknecyh Key Email ...Web browser Default appDliecafatuioltnapplication Email application Internet browser application Acer eManager application PP User-programmable In addition, there are located above the keyboard on the left hand side. They are default for Email and Internet programs, ...
...and Web browser are designated as the mail button, the Web browser, the Acer Empowering Key, and a user programmable button. Wireless communication Lights to enable/disable Bluetooth communications. "Acer eManager" on page 24 "Launch Manager" on page 26 LaunLcahuknecyh Key Email ...Web browser Default appDliecafatuioltnapplication Email application Internet browser application Acer eManager application PP User-programmable In addition, there are located above the keyboard on the left hand side. They are default for Email and Internet programs, ...

TravelMate 3000 Service Guide
Page 21
.... Scroll Lock does not work with the arithmetic operators +, -, *, and /). Scroll Lock + Chapter 1 15 Lock Keys The keyboard has three lock keys which you need to connect an external keypad. Using the Keyboard The keyboard has full-sized keys and an embedded keypad, separate cursor keys, two Windows keys and twelve function keys.
.... Scroll Lock does not work with the arithmetic operators +, -, *, and /). Scroll Lock + Chapter 1 15 Lock Keys The keyboard has three lock keys which you need to connect an external keypad. Using the Keyboard The keyboard has full-sized keys and an embedded keypad, separate cursor keys, two Windows keys and twelve function keys.

TravelMate 3000 Service Guide
Page 22
To simplify the keyboard legend, cursor-control key symbols are not printed on a standard keyboard. keypad. 16 Chapter 1 Desired action DesiNreduAmccLesosck on Num Lock On NuNmuLmockLOoffck off Type numbers Use embedded keypad in a normal the key within the enbedded manner. Type letters Fn Hold while pressing Type the letters in the same way as the numeric keypad on the keys. It is indicated by small characters located on the upper right corner of the keycaps. Embedded Numeric Keypad The embedded numeric keypad functions like a desktop numeric keypad.
To simplify the keyboard legend, cursor-control key symbols are not printed on a standard keyboard. keypad. 16 Chapter 1 Desired action DesiNreduAmccLesosck on Num Lock On NuNmuLmockLOoffck off Type numbers Use embedded keypad in a normal the key within the enbedded manner. Type letters Fn Hold while pressing Type the letters in the same way as the numeric keypad on the keys. It is indicated by small characters located on the upper right corner of the keycaps. Embedded Numeric Keypad The embedded numeric keypad functions like a desktop numeric keypad.

TravelMate 3000 Service Guide
Page 23
... effect as clickinTgabon the Windows Start button; it launches the Start menu. it opRens the application's context menu. F1 M Shift M R Chapter 1 17 Windows Keys The keyboard has two keys that perform Windows-specific functions. Key Key Key Windows logo key Application key Description IKceoDynescription DescriptioDnescription Pressed alone, this key has the...
... effect as clickinTgabon the Windows Start button; it launches the Start menu. it opRens the application's context menu. F1 M Shift M R Chapter 1 17 Windows Keys The keyboard has two keys that perform Windows-specific functions. Key Key Key Windows logo key Application key Description IKceoDynescription DescriptioDnescription Pressed alone, this key has the...

TravelMate 3000 Service Guide
Page 26
...typography/faq/faq12.htm for "En English (United States)" is set to United States-International or United Kingdom or if you have a keyboard with a European layout, you first set up Windows. International OK OK Alt Gr Note 20 www.microsoft.com/typography/faq/faq12.htm ...Regional and Language Options. 3. The Euro Symbol If your keyboard layout is set when you can type the Euro symbol on your keyboard. 2. NOTE: For US keyboard users: The keyboard layout is set to United States-International. Verify that the keyboard layout used for more information. Open a text editor or ...
...typography/faq/faq12.htm for "En English (United States)" is set to United States-International or United Kingdom or if you have a keyboard with a European layout, you first set up Windows. International OK OK Alt Gr Note 20 www.microsoft.com/typography/faq/faq12.htm ...Regional and Language Options. 3. The Euro Symbol If your keyboard layout is set when you can type the Euro symbol on your keyboard. 2. NOTE: For US keyboard users: The keyboard layout is set to United States-International. Verify that the keyboard layout used for more information. Open a text editor or ...

TravelMate 3000 Service Guide
Page 35
... reader NS87383, TQFP 64-pin Sigmatel STAC9200 Intel 915GM ICH6-M NS PC87541 ICH6-M V.92, Ambient MDC 1.5 ICH6-M Ti PC7411 Ti PC7411 Controller Keyboard Item Keyboard controller Keyboard vendor & model name Total number of keypads Windows logo key and Application key Multi-Language Specification NS87541 Standard... keyboard N/A Yes Yes Battery Item Vendor & model name Battery Type Typical capacity Cell voltage Number of battery cell Package configuration Pin 1 Pin 2 Pin 3 ...
... reader NS87383, TQFP 64-pin Sigmatel STAC9200 Intel 915GM ICH6-M NS PC87541 ICH6-M V.92, Ambient MDC 1.5 ICH6-M Ti PC7411 Ti PC7411 Controller Keyboard Item Keyboard controller Keyboard vendor & model name Total number of keypads Windows logo key and Application key Multi-Language Specification NS87541 Standard... keyboard N/A Yes Yes Battery Item Vendor & model name Battery Type Typical capacity Cell voltage Number of battery cell Package configuration Pin 1 Pin 2 Pin 3 ...

TravelMate 3000 Service Guide
Page 53
Chapter 3 47 For example, if you want to be removed during servicing. Disassembly Procedure Flowchart The flowchart on the succeeding page gives you a graphic representation on the entire disassembly sequence and instructs you must first remove the keyboard, then disassemble the inside assembly frame in that need to remove the main board, you on the components that order.
Chapter 3 47 For example, if you want to be removed during servicing. Disassembly Procedure Flowchart The flowchart on the succeeding page gives you a graphic representation on the entire disassembly sequence and instructs you must first remove the keyboard, then disassemble the inside assembly frame in that need to remove the main board, you on the components that order.

TravelMate 3000 Service Guide
Page 55
... side to pop out the memory and remove it. 5. Open the LCD panel. 2. Release the two inner keyboard latches that secure the RAM door and remove the RAM door. 2. Release another two outer keyboard latches. 4. Press the latch on left and right side to pop out the other memory and remove it... . 4. Press the latch on left and right side to pop out the miniPCI and remove it . Disconnect the keyboard FFC from the main unit. Chapter 3 49 Pull the HDD out and remove it over. 5. Remove the two screws that secure the HDD. 2.
... side to pop out the memory and remove it. 5. Open the LCD panel. 2. Release the two inner keyboard latches that secure the RAM door and remove the RAM door. 2. Release another two outer keyboard latches. 4. Press the latch on left and right side to pop out the other memory and remove it... . 4. Press the latch on left and right side to pop out the miniPCI and remove it . Disconnect the keyboard FFC from the main unit. Chapter 3 49 Pull the HDD out and remove it over. 5. Remove the two screws that secure the HDD. 2.

TravelMate 3000 Service Guide
Page 56
Remove the keyboard from the main unit. 50 Chapter 3 6.
Remove the keyboard from the main unit. 50 Chapter 3 6.

TravelMate 3000 Service Guide
Page 65
...connector. Do not replace a non-defective FRU: 1. Press F2 in the message window. NOTE: Make sure that the flexible cable extending from the keyboard is correctly seated in the connector on the System board. Replace the main board. The label can cause damage to the drive or can cause... Drive Check Do the following to be tested. Do the following to isolate the problem to the diagnostic memory in the message window. Replace the keyboard. 3. Replace the main board. See if CD-ROM Test is to select the test device: 1. Boot from the diagnostics diskette and start the...
...connector. Do not replace a non-defective FRU: 1. Press F2 in the message window. NOTE: Make sure that the flexible cable extending from the keyboard is correctly seated in the connector on the System board. Replace the main board. The label can cause damage to the drive or can cause... Drive Check Do the following to be tested. Do the following to isolate the problem to the diagnostic memory in the message window. Replace the keyboard. 3. Replace the main board. See if CD-ROM Test is to select the test device: 1. Boot from the diagnostics diskette and start the...
TravelMate 3000 Service Guide
Page 69
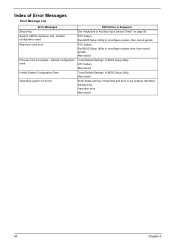
.... Dikette drive Hard disk drive Main board 63 Chapter 4 Default configuration used Invalid System Configuration Data Operating system not found FRU/Action in Sequence See "Keyboard or Auxiliary Input Device Check" on page 59 RTC battery Run BIOS Setup Utility to reconfigure system time, then reboot system. Main board Enter Setup...
.... Dikette drive Hard disk drive Main board 63 Chapter 4 Default configuration used Invalid System Configuration Data Operating system not found FRU/Action in Sequence See "Keyboard or Auxiliary Input Device Check" on page 59 RTC battery Run BIOS Setup Utility to reconfigure system time, then reboot system. Main board Enter Setup...

TravelMate 3000 Service Guide
Page 71
... Load alternate registers with initial POST values Restore CPU control word during warm boot Initialize PCI Bus Mastering devices Initialize keyboard controller BIOS ROM checksum Initialize cache before memory autosize 8254 timer initialization 8237 DMA controller initialization Reset Programmable Interrupt Controller... Test DRAM refresh Test 8742 Keyboard Controller Set ES segment register to 4 GB Autosize DRAM Initialize POST Memory Manager Clear 215 KB base RAM RAM ...
... Load alternate registers with initial POST values Restore CPU control word during warm boot Initialize PCI Bus Mastering devices Initialize keyboard controller BIOS ROM checksum Initialize cache before memory autosize 8254 timer initialization 8237 DMA controller initialization Reset Programmable Interrupt Controller... Test DRAM refresh Test 8742 Keyboard Controller Set ES segment register to 4 GB Autosize DRAM Initialize POST Memory Manager Clear 215 KB base RAM RAM ...
TravelMate 3000 Service Guide
Page 72
...system QuietBoot start (optional) Shadow video BIOS ROM Display BIOS copyright notice Display CPU type and speed Initialize EISA board Test keyboard Set key click if enabled Enable USB devices Test for unexpected interrupts Initialize POST display service Display prompt "Press F2 to ... (optional) Display shadow-area message Display possible high address for UMB recovery Display error messages Check for configuration errors Check for keyboard errors Set up hardware interrupt vectors Initialize coprocessor if present Disable onboard Super I/O ports and IRQs Late POST device initialization Detect...
...system QuietBoot start (optional) Shadow video BIOS ROM Display BIOS copyright notice Display CPU type and speed Initialize EISA board Test keyboard Set key click if enabled Enable USB devices Test for unexpected interrupts Initialize POST display service Display prompt "Press F2 to ... (optional) Display shadow-area message Display possible high address for UMB recovery Display error messages Check for configuration errors Check for keyboard errors Set up hardware interrupt vectors Initialize coprocessor if present Disable onboard Super I/O ports and IRQs Late POST device initialization Detect...

TravelMate 3000 Service Guide
Page 74
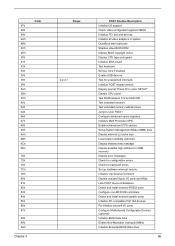
... F3h F4h F5h F6h F7h Beeps POST Routine Description Initialize notebook docking late Force check (optional) Extended checksum (optional) Redirect Int 15h to enable remote keyboard Redirect Int 13h to Full DOS Chapter 4 68
... F3h F4h F5h F6h F7h Beeps POST Routine Description Initialize notebook docking late Force check (optional) Extended checksum (optional) Redirect Int 15h to enable remote keyboard Redirect Int 13h to Full DOS Chapter 4 68

TravelMate 3000 Service Guide
Page 75
Reconnect the LCD connectors. Keyboard (if the brightness function key doesn't work ). Verify OS in Sequence First, plug a monitor to CRT port. Next, enter BIOS utility to execute "Load Setup ... extra horizontal or vertical lines displayed. LCD cable LCD inverter LCD Main board Enter BIOS Utility to running "Load Default Settings" then reboot the system. Keyboard (if the brightness function key doesn't work ). See "Power System Check" on page 60. Index of Symptom-to-FRU Error Message LCD-Related Symptoms Symptom...
Reconnect the LCD connectors. Keyboard (if the brightness function key doesn't work ). Verify OS in Sequence First, plug a monitor to CRT port. Next, enter BIOS utility to execute "Load Setup ... extra horizontal or vertical lines displayed. LCD cable LCD inverter LCD Main board Enter BIOS Utility to running "Load Default Settings" then reboot the system. Keyboard (if the brightness function key doesn't work ). See "Power System Check" on page 60. Index of Symptom-to-FRU Error Message LCD-Related Symptoms Symptom...

TravelMate 3000 Service Guide
Page 77
... Symptom / Error System configuration does not match the installed devices. Reconnect hard disk/CD-ROM drives/FDD or other peripherals. Keyboard Main board Reconnect touchpad cable. Power Management-Related Symptoms Symptom / Error Action in Sequence The system doesn't resume from Standby/Hibernation... mode. Main board Battery fuel gauge in Sequence Reconnect the keyboard cable. Printer driver Printer cable Printer Main board Enter BIOS Setup Utility to execute "Load Default Settings" then reboot the ...
... Symptom / Error System configuration does not match the installed devices. Reconnect hard disk/CD-ROM drives/FDD or other peripherals. Keyboard Main board Reconnect touchpad cable. Power Management-Related Symptoms Symptom / Error Action in Sequence The system doesn't resume from Standby/Hibernation... mode. Main board Battery fuel gauge in Sequence Reconnect the keyboard cable. Printer driver Printer cable Printer Main board Enter BIOS Setup Utility to execute "Load Default Settings" then reboot the ...


