
TravelMate 2100/2600 Service Guide
Page 25
... Cache size 1st level cache control 2nd level cache control Cache scheme control Specification ACPI 1.0b, SMBIOS 2.3, PCI 2.2, Boot Block, PXE 2.0, Mobile PC2001, Hard Disk Password, INT 13h Extensions, PCI Bus Power Management interface Specification, EI Torito-Bootable CD-ROM Format Specification V1.0, Simple Boot Flag 1.0 Set by switch, see SW5...
... Cache size 1st level cache control 2nd level cache control Cache scheme control Specification ACPI 1.0b, SMBIOS 2.3, PCI 2.2, Boot Block, PXE 2.0, Mobile PC2001, Hard Disk Password, INT 13h Extensions, PCI Bus Power Management interface Specification, EI Torito-Bootable CD-ROM Format Specification V1.0, Simple Boot Flag 1.0 Set by switch, see SW5...
TravelMate 2100/2600 Service Guide
Page 45
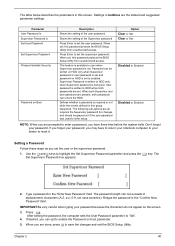
... and press the e key. When set . Use the w andy keys to "Set". 4. Type a password in the "Confirm New Password" field. IMPORTANT:Be very careful when typing your password. Settings in boldface are set and password on the screen. 3. When both passwords can not exceeds 8 alphanumeric characters (A-Z, a-z, 0-9, not case sensitive). The following sub-options are present...
... and press the e key. When set . Use the w andy keys to "Set". 4. Type a password in the "Confirm New Password" field. IMPORTANT:Be very careful when typing your password. Settings in boldface are set and password on the screen. 3. When both passwords can not exceeds 8 alphanumeric characters (A-Z, a-z, 0-9, not case sensitive). The following sub-options are present...

TravelMate 2100/2600 Service Guide
Page 46
... in the Enter Current Password field and press e. 3. The Set Password box appears: 2. Type the current password in the Enter New Password and Confirm New Password fields. When you are done, press u to highlight the Set Supervisor Password parameter and press the e key. Changing a Password 1. Use the w ... changes and exit the BIOS Setup Utility. Type a password in the Enter New Password field. If desired, you have changed the settings, press u to "Set". 5. After setting the password, the computer sets the User Password parameter to save the changes and exit the BIOS Setup...
... in the Enter Current Password field and press e. 3. The Set Password box appears: 2. Type the current password in the Enter New Password and Confirm New Password fields. When you are done, press u to highlight the Set Supervisor Password parameter and press the e key. Changing a Password 1. Use the w ... changes and exit the BIOS Setup Utility. Type a password in the Enter New Password field. If desired, you have changed the settings, press u to "Set". 5. After setting the password, the computer sets the User Password parameter to save the changes and exit the BIOS Setup...
TravelMate 2100/2600 Service Guide
Page 47
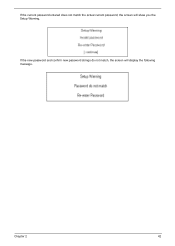
Chapter 2 42 If the new password and confirm new password strings do not match, the screen will show you the Setup Warning. If the current password entered does not match the actual current password, the screen will display the following message.
Chapter 2 42 If the new password and confirm new password strings do not match, the screen will show you the Setup Warning. If the current password entered does not match the actual current password, the screen will display the following message.
TravelMate 2100/2600 Service Guide
Page 83
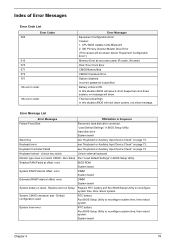
... not match CMOS - Index of Error Messages Error Code List Error Codes 006 010 070 071 072 110 Error Messages Equipment Configuration Error Causes: 1. Incorrect password is dead - Shadow RAM Failed at offset: nnnn BIOS ROM System board System RAM Failed at offset: nnnn DIMM System board Extended RAM Failed at...
... not match CMOS - Index of Error Messages Error Code List Error Codes 006 010 070 071 072 110 Error Messages Equipment Configuration Error Causes: 1. Incorrect password is dead - Shadow RAM Failed at offset: nnnn BIOS ROM System board System RAM Failed at offset: nnnn DIMM System board Extended RAM Failed at...

TravelMate 2100/2600 Service Guide
Page 88
... docking late Force check (optional) Extended checksum (optional) Unknown interrupt Chapter 4 prepare to boot operating system One short beep before boot Terminate QuietBoot (optional) Check password (optional) Prepare Boot Initialize DMI parameters Initialize PnP Option ROMs Clear parity checkers Display MultiBoot menu Clear screen (optional) Check virus and backup reminders Try...
... docking late Force check (optional) Extended checksum (optional) Unknown interrupt Chapter 4 prepare to boot operating system One short beep before boot Terminate QuietBoot (optional) Check password (optional) Prepare Boot Initialize DMI parameters Initialize PnP Option ROMs Clear parity checkers Display MultiBoot menu Clear screen (optional) Check virus and backup reminders Try...
TravelMate 2100/2600 Service Guide
Page 125
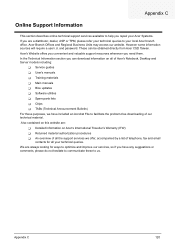
and password. In the Technical Information section you can be obtained directly from Acer CSD Taiwan. However some information sources will require a user i.d. These can download information on Acer's International Traveller's Warranty (ITW) T Returned material authorization procedures T An overview of all ...our technical material. Also contained on this website are: T Detailed information on all your local Acer branch office. Appendix C 120 Appendix C Online Support Information This section describes online technical support services available to help you repair your...
and password. In the Technical Information section you can be obtained directly from Acer CSD Taiwan. However some information sources will require a user i.d. These can download information on Acer's International Traveller's Warranty (ITW) T Returned material authorization procedures T An overview of all ...our technical material. Also contained on this website are: T Detailed information on all your local Acer branch office. Appendix C 120 Appendix C Online Support Information This section describes online technical support services available to help you repair your...

TravelMate 2100/2600 User's Guide
Page 8
2 Customizing my computer 31 Expanding through options 33 Connectivity options 33 Upgrade options 37 Using system utilities 39 Notebook Manager 39 Launch Manager 40 BIOS Utility 40 D to D Recovery (Disc to Disc) 41 Multilingual operating system installation 41 Restore without a Recovery CD 41 Setup password and exit 42 3 Troubleshooting my computer 43 Frequently-asked questions 45 Requesting service 49 International Traveler's Warranty (ITW) 49 Before you call 49 Appendix A Specifications 51 Appendix B Regulation & safety notices 57 Index 71
2 Customizing my computer 31 Expanding through options 33 Connectivity options 33 Upgrade options 37 Using system utilities 39 Notebook Manager 39 Launch Manager 40 BIOS Utility 40 D to D Recovery (Disc to Disc) 41 Multilingual operating system installation 41 Restore without a Recovery CD 41 Setup password and exit 42 3 Troubleshooting my computer 43 Frequently-asked questions 45 Requesting service 49 International Traveler's Warranty (ITW) 49 Before you call 49 Appendix A Specifications 51 Appendix B Regulation & safety notices 57 Index 71
TravelMate 2100/2600 User's Guide
Page 37
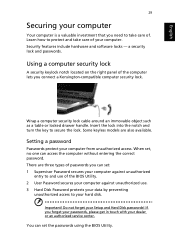
...by preventing unauthorized access to secure the lock. You can access the computer without entering the correct password. Some keyless models are three types of passwords you can set the passwords using the BIOS Utility. If you connect a Kensington-compatible computer security lock. Wrap a computer ... is a valuable investment that you need to protect and take care of. a security lock and passwords. Learn how to take care of the computer lets you forget your passwords, please get in touch with your hard disk. Important! Using a computer security lock A security ...
...by preventing unauthorized access to secure the lock. You can access the computer without entering the correct password. Some keyless models are three types of passwords you can set the passwords using the BIOS Utility. If you connect a Kensington-compatible computer security lock. Wrap a computer ... is a valuable investment that you need to protect and take care of. a security lock and passwords. Learn how to take care of the computer lets you forget your passwords, please get in touch with your hard disk. Important! Using a computer security lock A security ...
TravelMate 2100/2600 User's Guide
Page 47
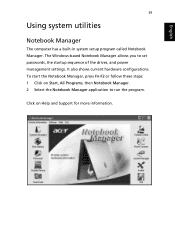
English 39 Using system utilities Notebook Manager The computer has a built-in system setup program called Notebook Manager. It also shows current hardware configurations. Click on Start, All Programs, then Notebook Manager. 2 Select the Notebook Manager application to set passwords, the startup sequence of the drives, and power management settings. To start the Notebook Manager, press Fn-F2 or follow these steps: 1 Click on Help and Support for more information. The Windows-based Notebook Manager allows you to run the program.
English 39 Using system utilities Notebook Manager The computer has a built-in system setup program called Notebook Manager. It also shows current hardware configurations. Click on Start, All Programs, then Notebook Manager. 2 Select the Notebook Manager application to set passwords, the startup sequence of the drives, and power management settings. To start the Notebook Manager, press Fn-F2 or follow these steps: 1 Click on Help and Support for more information. The Windows-based Notebook Manager allows you to run the program.

TravelMate 2100/2600 User's Guide
Page 50
...If "F5" is displayed. 5 Enter six 0s and continue. 6 "Acer Self-Configuration Preload" window appears. 7 Use the arrow keys to scroll through the items (operating system versions) and press "Enter" to reenter your password for confirmation before continuing. Important: This feature occupies 2 GB in a ...hit any key to exit the system recovery process when "Acer Self-Configuration Preload" window appears. Setup password and exit Press "F3" to setup password or press "F5" to reboot your hard drive. The screen will display "Password has been created. Please enter 000000:" is pressed, the...
...If "F5" is displayed. 5 Enter six 0s and continue. 6 "Acer Self-Configuration Preload" window appears. 7 Use the arrow keys to scroll through the items (operating system versions) and press "Enter" to reenter your password for confirmation before continuing. Important: This feature occupies 2 GB in a ...hit any key to exit the system recovery process when "Acer Self-Configuration Preload" window appears. Setup password and exit Press "F3" to setup password or press "F5" to reboot your hard drive. The screen will display "Password has been created. Please enter 000000:" is pressed, the...


