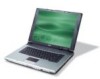
TravelMate 2310 Service Guide
Page 22
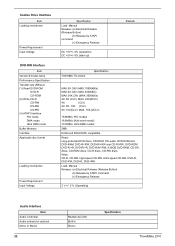
... Enhanced IDE(ATAPI) compatible Read: copy-protected DVD discs, CD-ROM, CD audio, DVD-ROM and DVD-RAM, DVD-R/-RW, DVD+R/+RW and CD-R/-RW, DVD-ROM, DVD-R/+R, DVD-R/+R, DVD-RW/+RW, 4.38GB DVD-RAM, CD-DA discs, CD-ROM discs, CD-R discs, CD-RW discs Write: CD-R, CD-RW, high-speed... by ATAPI command (c) Emergency Release 5 V +/- 5 % (Operating) Audio Interface Item Audio Controller Audio onboard or optional Mono or Stereo 22 Realtek ALC203 Built-in Stereo Specification TravelMate 2310
... Enhanced IDE(ATAPI) compatible Read: copy-protected DVD discs, CD-ROM, CD audio, DVD-ROM and DVD-RAM, DVD-R/-RW, DVD+R/+RW and CD-R/-RW, DVD-ROM, DVD-R/+R, DVD-R/+R, DVD-RW/+RW, 4.38GB DVD-RAM, CD-DA discs, CD-ROM discs, CD-R discs, CD-RW discs Write: CD-R, CD-RW, high-speed... by ATAPI command (c) Emergency Release 5 V +/- 5 % (Operating) Audio Interface Item Audio Controller Audio onboard or optional Mono or Stereo 22 Realtek ALC203 Built-in Stereo Specification TravelMate 2310
TravelMate 2310 Service Guide
Page 42
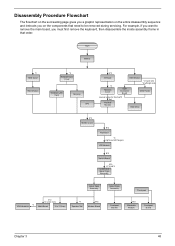
Start Battery *2 HDD Cover HDD Module *2 RAM/Wireless Cover Wireless LAN Card Memory CPU E*2 IO Bezel *2 Heatsink Cover ODD Module *2 back side *4 left/right side ODD Connector Board ODD Holder special screw ...
Start Battery *2 HDD Cover HDD Module *2 RAM/Wireless Cover Wireless LAN Card Memory CPU E*2 IO Bezel *2 Heatsink Cover ODD Module *2 back side *4 left/right side ODD Connector Board ODD Holder special screw ...
TravelMate 2310 Service Guide
Page 45
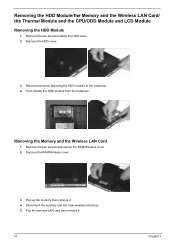
Removing the Memory and the Wireless LAN Card 1. Remove the RAM/Wireless cover. 3. Removing the HDD Module/the Memory and the Wireless LAN Card/ the Thermal Module and the CPU/ODD Module and LCD Module Removing .... 5. Remove the screw fastening the HDD module to the notebook. 4. Pop the wireless LAN card then remove it . 4. Remove the two screws that secure the RAM/Wireless cover. 2. Remove the HDD cover. 3. Then detach the HDD module from the notebook. Remove the two screws holding the HDD cover. 2. Pop up the...
Removing the Memory and the Wireless LAN Card 1. Remove the RAM/Wireless cover. 3. Removing the HDD Module/the Memory and the Wireless LAN Card/ the Thermal Module and the CPU/ODD Module and LCD Module Removing .... 5. Remove the screw fastening the HDD module to the notebook. 4. Pop the wireless LAN card then remove it . 4. Remove the two screws that secure the RAM/Wireless cover. 2. Remove the HDD cover. 3. Then detach the HDD module from the notebook. Remove the two screws holding the HDD cover. 2. Pop up the...

TravelMate 2310 Service Guide
Page 62
... at offset: nnnn BIOS ROM System board System RAM Failed at offset: nnnn DIMM System board Extended RAM Failed at xxxx:xxxx:xxxxh (R:xxxxh, W:xxxxh) Real Time Clock Error CMOS Battery Bad CMOS Checksum Error System disabled. Default configuration used RTC battery Run ...
... at offset: nnnn BIOS ROM System board System RAM Failed at offset: nnnn DIMM System board Extended RAM Failed at xxxx:xxxx:xxxxh (R:xxxxh, W:xxxxh) Real Time Clock Error CMOS Battery Bad CMOS Checksum Error System disabled. Default configuration used RTC battery Run ...
TravelMate 2310 Service Guide
Page 65
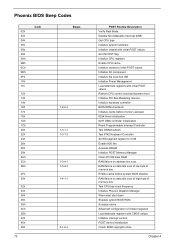
... DRAM refresh Test 8742 Keyboard Controller Set ES segment register to 4 GB Enable A20 line Autosize DRAM Initialize POST Memory Manager Clear 215 KB base RAM RAM failure on address line xxxx RAM failure on data bits xxxx of low byte of memory bus Enable cache before system BIOS shadow... RAM failure on data bits xxxx of high byte of memory bus Test CPU bus-clock frequency Initialize Phoenix Dispatch Manager Warm start shut down Shadow ...
... DRAM refresh Test 8742 Keyboard Controller Set ES segment register to 4 GB Enable A20 line Autosize DRAM Initialize POST Memory Manager Clear 215 KB base RAM RAM failure on address line xxxx RAM failure on data bits xxxx of low byte of memory bus Enable cache before system BIOS shadow... RAM failure on data bits xxxx of high byte of memory bus Test CPU bus-clock frequency Initialize Phoenix Dispatch Manager Warm start shut down Shadow ...
TravelMate 2310 Service Guide
Page 66
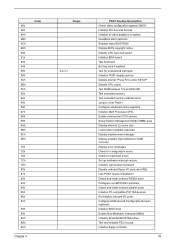
... keyboard Set key click if enabled Test for unexpected interrupts Initialize POST display service Display prompt "Press F2 to enter SETUP" Disable CPU cache Test RAM between 512 and 640 KB Test extended memory Test extended memory address lines Jump to User Patch1 Configure advanced cache registers Initialize Multi Processor APIC...
... keyboard Set key click if enabled Test for unexpected interrupts Initialize POST display service Display prompt "Press F2 to enter SETUP" Disable CPU cache Test RAM between 512 and 640 KB Test extended memory Test extended memory address lines Jump to User Patch1 Configure advanced cache registers Initialize Multi Processor APIC...


