Travelmate 2300 User's Guide
Page 8
2 Customizing my computer 37 Expanding through options 39 Connectivity options 39 Upgrade options 45 Using system utilities 48 Acer eManager 48 Launch Manager 49 BIOS Utility 49 D to D Recovery (Disc to Disc) 50 Multilingual operating system installation 50 Restore without a Recovery CD 50 Setup password and exit 51 3 Troubleshooting my computer 53 Frequently-asked questions 55 Troubleshooting tips 58 Error messages 59 Requesting service 60 ITW 60 Before you call 61 Appendix A Specifications 63 Appendix B Regulation & safety notices 69 Index 85
2 Customizing my computer 37 Expanding through options 39 Connectivity options 39 Upgrade options 45 Using system utilities 48 Acer eManager 48 Launch Manager 49 BIOS Utility 49 D to D Recovery (Disc to Disc) 50 Multilingual operating system installation 50 Restore without a Recovery CD 50 Setup password and exit 51 3 Troubleshooting my computer 53 Frequently-asked questions 55 Troubleshooting tips 58 Error messages 59 Requesting service 60 ITW 60 Before you call 61 Appendix A Specifications 63 Appendix B Regulation & safety notices 69 Index 85

Travelmate 2300 User's Guide
Page 26
... 1 Getting to know your TravelMate Hot keys The computer employs hot keys or key combinations to access most of the computer's controls like screen brightness, volume output and the BIOS Utility. Fn-F2 Fn-F3 Fn-F4 Acer eSetting Launches the Acer eSetting in the Acer eManager set by the Acer Empowering Key. To activate hot...
... 1 Getting to know your TravelMate Hot keys The computer employs hot keys or key combinations to access most of the computer's controls like screen brightness, volume output and the BIOS Utility. Fn-F2 Fn-F3 Fn-F4 Acer eSetting Launches the Acer eSetting in the Acer eManager set by the Acer Empowering Key. To activate hot...

Travelmate 2300 User's Guide
Page 43
You can access the computer without entering the correct password. Important! If you can set the passwords using the BIOS Utility. There are three types of passwords you forget your passwords, please get in touch with your hard disk. When set, no one can set : ...1 Supervisor Password secures your computer against unauthorized entry to and use of the BIOS Utility. 2 User Password secures your computer against unauthorized use. 3 Hard Disk Password protects your data by preventing unauthorized access to your dealer or an ...
You can access the computer without entering the correct password. Important! If you can set the passwords using the BIOS Utility. There are three types of passwords you forget your passwords, please get in touch with your hard disk. When set, no one can set : ...1 Supervisor Password secures your computer against unauthorized entry to and use of the BIOS Utility. 2 User Password secures your computer against unauthorized use. 3 Hard Disk Password protects your data by preventing unauthorized access to your dealer or an ...
Travelmate 2300 User's Guide
Page 57
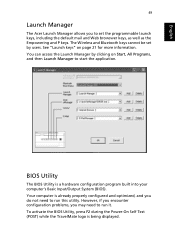
... However, if you encounter configuration problems, you may need to run this utility. BIOS Utility The BIOS Utility is being displayed. You can access the Launch Manager by users. English 49 Launch Manager The Acer Launch Manager allows you to start the application. See "Launch keys" on Start..., All Programs, and then Launch Manager to set by clicking on page 21 for more information. To activate the BIOS Utility, press F2 during the Power-On Self Test (POST) while the TravelMate logo...
... However, if you encounter configuration problems, you may need to run this utility. BIOS Utility The BIOS Utility is being displayed. You can access the Launch Manager by users. English 49 Launch Manager The Acer Launch Manager allows you to start the application. See "Launch keys" on Start..., All Programs, and then Launch Manager to set by clicking on page 21 for more information. To activate the BIOS Utility, press F2 during the Power-On Self Test (POST) while the TravelMate logo...

Travelmate 2300 User's Guide
Page 58
... my computer D to D Recovery (Disc to Disc) English Note: This feature is only available on the system. 2 Acer multilingual operating system selection menu will pop-up all data will be the only option for future recovery operations. 5 The system... changes. Press Enter to see if "Hard Disk Recovery" function is [Enabled]. Note: To activate BIOS Setup Utility, press during POST. Before performing a restore operation, please check the BIOS settings. a Check to confirm your notebook. Multilingual operating system installation Follow the instructions to the language version...
... my computer D to D Recovery (Disc to Disc) English Note: This feature is only available on the system. 2 Acer multilingual operating system selection menu will pop-up all data will be the only option for future recovery operations. 5 The system... changes. Press Enter to see if "Hard Disk Recovery" function is [Enabled]. Note: To activate BIOS Setup Utility, press during POST. Before performing a restore operation, please check the BIOS settings. a Check to confirm your notebook. Multilingual operating system installation Follow the instructions to the language version...
Travelmate 2300 User's Guide
Page 59
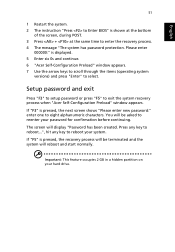
... to eight alphanumeric characters. The screen will be asked to exit the system recovery process when "Acer Self-Configuration Preload" window appears. English 51 1 Restart the system. 2 The instruction "Press to Enter BIOS" is shown at the bottom of the screen, during POST. 3 Press + at the same... time to select. If "F5" is displayed. 5 Enter six 0s and continue. 6 "Acer Self-Configuration Preload" window appears. 7 Use the arrow keys to ...
... to eight alphanumeric characters. The screen will be asked to exit the system recovery process when "Acer Self-Configuration Preload" window appears. English 51 1 Restart the system. 2 The instruction "Press to Enter BIOS" is shown at the bottom of the screen, during POST. 3 Press + at the same... time to select. If "F5" is displayed. 5 Enter six 0s and continue. 6 "Acer Self-Configuration Preload" window appears. 7 Use the arrow keys to ...

Travelmate 2300 User's Guide
Page 65
... instructions included with the kit. • If the problem does not lie with the kit. If it using a drive cleaning kit. Remember to access the BIOS Utility and verify that the infrared ports of 1 meter apart. • Make sure there is supported by the drive. If the CD or DVD is...
... instructions included with the kit. • If the problem does not lie with the kit. If it using a drive cleaning kit. Remember to access the BIOS Utility and verify that the infrared ports of 1 meter apart. • Make sure there is supported by the drive. If the CD or DVD is...

Travelmate 2300 User's Guide
Page 66
... location: 1 Click on Start, Control Panel. 2 Double-click on Phone and Modem Options. 3 Click on the printer. • During POST, press F2 to access the BIOS Utility and verify that delivers onscreen error message reports to Windows Help and Support.
... location: 1 Click on Start, Control Panel. 2 Double-click on Phone and Modem Options. 3 Click on the printer. • During POST, press F2 to access the BIOS Utility and verify that delivers onscreen error message reports to Windows Help and Support.

Travelmate 2300 User's Guide
Page 67
... measures, please contact your dealer or an authorized service center. Memory Size Mismatch Press F2 (during POST) to enter the BIOS Utility; Keyboard Interface Error Contact your dealer or an authorized service center. CMOS Checksum Error Contact your dealer or an authorized service...authorized service center. Disk Boot Failure Insert a system (bootable) diskette into the floppy drive (A:), then press Enter to enter the BIOS Utility; If you receive an error message, note the message and take the corrective action. The following table lists the error ...
... measures, please contact your dealer or an authorized service center. Memory Size Mismatch Press F2 (during POST) to enter the BIOS Utility; Keyboard Interface Error Contact your dealer or an authorized service center. CMOS Checksum Error Contact your dealer or an authorized service...authorized service center. Disk Boot Failure Insert a system (bootable) diskette into the floppy drive (A:), then press Enter to enter the BIOS Utility; If you receive an error message, note the message and take the corrective action. The following table lists the error ...

Travelmate 2300 User's Guide
Page 73
...; M Processor 320, 330 Memory • 256/512 MB of DDR333 SDRAM standard, upgradeable to 2048 MB with dual soDIMM modules • 512 KB flash ROM BIOS Data storage • One 30 GB and above E-IDE hard disk (2.5", 9.5mm, UltraDMA-100) • One internal optical drive, or One 5.25-inch internal removable...
...; M Processor 320, 330 Memory • 256/512 MB of DDR333 SDRAM standard, upgradeable to 2048 MB with dual soDIMM modules • 512 KB flash ROM BIOS Data storage • One 30 GB and above E-IDE hard disk (2.5", 9.5mm, UltraDMA-100) • One internal optical drive, or One 5.25-inch internal removable...
Travelmate 2300 User's Guide
Page 93
Index A AC adapter caring for v AcerMedia drive 26 audio 28 adjusting the volume 28 troubleshooting 56 B battery pack caring for v BIOS Utility 49 BIOS utility 49 brightness hotkeys 19 C caps lock 15 on indicator 13 care AC adapter v battery pack v computer iv CD troubleshooting 57 CD-ROM ejecting 25 ...
Index A AC adapter caring for v AcerMedia drive 26 audio 28 adjusting the volume 28 troubleshooting 56 B battery pack caring for v BIOS Utility 49 BIOS utility 49 brightness hotkeys 19 C caps lock 15 on indicator 13 care AC adapter v battery pack v computer iv CD troubleshooting 57 CD-ROM ejecting 25 ...
Travelmate 2300 User's Guide
Page 94
... support information 60 T touchpad 23 hotkey 19 using 23 travel international flights 32 local trips 32 troubleshooting 54 tips 58 U universal serial bus 41 utility BIOS Setup 49 V view front 7 left 7 rear 9
... support information 60 T touchpad 23 hotkey 19 using 23 travel international flights 32 local trips 32 troubleshooting 54 tips 58 U universal serial bus 41 utility BIOS Setup 49 V view front 7 left 7 rear 9

TravelMate 2300/4000/4500 Service Guide
Page 26
Acer ePowerManagement Launches the Acer ePowerManagement in the Acer eManager set by the Acer Empowering key. Turns the internal touchpad on and off. To activate hot keys, press and hold the Fn key before pressing the other key in ... Displays help on hot keys. Turns the display screen backlight off . Sleep Puts the computer in the hot key combination. Acer eSetting Launches the Acer eSetting in the Acer eManager set by the Acer Empowering key. Hot Keys The computer employs hot keys or key combinations to access most of the computer's controls like...
Acer ePowerManagement Launches the Acer ePowerManagement in the Acer eManager set by the Acer Empowering key. Turns the internal touchpad on and off. To activate hot keys, press and hold the Fn key before pressing the other key in ... Displays help on hot keys. Turns the display screen backlight off . Sleep Puts the computer in the hot key combination. Acer eSetting Launches the Acer eSetting in the Acer eManager set by the Acer Empowering key. Hot Keys The computer employs hot keys or key combinations to access most of the computer's controls like...
TravelMate 2300/4000/4500 Service Guide
Page 33
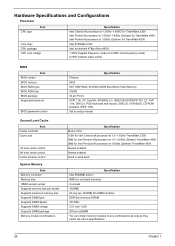
... for TravelMate 2300 Intel Pentim M processor at 1.5GHz~1.6GHz (Dothan) for TravelMate 4000 Intel Pentim M processor at 1.8GHz (Dothan) for TravelMate 4500 Intel 855GME+ICH4 Intel socketable 478pin Micro-BGA 1.308V (highest frequency mode) to 0.956V (low frequency mode) 0.748V (deeper sleep mode) BIOS Item BIOS vendor BIOS Version BIOS ROM type BIOS ROM size BIOS package Supported protocols BIOS password...
... for TravelMate 2300 Intel Pentim M processor at 1.5GHz~1.6GHz (Dothan) for TravelMate 4000 Intel Pentim M processor at 1.8GHz (Dothan) for TravelMate 4500 Intel 855GME+ICH4 Intel socketable 478pin Micro-BGA 1.308V (highest frequency mode) to 0.956V (low frequency mode) 0.748V (deeper sleep mode) BIOS Item BIOS vendor BIOS Version BIOS ROM type BIOS ROM size BIOS package Supported protocols BIOS password...

TravelMate 2300/4000/4500 Service Guide
Page 38
... UMA 16/32/64MB ATI M11-P 64MB for TM4500 DDR Specification ICH4-M 2.0 USB 1.1 and USB 2.0 Host controller 3 two on the front side Enable/Disable by BIOS Setup TI PC7411 1 Right side IEEE 1394 Specification TI PC7411 Type-II One type-II Right panel No ZV support Yes Specification Controller Intel 855GME...
... UMA 16/32/64MB ATI M11-P 64MB for TM4500 DDR Specification ICH4-M 2.0 USB 1.1 and USB 2.0 Host controller 3 two on the front side Enable/Disable by BIOS Setup TI PC7411 1 Right side IEEE 1394 Specification TI PC7411 Type-II One type-II Right panel No ZV support Yes Specification Controller Intel 855GME...
TravelMate 2300/4000/4500 Service Guide
Page 44
... Number: MPAA01Q2G0746A HDD2 Model Name: HDD2 Serial Number: ATAPI Device: MATSHITADVD-RAM UJ-825S System BIOS Ver: VGA BIOS Ver: 3A01 Montara-GME3360 KBC Ver: PQ1A24 Serial Number 1234567890123456789012 Asset Tag Number: 1234567890 Product Aspire1680 Manufacturer Name: Acer UUID: xxxxxxxxxxxxxxxxxxxxxxxxxxxxxxxx F1 Help Esc Exit ↑ ↓ Select Item ← → Select Menu F5...
... Number: MPAA01Q2G0746A HDD2 Model Name: HDD2 Serial Number: ATAPI Device: MATSHITADVD-RAM UJ-825S System BIOS Ver: VGA BIOS Ver: 3A01 Montara-GME3360 KBC Ver: PQ1A24 Serial Number 1234567890123456789012 Asset Tag Number: 1234567890 Product Aspire1680 Manufacturer Name: Acer UUID: xxxxxxxxxxxxxxxxxxxxxxxxxxxxxxxx F1 Help Esc Exit ↑ ↓ Select Item ← → Select Menu F5...

TravelMate 2300/4000/4500 Service Guide
Page 45
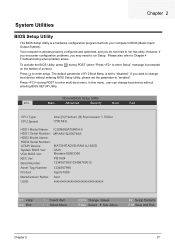
... menu are six menu options: Info., Main, System Devices, Security, Boot, and Exit. Read this carefully when making changes to expand this item. Navigating the BIOS Utility There are shown on the bottom of a parameter if it is enclosed in square brackets. Follow these instructions: T To choose a menu, use the cursor... settings by pressing t. T In any menu, you are found in models. 38 Chapter 2 Navigation keys for parameters are in any changes made and exit the BIOS Setup Utility.
... menu are six menu options: Info., Main, System Devices, Security, Boot, and Exit. Read this carefully when making changes to expand this item. Navigating the BIOS Utility There are shown on the bottom of a parameter if it is enclosed in square brackets. Follow these instructions: T To choose a menu, use the cursor... settings by pressing t. T In any menu, you are found in models. 38 Chapter 2 Navigation keys for parameters are in any changes made and exit the BIOS Setup Utility.

TravelMate 2300/4000/4500 Service Guide
Page 46
... 1.70Ghz 1700 MHz HDD1 Model Name: HDD1 Serial Number: HDD2 Model Name: HDD2 Serial Number: ATAPI Device: System BIOS Ver: VGA BIOS Ver: KBC Ver: Serial Number Asset Tag Number: Product Manufacturer Name: UUID: IC25N080ATMR04-0 MPAA01Q2G0746A MATSHITADVD-RAM UJ-825S ...3A01 Montara-GME3360 PQ1A24 1234567890123456789012 1234567890 Aspire1680 Acer xxxxxxxxxxxxxxxxxxxxxxxxxxxxxxxx F1 Help Esc Exit ↑ ↓ Select Item ← → Select...
... 1.70Ghz 1700 MHz HDD1 Model Name: HDD1 Serial Number: HDD2 Model Name: HDD2 Serial Number: ATAPI Device: System BIOS Ver: VGA BIOS Ver: KBC Ver: Serial Number Asset Tag Number: Product Manufacturer Name: UUID: IC25N080ATMR04-0 MPAA01Q2G0746A MATSHITADVD-RAM UJ-825S ...3A01 Montara-GME3360 PQ1A24 1234567890123456789012 1234567890 Aspire1680 Acer xxxxxxxxxxxxxxxxxxxxxxxxxxxxxxxx F1 Help Esc Exit ↑ ↓ Select Item ← → Select...

TravelMate 2300/4000/4500 Service Guide
Page 49
... Security Boot Exit Internal Touchpad: Infrared Port (FIR): [Both] [Enabled] Item Specific Help Configure Infrared Port using options: [Disable] No configuration [Enabled] User configuration [Auto] BIOS or OS chooses configuration (OS Controlled) Displayed when controlled by OS F1 Help Esc Exit ↑ ↓ Select Item ← → Select Menu F5/F6...
... Security Boot Exit Internal Touchpad: Infrared Port (FIR): [Both] [Enabled] Item Specific Help Configure Infrared Port using options: [Disable] No configuration [Enabled] User configuration [Auto] BIOS or OS chooses configuration (OS Controlled) Displayed when controlled by OS F1 Help Esc Exit ↑ ↓ Select Item ← → Select Menu F5/F6...
TravelMate 2300/4000/4500 Service Guide
Page 52
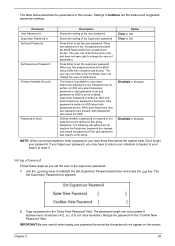
The table below describes the parameters in this password protects the BIOS Setup Utility from unauthorized access. The user can not either enter the Setup menu nor change the value of parameters. If you forget your ..." field. Supervisor Password is written to change the value of parameters. The Set Supervisor Password box appears: 2. Type a password in this password protects the BIOS Setup Utility from unauthorized access. Chapter 2 45 Parameter User Password is Supervisor Password is Set User Password Set Supervisor Password Primary Harddisk Security Password on...
The table below describes the parameters in this password protects the BIOS Setup Utility from unauthorized access. The user can not either enter the Setup menu nor change the value of parameters. If you forget your ..." field. Supervisor Password is written to change the value of parameters. The Set Supervisor Password box appears: 2. Type a password in this password protects the BIOS Setup Utility from unauthorized access. Chapter 2 45 Parameter User Password is Supervisor Password is Set User Password Set Supervisor Password Primary Harddisk Security Password on...


