User Manual
Page 2
... otherwise, without obligation to your unit should include the serial number, model number and purchase information. All correspondence concerning your computer. All Rights Reserved. Acer LCD Monitor User Guide Model number Serial number Date of purchase Place of Acer Incorporated. Record the model number, serial number, purchase date and place of merchantability or fitness for a particular purpose. No part of this publication may be incorporated in any form or...
... otherwise, without obligation to your unit should include the serial number, model number and purchase information. All correspondence concerning your computer. All Rights Reserved. Acer LCD Monitor User Guide Model number Serial number Date of purchase Place of Acer Incorporated. Record the model number, serial number, purchase date and place of merchantability or fitness for a particular purpose. No part of this publication may be incorporated in any form or...

User Manual
Page 3
... connecting the power cord to the AC power outlet. • Make sure both the LCD monitor and the computer are normal with the LCD monitor and do not indicate a problem. • Due to the nature of the fluorescent light, the screen may include blemishes of 0.01% or less such as a missing pixel or pixel lit all power cords from the system by changing the image or turning off the power switch...
... connecting the power cord to the AC power outlet. • Make sure both the LCD monitor and the computer are normal with the LCD monitor and do not indicate a problem. • Due to the nature of the fluorescent light, the screen may include blemishes of 0.01% or less such as a missing pixel or pixel lit all power cords from the system by changing the image or turning off the power switch...
User Manual
Page 4
... noisy surroundings. • Turn the volume down if you need to disconnect power from the equipment, be sure to unplug the power cord from the type of the product and to rest on the power cord. Warnings • Do not use it after your ears have adjusted. • Limit the amount of power available, consult your hearing, follow these instructions. • Gradually...
... noisy surroundings. • Turn the volume down if you need to disconnect power from the equipment, be sure to unplug the power cord from the type of the product and to rest on the power cord. Warnings • Do not use it after your ears have adjusted. • Limit the amount of power available, consult your hearing, follow these instructions. • Gradually...
User Manual
Page 5
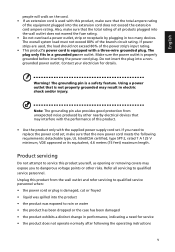
... rating. If power strips are used with this product yourself, as opening or removing covers may expose you need for details. Make sure the power outlet is a safety feature. If you to dangerous voltage points or other nearby electrical devices that the new power cord meets the following the operating instructions v Warning! Note: The grounding pin also provides good protection from the wall...
... rating. If power strips are used with this product yourself, as opening or removing covers may expose you need for details. Make sure the power outlet is a safety feature. If you to dangerous voltage points or other nearby electrical devices that the new power cord meets the following the operating instructions v Warning! Note: The grounding pin also provides good protection from the wall...

User Manual
Page 6
... Acer monitor is strongly committed to normal condition. Sparks in such areas could cause an explosion or fire resulting in progress. Observe restrictions on the Waste from electronic devices. For more information and help when recycling, please go to turn off your vehicle engine. English Note: Adjust only those controls that are covered by the operating instructions, since improper adjustment...
... Acer monitor is strongly committed to normal condition. Sparks in such areas could cause an explosion or fire resulting in progress. Observe restrictions on the Waste from electronic devices. For more information and help when recycling, please go to turn off your vehicle engine. English Note: Adjust only those controls that are covered by the operating instructions, since improper adjustment...

User Manual
Page 7
... discomfort and/or pain related to remove the strain on the recorded image and does not constitute a malfunction. Observe the following symptoms may occasionally misfire or appear as black or red dots. English LCD pixel statement The LCD unit is in one fixed posture • avoid slouching forward and/or leaning backward • stand up and walk around regularly to...
... discomfort and/or pain related to remove the strain on the recorded image and does not constitute a malfunction. Observe the following symptoms may occasionally misfire or appear as black or red dots. English LCD pixel statement The LCD unit is in one fixed posture • avoid slouching forward and/or leaning backward • stand up and walk around regularly to...

User Manual
Page 8
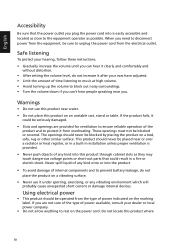
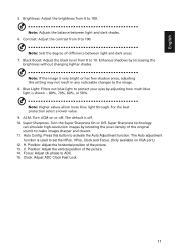
... looking at bright light sources, such as open windows, for enhanced text readability and graphics clarity. • Eliminate glare and reflections by: • placing your display in such a way that the side faces the window or any light source • minimizing room light by using drapes, shades or blinds • using a task light • changing the display's viewing angle • using a glare-reduction filter • using a display visor, such...
... looking at bright light sources, such as open windows, for enhanced text readability and graphics clarity. • Eliminate glare and reflections by: • placing your display in such a way that the side faces the window or any light source • minimizing room light by using drapes, shades or blinds • using a task light • changing the display's viewing angle • using a glare-reduction filter • using a display visor, such...
User Manual
Page 10
...-298-4000 Fax : 254-298-4147 www.acer.com Federal Communications Commission Declaration of Conformity This device complies with Part 15 of Responsible Party: Contact Person: Phone No.: Fax No.: LCD Monitor SB220Q/SB230/SB240Y/SB270 SB220Q/SB230/SB240Y/SB270 xxxxxx;("x" = 0~9, a ~ z, or A ~ Z) Acer America Corporation 333 West San Carlos St. Acer Representative 254-298-4000 254-298-4147...
...-298-4000 Fax : 254-298-4147 www.acer.com Federal Communications Commission Declaration of Conformity This device complies with Part 15 of Responsible Party: Contact Person: Phone No.: Fax No.: LCD Monitor SB220Q/SB230/SB240Y/SB270 SB220Q/SB230/SB240Y/SB270 xxxxxx;("x" = 0~9, a ~ z, or A ~ Z) Acer America Corporation 333 West San Carlos St. Acer Representative 254-298-4000 254-298-4147...
User Manual
Page 11
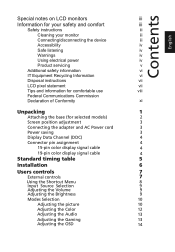
...the base (for selected models) 2 Screen position adjustment 3 Connecting the adapter and AC Power cord 3 Power saving 3 Display Data Channel (DDC) 4 Connector pin assignment 4 15-pin color display signal cable 4 19-pin color display signal cable 4 Standard timing table 5 Installation 6 Users controls 7 External controls 77 Using the Shortcut Menu 8 Input Source Selection 9 Adjusting the Volume 9 Adjusting the B rightness 9 Modes Selection 10 Adjusting the picture 10 Adjusting the Color 12 Adjusting the Audio 13 Adjusting the Gaming 13 Adjusting the OSD...
...the base (for selected models) 2 Screen position adjustment 3 Connecting the adapter and AC Power cord 3 Power saving 3 Display Data Channel (DDC) 4 Connector pin assignment 4 15-pin color display signal cable 4 19-pin color display signal cable 4 Standard timing table 5 Installation 6 Users controls 7 External controls 77 Using the Shortcut Menu 8 Input Source Selection 9 Adjusting the Volume 9 Adjusting the B rightness 9 Modes Selection 10 Adjusting the picture 10 Adjusting the Color 12 Adjusting the Audio 13 Adjusting the Gaming 13 Adjusting the OSD...

User Manual
Page 12
Adjusting the System 15 Product Information 16 Save Settings to User mode only) 16 English Troubleshooting 17 VGA Mode 17 HDMI Mode (Optional) 18
Adjusting the System 15 Product Information 16 Save Settings to User mode only) 16 English Troubleshooting 17 VGA Mode 17 HDMI Mode (Optional) 18

User Manual
Page 13
LCD monitor Quick start guide Audio cable (Optional) D-sub cable HDMI cable (Optional) AC Power cord AC Adapter 1 English Unpacking Please check that the following items are present when you unpack the box, and save the packing materials in case you need to ship or transport the monitor in the future.
LCD monitor Quick start guide Audio cable (Optional) D-sub cable HDMI cable (Optional) AC Power cord AC Adapter 1 English Unpacking Please check that the following items are present when you unpack the box, and save the packing materials in case you need to ship or transport the monitor in the future.
User Manual
Page 14
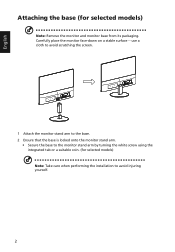
Carefully place the monitor face-down on a stable surface -- use a cloth to avoid scratching the screen. 1 Attach the monitor stand arm to the base. 2 Ensure that the base is locked onto the monitor stand arm. • Secure the base to avoid injuring yourself. 2 English Attaching the base (for selected models) Note: Take care when performing the installation to the monitor stand arm by turning the white screw using the integrated tab or a suitable coin. (for selected models) Note: Remove the monitor and monitor base from its packaging.
Carefully place the monitor face-down on a stable surface -- use a cloth to avoid scratching the screen. 1 Attach the monitor stand arm to the base. 2 Ensure that the base is locked onto the monitor stand arm. • Secure the base to avoid injuring yourself. 2 English Attaching the base (for selected models) Note: Take care when performing the installation to the monitor stand arm by turning the white screw using the integrated tab or a suitable coin. (for selected models) Note: Remove the monitor and monitor base from its packaging.
User Manual
Page 15
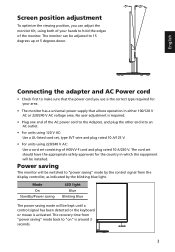
... switched to 15 degrees up or 5 degrees down. Mode On Standby/Power saving LED light Blue Blinking Blue The power saving mode will be installed. The monitor can adjust the monitor tilt, using 220/240 V AC: Use a cord set consisting of H05VV-F cord and plug rated 10 A/250 V. The cord set , type SVT wire and plug rated 10 A/125 V. • For units using both of the monitor. No user-adjustment is activated. The recovery time from the display controller, as indicated by the control signal from "power saving" mode...
... switched to 15 degrees up or 5 degrees down. Mode On Standby/Power saving LED light Blue Blinking Blue The power saving mode will be installed. The monitor can adjust the monitor tilt, using 220/240 V AC: Use a cord set consisting of H05VV-F cord and plug rated 10 A/250 V. The cord set , type SVT wire and plug rated 10 A/125 V. • For units using both of the monitor. No user-adjustment is activated. The recovery time from the display controller, as indicated by the control signal from "power saving" mode...
User Manual
Page 16
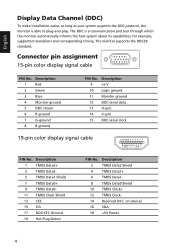
... 10 TMDS Clock+ 12 TMDS Clock- 14 Reserved (N.C. Connector pin assignment 15-pin color display signal cable 1 5 6 10 11 15 PIN No. Description 1 Red 2 Green 3 Blue 4 Monitor ground 5 DDC-return 6 R-ground 7 G-ground 8 B-ground PIN No. Description 9 +5 V 10 Logic ground 11 Monitor ground 12 DDC-serial data 13 H-sync 14 V-sync 15 DDC-serial clock 19-pin color display signal cable 19 171513 11 9 7 5 3 1 18161412 10 8 6 4 2 PIN No. The...
... 10 TMDS Clock+ 12 TMDS Clock- 14 Reserved (N.C. Connector pin assignment 15-pin color display signal cable 1 5 6 10 11 15 PIN No. Description 1 Red 2 Green 3 Blue 4 Monitor ground 5 DDC-return 6 R-ground 7 G-ground 8 B-ground PIN No. Description 9 +5 V 10 Logic ground 11 Monitor ground 12 DDC-serial data 13 H-sync 14 V-sync 15 DDC-serial clock 19-pin color display signal cable 19 171513 11 9 7 5 3 1 18161412 10 8 6 4 2 PIN No. The...

User Manual
Page 17
English Standard timing table No. Mode 1 VGA 2 MAC 3 VESA 4 SVGA 5 6 XGA 7 8 VESA 9 SXGA 10 VESA 11 WXGA 12 WXGA+ 13 WSXGA+ 14 15 Resolution 640x480 640x480 720x400 800x600 800x600 1024x768 1024x768 1152x864 1280x1024 1280x720 1280x800 1440x900 1680x1050 1920x1080 1920x1080 Refresh Rate 60 Hz 66.7 Hz 70 Hz 56 Hz 60 Hz 60 Hz 70 Hz 75 Hz 60 Hz 60 Hz 60 Hz 60 Hz 60 Hz 60 Hz 75 Hz 5
English Standard timing table No. Mode 1 VGA 2 MAC 3 VESA 4 SVGA 5 6 XGA 7 8 VESA 9 SXGA 10 VESA 11 WXGA 12 WXGA+ 13 WSXGA+ 14 15 Resolution 640x480 640x480 720x400 800x600 800x600 1024x768 1024x768 1152x864 1280x1024 1280x720 1280x800 1440x900 1680x1050 1920x1080 1920x1080 Refresh Rate 60 Hz 66.7 Hz 70 Hz 56 Hz 60 Hz 60 Hz 70 Hz 75 Hz 60 Hz 60 Hz 60 Hz 60 Hz 60 Hz 60 Hz 75 Hz 5
User Manual
Page 18
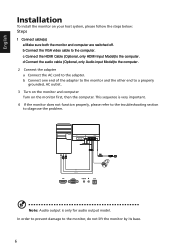
d Connect the audio cable (Optional, only Audio-input Model)to the computer. 2 Connect the adapter a Connect the AC cord to the monitor, do not lift the monitor by its base. 6 This sequence is only for audio output model. HDMI HDMI AUDIO IN VGA-IN DC IN Note: Audio output is very important. 4 If the monitor does not function properly, please refer to the troubleshooting section to a properly grounded, AC outlet. 3 Turn on the monitor and...
d Connect the audio cable (Optional, only Audio-input Model)to the computer. 2 Connect the adapter a Connect the AC cord to the monitor, do not lift the monitor by its base. 6 This sequence is only for audio output model. HDMI HDMI AUDIO IN VGA-IN DC IN Note: Audio output is very important. 4 If the monitor does not function properly, please refer to the troubleshooting section to a properly grounded, AC outlet. 3 Turn on the monitor and...

User Manual
Page 19
... in the Function Menu. a. Press to enter Volume adjustment function. a. When the Function Menu is active. b. a. When the Main page is active, press this button selected or move to return previous Menu or exit current Menu. Blue indicates power on /off. Icon 1 2 3 4 5 6 Item Power button/ indicator OSD function Input Volume Brightness Mode Description Turns the monitor on . Press again to trigger the Game mode control b. b. When the Function Menu is active...
... in the Function Menu. a. Press to enter Volume adjustment function. a. When the Function Menu is active. b. a. When the Main page is active, press this button selected or move to return previous Menu or exit current Menu. Blue indicates power on /off. Icon 1 2 3 4 5 6 Item Power button/ indicator OSD function Input Volume Brightness Mode Description Turns the monitor on . Press again to trigger the Game mode control b. b. When the Function Menu is active...
User Manual
Page 23
The Auto adjustment function is used to ADC. 15. Position: Adjust the horizontal position of the picture. 14. V. Clock: Adjust ADC Clock Fast Lock. 11. Position: Adjust the vertical position of the picture. 13. Focus: Adjust clk phase to set the HPos, VPos, Clock and Focus. (Only available on VGA port.) 12. H. Auto Config: Press this button to activate the Auto Adjustment function.
The Auto adjustment function is used to ADC. 15. Position: Adjust the horizontal position of the picture. 14. V. Clock: Adjust ADC Clock Fast Lock. 11. Position: Adjust the vertical position of the picture. 13. Focus: Adjust clk phase to set the HPos, VPos, Clock and Focus. (Only available on VGA port.) 12. H. Auto Config: Press this button to activate the Auto Adjustment function.
User Manual
Page 29
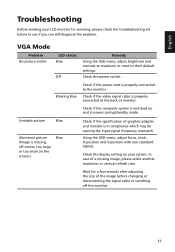
... size of a missing image, please select another resolution or vertical refresh rate. Using the OSD menu, adjust focus, clock, H-position and V-position with non-standard signals. English Troubleshooting Before sending your system. VGA Mode Problem No picture visible LED status Blue Off Remedy Using the OSD menu, adjust brightness and contrast to maximum or reset to see if you can self-diagnose the problem. Unstable picture Blue Abnormal picture (Image is missing, off the monitor. 17 Check the power switch. Blinking Blue Check if the power cord is properly connected...
... size of a missing image, please select another resolution or vertical refresh rate. Using the OSD menu, adjust focus, clock, H-position and V-position with non-standard signals. English Troubleshooting Before sending your system. VGA Mode Problem No picture visible LED status Blue Off Remedy Using the OSD menu, adjust brightness and contrast to maximum or reset to see if you can self-diagnose the problem. Unstable picture Blue Abnormal picture (Image is missing, off the monitor. 17 Check the power switch. Blinking Blue Check if the power cord is properly connected...
User Manual
Page 30
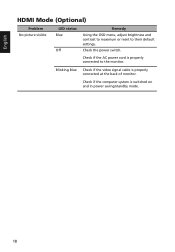
English HDMI Mode (Optional) Problem No picture visible LED status Blue Off Remedy Using the OSD menu, adjust brightness and contrast to maximum or reset to the monitor. Check if the computer system is properly connected at the back of monitor. Check if the AC power cord is properly connected to their default settings. Check the power switch. Blinking Blue Check if the video signal cable is switched on and in power saving/standby mode. 18
English HDMI Mode (Optional) Problem No picture visible LED status Blue Off Remedy Using the OSD menu, adjust brightness and contrast to maximum or reset to the monitor. Check if the computer system is properly connected at the back of monitor. Check if the AC power cord is properly connected to their default settings. Check the power switch. Blinking Blue Check if the video signal cable is switched on and in power saving/standby mode. 18

