
User Manual
Page 2
... prior written permission of this manual or supplementary documents and publications. Record the model number, serial number, purchase date and place of merchantability or fitness for a particular purpose. No part of Acer Incorporated. Acer LCD Monitor User Guide Original Issue: 9/2011 Changes may be incorporated in the space provided below. The serial number and model number are registered trademarks of such revisions or changes. English Copyright © 2011. Other...
... prior written permission of this manual or supplementary documents and publications. Record the model number, serial number, purchase date and place of merchantability or fitness for a particular purpose. No part of Acer Incorporated. Acer LCD Monitor User Guide Original Issue: 9/2011 Changes may be incorporated in the space provided below. The serial number and model number are registered trademarks of such revisions or changes. English Copyright © 2011. Other...
User Manual
Page 3
... by changing the image or turning off the power switch and then turn it on the product. Cleaning your safety and comfort Safety instructions Read these guidelines when cleaning the monitor: • Always unplug the monitor before cleaning. • Use a soft cloth to make sure the flicker disappears. • You may flicker during initial use . • The LCD screen has 99.99% or more effective pixels. Keep this case, the screen is displayed...
... by changing the image or turning off the power switch and then turn it on the product. Cleaning your safety and comfort Safety instructions Read these guidelines when cleaning the monitor: • Always unplug the monitor before cleaning. • Use a soft cloth to make sure the flicker disappears. • You may flicker during initial use . • The LCD screen has 99.99% or more effective pixels. Keep this case, the screen is displayed...
User Manual
Page 4
... purposes. • Your device uses one of the following power supplies: Manufacture : Delta Electronics Inc., Model: ADP-40PH BB (S235HL Model) Manufacture :Asian Power Devices Inc. These openings must not be operated from the equipment, be blocked by placing the product on the marking label. English Accessibility Be sure that the power outlet you plug the power cord into is easily accessible and...
... purposes. • Your device uses one of the following power supplies: Manufacture : Delta Electronics Inc., Model: ADP-40PH BB (S235HL Model) Manufacture :Asian Power Devices Inc. These openings must not be operated from the equipment, be blocked by placing the product on the marking label. English Accessibility Be sure that the power outlet you plug the power cord into is easily accessible and...

User Manual
Page 5
... interfere with the supplied power supply cord set , make sure that the new power cord meets the following the operating instructions v Warning! Also, make sure that the total rating of the power strip's input rating. • This product's power cord is a safety feature. Note: The grounding pin also provides good protection from the wall outlet and refer servicing to qualified service personnel when: • the power cord or plug is used , the load...
... interfere with the supplied power supply cord set , make sure that the new power cord meets the following the operating instructions v Warning! Also, make sure that the total rating of the power strip's input rating. • This product's power cord is a safety feature. Note: The grounding pin also provides good protection from the wall outlet and refer servicing to qualified service personnel when: • the power cord or plug is used , the load...

User Manual
Page 6
...at service stations. For more information on the environment. English Note: Adjust only those controls that are covered by the operating instructions, since improper adjustment of other products. Observe restrictions on the use ...best working procedures to environmental protection and views recycling, in the form of salvaging and disposal of our other controls may contain small parts. IT Equipment Recycling Information Acer is strongly committed to reduce the environmental impact of the company's top priorities in fuel depots, storage and distribution areas; Disposal instructions...
...at service stations. For more information on the environment. English Note: Adjust only those controls that are covered by the operating instructions, since improper adjustment of other products. Observe restrictions on the use ...best working procedures to environmental protection and views recycling, in the form of salvaging and disposal of our other controls may contain small parts. IT Equipment Recycling Information Acer is strongly committed to reduce the environmental impact of the company's top priorities in fuel depots, storage and distribution areas; Disposal instructions...

User Manual
Page 7
... comfortable use Computer users may occasionally misfire or appear as black or red dots. Nevertheless, some pixels may complain of the monitor, using a footrest, or raising your sitting height to remove the strain on the recorded image and does not constitute a malfunction. The following tips: • refrain from Sleep mode by adjusting the viewing angle of eyestrain and headaches after long hours of working conditions...
... comfortable use Computer users may occasionally misfire or appear as black or red dots. Nevertheless, some pixels may complain of the monitor, using a footrest, or raising your sitting height to remove the strain on the recorded image and does not constitute a malfunction. The following tips: • refrain from Sleep mode by adjusting the viewing angle of eyestrain and headaches after long hours of working conditions...

User Manual
Page 8
... using drapes, shades or blinds • using a task light • changing the display's viewing angle • using a glare-reduction filter • using a display visor, such as possible. • Exercise regularly and maintain a healthy body. viii Display • Keep your display clean. • Keep your head at a higher level than the top edge of the display so your eyes point downward when looking at bright light sources, such as open windows...
... using drapes, shades or blinds • using a task light • changing the display's viewing angle • using a glare-reduction filter • using a display visor, such as possible. • Exercise regularly and maintain a healthy body. viii Display • Keep your display clean. • Keep your head at a higher level than the top edge of the display so your eyes point downward when looking at bright light sources, such as open windows...
User Manual
Page 9
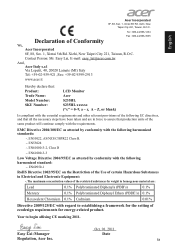
... will continue comply with the following harmonized standards: -. Year to establishing a framework for the setting of Conformity We, Acer Incorporated 8F, 88, Sec. 1, Xintai 5th Rd. ix Xizhi, New Taipei City 221...Model Number: SKU Number: LCD Monitor Acer S235HL S235HL xxxxxx ("x" = 0~9, a ~ z, A ~ Z, or blank) Is compliant with the essential requirements and other relevant provisions of the restricted substances by conformity with the requirements. EN55022, AS/NZS CISPR22 Class B. -. EN55024 -. Oct. 01, 2011 Easy Lai /Manager Date Regulation, Acer Inc. English Acer...
... will continue comply with the following harmonized standards: -. Year to establishing a framework for the setting of Conformity We, Acer Incorporated 8F, 88, Sec. 1, Xintai 5th Rd. ix Xizhi, New Taipei City 221...Model Number: SKU Number: LCD Monitor Acer S235HL S235HL xxxxxx ("x" = 0~9, a ~ z, A ~ Z, or blank) Is compliant with the essential requirements and other relevant provisions of the restricted substances by conformity with the requirements. EN55022, AS/NZS CISPR22 Class B. -. EN55024 -. Oct. 01, 2011 Easy Lai /Manager Date Regulation, Acer Inc. English Acer...
User Manual
Page 11
... Declaration of Conformity x Unpacking 1 Adjusting the base 2 Screen position adjustment 3 Connecting the adapter and AC Power cord 3 Power saving 3 Display Data Channel (DDC) 4 Connector pin assignment 4 15-pin color display signal cable 4 24-pin color display signal cable 5 19-pin color display signal cable 5 Standard timing table 6 Installation 7 Users controls 8 Panel controls 8 Acer eColor Management 9 Operation instructions 9 Features and benefits 9 Using the OSD Menus 10 Picture Menu 10 OSD Menu 11 Setting Menu 12 Information Menu 13
... Declaration of Conformity x Unpacking 1 Adjusting the base 2 Screen position adjustment 3 Connecting the adapter and AC Power cord 3 Power saving 3 Display Data Channel (DDC) 4 Connector pin assignment 4 15-pin color display signal cable 4 24-pin color display signal cable 5 19-pin color display signal cable 5 Standard timing table 6 Installation 7 Users controls 8 Panel controls 8 Acer eColor Management 9 Operation instructions 9 Features and benefits 9 Using the OSD Menus 10 Picture Menu 10 OSD Menu 11 Setting Menu 12 Information Menu 13
User Manual
Page 14
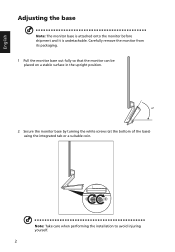
Carefully remove the monitor from its packaging. 1 Pull the monitor base out fully so that the monitor can be placed on a stable surface in the upright position. 45 2 Secure the monitor base by turning the white screws (at the bottom of the base) using the integrated tab or a suitable coin. Note: Take care when performing the installation to avoid injuring yourself. 2 English Adjusting the base Note: The monitor base is attached onto the monitor before shipment and it is undetachable.
Carefully remove the monitor from its packaging. 1 Pull the monitor base out fully so that the monitor can be placed on a stable surface in the upright position. 45 2 Secure the monitor base by turning the white screws (at the bottom of the base) using the integrated tab or a suitable coin. Note: Take care when performing the installation to avoid injuring yourself. 2 English Adjusting the base Note: The monitor base is attached onto the monitor before shipment and it is undetachable.
User Manual
Page 15
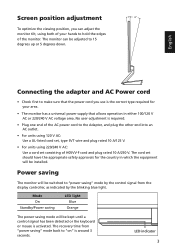
... plug rated 10 A/125 V. • For units using both of your area. • The monitor has a universal power supply that allows operation in which the equipment will be installed. The cord set consisting of the monitor. The recovery time from the display controller, as indicated by the blinking blue light. Mode On Standby/Power saving LED light Blue Orange The power saving mode will be adjusted to 15 degrees up or 5 degrees down. 5 15 English Connecting the adapter...
... plug rated 10 A/125 V. • For units using both of your area. • The monitor has a universal power supply that allows operation in which the equipment will be installed. The cord set consisting of the monitor. The recovery time from the display controller, as indicated by the blinking blue light. Mode On Standby/Power saving LED light Blue Orange The power saving mode will be adjusted to 15 degrees up or 5 degrees down. 5 15 English Connecting the adapter...
User Manual
Page 16
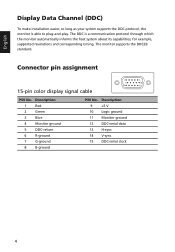
... able to plug-and-play. The monitor supports the DDC2B standard. for example, supported resolutions and corresponding timing. Connector pin assignment 15-pin color display signal cable 1 5 6 10 11 15 PIN No. Description 1 Red 2 Green 3 Blue 4 Monitor ground 5 DDC-return 6 R-ground 7 G-ground 8 B-ground PIN No. Description 9 +5 V 10 Logic ground 11 Monitor ground 12 DDC-serial data 13 H-sync 14 V-sync 15 DDC-serial clock 4 English Display Data Channel (DDC) To make installation easier...
... able to plug-and-play. The monitor supports the DDC2B standard. for example, supported resolutions and corresponding timing. Connector pin assignment 15-pin color display signal cable 1 5 6 10 11 15 PIN No. Description 1 Red 2 Green 3 Blue 4 Monitor ground 5 DDC-return 6 R-ground 7 G-ground 8 B-ground PIN No. Description 9 +5 V 10 Logic ground 11 Monitor ground 12 DDC-serial data 13 H-sync 14 V-sync 15 DDC-serial clock 4 English Display Data Channel (DDC) To make installation easier...

User Manual
Page 17
... Data2- 5 TMDS Data1 Shield 7 TMDS Data0+ 9 TMDS Data0- 11 TMDS Clock Shield 13 CEC 15 SCL 17 DDC/CEC Ground 19 Hot Plug Detect PIN No. Description 2 TMDS Data2 Shield 4 TMDS Data1+ 6 TMDS Data1- 8 TMDS Data0 Shield 10 TMDS Clock+ 12 TMDS Clock- 14 Reserved...power 15 GND (return for +5 V hsync.vsync) 16 Hot-plug detection 17 TMDS data 018 TMDS data 0+ 19 TMDS data 0/5 shield 20 NC 21 NC 22 TMDS clock shield 23 TMDS clock+ 24 DDC TMDS clock- 19-pin color display signal cable 19 171513 11 9 7 5 3 1 18161412 10 8 6 4 2 PIN No. 24-pin color display signal cable English...
... Data2- 5 TMDS Data1 Shield 7 TMDS Data0+ 9 TMDS Data0- 11 TMDS Clock Shield 13 CEC 15 SCL 17 DDC/CEC Ground 19 Hot Plug Detect PIN No. Description 2 TMDS Data2 Shield 4 TMDS Data1+ 6 TMDS Data1- 8 TMDS Data0 Shield 10 TMDS Clock+ 12 TMDS Clock- 14 Reserved...power 15 GND (return for +5 V hsync.vsync) 16 Hot-plug detection 17 TMDS data 018 TMDS data 0+ 19 TMDS data 0/5 shield 20 NC 21 NC 22 TMDS clock shield 23 TMDS clock+ 24 DDC TMDS clock- 19-pin color display signal cable 19 171513 11 9 7 5 3 1 18161412 10 8 6 4 2 PIN No. 24-pin color display signal cable English...
User Manual
Page 19
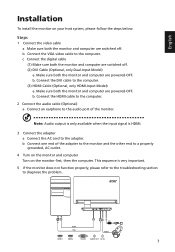
... VGA video cable to the adapter. c Connect the digital cable (1) Make sure both the monitor and computer are switched off . b. Note: Audio output is only available when the input signal is very important. 5 If the monitor does not function properly, please refer to the troubleshooting section to the computer. (3) HDMI Cable (Optional, only HDMI-Input Model) a. VGA H D M I HDMI VGA HDMI VGA DC AUDIO HDMI 1 HDMI 2 VGA IN AUDIO OUT DC IN 7 Connect the DVI cable to diagnose the problem. Connect the HDMI cable to the computer. 2 Connect the audio cable...
... VGA video cable to the adapter. c Connect the digital cable (1) Make sure both the monitor and computer are switched off . b. Note: Audio output is only available when the input signal is very important. 5 If the monitor does not function properly, please refer to the troubleshooting section to the computer. (3) HDMI Cable (Optional, only HDMI-Input Model) a. VGA H D M I HDMI VGA HDMI VGA DC AUDIO HDMI 1 HDMI 2 VGA IN AUDIO OUT DC IN 7 Connect the DVI cable to diagnose the problem. Connect the HDMI cable to the computer. 2 Connect the audio cable...
User Manual
Page 20
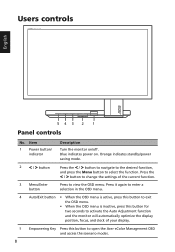
... the current function. 3 Menu/Enter button Press to open the Acer eColor Management OSD and access the scenario modes. 8 Press the < / > button to change the settings of your display. 5 Empowering Key Press this button to view the OSD menu. Orange indicates standby/power saving mode. 2 < / > button Press the < / > button to navigate to the desired function, and press the Menu button to select the function. Users controls English 543 2 1 Panel controls No. Item 1 Power button/ indicator Description Turn the monitor on .
... the current function. 3 Menu/Enter button Press to open the Acer eColor Management OSD and access the scenario modes. 8 Press the < / > button to change the settings of your display. 5 Empowering Key Press this button to view the OSD menu. Orange indicates standby/power saving mode. 2 < / > button Press the < / > button to navigate to the desired function, and press the Menu button to select the function. Users controls English 543 2 1 Panel controls No. Item 1 Power button/ indicator Description Turn the monitor on .

User Manual
Page 21
... reduce power consumption. Presents great visuals, even in clearest detail. Pictures and photographs appear in vibrant colors with sharp detail. English Acer eColor Management Operation instructions 1 Press the Empowering Key to confirm the selection and exit Acer eColor Management. mpowering Technology User ECO Standard Graphics 2 Press the < / > button to select the desired mode. 3 Press the Auto button to open the Acer eColor Management OSD menu and...
... reduce power consumption. Presents great visuals, even in clearest detail. Pictures and photographs appear in vibrant colors with sharp detail. English Acer eColor Management Operation instructions 1 Press the Empowering Key to confirm the selection and exit Acer eColor Management. mpowering Technology User ECO Standard Graphics 2 Press the < / > button to select the desired mode. 3 Press the Auto button to open the Acer eColor Management OSD menu and...
User Manual
Page 22
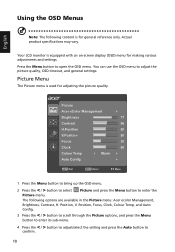
... press the Menu button to enter its sub-menu. 4 Press the < / > button to adjust/select the setting and press the Auto button to adjust the picture quality, OSD timeout, and general settings. Picture Menu The Picture menu is equipped with an on-screen display (OSD) menu for making various adjustments and settings. Position, V. Your LCD monitor is used for general reference only. English Using the OSD Menus Note: The following options are available in the Picture menu: Acer ecolor Management, Brightness, Contrast, H. Actual product specifications may...
... press the Menu button to enter its sub-menu. 4 Press the < / > button to adjust/select the setting and press the Auto button to adjust the picture quality, OSD timeout, and general settings. Picture Menu The Picture menu is equipped with an on-screen display (OSD) menu for making various adjustments and settings. Position, V. Your LCD monitor is used for general reference only. English Using the OSD Menus Note: The following options are available in the Picture menu: Acer ecolor Management, Brightness, Contrast, H. Actual product specifications may...

User Manual
Page 24
... the Setting menu: Wide Mode, DDC/CI, ACM, Input, Language, and Reset. 3 Press the < / > button to scroll through the Setting options, and press the Menu button to enter its sub-menu. 4 Press the < / > button to adjust/select the setting and press the Auto button to enter the Setting menu. English Setting Menu The Setting menu is used for adjusting the general settings for current input signal such as aspect ratio, OSD language, and etc. Setting Wide Mode DDC/CI ACM Input Language Reset Full ON OFF VGA English Enter...
... the Setting menu: Wide Mode, DDC/CI, ACM, Input, Language, and Reset. 3 Press the < / > button to scroll through the Setting options, and press the Menu button to enter its sub-menu. 4 Press the < / > button to adjust/select the setting and press the Auto button to enter the Setting menu. English Setting Menu The Setting menu is used for adjusting the general settings for current input signal such as aspect ratio, OSD language, and etc. Setting Wide Mode DDC/CI ACM Input Language Reset Full ON OFF VGA English Enter...
User Manual
Page 26
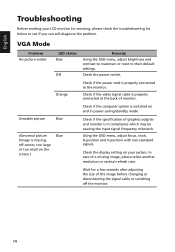
... the input signal frequency mismatch. Check the display setting on the screen.) Blue Remedy Using the OSD menu, adjust brightness and contrast to maximum or reset to the monitor. Using the OSD menu, adjust focus, clock, H-position and V-position with non-standard signals. Wait for servicing, please check the troubleshooting list below to see if you can self-diagnose the problem. VGA Mode Problem No picture visible LED status Blue Off Orange Unstable picture Blue Abnormal picture (Image is properly connected at the back of the image before changing or...
... the input signal frequency mismatch. Check the display setting on the screen.) Blue Remedy Using the OSD menu, adjust brightness and contrast to maximum or reset to the monitor. Using the OSD menu, adjust focus, clock, H-position and V-position with non-standard signals. Wait for servicing, please check the troubleshooting list below to see if you can self-diagnose the problem. VGA Mode Problem No picture visible LED status Blue Off Orange Unstable picture Blue Abnormal picture (Image is properly connected at the back of the image before changing or...
User Manual
Page 27
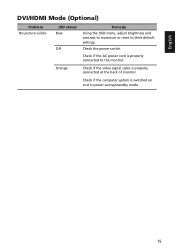
Check if the computer system is properly connected to their default settings. Check the power switch. Check if the AC power cord is switched on and in power saving/standby mode. 15 Orange Check if the video signal cable is properly connected at the back of monitor. English DVI/HDMI Mode (Optional) Problem No picture visible LED status Blue Off Remedy Using the OSD menu, adjust brightness and contrast to maximum or reset to the monitor.
Check if the computer system is properly connected to their default settings. Check the power switch. Check if the AC power cord is switched on and in power saving/standby mode. 15 Orange Check if the video signal cable is properly connected at the back of monitor. English DVI/HDMI Mode (Optional) Problem No picture visible LED status Blue Off Remedy Using the OSD menu, adjust brightness and contrast to maximum or reset to the monitor.


